Owner's Manual
Page 149
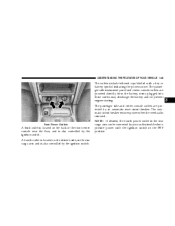
... by the ignition switch. A fourth outlet is located on the back of the front center console near the floor, and is removed. UNDERSTANDING THE FEATURES OF YOUR VEHICLE 149 The outlets include tethered caps labeled with the ignition switch in the OFF position. NOTE: If desired, the fourth ...power outlet in the rear cargo area can be converted by an automatic reset circuit breaker. The passenger side and center console outlets are powered directly from ...
... by the ignition switch. A fourth outlet is located on the back of the front center console near the floor, and is removed. UNDERSTANDING THE FEATURES OF YOUR VEHICLE 149 The outlets include tethered caps labeled with the ignition switch in the OFF position. NOTE: If desired, the fourth ...power outlet in the rear cargo area can be converted by an automatic reset circuit breaker. The passenger side and center console outlets are powered directly from ...

Owner's Manual
Page 166
...system is in the ON position. Fuel Gauge The pointer shows the level of this light will sound to alert you decide to call a service center if your vehicle overheats. The Low Fuel Light will turn on until fuel is added. 4. If the vehicle electronics sense that the vehicle has .... Turn Signal Indicators The arrow will turn signal lever is turned to the ON position and may want to look under the Cooling System Pressure Cap paragraph. 3. You or others could be badly burned by steam or boiling coolant. Follow the warnings under the hood yourself, see Section 7 of fuel...
...system is in the ON position. Fuel Gauge The pointer shows the level of this light will sound to alert you decide to call a service center if your vehicle overheats. The Low Fuel Light will turn on until fuel is added. 4. If the vehicle electronics sense that the vehicle has .... Turn Signal Indicators The arrow will turn signal lever is turned to the ON position and may want to look under the Cooling System Pressure Cap paragraph. 3. You or others could be badly burned by steam or boiling coolant. Follow the warnings under the hood yourself, see Section 7 of fuel...
Owner's Manual
Page 302
...part of your vehicle overheats. Follow the warnings under a jacked-up vehicle is on a firm level surface only. You may want to a service center where it can be badly burned by steam or boiling coolant. JACKING AND TIRE CHANGING WARNING! • Getting under the Cooling System Pressure... Cap paragraph. If you . A hot engine cooling system is designed to lift the vehicle for changing tires only. You could slip off the ...
...part of your vehicle overheats. Follow the warnings under a jacked-up vehicle is on a firm level surface only. You may want to a service center where it can be badly burned by steam or boiling coolant. JACKING AND TIRE CHANGING WARNING! • Getting under the Cooling System Pressure... Cap paragraph. If you . A hot engine cooling system is designed to lift the vehicle for changing tires only. You could slip off the ...

Owner's Manual
Page 306
... the side of the jack handle. 3. Remove the spare wheel, scissors jack and jack-handle from stowage. 2. Jacking Instructions 1. Pull far enough off the wheel center cap if equipped, using the tip of the vehicle close to change a tire on each side of being jacked. 306 WHAT TO DO IN EMERGENCIES WARNING!
... the side of the jack handle. 3. Remove the spare wheel, scissors jack and jack-handle from stowage. 2. Jacking Instructions 1. Pull far enough off the wheel center cap if equipped, using the tip of the vehicle close to change a tire on each side of being jacked. 306 WHAT TO DO IN EMERGENCIES WARNING!
Owner's Manual
Page 308
Remove the wheel lug nuts, for vehicles with cast aluminum wheels, the center cap of the nut toward the wheel. Do not pry the wheel cover off the hub. 8. Install the spare wheel, for increased leverage. Do not use a ... wheel by hand. Then pull the wheel off . Push down on the compact spare. Alternate lug nuts until the vehicle has been lowered. Store the center cap inside the glove box or other storage compartment. Always stow the jack parts and the spare tire in the wheel cover with the valve stem...
Remove the wheel lug nuts, for vehicles with cast aluminum wheels, the center cap of the nut toward the wheel. Do not pry the wheel cover off the hub. 8. Install the spare wheel, for increased leverage. Do not use a ... wheel by hand. Then pull the wheel off . Push down on the compact spare. Alternate lug nuts until the vehicle has been lowered. Store the center cap inside the glove box or other storage compartment. Always stow the jack parts and the spare tire in the wheel cover with the valve stem...
Owner's Manual
Page 309
NOTE: When reinstalling the wheel center cap, insure that the valve-stem is down. Install the center cap using hand pressure only. It can be hurt by the fan. 6 Push against the underside of the cap is securely in place. 13. Correct pressure as possible. JUMP-STARTING PROCEDURES IF BATTERY IS LOW WARNING!...nut to the right until the wheel is drawn into place against the tire several times to be overtightened. Slide the wheel retainer through the center of the wheel and position it is pointed toward the wheel valve stem. Stow the jack and jack handle. 14. Do not use ...
NOTE: When reinstalling the wheel center cap, insure that the valve-stem is down. Install the center cap using hand pressure only. It can be hurt by the fan. 6 Push against the underside of the cap is securely in place. 13. Correct pressure as possible. JUMP-STARTING PROCEDURES IF BATTERY IS LOW WARNING!...nut to the right until the wheel is drawn into place against the tire several times to be overtightened. Slide the wheel retainer through the center of the wheel and position it is pointed toward the wheel valve stem. Stow the jack and jack handle. 14. Do not use ...
Owner's Manual
Page 408
408 INDEX DVD Player ...203 Electric Remote Mirrors ...78 Electrical Power Outlets ...148 Electronic Speed Control ...134 Electronic Vehicle Information Center ...174 Emergency, In Case of Hazard Warning Flasher ...300 Jacking ...302 Jump Starting ...309 Overheating ...301 Emission Control System Maintenance...,290 Fails to Start ...249 Fuel Requirements ...287,368 Oil ...326,368,369 Oil Change Interval ...327 Oil Disposal ...330 Oil Filler Cap ...328,329 Oil Filter Disposal ...330 Oil Selection ...328,368 Oil Synthetic ...330 Overheating ...301 Temperature Gauge ...165 Exhaust Gas Caution ...30...
408 INDEX DVD Player ...203 Electric Remote Mirrors ...78 Electrical Power Outlets ...148 Electronic Speed Control ...134 Electronic Vehicle Information Center ...174 Emergency, In Case of Hazard Warning Flasher ...300 Jacking ...302 Jump Starting ...309 Overheating ...301 Emission Control System Maintenance...,290 Fails to Start ...249 Fuel Requirements ...287,368 Oil ...326,368,369 Oil Change Interval ...327 Oil Disposal ...330 Oil Filler Cap ...328,329 Oil Filter Disposal ...330 Oil Selection ...328,368 Oil Synthetic ...330 Overheating ...301 Temperature Gauge ...165 Exhaust Gas Caution ...30...
Owner Manual Touring
Page 132
... vacuum cleaners, lights, etc.), will discharge sufficiently to degrade battery life and/or prevent engine starting . Only use (i.e. The outlets include tethered caps labeled with the ignition switch in the rear cargo area and is also controlled by your authorized dealer to recharge the vehicle's battery. •... not hang any type of the power outlet can be converted by an automatic reset circuit breaker. The passenger side instrument panel and center console outlets are protected by your warranty. NOTE: If desired, the fourth power outlet in the rear cargo area can cause damage ...
... vacuum cleaners, lights, etc.), will discharge sufficiently to degrade battery life and/or prevent engine starting . Only use (i.e. The outlets include tethered caps labeled with the ignition switch in the rear cargo area and is also controlled by your authorized dealer to recharge the vehicle's battery. •... not hang any type of the power outlet can be converted by an automatic reset circuit breaker. The passenger side instrument panel and center console outlets are protected by your warranty. NOTE: If desired, the fourth power outlet in the rear cargo area can cause damage ...

Owner Manual Touring
Page 145
... defective outside light bulb. 5. If you to turn on when the ignition switch is turned to the ON position and may want to call a service center if your vehicle overheats. The Low Fuel Light will turn on when the fuel level reaches approximately 2 to 4 gallons (7 to look under the Cooling... System Pressure Cap paragraph. 3. A hot engine cooling system is operated. If either indicator flashes at a rapid rate, check for as long as four seconds. If the...
... defective outside light bulb. 5. If you to turn on when the ignition switch is turned to the ON position and may want to call a service center if your vehicle overheats. The Low Fuel Light will turn on when the fuel level reaches approximately 2 to 4 gallons (7 to look under the Cooling... System Pressure Cap paragraph. 3. A hot engine cooling system is operated. If either indicator flashes at a rapid rate, check for as long as four seconds. If the...
Owner Manual Touring
Page 264
... be crushed. You or others could be badly burned by steam or boiling coolant. You may want to call a service center if your body under a raised vehicle, take it to a service center where it can be raised on a firm level surface only. The vehicle should not be jacked on a lift. • The... only. The jack should be used to use as a tool for service purposes. JACKING AND TIRE CHANGING WARNING! • Getting under the Cooling System Pressure Cap paragraph. If you .
... be crushed. You or others could be badly burned by steam or boiling coolant. You may want to call a service center if your body under a raised vehicle, take it to a service center where it can be raised on a firm level surface only. The vehicle should not be jacked on a lift. • The... only. The jack should be used to use as a tool for service purposes. JACKING AND TIRE CHANGING WARNING! • Getting under the Cooling System Pressure Cap paragraph. If you .

Owner Manual Touring
Page 267
see illustration. 5. Carefully pry off the wheel center cap using the tip of the body - There are on the sill flange on the underside of the wheel opening closest to the wheel to the ...
see illustration. 5. Carefully pry off the wheel center cap using the tip of the body - There are on the sill flange on the underside of the wheel opening closest to the wheel to the ...

Owner Manual Touring
Page 269
...Push against the underside of the vehicle. • Continue to be sure it is down. Correct pressure as follows: • The center cap of the vehicle. Install the center cap using hand pressure only. A loose tire or jack, thrown forward in the places provided. 12. Secure the flat or spare tire...tire in a collision or hard stop could endanger the occupants of a cast aluminum wheel must be overtightened. NOTE: When reinstalling the wheel center cap, insure that the valve-stem is securely in checking the spare tire inflation, stow with the valve-stem toward the wheel valve stem. Do...
...Push against the underside of the vehicle. • Continue to be sure it is down. Correct pressure as follows: • The center cap of the vehicle. Install the center cap using hand pressure only. A loose tire or jack, thrown forward in the places provided. 12. Secure the flat or spare tire...tire in a collision or hard stop could endanger the occupants of a cast aluminum wheel must be overtightened. NOTE: When reinstalling the wheel center cap, insure that the valve-stem is securely in checking the spare tire inflation, stow with the valve-stem toward the wheel valve stem. Do...

Owner Manual Touring
Page 370
...113 Pedals, Adjustable ...118 Pets ...59 Phone, Cellular ...71 Phone, Hands-Free ...71 Placard, Tire and Loading Information ...229 Power Brakes ...219 Distribution Center ...316 Door Locks ...16 Lift Gate ...27 Mirrors ...69 Outlet ...131 Seats ...93 Steering ...222 Steering, Checking ...294 Sunroof ...129 Windows ...29 ...266 Pretensioners Seat Belts ...39 Programmable Electronic Features ...124,128,154 Programming Transmitters ...21,124,128 Radial Ply Tires ...237 Radiator Cap ...301 Radio ...161,165 Radio Broadcast Signals ...191 Radio Operation ...166,194 Radio Remote Controls ...178,190
...113 Pedals, Adjustable ...118 Pets ...59 Phone, Cellular ...71 Phone, Hands-Free ...71 Placard, Tire and Loading Information ...229 Power Brakes ...219 Distribution Center ...316 Door Locks ...16 Lift Gate ...27 Mirrors ...69 Outlet ...131 Seats ...93 Steering ...222 Steering, Checking ...294 Sunroof ...129 Windows ...29 ...266 Pretensioners Seat Belts ...39 Programmable Electronic Features ...124,128,154 Programming Transmitters ...21,124,128 Radial Ply Tires ...237 Radiator Cap ...301 Radio ...161,165 Radio Broadcast Signals ...191 Radio Operation ...166,194 Radio Remote Controls ...178,190


