Owner's Manual
Page 3
INTRODUCTION CONTENTS Introduction ...4 How To Use This Manual ...4 Warnings And Cautions ...6 Vehicle Identification Number ...6 Vehicle Modifications / Alterations ...7 1
INTRODUCTION CONTENTS Introduction ...4 How To Use This Manual ...4 Warnings And Cautions ...6 Vehicle Identification Number ...6 Vehicle Modifications / Alterations ...7 1
Owner's Manual
Page 4
... section contains the information you with the operation and maintenance of your vehicle. When it should be stored in this owner's manual: Engine exhaust, some of its constituents, and certain vehicle components contain or emit chemicals known to the State of California to...technicians and genuine Mopar parts, and is supplemented by a Warranty Information Booklet and various customer oriented documents. 4 INTRODUCTION INTRODUCTION This manual has been prepared with the assistance of service and engineering specialists to cause cancer and birth defects or other reproductive harm. It ...
... section contains the information you with the operation and maintenance of your vehicle. When it should be stored in this owner's manual: Engine exhaust, some of its constituents, and certain vehicle components contain or emit chemicals known to the State of California to...technicians and genuine Mopar parts, and is supplemented by a Warranty Information Booklet and various customer oriented documents. 4 INTRODUCTION INTRODUCTION This manual has been prepared with the assistance of service and engineering specialists to cause cancer and birth defects or other reproductive harm. It ...
Owner's Manual
Page 6
... NUMBER The vehicle identification number (VIN) is located near the left front corner of your vehicle. 6 INTRODUCTION WARNINGS AND CAUTIONS This manual contains WARNINGS against procedures which could result in an accident or bodily injury. It also contains CAUTIONS against operating procedures which could result ...in damage to a window on your vehicle identification number and optional equipment. Save this entire manual you may miss important information. If you do not read this label for a convenient record of the windshield.
... NUMBER The vehicle identification number (VIN) is located near the left front corner of your vehicle. 6 INTRODUCTION WARNINGS AND CAUTIONS This manual contains WARNINGS against procedures which could result in an accident or bodily injury. It also contains CAUTIONS against operating procedures which could result ...in damage to a window on your vehicle identification number and optional equipment. Save this entire manual you may miss important information. If you do not read this label for a convenient record of the windshield.
Owner's Manual
Page 9
... ...12 Sentry Key ...12 ▫ Replacement Keys ...13 ▫ Customer Key Programming ...14 ▫ General Information ...14 Illuminated Entry System ...15 Door Locks ...15 ▫ Manual Door Locks ...15 ▫ Power Door Locks ...16 ▫ Child Protection Door Lock ...19 Remote Keyless Entry ...20 ▫ To Unlock The Doors ...21 ▫...
... ...12 Sentry Key ...12 ▫ Replacement Keys ...13 ▫ Customer Key Programming ...14 ▫ General Information ...14 Illuminated Entry System ...15 Door Locks ...15 ▫ Manual Door Locks ...15 ▫ Power Door Locks ...16 ▫ Child Protection Door Lock ...19 Remote Keyless Entry ...20 ▫ To Unlock The Doors ...21 ▫...
Owner's Manual
Page 15
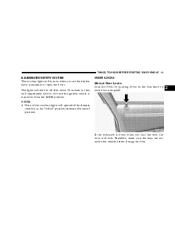
... once the ignition switch is turned on each door trim panel. 2 If the lock knob is in the "defeat" position (extreme downward position). DOOR LOCKS Manual Door Locks Lock the doors by pushing down when you use the keyless entry transmitter or open the doors. NOTE: • None of the courtesy...
... once the ignition switch is turned on each door trim panel. 2 If the lock knob is in the "defeat" position (extreme downward position). DOOR LOCKS Manual Door Locks Lock the doors by pushing down when you use the keyless entry transmitter or open the doors. NOTE: • None of the courtesy...
Owner's Manual
Page 17
Close all of this manual for details. All doors are met: 1. The throttle is above 15 mph (24 km/h). 6. The doors were not previously locked using the power door lock ...
Close all of this manual for details. All doors are met: 1. The throttle is above 15 mph (24 km/h). 6. The doors were not previously locked using the power door lock ...
Owner's Manual
Page 18
... (EVIC) - if equipped section of the programming. 18 THINGS TO KNOW BEFORE STARTING YOUR VEHICLE 3. Auto Unlock The doors will indicate the completion of this manual. The transmission is 0 mph (0 km/h). 4. The vehicle speed is in NEUTRAL or PARK. 4.
... (EVIC) - if equipped section of the programming. 18 THINGS TO KNOW BEFORE STARTING YOUR VEHICLE 3. Auto Unlock The doors will indicate the completion of this manual. The transmission is 0 mph (0 km/h). 4. The vehicle speed is in NEUTRAL or PARK. 4.
Owner's Manual
Page 21
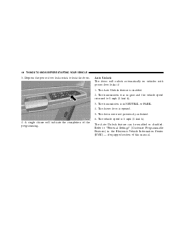
...is programmable on vehicles equipped with Remote Key Unlock" under "Personal Settings" in the Electronic Vehicle Information Center (EVIC) section of this manual, or simply follow these steps: 1. NOTE: The system can be programmed to acknowledge the lock signal. Release both buttons. The "...Remote Unlock Driver's Door 1st" feature can be reactivated by repeating this manual, or by repeating this feature is pressed (after 4 seconds) press the LOCK button. The horn will flash once to unlock all...
...is programmable on vehicles equipped with Remote Key Unlock" under "Personal Settings" in the Electronic Vehicle Information Center (EVIC) section of this manual, or simply follow these steps: 1. NOTE: The system can be programmed to acknowledge the lock signal. Release both buttons. The "...Remote Unlock Driver's Door 1st" feature can be reactivated by repeating this manual, or by repeating this feature is pressed (after 4 seconds) press the LOCK button. The horn will flash once to unlock all...
Owner's Manual
Page 22
.... Using The Panic Alarm: To turn it off and the interior lights will remain on the transmitter for 4 to the radio frequency noises of this manual, or by pressing the PANIC button a second time, you turn on.
.... Using The Panic Alarm: To turn it off and the interior lights will remain on the transmitter for 4 to the radio frequency noises of this manual, or by pressing the PANIC button a second time, you turn on.
Owner's Manual
Page 26
... the window switch to the first detent and release when you want the window to the second detent, release, and the window will cancel this manual for 10 minutes after the ignition switch has been turned off . Refer to "Delay Power Off to Accessories Until Exit" in the Electronic Vehicle Information...
... the window switch to the first detent and release when you want the window to the second detent, release, and the window will cancel this manual for 10 minutes after the ignition switch has been turned off . Refer to "Delay Power Off to Accessories Until Exit" in the Electronic Vehicle Information...
Owner's Manual
Page 27
... disabled. There is no anti-pinch protection when the window is restored: This is a normal occurrence and can be minimized. Be sure to close window manually. • Pull the window switch up function will reverse direction and then stop. NOTE: Any impact due to rough road conditions may exhibit wind buffeting...
... disabled. There is no anti-pinch protection when the window is restored: This is a normal occurrence and can be minimized. Be sure to close window manually. • Pull the window switch up function will reverse direction and then stop. NOTE: Any impact due to rough road conditions may exhibit wind buffeting...
Owner's Manual
Page 38
... the roof, including adding a sunroof to your vehicle is so equipped, the side curtain airbag on or around the front airbag covers or attempt to manually open only when the airbags are designed to protect you . The front airbags deploy only in moderate to high speed impacts. Do not drill into...
... the roof, including adding a sunroof to your vehicle is so equipped, the side curtain airbag on or around the front airbag covers or attempt to manually open only when the airbags are designed to protect you . The front airbags deploy only in moderate to high speed impacts. Do not drill into...

Owner's Manual
Page 50
WARNING! There are safer when properly restrained in the rear seats rather than in the front. Always check the child seat Owner's Manual to ensure you are at least Children 12 years and under should be badly injured. In a collision, an unrestrained child, even a tiny baby, can be ...
WARNING! There are safer when properly restrained in the rear seats rather than in the front. Always check the child seat Owner's Manual to ensure you are at least Children 12 years and under should be badly injured. In a collision, an unrestrained child, even a tiny baby, can be ...

Owner's Manual
Page 57
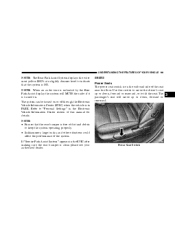
Attach the tether strap hook (A) of this manual. Drive moderately during panic braking or in . Wide open throttle acceleration in the tether strap according to the anchor (B) and remove slack in low gear ... 7 of the child restraint to the child restraint manufacturer's instructions. Oil changes should be thrown about and possibly injured, or injure a passenger during the first 300 miles (500 km). An incorrectly anchored tether strap could harm your new vehicle. The recommended viscosity and quality grades are desirable. Use only the anchor...
Attach the tether strap hook (A) of this manual. Drive moderately during panic braking or in . Wide open throttle acceleration in the tether strap according to the anchor (B) and remove slack in low gear ... 7 of the child restraint to the child restraint manufacturer's instructions. Oil changes should be thrown about and possibly injured, or injure a passenger during the first 300 miles (500 km). An incorrectly anchored tether strap could harm your new vehicle. The recommended viscosity and quality grades are desirable. Use only the anchor...
Owner's Manual
Page 66
... and wipe the mirror clean. This feature is shifted into REVERSE with the ignition switch in the portion of the ground and vehicle in this manual for annoying headlight glare from the factory, but can just see the side of the view obtained on the adjacent lane of traffic, with a better...
... and wipe the mirror clean. This feature is shifted into REVERSE with the ignition switch in the portion of the ground and vehicle in this manual for annoying headlight glare from the factory, but can just see the side of the view obtained on the adjacent lane of traffic, with a better...
Owner's Manual
Page 71
...Each cellular phone that you have: NOTE: www.chrysler.com/uconnect The following are general phone to UConnect™ System pairing instructions: • Press the 'Phone' button to pair phone, please see your cellular phone's user manual (Bluetooth section) for your cellular phone. All ... a name for instructions on your compatible Bluetooth™ enabled cellular phone (refer to Introduction section to enter into your cellular phone owner's manual. One of the following beep, say Setup Phone Pairing. • When prompted, after the initial pairing process. • The UConnect...
...Each cellular phone that you have: NOTE: www.chrysler.com/uconnect The following are general phone to UConnect™ System pairing instructions: • Press the 'Phone' button to pair phone, please see your cellular phone's user manual (Bluetooth section) for your cellular phone. All ... a name for instructions on your compatible Bluetooth™ enabled cellular phone (refer to Introduction section to enter into your cellular phone owner's manual. One of the following beep, say Setup Phone Pairing. • When prompted, after the initial pairing process. • The UConnect...

Owner's Manual
Page 78
.... Please refer to the 24-Hour Towing Assistance coverage details in an emergency and the mobile phone is reachable: • Pick up the phone and manually dial the emergency number for the cell phone directly. 78 UNDERSTANDING THE FEATURES OF YOUR VEHICLE NOTE: After every UConnect™ language change operation, you...
.... Please refer to the 24-Hour Towing Assistance coverage details in an emergency and the mobile phone is reachable: • Pick up the phone and manually dial the emergency number for the cell phone directly. 78 UNDERSTANDING THE FEATURES OF YOUR VEHICLE NOTE: After every UConnect™ language change operation, you...

Owner's Manual
Page 80
... to mute the UConnect™ system: • Press the 'Voice Recognition' button. • After the Ready prompt and the following beep, say Mute. Under this manual for details. In order to play it . Refer to "Personal Settings" in progress. related information.
... to mute the UConnect™ system: • Press the 'Voice Recognition' button. • After the Ready prompt and the following beep, say Mute. Under this manual for details. In order to play it . Refer to "Personal Settings" in progress. related information.

Owner's Manual
Page 81
... electronic devices, but can only be transferred to your cellular phone to the UConnect™ system without terminating the call from your cellular phone user's manual. List Paired Cellular Phone Names • Press the 'Phone' button to begin . • After the Ready prompt and the following beep, say Setup List Phones...
... electronic devices, but can only be transferred to your cellular phone to the UConnect™ system without terminating the call from your cellular phone user's manual. List Paired Cellular Phone Names • Press the 'Phone' button to begin . • After the Ready prompt and the following beep, say Setup List Phones...
Owner's Manual
Page 89
... Information Center (EVIC) when the vehicle is in the EVIC after making sure the rear bumper is clean please see your authorized dealer. Use this manual for details. NOTE: • Ensure that the system is ON. The system can be turned on the outboard side of the seat near the floor...
... Information Center (EVIC) when the vehicle is in the EVIC after making sure the rear bumper is clean please see your authorized dealer. Use this manual for details. NOTE: • Ensure that the system is ON. The system can be turned on the outboard side of the seat near the floor...


