
Owner's Manual
Page 1
2012 Chevrolet Impala Owner Manual M In Brief ...1-1 Instrument Panel ...1-2 Initial Drive Information ...1-3 Vehicle Features ...1-13 Performance and Maintenance ...1-17 Keys, Doors, and Windows ...2-1 Keys and Locks ...2-2 Doors ...2-9 Vehicle Security...2-11 Exterior Mirrors ...2-13 Interior... Displays ...5-23 Vehicle Messages ...5-27 Vehicle Personalization ...5-35 Universal Remote System ...5-40 Lighting ...6-1 Exterior Lighting ...6-1 Interior Lighting ...6-5 Lighting Features ...6-6 Infotainment System ...7-1 Introduction ...7-1 Radio ...7-6 Audio Players ...7-13 Phone ...7-19 Climate ...
2012 Chevrolet Impala Owner Manual M In Brief ...1-1 Instrument Panel ...1-2 Initial Drive Information ...1-3 Vehicle Features ...1-13 Performance and Maintenance ...1-17 Keys, Doors, and Windows ...2-1 Keys and Locks ...2-2 Doors ...2-9 Vehicle Security...2-11 Exterior Mirrors ...2-13 Interior... Displays ...5-23 Vehicle Messages ...5-27 Vehicle Personalization ...5-35 Universal Remote System ...5-40 Lighting ...6-1 Exterior Lighting ...6-1 Interior Lighting ...6-5 Lighting Features ...6-6 Infotainment System ...7-1 Introduction ...7-1 Radio ...7-6 Audio Players ...7-13 Phone ...7-19 Climate ...
Owner's Manual
Page 7
... Vehicle Start ...Door Locks ...Trunk Release ...Windows ...Seat Adjustment ...Second Row Seats ...Head Restraint Adjustment ...Safety Belts ...1-3 1-3 1-4 1-5 1-5 1-5 1-6 1-7 1-7 1-7 Passenger Sensing System ...1-8 Mirror Adjustment ...1-8 Steering Wheel Adjustment ...1-9 Interior Lighting ...1-9 Exterior Lighting ...1-10 Windshield Wiper/Washer ...1-10 Climate Controls ...1-11 Performance and Maintenance Traction Control System (TCS) ...1-17 Electronic Stability Control (ESC) ...1-17 Tire...
... Vehicle Start ...Door Locks ...Trunk Release ...Windows ...Seat Adjustment ...Second Row Seats ...Head Restraint Adjustment ...Safety Belts ...1-3 1-3 1-4 1-5 1-5 1-5 1-6 1-7 1-7 1-7 Passenger Sensing System ...1-8 Mirror Adjustment ...1-8 Steering Wheel Adjustment ...1-9 Interior Lighting ...1-9 Exterior Lighting ...1-10 Windshield Wiper/Washer ...1-10 Climate Controls ...1-11 Performance and Maintenance Traction Control System (TCS) ...1-17 Electronic Stability Control (ESC) ...1-17 Tire...
Owner's Manual
Page 15
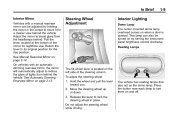
...mirror in place. Hold the wheel and pull the lever toward you. 2. Do not adjust the steering wheel while driving. 1-9 Steering Wheel Adjustment Interior Lighting Dome Lamp The center mounted dome lamp overhead comes on and off. On vehicles with a manual rearview mirror can also be adjusted by ... it for a clearer view behind the vehicle. This lamp can be turned on the left side of the steering column. In Brief Interior Mirror Vehicles with an automatic dimming rearview mirror, the mirror will automatically adjust to reduce the glare of lights from the headlamps behind.
...mirror in place. Hold the wheel and pull the lever toward you. 2. Do not adjust the steering wheel while driving. 1-9 Steering Wheel Adjustment Interior Lighting Dome Lamp The center mounted dome lamp overhead comes on and off. On vehicles with a manual rearview mirror can also be adjusted by ... it for a clearer view behind the vehicle. This lamp can be turned on the left side of the steering column. In Brief Interior Mirror Vehicles with an automatic dimming rearview mirror, the mirror will automatically adjust to reduce the glare of lights from the headlamps behind.
Owner's Manual
Page 16
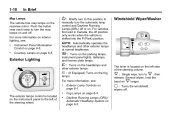
Windshield Wiper/Washer Instrument Panel Illumination Control on 8 longer. Push the button near each lamp to turn the map lamps on interior lighting, see : . For more information, see : . Exterior Lighting ; : Turns on the parking lamps, instrument panel lights, taillamps, and license plate lamps. 2 : Turns on the fog ...
Windshield Wiper/Washer Instrument Panel Illumination Control on 8 longer. Push the button near each lamp to turn the map lamps on interior lighting, see : . For more information, see : . Exterior Lighting ; : Turns on the parking lamps, instrument panel lights, taillamps, and license plate lamps. 2 : Turns on the fog ...

Owner's Manual
Page 27
... ...Remote Keyless Entry (RKE) System Operation ...Remote Vehicle Start ...Door Locks ...Power Door Locks ...Delayed Locking ...Automatic Door Locks ...Lockout Protection ...Safety Locks ...2-2 2-2 2-3 2-5 2-6 2-7 2-7 2-8 2-8 2-8 Doors Trunk ...2-9 Interior Mirrors Manual Rearview Mirror ...2-14 Automatic Dimming Rearview Mirror ...2-15 Vehicle Security Vehicle Security ...2-11 Anti-theft Alarm System ...2-11 Immobilizer ...2-12 Immobilizer Operation ...2-12...
... ...Remote Keyless Entry (RKE) System Operation ...Remote Vehicle Start ...Door Locks ...Power Door Locks ...Delayed Locking ...Automatic Door Locks ...Lockout Protection ...Safety Locks ...2-2 2-2 2-3 2-5 2-6 2-7 2-7 2-8 2-8 2-8 Doors Trunk ...2-9 Interior Mirrors Manual Rearview Mirror ...2-14 Automatic Dimming Rearview Mirror ...2-15 Vehicle Security Vehicle Security ...2-11 Anti-theft Alarm System ...2-11 Immobilizer ...2-12 Immobilizer Operation ...2-12...

Owner's Manual
Page 29
... Start): Remote Keyless Entry (RKE) System Operation The Remote Keyless Entry (RKE) transmitter functions work up to 60 m (195 ft) away from the vehicle. The interior lamps come on and stay on . If enabled through the DIC, the parking lamps flash twice to indicate unlocking has occurred. See "Battery Replacement" later...
... Start): Remote Keyless Entry (RKE) System Operation The Remote Keyless Entry (RKE) transmitter functions work up to 60 m (195 ft) away from the vehicle. The interior lamps come on and stay on . If enabled through the DIC, the parking lamps flash twice to indicate unlocking has occurred. See "Battery Replacement" later...

Owner's Manual
Page 40
Power Mirrors Interior Mirrors Manual Rearview Mirror Adjust the inside rearview mirror for a clear view of the area behind your dealer for the outside mirror. Vehicles with heated ...
Power Mirrors Interior Mirrors Manual Rearview Mirror Adjust the inside rearview mirror for a clear view of the area behind your dealer for the outside mirror. Vehicles with heated ...

Owner's Manual
Page 69
... it prevent people from seeing out of the airbag module may be at least partially inflated for several minutes. on the interior lamps and hazard warning flashers, and shut off the interior lamps and hazard warning flashers by vehicle deformation. To avoid this, everyone in the vehicle, such as the fuel system...
... it prevent people from seeing out of the airbag module may be at least partially inflated for several minutes. on the interior lamps and hazard warning flashers, and shut off the interior lamps and hazard warning flashers by vehicle deformation. To avoid this, everyone in the vehicle, such as the fuel system...

Owner's Manual
Page 145
... is located on the instrument panel to -Pass ...6-2 Daytime Running Lamps (DRL)/Automatic Headlamp System ...6-3 Hazard Warning Flashers ...6-3 Turn and Lane-Change Signals ...6-4 Fog Lamps ...6-4 Interior Lighting Instrument Panel Illumination Control ...Courtesy Lamps ...Dome Lamps ...Reading Lamps ...6-5 6-5 6-6 6-6 6-6 6-7 6-7 6-7 6-7 6-8 Exterior Lighting Exterior Lamp Controls Lighting Features Entry Lighting ...Delayed Entry Lighting ...Delayed Exit...
... is located on the instrument panel to -Pass ...6-2 Daytime Running Lamps (DRL)/Automatic Headlamp System ...6-3 Hazard Warning Flashers ...6-3 Turn and Lane-Change Signals ...6-4 Fog Lamps ...6-4 Interior Lighting Instrument Panel Illumination Control ...Courtesy Lamps ...Dome Lamps ...Reading Lamps ...6-5 6-5 6-6 6-6 6-6 6-7 6-7 6-7 6-7 6-8 Exterior Lighting Exterior Lamp Controls Lighting Features Entry Lighting ...Delayed Entry Lighting ...Delayed Exit...

Owner's Manual
Page 149
... rearview mirror, can also manually turn these lamps on or off independent of the steering wheel. You can be on along with the fog lamps. 6-5 Interior Lighting Instrument Panel Illumination Control Courtesy Lamps When a door is located on in the instrument panel cluster. Push the knob back in all the way...
... rearview mirror, can also manually turn these lamps on or off independent of the steering wheel. You can be on along with the fog lamps. 6-5 Interior Lighting Instrument Panel Illumination Control Courtesy Lamps When a door is located on in the instrument panel cluster. Push the knob back in all the way...

Owner's Manual
Page 151
... is inactive, which means the courtesy lamps will not come on unless a door is opened. 6-7 Delayed Exit Lighting This feature illuminates the interior for a period of time after all the doors have been closed , the delayed entry lighting feature continues to work . Delayed Entry Lighting Delayed...... The ignition is in ON/RUN. If during the illumination period a door is removed from the ignition. When the key is removed, interior illumination activates and remains on because a door is lowered slightly to prevent overcharging. When the battery's state of charge is high, the voltage ...
... is inactive, which means the courtesy lamps will not come on unless a door is opened. 6-7 Delayed Exit Lighting This feature illuminates the interior for a period of time after all the doors have been closed , the delayed entry lighting feature continues to work . Delayed Entry Lighting Delayed...... The ignition is in ON/RUN. If during the illumination period a door is removed from the ignition. When the key is removed, interior illumination activates and remains on because a door is lowered slightly to prevent overcharging. When the battery's state of charge is high, the voltage ...
Owner's Manual
Page 152
... SAVER ACTIVE. It can increase engine idle speed to prevent excessive discharge of these actions occur in steps or levels, without being drained, if the interior courtesy lamps, reading/map lamps, visor vanity lamps, or trunk lamp are accidentally left on, they are on again. The exterior lamps control is needed...
... SAVER ACTIVE. It can increase engine idle speed to prevent excessive discharge of these actions occur in steps or levels, without being drained, if the interior courtesy lamps, reading/map lamps, visor vanity lamps, or trunk lamp are accidentally left on, they are on again. The exterior lamps control is needed...
Owner's Manual
Page 171
... phone with a Hands‐Free Profile to access the address book or contact list. The system can interact with many cell phones, allowing: . . Noise: Keep interior noise levels to a minimum.
... phone with a Hands‐Free Profile to access the address book or contact list. The system can interact with many cell phones, allowing: . . Noise: Keep interior noise levels to a minimum.

Owner's Manual
Page 191
... rolling terrain. Pay attention to fall, resulting in good shape. Wet ice can be in your own lane. Check all the work well. Keep the interior temperature cool. Hill and Mountain Roads Driving on steep hills or through mountains is dangerous. You would not work of the road. Driving and Operating...
... rolling terrain. Pay attention to fall, resulting in good shape. Wet ice can be in your own lane. Check all the work well. Keep the interior temperature cool. Hill and Mountain Roads Driving on steep hills or through mountains is dangerous. You would not work of the road. Driving and Operating...
Owner's Manual
Page 232
Genuine GM parts have one of these marks: Towing Towing the Vehicle ...10-66 Recreational Vehicle Towing ...10-66 Appearance Care Exterior Care ...10-68 Interior Care ...10-70 Floor Mats ...10-73 10-2 Vehicle Care Jump Starting Jump Starting ...10-62 When It Is Time for New Tires ...10-47 ...
Genuine GM parts have one of these marks: Towing Towing the Vehicle ...10-66 Recreational Vehicle Towing ...10-66 Appearance Care Exterior Care ...10-68 Interior Care ...10-70 Floor Mats ...10-73 10-2 Vehicle Care Jump Starting Jump Starting ...10-62 When It Is Time for New Tires ...10-47 ...
Owner's Manual
Page 235
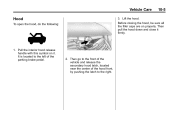
It is located to the right. Vehicle Care 10-5 Hood To open the hood, do the following: 3. Then pull the hood down and close it . Pull the interior hood release handle with this symbol on properly. Then go to the front of the vehicle and release the secondary hood latch, located near the center of the hood front, by pushing the latch to the left of the parking brake pedal. 2. Before closing the hood, be sure all the filler caps are on it firmly. 1. Lift the hood.
It is located to the right. Vehicle Care 10-5 Hood To open the hood, do the following: 3. Then pull the hood down and close it . Pull the interior hood release handle with this symbol on properly. Then go to the front of the vehicle and release the secondary hood latch, located near the center of the hood front, by pushing the latch to the left of the parking brake pedal. 2. Before closing the hood, be sure all the filler caps are on it firmly. 1. Lift the hood.
Owner's Manual
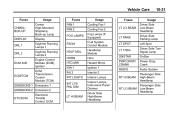
Page 261
... FAN 1 FAN 2 FOG LAMPS Usage Cooling Fan 1 Cooling Fan 2 Fog Lamps (If Equipped) Fuel System Control Module Headlamp Module Horn Heated Mirror Ignition 1 Injector 2 Interior Lamps Interior Lamps, Instrument Panel Dimmer Driver Side High-Beam Headlamp RT HI BEAM LT LO BEAM LT PARK LT SPOT LT T/SIG ONSTAR PWR DROP/ CRANK...
... FAN 1 FAN 2 FOG LAMPS Usage Cooling Fan 1 Cooling Fan 2 Fog Lamps (If Equipped) Fuel System Control Module Headlamp Module Horn Heated Mirror Ignition 1 Injector 2 Interior Lamps Interior Lamps, Instrument Panel Dimmer Driver Side High-Beam Headlamp RT HI BEAM LT LO BEAM LT PARK LT SPOT LT T/SIG ONSTAR PWR DROP/ CRANK...

Owner's Manual
Page 300
... and attack painted vehicle surfaces causing blotchy, ring-shaped discolorations, and small, irregular dark spots etched into the paint surface. Interior Care To prevent dirt particle abrasions, regularly clean the vehicle's interior. Use only approved cleaners. Your dealer or an underbody car washing system can do not use strong soaps, chemicals, abrasive...
... and attack painted vehicle surfaces causing blotchy, ring-shaped discolorations, and small, irregular dark spots etched into the paint surface. Interior Care To prevent dirt particle abrasions, regularly clean the vehicle's interior. Use only approved cleaners. Your dealer or an underbody car washing system can do not use strong soaps, chemicals, abrasive...

Owner's Manual
Page 301
... transfer color to remain on the instrument cluster. Do not use a brush with stiff bristles. To prevent damage, do not clean the interior using cleaners, read and adhere to fog. Wipe droplets left behind with water during the first three to six months of time. Never ... or dishwashing soaps with plain water. Before using the following cleaners or techniques: . . 10-71 Do not heavily saturate the upholstery when cleaning. Interior Glass To clean, use a razor or any other sharp object to the cleaning cloth. Commercial glass cleaners may result. Using a mild soap solution,...
... transfer color to remain on the instrument cluster. Do not use a brush with stiff bristles. To prevent damage, do not clean the interior using cleaners, read and adhere to fog. Wipe droplets left behind with water during the first three to six months of time. Never ... or dishwashing soaps with plain water. Before using the following cleaners or techniques: . . 10-71 Do not heavily saturate the upholstery when cleaning. Interior Glass To clean, use a razor or any other sharp object to the cleaning cloth. Commercial glass cleaners may result. Using a mild soap solution,...

Owner's Manual
Page 302
... rubbing the soiled area until no longer any color transfer from these solvents can permanently change the appearance and feel of the soil as other interior surfaces, may be necessary to the fabric or carpet. 2. To clean: 1. Start on the floor carpet. 10-72 Vehicle Care 3.
... rubbing the soiled area until no longer any color transfer from these solvents can permanently change the appearance and feel of the soil as other interior surfaces, may be necessary to the fabric or carpet. 2. To clean: 1. Start on the floor carpet. 10-72 Vehicle Care 3.


