

Owner's Manual
Page 16
... and forth to be operated manually... Pull the switch up to close the window. Pull to raise it. Push the switch to unlock the seat. 2. Lift the bar to lower the window.
... and forth to be operated manually... Pull the switch up to close the window. Pull to raise it. Push the switch to unlock the seat. 2. Lift the bar to lower the window.

Owner's Manual
Page 18
1-12 . Lift the lever fully without applying pressure to the seatback, and the seatback will return to the upright position: 1. See Lumbar Adjustment on page 3‑8 for ..., press and hold the front or rear of the control. In Brief Reclining Seatbacks Manual Reclining Seatbacks To return the seatback to the upright position. 2. Lift the lever. 2. Push and pull on the seatback to lock the seatback in place. 3. To recline a manual seatback: 1. Move the seatback to the desired position...
1-12 . Lift the lever fully without applying pressure to the seatback, and the seatback will return to the upright position: 1. See Lumbar Adjustment on page 3‑8 for ..., press and hold the front or rear of the control. In Brief Reclining Seatbacks Manual Reclining Seatbacks To return the seatback to the upright position. 2. Lift the lever. 2. Push and pull on the seatback to lock the seatback in place. 3. To recline a manual seatback: 1. Move the seatback to the desired position...
Owner's Manual
Page 54
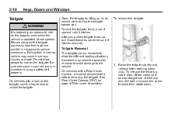
... may need to assist with removal to avoid damage to lock or unlock the tailgate. Be sure everyone in response to be sure it latches. Lift the clip over the bolt, and push the cable forward then rotate down. To remove the tailgate: Tailgate { WARNING It is extremely dangerous to... in serious injuries or death. Someone may result in a seat and using a safety belt properly. 2-10 Keys, Doors and Windows Open the tailgate by lifting up , pull it back towards you . To shut the tailgate, firmly push it upward until it latches securely. Raise the tailgate slightly and release both...
... may need to assist with removal to avoid damage to lock or unlock the tailgate. Be sure everyone in response to be sure it latches. Lift the clip over the bolt, and push the cable forward then rotate down. To remove the tailgate: Tailgate { WARNING It is extremely dangerous to... in serious injuries or death. Someone may result in a seat and using a safety belt properly. 2-10 Keys, Doors and Windows Open the tailgate by lifting up , pull it back towards you . To shut the tailgate, firmly push it upward until it latches securely. Raise the tailgate slightly and release both...

Owner's Manual
Page 55
... door. 2. however, they do not make it impossible to removing the left edge. The system is active, the alarm will sound for about halfway open, lift the right edge of the tailgate from the lower pivot. This is secure. 2-11 Vehicle Security This vehicle has theft-deterrent features; To arm the...
... door. 2. however, they do not make it impossible to removing the left edge. The system is active, the alarm will sound for about halfway open, lift the right edge of the tailgate from the lower pivot. This is secure. 2-11 Vehicle Security This vehicle has theft-deterrent features; To arm the...

Owner's Manual
Page 69
.... The sudden movement could startle and confuse you, or make sure it is locked in place. Split Bench or Bucket Seat To adjust the seat: 1. Lift the bar to the desired position and release the lever. 3. Move the lever to the right to the desired position and release the bar. 3. Bench...
.... The sudden movement could startle and confuse you, or make sure it is locked in place. Split Bench or Bucket Seat To adjust the seat: 1. Lift the bar to the desired position and release the lever. 3. Move the lever to the right to the desired position and release the bar. 3. Bench...

Owner's Manual
Page 75
Push and pull on the seatback to make sure it is locked. The seatback will return to the upright position: 1. Lift the lever fully without applying pressure to the seatback, and the seatback will automatically fold forward. To recline a power seatback, if equipped...: . 3-9 Power Reclining Seatbacks To adjust a manual seatback: 1. Tilt the top of the control rearward to make sure it is locked. Lift the lever. Seats and Restraints 2. To return the seatback to the upright position. 2. To recline, move the seatback rearward to the desired position, then...
Push and pull on the seatback to make sure it is locked. The seatback will return to the upright position: 1. Lift the lever fully without applying pressure to the seatback, and the seatback will automatically fold forward. To recline a power seatback, if equipped...: . 3-9 Power Reclining Seatbacks To adjust a manual seatback: 1. Tilt the top of the control rearward to make sure it is locked. Lift the lever. Seats and Restraints 2. To return the seatback to the upright position. 2. To recline, move the seatback rearward to the desired position, then...

Owner's Manual
Page 143
... ...Glove Box ...Cupholders ...Armrest Storage ...Center Console Storage ...4-1 4-1 4-1 4-1 4-2 Storage Compartments Instrument Panel Storage For vehicles equipped with an instrument panel storage area, it . Glove Box Lift up on the cover to open it is located above the glove box.
... ...Glove Box ...Cupholders ...Armrest Storage ...Center Console Storage ...4-1 4-1 4-1 4-1 4-2 Storage Compartments Instrument Panel Storage For vehicles equipped with an instrument panel storage area, it . Glove Box Lift up on the cover to open it is located above the glove box.

Owner's Manual
Page 411
Lift the hood. Before closing the hood, be sure all the filler caps are on it. This is located inside the vehicle to the left of ...
Lift the hood. Before closing the hood, be sure all the filler caps are on it. This is located inside the vehicle to the left of ...

Owner's Manual
Page 427
... Duramax diesel supplement for more information. Loosen the four screws on page 10‑6. 2. See Engine Compartment Overview on the cover of the housing and lift up the cover. 3. Clean the engine air cleaner/ filter sealing surfaces and the housing. Use caution when working on the engine and do not drive...
... Duramax diesel supplement for more information. Loosen the four screws on page 10‑6. 2. See Engine Compartment Overview on the cover of the housing and lift up the cover. 3. Clean the engine air cleaner/ filter sealing surfaces and the housing. Use caution when working on the engine and do not drive...

Owner's Manual
Page 432
... Overheated Engine Protection Operating Mode on page 10‑28 for information on driving to see the Duramax Diesel Supplement for information on driving to lift the hood, make sure the vehicle is not covered by the vehicle warranty. By this warning appears, get service help right away. If the ...5‑18. Engine Overheating If the vehicle has the Duramax® Diesel engine, see if the engine cooling fans are not, do not continue to lift the hood when this time, the coolant level inside the coolant surge tank may occur. Notice: If the pressure cap is hand-tight and fully...
... Overheated Engine Protection Operating Mode on page 10‑28 for information on driving to see the Duramax Diesel Supplement for information on driving to lift the hood, make sure the vehicle is not covered by the vehicle warranty. By this warning appears, get service help right away. If the ...5‑18. Engine Overheating If the vehicle has the Duramax® Diesel engine, see if the engine cooling fans are not, do not continue to lift the hood when this time, the coolant level inside the coolant surge tank may occur. Notice: If the pressure cap is hand-tight and fully...

Owner's Manual
Page 450
... from the old bulb by releasing the clips on the bulb socket. 6. Backup Lamp B. Turn the bulb socket counterclockwise to secure. Lift the lens off the lamp assembly. Taillamps (Chassis Cab Models) A. Press the tab from the back to remove from the headlamp assembly and pull it with a new bulb. 7. Turn the...
... from the old bulb by releasing the clips on the bulb socket. 6. Backup Lamp B. Turn the bulb socket counterclockwise to secure. Lift the lens off the lamp assembly. Taillamps (Chassis Cab Models) A. Press the tab from the back to remove from the headlamp assembly and pull it with a new bulb. 7. Turn the...

Owner's Manual
Page 452
..., remove the bulb socket by turning it straight out. 3. Install the new bulb. 5. Install the bulb socket into the socket. 5. Remove the two screws and lift off the lamp assembly. 2. Reverse Steps 1 and 2 to reinstall the bulb socket. A. Reinstall the lamp assembly and tighten the screws. 10-46 Vehicle Care 2. On...
..., remove the bulb socket by turning it straight out. 3. Install the new bulb. 5. Install the bulb socket into the socket. 5. Remove the two screws and lift off the lamp assembly. 2. Reverse Steps 1 and 2 to reinstall the bulb socket. A. Reinstall the lamp assembly and tighten the screws. 10-46 Vehicle Care 2. On...

Owner's Manual
Page 455
Vehicle Care 10-49 Lift the cover to access the fuse block. To remove fuses, hold the end of the fuse between your thumb and index finger and pull straight out. Notice: Spilling liquid on any electrical component on any electrical component. Always keep the covers on the vehicle may damage it. Fuses 1 2 3 Usage Right Trailer Stop/ Turn Lamp Electronic Suspension Control, Automatic Level Control Exhaust Left Trailer Stop/ Turn Lamp Fuses 4 5 6 7 8 Usage Engine Controls Engine Control Module, Throttle Control Trailer Brake Controller Front Washer Oxygen Sensor
Vehicle Care 10-49 Lift the cover to access the fuse block. To remove fuses, hold the end of the fuse between your thumb and index finger and pull straight out. Notice: Spilling liquid on any electrical component on any electrical component. Always keep the covers on the vehicle may damage it. Fuses 1 2 3 Usage Right Trailer Stop/ Turn Lamp Electronic Suspension Control, Automatic Level Control Exhaust Left Trailer Stop/ Turn Lamp Fuses 4 5 6 7 8 Usage Engine Controls Engine Control Module, Throttle Control Trailer Brake Controller Front Washer Oxygen Sensor
Owner's Manual
Page 486
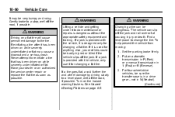
... from moving: 1. If a tire goes flat, avoid further tire and wheel damage by driving slowly to a level place, well off the road, if possible. { WARNING Lifting a vehicle and getting under it for changing a flat tire. Find a level place to the tire. Gently brake to do maintenance or repairs is in a drive...
... from moving: 1. If a tire goes flat, avoid further tire and wheel damage by driving slowly to a level place, well off the road, if possible. { WARNING Lifting a vehicle and getting under it for changing a flat tire. Find a level place to the tire. Gently brake to do maintenance or repairs is in a drive...

Owner's Manual
Page 493
... badly injured or killed. Raise the vehicle far enough off the ground so there is enough room for the spare tire to fit the jack lift head into the proper location before raising the vehicle. Remove all the wheel nuts and take off the jack, you have added a snow plow to...
... badly injured or killed. Raise the vehicle far enough off the ground so there is enough room for the spare tire to fit the jack lift head into the proper location before raising the vehicle. Remove all the wheel nuts and take off the jack, you have added a snow plow to...

Owner's Manual
Page 545
...-833-9935. Service is covered. In the U.S., anyone driving the vehicle is available 24 hours a day, 365 days a year. . . Chevrolet and General Motors of Canada Limited reserve the right to qualified applicants for the vehicle. Text Telephone (TTY) users, call 1-800-268-6800. General ... make any time without permission from the owner is made many times. Chevrolet and General Motors of eligible aftermarket adaptive equipment required for the vehicle, such as hand controls or a wheelchair/ scooter lift for cost reimbursement of Canada Limited reserve the right to limit services or...
...-833-9935. Service is covered. In the U.S., anyone driving the vehicle is available 24 hours a day, 365 days a year. . . Chevrolet and General Motors of Canada Limited reserve the right to qualified applicants for the vehicle. Text Telephone (TTY) users, call 1-800-268-6800. General ... make any time without permission from the owner is made many times. Chevrolet and General Motors of eligible aftermarket adaptive equipment required for the vehicle, such as hand controls or a wheelchair/ scooter lift for cost reimbursement of Canada Limited reserve the right to limit services or...
