

Owner's Manual
Page 1
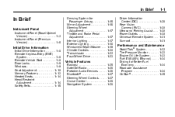
2011 Chevrolet Silverado Owner Manual M In Brief ...1-1 Instrument Panel ...1-2 Initial Drive Information ...1-8 Vehicle Features ...1-25 Performance and Maintenance ...1-32 Keys, Doors and Windows ...2-1 Keys and Locks ...2-2 Doors ...2-9 Vehicle Security...2-11 Exterior Mirrors ...2-14 Interior...Displays ...5-32 Vehicle Messages ...5-41 Vehicle Personalization ...5-50 Universal Remote System ...5-58 Lighting ...6-1 Exterior Lighting ...6-1 Interior Lighting ...6-8 Lighting Features ...6-9 Infotainment System ...7-1 Introduction ...7-1 Radio ...7-8 Audio Players ...7-14 Rear Seat Infotainment ...
2011 Chevrolet Silverado Owner Manual M In Brief ...1-1 Instrument Panel ...1-2 Initial Drive Information ...1-8 Vehicle Features ...1-25 Performance and Maintenance ...1-32 Keys, Doors and Windows ...2-1 Keys and Locks ...2-2 Doors ...2-9 Vehicle Security...2-11 Exterior Mirrors ...2-14 Interior...Displays ...5-32 Vehicle Messages ...5-41 Vehicle Personalization ...5-50 Universal Remote System ...5-58 Lighting ...6-1 Exterior Lighting ...6-1 Interior Lighting ...6-8 Lighting Features ...6-9 Infotainment System ...7-1 Introduction ...7-1 Radio ...7-8 Audio Players ...7-14 Rear Seat Infotainment ...
Owner's Manual
Page 7
... ...1-33 Engine Oil Life System ...1-33 Fuel E85 (85% Ethanol) ...1-34 Driving for Passenger Airbag ...Mirror Adjustment ...Steering Wheel Adjustment ...Throttle and Brake Pedal Adjustment ...Interior Lighting ...Exterior Lighting ...Windshield Wiper/Washer ...Climate Controls ...Transmission ...Four-Wheel Drive ... 1-15 1-16 1-17 1-17 1-17 1-18 1-19 1-20 1-22 1-23 1-25 1-26 1-26...
... ...1-33 Engine Oil Life System ...1-33 Fuel E85 (85% Ethanol) ...1-34 Driving for Passenger Airbag ...Mirror Adjustment ...Steering Wheel Adjustment ...Throttle and Brake Pedal Adjustment ...Interior Lighting ...Exterior Lighting ...Windshield Wiper/Washer ...Climate Controls ...Transmission ...Four-Wheel Drive ... 1-15 1-16 1-17 1-17 1-17 1-18 1-19 1-20 1-22 1-23 1-25 1-26 1-26...
Owner's Manual
Page 22
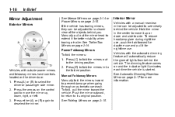
... mirrors: 1. Vehicles with a manual rearview mirror can be adjusted to the folded position. Press either (A) or (B) again to the driving position. Mirror Adjustment Exterior Mirrors Interior Mirror Vehicles with the automatic dimming feature will automatically reduce the glare of the objects behind the vehicle. The dimming feature comes on page 2‑...
... mirrors: 1. Vehicles with a manual rearview mirror can be adjusted to the folded position. Press either (A) or (B) again to the driving position. Mirror Adjustment Exterior Mirrors Interior Mirror Vehicles with the automatic dimming feature will automatically reduce the glare of the objects behind the vehicle. The dimming feature comes on page 2‑...

Owner's Manual
Page 23
... the dome lamps. Release the lever to adjust the pedals is located on when any door is turned counterclockwise. In Brief 1-17 Steering Wheel Adjustment 3. Interior Lighting Dome Lamps The dome lamps are closed. The control used to lock the wheel in the overhead console. The dome lamps remain on until...
... the dome lamps. Release the lever to adjust the pedals is located on when any door is turned counterclockwise. In Brief 1-17 Steering Wheel Adjustment 3. Interior Lighting Dome Lamps The dome lamps are closed. The control used to lock the wheel in the overhead console. The dome lamps remain on until...

Owner's Manual
Page 24
For more information about interior lamps, see: ... Instrument Panel Illumination Control on page 6‑9. Reading Lamps on page 6‑8. 1-18 In Brief Reading Lamps For vehicles with reading lamps in ...
For more information about interior lamps, see: ... Instrument Panel Illumination Control on page 6‑9. Reading Lamps on page 6‑8. 1-18 In Brief Reading Lamps For vehicles with reading lamps in ...

Owner's Manual
Page 45
... ...Door Locks ...Power Door Locks ...Delayed Locking ...Automatic Door Locks ...Lockout Protection ...Safety Locks ...2-2 2-2 2-3 2-5 2-7 2-8 2-8 2-8 2-8 2-8 Doors Rear Doors (Extended Cab) ...2-9 Tailgate ...2-10 Interior Mirrors Manual Rearview Mirror ...2-17 Automatic Dimming Rearview Mirror ...2-17 Vehicle Security Vehicle Security ...2-11 Anti-theft Alarm System ...2-11 Immobilizer ...2-12 Immobilizer Operation......Power Mirrors ...Folding Mirrors ...Heated Mirrors ...Park Tilt Mirrors ...2-14 2-14 2-14 2-15 2-15 2-16 2-17 Roof Sunroof (Extended Cab) ...2-20 Sunroof (Crew Cab) ...2-21
... ...Door Locks ...Power Door Locks ...Delayed Locking ...Automatic Door Locks ...Lockout Protection ...Safety Locks ...2-2 2-2 2-3 2-5 2-7 2-8 2-8 2-8 2-8 2-8 Doors Rear Doors (Extended Cab) ...2-9 Tailgate ...2-10 Interior Mirrors Manual Rearview Mirror ...2-17 Automatic Dimming Rearview Mirror ...2-17 Vehicle Security Vehicle Security ...2-11 Anti-theft Alarm System ...2-11 Immobilizer ...2-12 Immobilizer Operation......Power Mirrors ...Folding Mirrors ...Heated Mirrors ...Park Tilt Mirrors ...2-14 2-14 2-14 2-15 2-15 2-16 2-17 Roof Sunroof (Extended Cab) ...2-20 Sunroof (Crew Cab) ...2-21

Owner's Manual
Page 47
.... Press to lock all remaining doors unlock. There are other conditions which can affect the performance of the transmitter. See Remote Vehicle Start on . The interior lamps may come on and stay on for additional information. Keys, Doors and Windows . 2-3 Check the transmitter's battery.
.... Press to lock all remaining doors unlock. There are other conditions which can affect the performance of the transmitter. See Remote Vehicle Start on . The interior lamps may come on and stay on for additional information. Keys, Doors and Windows . 2-3 Check the transmitter's battery.

Owner's Manual
Page 61
Interior Mirrors Manual Rearview Mirror Hold the mirror in R (Reverse). Push the tab at the bottom of behind your dealer for more information about OnStar and ...
Interior Mirrors Manual Rearview Mirror Hold the mirror in R (Reverse). Push the tab at the bottom of behind your dealer for more information about OnStar and ...

Owner's Manual
Page 91
... the two edges of the belt into the slots of a moderate to the shoulder belt: 1. See Replacing Safety Belt System Parts after a Crash on the interior body. 2. Here is how to install a comfort guide to severe frontal, near frontal, or rear crash if the threshold conditions for front outboard occupants. They...
... the two edges of the belt into the slots of a moderate to the shoulder belt: 1. See Replacing Safety Belt System Parts after a Crash on the interior body. 2. Here is how to install a comfort guide to severe frontal, near frontal, or rear crash if the threshold conditions for front outboard occupants. They...

Owner's Manual
Page 102
... deployment, you should get out of the vehicle after the airbags inflate. You can lock the doors, turn on the interior lamps and hazard warning flashers, and shut off the interior lamps and hazard warning flashers by using the controls for people with you may automatically unlock the doors, turn off the...
... deployment, you should get out of the vehicle after the airbags inflate. You can lock the doors, turn on the interior lamps and hazard warning flashers, and shut off the interior lamps and hazard warning flashers by using the controls for people with you may automatically unlock the doors, turn off the...

Owner's Manual
Page 209
... Changer ...6-3 Flash-to-Pass ...6-3 Daytime Running Lamps (DRL) ...6-3 Automatic Headlamp System ...6-4 Hazard Warning Flashers ...6-5 Turn and Lane-Change Signals ...6-6 Fog Lamps ...6-6 Auxiliary Roof-Mounted Lamp ...6-7 Interior Lighting Instrument Panel Illumination Control ...Cargo Lamp ...Dome Lamps ...Reading Lamps ...6-8 6-8 6-8 6-9 Exterior Lighting Exterior Lamp Controls Lighting Features Entry Lighting ...6-9 Exit Lighting ...6-9 Battery Load Management...
... Changer ...6-3 Flash-to-Pass ...6-3 Daytime Running Lamps (DRL) ...6-3 Automatic Headlamp System ...6-4 Hazard Warning Flashers ...6-5 Turn and Lane-Change Signals ...6-6 Fog Lamps ...6-6 Auxiliary Roof-Mounted Lamp ...6-7 Interior Lighting Instrument Panel Illumination Control ...Cargo Lamp ...Dome Lamps ...Reading Lamps ...6-8 6-8 6-8 6-9 Exterior Lighting Exterior Lamp Controls Lighting Features Entry Lighting ...6-9 Exit Lighting ...6-9 Battery Load Management...

Owner's Manual
Page 216
Turning the knob to the farthest clockwise position turns on until the knob is turned counterclockwise. Interior Lighting Instrument Panel Illumination Control Dome Lamps The dome lamps are closed. The dome lamps remain on the dome lamps. Cargo Lamp The cargo lamps ...
Turning the knob to the farthest clockwise position turns on until the knob is turned counterclockwise. Interior Lighting Instrument Panel Illumination Control Dome Lamps The dome lamps are closed. The dome lamps remain on the dome lamps. Cargo Lamp The cargo lamps ...

Owner's Manual
Page 217
Exit Lighting The interior lamps come on when the key is opened . To turn the lamps on or off, press the button located next to turn off . Lighting Features ...
Exit Lighting The interior lamps come on when the key is opened . To turn the lamps on or off, press the button located next to turn off . Lighting Features ...

Owner's Manual
Page 266
... shortcuts. The system may not recognize voice commands if there is in a voice recognition menu. See "Voice Pass-Thru" in -vehicle Bluetooth system. Noise: Keep interior noise levels to dial phone numbers and name tags. A Bluetooth system can be distracting to access the address book or contact list. Organize the phone...
... shortcuts. The system may not recognize voice commands if there is in a voice recognition menu. See "Voice Pass-Thru" in -vehicle Bluetooth system. Noise: Keep interior noise levels to dial phone numbers and name tags. A Bluetooth system can be distracting to access the address book or contact list. Organize the phone...

Owner's Manual
Page 284
... a false reading in the displayed temperature. Air Vents Use the air outlets located in the headliner, measures the temperature of air into the vehicle. The interior temperature sensor, located in the center and on the front of the vehicle could block the flow of the air inside the vehicle. Use of...
... a false reading in the displayed temperature. Air Vents Use the air outlets located in the headliner, measures the temperature of air into the vehicle. The interior temperature sensor, located in the center and on the front of the vehicle could block the flow of the air inside the vehicle. Use of...

Owner's Manual
Page 302
... include: . . { WARNING Coasting downhill in gear when going down steep or long hills. . You could crash. Shift to a lower gear when going down a hill. Keep interior temperature cool. Keep your surroundings while driving. See Tires on a steep downhill slope. Keep the vehicle serviced and in good shape. You would not work...
... include: . . { WARNING Coasting downhill in gear when going down steep or long hills. . You could crash. Shift to a lower gear when going down a hill. Keep interior temperature cool. Keep your surroundings while driving. See Tires on a steep downhill slope. Keep the vehicle serviced and in good shape. You would not work...

Owner's Manual
Page 408
... ...10-72 Jump Starting Jump Starting ...10-94 Towing Towing the Vehicle ...10-99 Recreational Vehicle Towing ...10-99 Appearance Care Exterior Care ...10-104 Interior Care ...10-108 Floor Mats ...10-111
... ...10-72 Jump Starting Jump Starting ...10-94 Towing Towing the Vehicle ...10-99 Recreational Vehicle Towing ...10-99 Appearance Care Exterior Care ...10-104 Interior Care ...10-108 Floor Mats ...10-111
Owner's Manual
Page 459
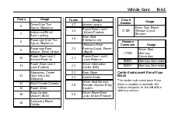
... Stoplamp Rear Climate Controls Power Mirror Body Control Module (BCM) Accessory Power Outlets 26 Fuses 17 18 19 20 21 22 23 24 25 Usage Interior Lamps Power Door Lock 1 (Unlock Feature) Rear Seat Entertainment Ultrasonic Rear Parking Assist, Power Liftgate Power Door Lock 1 (Lock Feature) Driver Information Center (DIC) Rear...
... Stoplamp Rear Climate Controls Power Mirror Body Control Module (BCM) Accessory Power Outlets 26 Fuses 17 18 19 20 21 22 23 24 25 Usage Interior Lamps Power Door Lock 1 (Unlock Feature) Rear Seat Entertainment Ultrasonic Rear Parking Assist, Power Liftgate Power Door Lock 1 (Lock Feature) Driver Information Center (DIC) Rear...

Owner's Manual
Page 514
... liftgate hinges, and steel fuel door hinge unless the components are being flushed. Newspapers and garments that are plastic. When cleaning the interior, only use cleaners specifically designed for which they have corrosion protection. If these materials from using cleaners on the upholstery and cause damage... home furnishings can do this fallout condition within 12 months or 20 000 km (12,000 mi) of the frame should be Interior Care The interior will make them to the owner, the surfaces of new vehicles damaged by this . the carpet, fabric, leather, and plastic ...
... liftgate hinges, and steel fuel door hinge unless the components are being flushed. Newspapers and garments that are plastic. When cleaning the interior, only use cleaners specifically designed for which they have corrosion protection. If these materials from using cleaners on the upholstery and cause damage... home furnishings can do this fallout condition within 12 months or 20 000 km (12,000 mi) of the frame should be Interior Care The interior will make them to the owner, the surfaces of new vehicles damaged by this . the carpet, fabric, leather, and plastic ...

Owner's Manual
Page 515
...try to remove them first with degreasers. Remove excess moisture. 3. Never use a stiff brush. A canister vacuum with a beater bar in the interior. Vehicle Care Notice: Using abrasive cleaners when cleaning glass surfaces on the label. Use of the following cleaners or techniques: . . 10-109...a paper towel. Use only mild, neutral-pH soaps. Cleaners that can become concentrated in the nozzle may only be removed. Continue to the interior surfaces. Fabric/Carpet Use a vacuum cleaner with water or club soda. 2. For soils, . Before using the following techniques: . . Allow...
...try to remove them first with degreasers. Remove excess moisture. 3. Never use a stiff brush. A canister vacuum with a beater bar in the interior. Vehicle Care Notice: Using abrasive cleaners when cleaning glass surfaces on the label. Use of the following cleaners or techniques: . . 10-109...a paper towel. Use only mild, neutral-pH soaps. Cleaners that can become concentrated in the nozzle may only be removed. Continue to the interior surfaces. Fabric/Carpet Use a vacuum cleaner with water or club soda. 2. For soils, . Before using the following techniques: . . Allow...
