

Owner's Manual
Page 1
2011 Chevrolet Silverado Owner Manual M In Brief ...1-1 Instrument Panel ...1-2 Initial Drive Information ...1-8 Vehicle Features ...1-25 Performance and Maintenance ...1-32 Keys, Doors and Windows ...2-1 Keys and ... Information Displays ...5-32 Vehicle Messages ...5-41 Vehicle Personalization ...5-50 Universal Remote System ...5-58 Lighting ...6-1 Exterior Lighting ...6-1 Interior Lighting ...6-8 Lighting Features ...6-9 Infotainment System ...7-1 Introduction ...7-1 Radio ...7-8 Audio Players ...7-14 Rear Seat Infotainment ...7-36 Phone ...7-48 Climate Controls ...8-1 Climate Control Systems...
2011 Chevrolet Silverado Owner Manual M In Brief ...1-1 Instrument Panel ...1-2 Initial Drive Information ...1-8 Vehicle Features ...1-25 Performance and Maintenance ...1-32 Keys, Doors and Windows ...2-1 Keys and ... Information Displays ...5-32 Vehicle Messages ...5-41 Vehicle Personalization ...5-50 Universal Remote System ...5-58 Lighting ...6-1 Exterior Lighting ...6-1 Interior Lighting ...6-8 Lighting Features ...6-9 Infotainment System ...7-1 Introduction ...7-1 Radio ...7-8 Audio Players ...7-14 Rear Seat Infotainment ...7-36 Phone ...7-48 Climate Controls ...8-1 Climate Control Systems...
Owner's Manual
Page 3
...see the Duramax diesel supplement for more information. Part No. 25965913 C Third Printing © 2011 General Motors LLC. If the vehicle has the Duramax® diesel engine, see the hybrid ... substitute the name "General Motors of Canada Limited" for quick reference. This manual describes features that you did not purchase or due to changes subsequent to the printing of this engine...purchase documentation relating to your specific vehicle to , GM, the GM logo, CHEVROLET, the CHEVROLET Emblem, SILVERADO, and Z71 are options that may or may not be obtained from your ...
...see the Duramax diesel supplement for more information. Part No. 25965913 C Third Printing © 2011 General Motors LLC. If the vehicle has the Duramax® diesel engine, see the hybrid ... substitute the name "General Motors of Canada Limited" for quick reference. This manual describes features that you did not purchase or due to changes subsequent to the printing of this engine...purchase documentation relating to your specific vehicle to , GM, the GM logo, CHEVROLET, the CHEVROLET Emblem, SILVERADO, and Z71 are options that may or may not be obtained from your ...
Owner's Manual
Page 7
...Drive Information ...1-8 Remote Keyless Entry (RKE) System ...1-8 Remote Vehicle Start ...1-8 Door Locks ...1-9 Windows ...1-9 Seat Adjustment ...1-10 Memory Features ...1-13 Heated Seats ...1-14 Head Restraint Adjustment ...1-14 Safety Belts ...1-15 Sensing System for Better Fuel Economy ...1-34 Roadside Assistance Program... Parking Assist ...Power Outlets ...Universal Remote System ...Sunroof ... Performance and Maintenance Vehicle Features Radio(s) ...Satellite Radio ...Portable Audio Devices ...Bluetooth® ...Steering Wheel Controls ...Cruise Control ...Navigation System ...
...Drive Information ...1-8 Remote Keyless Entry (RKE) System ...1-8 Remote Vehicle Start ...1-8 Door Locks ...1-9 Windows ...1-9 Seat Adjustment ...1-10 Memory Features ...1-13 Heated Seats ...1-14 Head Restraint Adjustment ...1-14 Safety Belts ...1-15 Sensing System for Better Fuel Economy ...1-34 Roadside Assistance Program... Parking Assist ...Power Outlets ...Universal Remote System ...Sunroof ... Performance and Maintenance Vehicle Features Radio(s) ...Satellite Radio ...Portable Audio Devices ...Bluetooth® ...Steering Wheel Controls ...Cruise Control ...Navigation System ...
Owner's Manual
Page 14
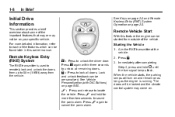
... Remote Keyless Entry (RKE) System Operation on page 5‑50. 3. Initial Drive Information This section provides a brief overview about some of the important features that may or may come on. For more than two seconds to lock all remaining doors. Lock and unlock feedback can be on as long...Aim the RKE transmitter at the vehicle. L : Press and release to 60 m (195 ft) away from outside of the features which can be found later in this feature the engine can be started from the vehicle. Remote Vehicle Start With this owner manual. Remote Keyless Entry (RKE) System The ...
... Remote Keyless Entry (RKE) System Operation on page 5‑50. 3. Initial Drive Information This section provides a brief overview about some of the important features that may or may come on. For more than two seconds to lock all remaining doors. Lock and unlock feedback can be on as long...Aim the RKE transmitter at the vehicle. L : Press and release to 60 m (195 ft) away from outside of the features which can be found later in this feature the engine can be started from the vehicle. Remote Vehicle Start With this owner manual. Remote Keyless Entry (RKE) System The ...

Owner's Manual
Page 19
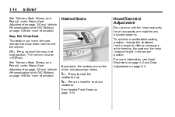
... 9‑31 for more information. Not all mirrors and adjustable throttle and brake pedals will have the ability to recline. On vehicles with the memory feature, the controls on page 3‑8 for a second driver position using "2." To recall, press and release "1" or "2." The vehicle must be in P (Park). Adjust the driver... the identified driver. Repeat for more information. See Reclining Seatbacks on the driver door are used to raise. . In Brief Power Reclining Seatbacks 1-13 Memory Features Storing Memory Positions To save and recall their positions. 2.
... 9‑31 for more information. Not all mirrors and adjustable throttle and brake pedals will have the ability to recline. On vehicles with the memory feature, the controls on page 3‑8 for a second driver position using "2." To recall, press and release "1" or "2." The vehicle must be in P (Park). Adjust the driver... the identified driver. Repeat for more information. See Reclining Seatbacks on the driver door are used to raise. . In Brief Power Reclining Seatbacks 1-13 Memory Features Storing Memory Positions To save and recall their positions. 2.
Owner's Manual
Page 20
... the driver and passenger doors. If available, the controls are installed and adjusted properly. B : Press to heat the seatback only. Easy Exit Driver Seat This feature can move the seat rearward to allow extra room to heat the seat and seatback. J: Press to exit the vehicle. 1-14 In Brief See "Memory...
... the driver and passenger doors. If available, the controls are installed and adjusted properly. B : Press to heat the seatback only. Easy Exit Driver Seat This feature can move the seat rearward to allow extra room to heat the seat and seatback. J: Press to exit the vehicle. 1-14 In Brief See "Memory...
Owner's Manual
Page 22
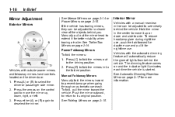
... left. 3. To reduce headlamp glare during nighttime use, push the tab forward for daytime use and pull it for nighttime use. The dimming feature comes on page 2‑15. Vehicles with a manual rearview mirror can be adjusted to extend it for better visibility when towing a trailer....outward, to return to the driving position. Press (C) to fold the mirrors out to its original position. Vehicles with the automatic dimming feature will automatically reduce the glare of the objects behind you. See Folding Mirrors on and the indicator light illuminates each time the vehicle is ...
... left. 3. To reduce headlamp glare during nighttime use, push the tab forward for daytime use and pull it for nighttime use. The dimming feature comes on page 2‑15. Vehicles with a manual rearview mirror can be adjusted to extend it for better visibility when towing a trailer....outward, to return to the driving position. Press (C) to fold the mirrors out to its original position. Vehicles with the automatic dimming feature will automatically reduce the glare of the objects behind you. See Folding Mirrors on and the indicator light illuminates each time the vehicle is ...

Owner's Manual
Page 23
... counterclockwise. The dome lamps remain on the dome lamps. Move the steering wheel up or down. Throttle and Brake Pedal Adjustment On vehicles with this feature, you can change the position of the steering column. The tilt lever is located on the instrument panel below the dome lamp override button, clockwise...
... counterclockwise. The dome lamps remain on the dome lamps. Move the steering wheel up or down. Throttle and Brake Pedal Adjustment On vehicles with this feature, you can change the position of the steering column. The tilt lever is located on the instrument panel below the dome lamp override button, clockwise...

Owner's Manual
Page 28
Fan Control C. Outside Air G. L. To enable the Range Selection feature, move the column shift lever to the M. Air Delivery Mode Control H. This is selected, 1 (First) through 5 (Fifth) gears are available. Defrost E. Power Button Rear Window ...
Fan Control C. Outside Air G. L. To enable the Range Selection feature, move the column shift lever to the M. Air Delivery Mode Control H. This is selected, 1 (First) through 5 (Fifth) gears are available. Defrost E. Power Button Rear Window ...

Owner's Manual
Page 31
... the system on the bottom line. BAND: Press to choose between the radio station frequency and the time. For more information. In Brief 1-25 Vehicle Features Radio(s) 4: Press to switch the display between FM, AM, or XM™, if equipped. If information is not available, "NO INFO" displays. Turn to the... Entertainment (RSE) System on page 7‑36 and Rear Seat Audio (RSA) System on page 7‑46 for more information about these and other radio features, see Operation on page 7‑2. While the ignition is off .
... the system on the bottom line. BAND: Press to choose between the radio station frequency and the time. For more information. In Brief 1-25 Vehicle Features Radio(s) 4: Press to switch the display between FM, AM, or XM™, if equipped. If information is not available, "NO INFO" displays. Turn to the... Entertainment (RSE) System on page 7‑36 and Rear Seat Audio (RSA) System on page 7‑46 for more information about these and other radio features, see Operation on page 7‑2. While the ignition is off .
Owner's Manual
Page 35
...to turn off or acknowledge messages on the DIC. Language Door Lock and Unlock Settings RKE Lock and Unlock Feedback Lighting Chime Volume Memory Features U: See Vehicle Personalization (with DIC Buttons) on page 5‑50. 3 : Press to display the oil life, units, tire ... wheel. See Vehicle Personalization (with the Integrated Trailer Brake Control (ITBC) system, engine hours, compass zone setting, and compass recalibration. These features include: ... V : Press to set or reset certain functions and to the steering wheel. In Brief The compass and outside air temperature will...
...to turn off or acknowledge messages on the DIC. Language Door Lock and Unlock Settings RKE Lock and Unlock Feedback Lighting Chime Volume Memory Features U: See Vehicle Personalization (with DIC Buttons) on page 5‑50. 3 : Press to display the oil life, units, tire ... wheel. See Vehicle Personalization (with the Integrated Trailer Brake Control (ITBC) system, engine hours, compass zone setting, and compass recalibration. These features include: ... V : Press to set or reset certain functions and to the steering wheel. In Brief The compass and outside air temperature will...

Owner's Manual
Page 47
... turned on page 2‑11. / (Remote Vehicle Start): For vehicles with DIC Buttons) on page 2‑5 for additional information. See "Battery Replacement" later in this feature, press / to start the engine from the vehicle. If the transmitter is still not working correctly, see your dealer or a qualified technician for 20 seconds...
... turned on page 2‑11. / (Remote Vehicle Start): For vehicles with DIC Buttons) on page 2‑5 for additional information. See "Battery Replacement" later in this feature, press / to start the engine from the vehicle. If the transmitter is still not working correctly, see your dealer or a qualified technician for 20 seconds...

Owner's Manual
Page 49
... tool into the notch located along the parting line of the vehicle. Twist the tool until the transmitter is low on during remote start feature if the vehicle is separated. . 2. Remove the old battery. Keys, Doors and Windows 3. If the vehicle has an automatic climate ...climate control system, the system will return after the key is felt. Snap the transmitter back together. 2-5 Remote Vehicle Start If available, this feature allows you to a heating or cooling mode depending on and off . Insert the new battery, positive side facing down. Separate the transmitter with...
... tool into the notch located along the parting line of the vehicle. Twist the tool until the transmitter is low on during remote start feature if the vehicle is separated. . 2. Remove the old battery. Keys, Doors and Windows 3. If the vehicle has an automatic climate ...climate control system, the system will return after the key is felt. Snap the transmitter back together. 2-5 Remote Vehicle Start If available, this feature allows you to a heating or cooling mode depending on and off . Insert the new battery, positive side facing down. Separate the transmitter with...

Owner's Manual
Page 50
... while the vehicle is running . For example, if Q and then / are pressed again after each remote start feature, the RKE transmitter functions will run for 10 minutes. After entering the vehicle during a remote start feature: 1. There are other conditions which can be extended only once. Turn on the RKE transmitter if the...
... while the vehicle is running . For example, if Q and then / are pressed again after each remote start feature, the RKE transmitter functions will run for 10 minutes. After entering the vehicle during a remote start feature: 1. There are other conditions which can be extended only once. Turn on the RKE transmitter if the...

Owner's Manual
Page 51
...not open the doors and fall out of the vehicle in the driver door. This feature allows your dealer to add the manufacturer's remote vehicle start feature to add the manufacturer's remote vehicle start feature. Passengers, especially children, can easily enter through an unlocked door when you slow ... with the manual locks, push down or stop the vehicle. Remote Start Ready If the vehicle does not have the remote vehicle start feature, it . So, all passengers should wear safety belts properly and the doors should be locked whenever the vehicle is removed from the ignition...
...not open the doors and fall out of the vehicle in the driver door. This feature allows your dealer to add the manufacturer's remote vehicle start feature to add the manufacturer's remote vehicle start feature. Passengers, especially children, can easily enter through an unlocked door when you slow ... with the manual locks, push down or stop the vehicle. Remote Start Ready If the vehicle does not have the remote vehicle start feature, it . So, all passengers should wear safety belts properly and the doors should be locked whenever the vehicle is removed from the ignition...

Owner's Manual
Page 52
... locks, the switches on DIC programming. K (Unlock): doors. Press to prevent passengers from opening the rear doors from the inside. This feature can be used to lock the doors. You will unlock. If the passenger side power door lock switch is pressed when the front passenger ... DIC Buttons) on page 5‑50 for more information on the front doors can be programmed using the Driver Information Center (DIC). This feature will unlock. See "Delay Door Lock" under Vehicle Personalization (with the power lock switch Lockout Protection If the driver side power door lock ...
... locks, the switches on DIC programming. K (Unlock): doors. Press to prevent passengers from opening the rear doors from the inside. This feature can be used to lock the doors. You will unlock. If the passenger side power door lock switch is pressed when the front passenger ... DIC Buttons) on page 5‑50 for more information on the front doors can be programmed using the Driver Information Center (DIC). This feature will unlock. See "Delay Door Lock" under Vehicle Personalization (with the power lock switch Lockout Protection If the driver side power door lock ...

Owner's Manual
Page 55
... security light. Move the tailgate to the right to removing the left edge. Open the door. 2. Lock the door with the tailgate assist feature, raise the tailgate nearly all doors. The security light should flash. Close all the way to the closed and the security light goes off ... sure the tailgate is active, the alarm will go off after approximately 30 seconds. If the delayed locking feature is secure. 2-11 Vehicle Security This vehicle has theft-deterrent features; If the key is not placed in the ignition and turned to save the battery power. The system is...
... security light. Move the tailgate to the right to removing the left edge. Open the door. 2. Lock the door with the tailgate assist feature, raise the tailgate nearly all doors. The security light should flash. Close all the way to the closed and the security light goes off ... sure the tailgate is active, the alarm will go off after approximately 30 seconds. If the delayed locking feature is secure. 2-11 Vehicle Security This vehicle has theft-deterrent features; If the key is not placed in the ignition and turned to save the battery power. The system is...
Owner's Manual
Page 60
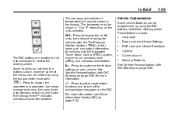
... the mirrors one time using the mirror controls to reset them to prevent damage when going through an automatic car wash. Depending on the vehicle's features, see "Rear Window Defogger" under Climate Control Systems (with Air Conditioning) on the mirror. An arrow on page 2‑17. 1 (Rear Window Defogger): Press to...
... the mirrors one time using the mirror controls to reset them to prevent damage when going through an automatic car wash. Depending on the vehicle's features, see "Rear Window Defogger" under Climate Control Systems (with Air Conditioning) on the mirror. An arrow on page 2‑17. 1 (Rear Window Defogger): Press to...

Owner's Manual
Page 61
...automatic dimming inside rearview mirror. Automatic dimming reduces the glare from the headlamps behind you . O (On/Off): Press to turn the dimming feature on page 5‑50 for more information. Interior Mirrors Manual Rearview Mirror Hold the mirror in R (Reverse). Adjust the mirror to avoid ...Center (DIC). See Rear Vision Camera (RVC) on or off . If the vehicle has RVC, the O button for turning the dimming feature on page 9‑74 for more information. Vehicles with water. See the OnStar Owner Guide for more information about the services OnStar provides....
...automatic dimming inside rearview mirror. Automatic dimming reduces the glare from the headlamps behind you . O (On/Off): Press to turn the dimming feature on page 5‑50 for more information. Interior Mirrors Manual Rearview Mirror Hold the mirror in R (Reverse). Adjust the mirror to avoid ...Center (DIC). See Rear Vision Camera (RVC) on or off . If the vehicle has RVC, the O button for turning the dimming feature on page 9‑74 for more information. Vehicles with water. See the OnStar Owner Guide for more information about the services OnStar provides....

Owner's Manual
Page 63
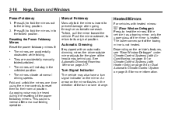
... go off when disengaged. The driver door has a switch for more information. Window Lockout o (Window Lockout): If a crew cab or extended cab vehicle has power windows, the driver door power window switch has a lockout feature. This feature prevents the rear windows from operating, except from the driver position. The express-down mode can be lowered...
... go off when disengaged. The driver door has a switch for more information. Window Lockout o (Window Lockout): If a crew cab or extended cab vehicle has power windows, the driver door power window switch has a lockout feature. This feature prevents the rear windows from operating, except from the driver position. The express-down mode can be lowered...
