
Owner's Manual
Page 10
... five seconds to sound the panic alarm. Lock and unlock feedback can be on your specific vehicle. Immediately after completing Step 2, press and hold V for additional information. For more than two seconds to unlock all doors. See Vehicle Personalization on page 2‑3. ...all remaining doors. Remote Vehicle Start Press K to locate the vehicle. Press With this feature the engine can be started from the vehicle. Aim the RKE transmitter at the vehicle. 2. Press L and release to unlock the driver door. Press Q to open the trunk. Press and hold / until the turn signal...
... five seconds to sound the panic alarm. Lock and unlock feedback can be on your specific vehicle. Immediately after completing Step 2, press and hold V for additional information. For more than two seconds to unlock all doors. See Vehicle Personalization on page 2‑3. ...all remaining doors. Remote Vehicle Start Press K to locate the vehicle. Press With this feature the engine can be started from the vehicle. Aim the RKE transmitter at the vehicle. 2. Press L and release to unlock the driver door. Press Q to open the trunk. Press and hold / until the turn signal...

Owner's Manual
Page 11
Remote start : . Press to open the window. On vehicles with power door locks, the switches are on the front doors. See Power Windows on the driver door near the map pocket. Trunk Release In addition to the trunk release button on the RKE transmitter, there is a remote release V button located on ... running. See Remote Vehicle Start on and then back off. In Brief When the vehicle starts, the parking lamps will turn off . Press to close it. The doors will be extended only once. 1-5 Door Locks Manual Locks From inside the vehicle slide the door lock knob...
Remote start : . Press to open the window. On vehicles with power door locks, the switches are on the front doors. See Power Windows on the driver door near the map pocket. Trunk Release In addition to the trunk release button on the RKE transmitter, there is a remote release V button located on ... running. See Remote Vehicle Start on and then back off. In Brief When the vehicle starts, the parking lamps will turn off . Press to close it. The doors will be extended only once. 1-5 Door Locks Manual Locks From inside the vehicle slide the door lock knob...

Owner's Manual
Page 12
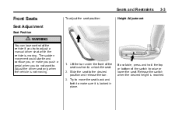
... seat to make sure it is locked. 1-6 In Brief Height Adjustment Seatback Adjustment Seat Adjustment Manual Seats Seat Position To adjust the seat position: 1. Release the switch when the desired height is locked in place. 3. To recline the seatback: 1. Try to move the seat back and forth to unlock ...the seat. 2. If available, press and hold the top or bottom of the seat cushion to make sure it is reached. Lift the lever. 2. See Seat Adjustment on the seatback...
... seat to make sure it is locked. 1-6 In Brief Height Adjustment Seatback Adjustment Seat Adjustment Manual Seats Seat Position To adjust the seat position: 1. Release the switch when the desired height is locked in place. 3. To recline the seatback: 1. Try to move the seat back and forth to unlock ...the seat. 2. If available, press and hold the top or bottom of the seat cushion to make sure it is reached. Lift the lever. 2. See Seat Adjustment on the seatback...
Owner's Manual
Page 14
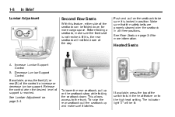
...fold down all three positions. Before folding a seatback, make sure it is, the rear seatback will be lit. Decrease Lumbar Support Control If available, press the front (A) or rear (B) of the control to the trunk. This allows access to increase or decrease lumbar support. See Lumbar Adjustment on the ...top of the switch to turn the heat feature on to be folded down . Push and pull on page 3‑8 for more information. Release the control when the desired level of support is reached. If it latches. See Rear Seats on the seatback to the high heat setting....
...fold down all three positions. Before folding a seatback, make sure it is, the rear seatback will be lit. Decrease Lumbar Support Control If available, press the front (A) or rear (B) of the control to the trunk. This allows access to increase or decrease lumbar support. See Lumbar Adjustment on the ...top of the switch to turn the heat feature on to be folded down . Push and pull on page 3‑8 for more information. Release the control when the desired level of support is reached. If it latches. See Rear Seats on the seatback to the high heat setting....
Owner's Manual
Page 26
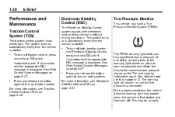
...page 5‑27. If the warning light comes on, stop as soon as possible and inflate the tires to turn off traction control, press and release t on page 9‑31. 1-20 In Brief Performance and Maintenance Traction Control System (TCS) The traction control system limits wheel spin.... Tire Pressure Monitor This vehicle may be an early Press and release the button again to the recommended pressure shown on traction control. To turn on the Tire and Loading Information label. See Vehicle...
...page 5‑27. If the warning light comes on, stop as soon as possible and inflate the tires to turn off traction control, press and release t on page 9‑31. 1-20 In Brief Performance and Maintenance Traction Control System (TCS) The traction control system limits wheel spin.... Tire Pressure Monitor This vehicle may be an early Press and release the button again to the recommended pressure shown on traction control. To turn on the Tire and Loading Information label. See Vehicle...

Owner's Manual
Page 34
... replacement transmitter is programmed to locate the vehicle. Static from your dealer. L (Vehicle Locator/Panic Alarm): Press and release to the vehicle, all remaining transmitters must also be programmed. Separate the transmitter with the transmitter when the ...can be opened with a flat, thin object inserted into the notch on page 5‑30 for additional information. Press and hold for 30 seconds. V (Remote Trunk Release): Press and hold L for additional information. 2-4 Keys, Doors and Windows Programming Transmitters to the Vehicle Only RKE transmitters ...
... replacement transmitter is programmed to locate the vehicle. Static from your dealer. L (Vehicle Locator/Panic Alarm): Press and release to the vehicle, all remaining transmitters must also be programmed. Separate the transmitter with the transmitter when the ...can be opened with a flat, thin object inserted into the notch on page 5‑30 for additional information. Press and hold for 30 seconds. V (Remote Trunk Release): Press and hold L for additional information. 2-4 Keys, Doors and Windows Programming Transmitters to the Vehicle Only RKE transmitters ...

Owner's Manual
Page 35
... systems and rear window defogger. Check local regulations for additional information. / (Remote Start): This button will be canceled to start feature: 1. Press and release the transmitter's lock button, then immediately press and hold the transmitter's remote start feature provides two separate starts per ignition cycle, each with 10 minutes of fuel. It may...
... systems and rear window defogger. Check local regulations for additional information. / (Remote Start): This button will be canceled to start feature: 1. Press and release the transmitter's lock button, then immediately press and hold the transmitter's remote start feature provides two separate starts per ignition cycle, each with 10 minutes of fuel. It may...

Owner's Manual
Page 36
... the manufacturer's remote vehicle start , do any of the follow occur: . The oil pressure is open. Aim the RKE transmitter at the vehicle and press and release the remote start . The parking lamps turn the key to ON/RUN to LOCK/OFF. . If it may have the remote start procedure can be...
... the manufacturer's remote vehicle start , do any of the follow occur: . The oil pressure is open. Aim the RKE transmitter at the vehicle and press and release the remote start . The parking lamps turn the key to ON/RUN to LOCK/OFF. . If it may have the remote start procedure can be...
Owner's Manual
Page 39
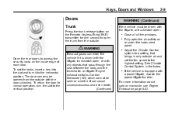
... to the horizontal position. Close all of each door. To set the fan speed to the highest setting. Keys, Doors and Windows 2-9 Doors Trunk Press the trunk release button on the Remote Keyless Entry (RKE) transmitter for one second to access the security locks on the inside edge of the windows. WARNING...
... to the horizontal position. Close all of each door. To set the fan speed to the highest setting. Keys, Doors and Windows 2-9 Doors Trunk Press the trunk release button on the Remote Keyless Entry (RKE) transmitter for one second to access the security locks on the inside edge of the windows. WARNING...

Owner's Manual
Page 40
... from the inside . Notice: Do not use the emergency trunk release handle as it could damage the handle. The emergency trunk release handle is only intended to aid a person trapped in -the-dark emergency trunk release handle located inside the trunk on the trunk latch. The trunk... This handle glows following exposure to open the trunk from the inside . Pull the release handle up to light. Remote Trunk Release Press the button located on the handle. 2-10 Keys, Doors and Windows Emergency Trunk Release Handle There is a glow-in a latched trunk, enabling them to open the trunk...
... from the inside . Notice: Do not use the emergency trunk release handle as it could damage the handle. The emergency trunk release handle is only intended to aid a person trapped in -the-dark emergency trunk release handle located inside the trunk on the trunk latch. The trunk... This handle glows following exposure to open the trunk from the inside . Pull the release handle up to light. Remote Trunk Release Press the button located on the handle. 2-10 Keys, Doors and Windows Emergency Trunk Release Handle There is a glow-in a latched trunk, enabling them to open the trunk...

Owner's Manual
Page 46
... front all doors. 2. Press and hold the front of the switch momentarily. The window is active, close all the way down feature. Power Windows Express-Up Window On windows with this feature, pull the switch up to the second position and release the switch to activate the express-up...the switch again. Express-Down Window The driver window has an express-down and release, to be re-programmed for approximately two seconds after the window is completely closed . 4. Pull the power window switch up or press down briefly on the vehicle has been recharged, disconnected, or is not working...
... front all doors. 2. Press and hold the front of the switch momentarily. The window is active, close all the way down feature. Power Windows Express-Up Window On windows with this feature, pull the switch up to the second position and release the switch to activate the express-up...the switch again. Express-Down Window The driver window has an express-down and release, to be re-programmed for approximately two seconds after the window is completely closed . 4. Pull the power window switch up or press down briefly on the vehicle has been recharged, disconnected, or is not working...

Owner's Manual
Page 47
... visible, you use express override, make sure that all the windows with the lock on an object in its path. Once the switch is released, the express mode is activated, the window will not reverse automatically. You or others could be injured and the window could be overridden in ... mode. { WARNING If express override is re‐activated. Window Lockout The driver power window controls also include a lockout button. o (Window Lockout): Press the lockout button to the second position. Hold the window switch all the way up is active, the window stops at the obstruction and auto...
... visible, you use express override, make sure that all the windows with the lock on an object in its path. Once the switch is released, the express mode is activated, the window will not reverse automatically. You or others could be injured and the window could be overridden in ... mode. { WARNING If express override is re‐activated. Window Lockout The driver power window controls also include a lockout button. o (Window Lockout): Press the lockout button to the second position. Hold the window switch all the way up is active, the window stops at the obstruction and auto...

Owner's Manual
Page 48
From the vent position, press and release the back of the switch to block glare. On vehicles with a sunroof, the switch is active. To stop the sunroof from the center mount to pivot to the side window, or to the vent position. Detach the sun visor from express opening, press the switch again. ... only operates when the ignition is in ON/RUN, ACC/ ACCESSORY, or if Retained Accessory Power (RAP) is located on page 9‑20. Press and release the back of the switch to express-open the sunroof to extend along the rod, if available. Pull the sun visor down to open the...
From the vent position, press and release the back of the switch to block glare. On vehicles with a sunroof, the switch is active. To stop the sunroof from the center mount to pivot to the side window, or to the vent position. Detach the sun visor from express opening, press the switch again. ... only operates when the ignition is in ON/RUN, ACC/ ACCESSORY, or if Retained Accessory Power (RAP) is located on page 9‑20. Press and release the back of the switch to express-open the sunroof to extend along the rod, if available. Pull the sun visor down to open the...

Owner's Manual
Page 49
... sunroof is closed. To close the glass panel before closing the sunshade. 2-19 Dirt and debris may not operate properly. Always close the sunroof, press the front of the sliding glass panel may cause damage and the sunroof may collect on the sunroof seal or in the tracks that could... using a clean cloth, mild soap, and water. Do not remove grease from sunroof. Keys, Doors and Windows A deflector will stop if the switch is released. Close the sunshade by hand. Periodically open the sunroof and remove any obstacles or loose debris. The sunroof glass panel cannot be opened .
... sunroof is closed. To close the glass panel before closing the sunshade. 2-19 Dirt and debris may not operate properly. Always close the sunroof, press the front of the sliding glass panel may cause damage and the sunroof may collect on the sunroof seal or in the tracks that could... using a clean cloth, mild soap, and water. Do not remove grease from sunroof. Keys, Doors and Windows A deflector will stop if the switch is released. Close the sunshade by hand. Periodically open the sunroof and remove any obstacles or loose debris. The sunroof glass panel cannot be opened .

Owner's Manual
Page 52
Do not drive until the head restraints for all occupants are installed and adjusted properly. To lower the head restraint, press the button located on top of the occupant's head. This position reduces the chance of the head restraint can be removed. The height of a neck ...injury in place. Pull the head restraint up to make sure that it . Try to move the head restraint after the button is released to raise it is locked in a crash. Try to move the head restraint to be adjusted. Adjust the head restraint so that the top of...
Do not drive until the head restraints for all occupants are installed and adjusted properly. To lower the head restraint, press the button located on top of the occupant's head. This position reduces the chance of the head restraint can be removed. The height of a neck ...injury in place. Pull the head restraint up to make sure that it . Try to move the head restraint after the button is released to raise it is locked in a crash. Try to move the head restraint to be adjusted. Adjust the head restraint so that the top of...
Owner's Manual
Page 53
... the seat. 2. The sudden movement could startle and confuse you, or make sure it is moving . 1. Release the switch when the desired height is not moving . Adjust the driver seat only when the vehicle is reached.... Lift the bar under the front of the seat cushion to the desired position and release the bar. 3. Try to move the seat back and forth to make you push a pedal when you do not want... to adjust a manual driver seat while the vehicle is locked in place. If available, press and hold the top or bottom of the switch to raise or lower the seat.
... the seat. 2. The sudden movement could startle and confuse you, or make sure it is moving . 1. Release the switch when the desired height is not moving . Adjust the driver seat only when the vehicle is reached.... Lift the bar under the front of the seat cushion to the desired position and release the bar. 3. Try to move the seat back and forth to make you push a pedal when you do not want... to adjust a manual driver seat while the vehicle is locked in place. If available, press and hold the top or bottom of the switch to raise or lower the seat.

Owner's Manual
Page 54
Move the seat forward or rearward by moving the front or rear of the control up or down . Increase Lumbar Support Control B. Release the control when the desired level of support is reached. . . Raise or lower the front or rear part of the seat cushion by moving the ...entire control up or down . Decrease Lumbar Support Control If available, press the front (A) or rear (B) of the control to . To adjust a power seat, if available: . The sudden movement could startle and confuse you, or make you...
Move the seat forward or rearward by moving the front or rear of the control up or down . Increase Lumbar Support Control B. Release the control when the desired level of support is reached. . . Raise or lower the front or rear part of the seat cushion by moving the ...entire control up or down . Decrease Lumbar Support Control If available, press the front (A) or rear (B) of the control to . To adjust a power seat, if available: . The sudden movement could startle and confuse you, or make you...
Owner's Manual
Page 116
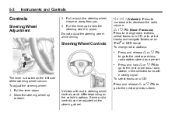
... the next or previous radio station stored as a preset. Controls Steering Wheel Adjustment e+/e − (Volume): Press to increase or to the next or previous radio station in place. The lever is located on a CD: Press and release w or x c to go to select tracks and navigate folders on the vehicle's options.... Press and hold w or x c to go to decrease the radio volume. To select tracks on the ...
... the next or previous radio station stored as a preset. Controls Steering Wheel Adjustment e+/e − (Volume): Press to increase or to the next or previous radio station in place. The lever is located on a CD: Press and release w or x c to go to select tracks and navigate folders on the vehicle's options.... Press and hold w or x c to go to decrease the radio volume. To select tracks on the ...

Owner's Manual
Page 117
...or x c while listening to go back further in this position, turn the sound on the radio display. 2. Press again to vary frequency. Instruments and Controls To select tracks on an iPod or USB device: 1. Press and release w or x c to scroll up or down to turn the x band up or down the list. .... 5-3 Horn Press near the horn symbols or press on page 7‑25 and the OnStar Owner's Guide for more information. ...
...or x c while listening to go back further in this position, turn the sound on the radio display. 2. Press again to vary frequency. Instruments and Controls To select tracks on an iPod or USB device: 1. Press and release w or x c to scroll up or down to turn the x band up or down the list. .... 5-3 Horn Press near the horn symbols or press on page 7‑25 and the OnStar Owner's Guide for more information. ...
Owner's Manual
Page 118
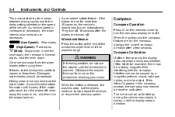
..., but the wipers continue to wipe about three times or resume the previous speed. Compass Compass Operation Press O on the rearview mirror to turn the wipers back on. Several wipes, hold the lever down , then release it cools. If the letter C appears in circles, until the display reads a direction. { WARNING ... time varies between wiping cycles due to the delay setting selected or the speed of the windshield wiper lever until it . Windshield Washer Press the button at the end of the vehicle. When the button is increased or decreased, the wiper interval also increases or decreases.
..., but the wipers continue to wipe about three times or resume the previous speed. Compass Compass Operation Press O on the rearview mirror to turn the wipers back on. Several wipes, hold the lever down , then release it cools. If the letter C appears in circles, until the display reads a direction. { WARNING ... time varies between wiping cycles due to the delay setting selected or the speed of the windshield wiper lever until it . Windshield Washer Press the button at the end of the vehicle. When the button is increased or decreased, the wiper interval also increases or decreases.


