Owner's Manual
Page 1
2010 Chevrolet Malibu Owner Manual In Brief ...1-1 Instrument Panel ...1-2 Initial Drive Information ...1-4 Vehicle Features ...1-16 Performance and Maintenance ...1-21 Seats and Restraint System ...2-1 Head Restraints ...2-2 Front Seats ...2-4 ... ...3-38 Storage Areas ...3-45 Sunroof ...3-47 Instrument Panel ...4-1 Instrument Panel Overview ...4-3 Climate Controls ...4-17 Warning Lights, Gages, and Indicators ...4-25 Driver Information Center (DIC) ...4-40 Audio System(s) ...4-52 Driving Your Vehicle ...5-1 Your Driving, the Road, and the Vehicle ...5-2 Towing ...5-26 Service and Appearance...
2010 Chevrolet Malibu Owner Manual In Brief ...1-1 Instrument Panel ...1-2 Initial Drive Information ...1-4 Vehicle Features ...1-16 Performance and Maintenance ...1-21 Seats and Restraint System ...2-1 Head Restraints ...2-2 Front Seats ...2-4 ... ...3-38 Storage Areas ...3-45 Sunroof ...3-47 Instrument Panel ...4-1 Instrument Panel Overview ...4-3 Climate Controls ...4-17 Warning Lights, Gages, and Indicators ...4-25 Driver Information Center (DIC) ...4-40 Audio System(s) ...4-52 Driving Your Vehicle ...5-1 Your Driving, the Road, and the Vehicle ...5-2 Towing ...5-26 Service and Appearance...

Owner's Manual
Page 2
Tires ...6-48 Appearance Care ...6-94 Vehicle Identification ...6-102 Electrical System ...6-103 Capacities and Specifications ...6-114 Maintenance Schedule ...7-1 Maintenance Schedule ...7-2 Customer Assistance Information ...8-1 Customer Assistance and Information ...8-2 Reporting Safety Defects ...8-16 Vehicle Data Recording and Privacy ...8-18 Index ...1
Tires ...6-48 Appearance Care ...6-94 Vehicle Identification ...6-102 Electrical System ...6-103 Capacities and Specifications ...6-114 Maintenance Schedule ...7-1 Maintenance Schedule ...7-2 Customer Assistance Information ...8-1 Customer Assistance and Information ...8-2 Reporting Safety Defects ...8-16 Vehicle Data Recording and Privacy ...8-18 Index ...1

Owner's Manual
Page 3
... de ce guide en français auprès du concessionnaire ou à l'adresse suivante: GENERAL MOTORS, GM, the GM Emblem, CHEVROLET, the CHEVROLET Emblem, the MALIBU Emblem, and the name MALIBU are options that may or may not be found. Part No. 25852253 A First Printing © 2009 General Motors Corporation. It is an... 07130 Detroit, MI 48207 1-800-551-4123 Numéro de poste 6438 de langue française www.helminc.com Index To quickly locate information about the vehicle, use the index in Canada, substitute the name "General Motors of Canada Limited" for quick reference.
... de ce guide en français auprès du concessionnaire ou à l'adresse suivante: GENERAL MOTORS, GM, the GM Emblem, CHEVROLET, the CHEVROLET Emblem, the MALIBU Emblem, and the name MALIBU are options that may or may not be found. Part No. 25852253 A First Printing © 2009 General Motors Corporation. It is an... 07130 Detroit, MI 48207 1-800-551-4123 Numéro de poste 6438 de langue française www.helminc.com Index To quickly locate information about the vehicle, use the index in Canada, substitute the name "General Motors of Canada Limited" for quick reference.

Owner's Manual
Page 4
...avoid or reduce them. Notice: This means there is something that could hurt you need to see a service manual for additional instructions or information. Danger indicates a hazard with a slash through it is a safety symbol which will result in serious injury or death. iv Safety Warnings ... would not be covered by the vehicle's warranty M : This symbol is shown when you need to see your owner manual for additional instructions or information. * : This symbol is shown when you or other people. A circle with a high level of text. Warning or Caution indicates a hazard that...
...avoid or reduce them. Notice: This means there is something that could hurt you need to see a service manual for additional instructions or information. Danger indicates a hazard with a slash through it is a safety symbol which will result in serious injury or death. iv Safety Warnings ... would not be covered by the vehicle's warranty M : This symbol is shown when you need to see your owner manual for additional instructions or information. * : This symbol is shown when you or other people. A circle with a high level of text. Warning or Caution indicates a hazard that...
Owner's Manual
Page 5
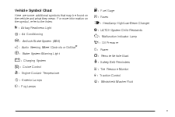
For more information on the vehicle and what they mean. Vehicle Symbol Chart Here are some additional symbols that may be found on the symbol, refer to the ...
For more information on the vehicle and what they mean. Vehicle Symbol Chart Here are some additional symbols that may be found on the symbol, refer to the ...

Owner's Manual
Page 7
Section 1 Instrument Panel ...1-2 Initial Drive Information ...1-4 Remote Keyless Entry (RKE) System ...1-4 Remote Vehicle Start ...1-4 Door Locks ...1-5 Trunk Release ...1-5 Windows ...1-6 Seat Adjustment ...1-6 Second Row Seats ...1-8 Heated Seats ... Radio(s) ...1-16 Satellite Radio ...1-17 Portable Audio Devices (Auxiliary Input or USB Port) ...1-18 Steering Wheel Controls ...1-18 Bluetooth® ...1-19 Driver Information Center (DIC) ...1-19 Cruise Control ...1-20 Power Outlets ...1-21 Universal Remote System ...1-21 Performance and Maintenance ...1-21 Traction Control System (TCS) ...1-21...
Section 1 Instrument Panel ...1-2 Initial Drive Information ...1-4 Remote Keyless Entry (RKE) System ...1-4 Remote Vehicle Start ...1-4 Door Locks ...1-5 Trunk Release ...1-5 Windows ...1-6 Seat Adjustment ...1-6 Second Row Seats ...1-8 Heated Seats ... Radio(s) ...1-16 Satellite Radio ...1-17 Portable Audio Devices (Auxiliary Input or USB Port) ...1-18 Steering Wheel Controls ...1-18 Bluetooth® ...1-19 Driver Information Center (DIC) ...1-19 Cruise Control ...1-20 Power Outlets ...1-21 Universal Remote System ...1-21 Performance and Maintenance ...1-21 Traction Control System (TCS) ...1-21...

Owner's Manual
Page 9
...Transmission) on page 4-20. E. H. J. M. S. Turn Signal/Multifunction Lever on page 4-26. Instrument Panel Cluster on page 4-4. I. Driver Information Center (DIC) Buttons. Q. V. Audio Steering Wheel Controls on page 4-29. Passenger Airbag Status Indicator on page 4-84 (If Equipped). Instrument ...Panel Storage on page 6-13. Hood Release on page 3-46. See Driver Information Center (DIC) on page 3-22. Ignition Positions on page 4-40. Hazard Warning Flashers on page 5-7. Traction Control System (...
...Transmission) on page 4-20. E. H. J. M. S. Turn Signal/Multifunction Lever on page 4-26. Instrument Panel Cluster on page 4-4. I. Driver Information Center (DIC) Buttons. Q. V. Audio Steering Wheel Controls on page 4-29. Passenger Airbag Status Indicator on page 4-84 (If Equipped). Instrument ...Panel Storage on page 6-13. Hood Release on page 3-46. See Driver Information Center (DIC) on page 3-22. Ignition Positions on page 4-40. Hazard Warning Flashers on page 5-7. Traction Control System (...

Owner's Manual
Page 10
... each of the important features that may or may come on your specific vehicle. Aim the RKE transmitter at the vehicle. 2. For more detailed information, refer to locate the vehicle. Press K to cancel the panic alarm. L again to unlock the driver door. See Keys on page 3-3 and Remote Keyless Entry... and hold open the trunk. Press again within five seconds to sound the panic alarm. Press Q. 3. Press Q to lock all remaining doors. Initial Drive Information This section provides a brief overview about some of the features which can be on . 1-4
... each of the important features that may or may come on your specific vehicle. Aim the RKE transmitter at the vehicle. 2. For more detailed information, refer to locate the vehicle. Press K to cancel the panic alarm. L again to unlock the driver door. See Keys on page 3-3 and Remote Keyless Entry... and hold open the trunk. Press again within five seconds to sound the panic alarm. Press Q. 3. Press Q to lock all remaining doors. Initial Drive Information This section provides a brief overview about some of the features which can be on . 1-4

Owner's Manual
Page 11
... : ": Q: Press to lock the doors. • Aim the RKE transmitter at the vehicle and press and hold / until the parking lamps turn off . For more information, see: • Turn on the hazard warning flashers. • Turn the ignition switch out of LOCK/OFF position and then back to the trunk...
... : ": Q: Press to lock the doors. • Aim the RKE transmitter at the vehicle and press and hold / until the parking lamps turn off . For more information, see: • Turn on the hazard warning flashers. • Turn the ignition switch out of LOCK/OFF position and then back to the trunk...

Owner's Manual
Page 12
Lift the bar under the seat to open the window. See Manual Seats on page 3-15. 1. Try to move the seat to be sure it . For more information, see Power Windows on page 2-4. 1-6 Each passenger door has a switch that controls only that window. Windows Seat Adjustment Manual Seat On vehicles with power windows, the switches are on the driver door armrest. Pull the switch up to the desired position and release the bar. Press the front of the switch to unlock the seat. 2. Slide the seat to close it is locked in place.
Lift the bar under the seat to open the window. See Manual Seats on page 3-15. 1. Try to move the seat to be sure it . For more information, see Power Windows on page 2-4. 1-6 Each passenger door has a switch that controls only that window. Windows Seat Adjustment Manual Seat On vehicles with power windows, the switches are on the driver door armrest. Pull the switch up to the desired position and release the bar. Press the front of the switch to unlock the seat. 2. Slide the seat to close it is locked in place.

Owner's Manual
Page 14
Press the front (A) or rear (B) of the rear seatback can be folded down . This allows access to increase or decrease lumbar support. For more cargo space. With the front seatbacks in the fully upright position, lower the rear seatback by pulling up on the seatback strap while folding the seatback down for more information see Split Folding Rear Seat on page 2-5. See Power Lumbar on page 2-10. 1-8 Power Lumbar Adjustment Second Row Seats Either side of the control to the trunk.
Press the front (A) or rear (B) of the rear seatback can be folded down . This allows access to increase or decrease lumbar support. For more cargo space. With the front seatbacks in the fully upright position, lower the rear seatback by pulling up on the seatback strap while folding the seatback down for more information see Split Folding Rear Seat on page 2-5. See Power Lumbar on page 2-10. 1-8 Power Lumbar Adjustment Second Row Seats Either side of the control to the trunk.

Owner's Manual
Page 15
... (1) will be lit. Press the bottom of the switch to use safety belts properly. For more information see: Heated Seats on page 2-26. Lap-Shoulder Belt on page 2-6. Refer to the following sections for important information on how to turn the feature off . The heated seat feature will be lit. The indicator...
... (1) will be lit. Press the bottom of the switch to use safety belts properly. For more information see: Heated Seats on page 2-26. Lap-Shoulder Belt on page 2-6. Refer to the following sections for important information on how to turn the feature off . The heated seat feature will be lit. The indicator...

Owner's Manual
Page 16
The driver airbags are located on the instrument panel when the vehicle is started. Mirror Adjustment Exterior Mirrors Controls for important information. 1-10 The passenger airbag status indicator will turn off the right front passenger frontal airbag under certain conditions. United States Canada To adjust the mirrors: 1. ...
The driver airbags are located on the instrument panel when the vehicle is started. Mirror Adjustment Exterior Mirrors Controls for important information. 1-10 The passenger airbag status indicator will turn off the right front passenger frontal airbag under certain conditions. United States Canada To adjust the mirrors: 1. ...

Owner's Manual
Page 18
.... The rear reading lamps are located in the front overhead console. The dome lamps will remain on whether a door is opened or closed . For more information on interior lighting, see: • Instrument Panel Brightness on page 4-13. • Entry/Exit Lighting on page 4-13. • Parade Dimming on page 4-13. 1-12...
.... The rear reading lamps are located in the front overhead console. The dome lamps will remain on whether a door is opened or closed . For more information on interior lighting, see: • Instrument Panel Brightness on page 4-13. • Entry/Exit Lighting on page 4-13. • Parade Dimming on page 4-13. 1-12...

Owner's Manual
Page 19
... when a vehicle is put into D (Drive) the lights come on . Delayed Headlamps on page 4-10. When the vehicle is in the P (Park) position. For more information, see: Headlamps on page 4-11.
... when a vehicle is put into D (Drive) the lights come on . Delayed Headlamps on page 4-10. When the vehicle is in the P (Park) position. For more information, see: Headlamps on page 4-11.

Owner's Manual
Page 22
.... Seek or scan stations. © ¨: 4 : For vehicles with a FAV button, a maximum of 36 stations can contain any combination of the display while the artist information will be stored as either favorites or presets. or CD, MP3, WMA song. For radios with XM, MP3, WMA, or RDS features, press to display... to turn the system on page 4-55. Each page of favorites, each having six favorite stations available per page. When information is available during XM, CD, MP3, or WMA playback. Press FAV to go through up to six pages of favorites can be displayed on which ...
.... Seek or scan stations. © ¨: 4 : For vehicles with a FAV button, a maximum of 36 stations can contain any combination of the display while the artist information will be stored as either favorites or presets. or CD, MP3, WMA song. For radios with XM, MP3, WMA, or RDS features, press to display... to turn the system on page 4-55. Each page of favorites, each having six favorite stations available per page. When information is available during XM, CD, MP3, or WMA playback. Press FAV to go through up to six pages of favorites can be displayed on which ...

Owner's Manual
Page 23
For more information, refer to: Setting the Clock To set the time and date for your specific audio system, see Setting the Clock on setting the clock ...
For more information, refer to: Setting the Clock To set the time and date for your specific audio system, see Setting the Clock on setting the clock ...

Owner's Manual
Page 24
... port using a 3.5 mm (1/8 in) input jack or the USB port depending on . can be connected to turn the sound on the audio system. For more information, see Audio Steering Wheel Controls on the steering wheel. External devices such as iPods®, laptop computers, MP3 players, CD changers, USB storage devices, etc...
... port using a 3.5 mm (1/8 in) input jack or the USB port depending on . can be connected to turn the sound on the audio system. For more information, see Audio Steering Wheel Controls on the steering wheel. External devices such as iPods®, laptop computers, MP3 players, CD changers, USB storage devices, etc...

Owner's Manual
Page 25
.... Not all phones will support all functions. It shows the status of many vehicle systems and enables access to scroll through the vehicle information displays. For more information visit www.gm.com/bluetooth. The DIC buttons are located on page 4-40. 1-19 r : Press to reset some vehicle... information displays, select a personalization setting, or acknowledge a warning message. The Bluetooth enabled cell phone must be used in -vehicle Bluetooth system before it allows...
.... Not all phones will support all functions. It shows the status of many vehicle systems and enables access to scroll through the vehicle information displays. For more information visit www.gm.com/bluetooth. The DIC buttons are located on page 4-40. 1-19 r : Press to reset some vehicle... information displays, select a personalization setting, or acknowledge a warning message. The Bluetooth enabled cell phone must be used in -vehicle Bluetooth system before it allows...

Owner's Manual
Page 26
Vehicle Personalization Some vehicle features can be programmed by using the DIC buttons on the left side of the steering wheel. For more information, see Cruise Control on page 4-47. SET−: Press to resume or accelerate speed. RES+: Press to set or decrease speed. These features include: Cruise Control The cruise control buttons are located on the left side of the steering wheel. J: On/Off. Oil Life Reset Units RKE Lock and Unlock Feedback Door Lock and Unlock Settings Language See DIC Vehicle Personalization on page 4-7. 1-20
Vehicle Personalization Some vehicle features can be programmed by using the DIC buttons on the left side of the steering wheel. For more information, see Cruise Control on page 4-47. SET−: Press to resume or accelerate speed. RES+: Press to set or decrease speed. These features include: Cruise Control The cruise control buttons are located on the left side of the steering wheel. J: On/Off. Oil Life Reset Units RKE Lock and Unlock Feedback Door Lock and Unlock Settings Language See DIC Vehicle Personalization on page 4-7. 1-20


