Owner's Manual
Page 3
... because they are options that you did not purchase or due to changes subsequent to confirm each of the features found on your vehicle. Manufactured under license under U.S. and worldwide patents issued & pending. Litho in this manual. Introduction Please refer to the purchase documentation relating to your... Inc. © 1996-2007 DTS, Inc. Part No. 25798562 B Second Printing © 2009 General Motors. iii GENERAL MOTORS, GM, the GM Emblem, CHEVROLET, the CHEVROLET Emblem, the name Equinox and the Equinox Emblem are trademarks of Canada Limited" for quick reference.
... because they are options that you did not purchase or due to changes subsequent to confirm each of the features found on your vehicle. Manufactured under license under U.S. and worldwide patents issued & pending. Litho in this manual. Introduction Please refer to the purchase documentation relating to your... Inc. © 1996-2007 DTS, Inc. Part No. 25798562 B Second Printing © 2009 General Motors. iii GENERAL MOTORS, GM, the GM Emblem, CHEVROLET, the CHEVROLET Emblem, the name Equinox and the Equinox Emblem are trademarks of Canada Limited" for quick reference.

Owner's Manual
Page 4
... your dealer/retailer or from: On peut obtenir un exemplaire de ce guide en français auprès du concessionnaire ou à l'adresse suivante: Manufactured under license from Dolby Laboratories. All rights reserved. Use of Apple Computer, Inc., registered in the U.S. Copyright 1992-1997 Dolby Laboratories. Box 07130 Detroit, MI...
... your dealer/retailer or from: On peut obtenir un exemplaire de ce guide en français auprès du concessionnaire ou à l'adresse suivante: Manufactured under license from Dolby Laboratories. All rights reserved. Use of Apple Computer, Inc., registered in the U.S. Copyright 1992-1997 Dolby Laboratories. Box 07130 Detroit, MI...
Owner's Manual
Page 62
... front passenger seat, but the off . Remove any additional items from the vehicle. 3. Reinstall the child restraint following the directions provided by the child restraint manufacturer and refer to Securing Child Restraints (Rear Seat ) on page 2‑56 or Securing Child Restraints (Front Passenger Seat) on page 2‑2. 6. If this happens...
... front passenger seat, but the off . Remove any additional items from the vehicle. 3. Reinstall the child restraint following the directions provided by the child restraint manufacturer and refer to Securing Child Restraints (Rear Seat ) on page 2‑56 or Securing Child Restraints (Front Passenger Seat) on page 2‑2. 6. If this happens...
Owner's Manual
Page 67
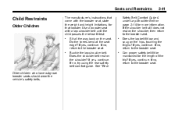
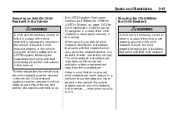
... belt fit low and snug on the hips, touching the thighs? Buckle the lap-shoulder belt. Seats and Restraints 2-41 Child Restraints Older Children The manufacturer's instructions that booster. Can proper safety belt fit be maintained for that come with a lap-shoulder belt until the child passes the below fit test...
... belt fit low and snug on the hips, touching the thighs? Buckle the lap-shoulder belt. Seats and Restraints 2-41 Child Restraints Older Children The manufacturer's instructions that booster. Can proper safety belt fit be maintained for that come with a lap-shoulder belt until the child passes the below fit test...

Owner's Manual
Page 71
... should always be secured in which are still so small that the vehicle's regular safety belt may settle up around the child's abdomen. The restraint manufacturer's instructions that it should always be secured in four basic types. Instead, it may not remain low on the hip bones, as it meets federal...
... should always be secured in which are still so small that the vehicle's regular safety belt may settle up around the child's abdomen. The restraint manufacturer's instructions that it should always be secured in four basic types. Instead, it may not remain low on the hip bones, as it meets federal...
Owner's Manual
Page 73
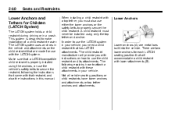
The child restraint instructions are important, so if they are not available, obtain a replacement copy from the manufacturer. See Lower Anchors and Tethers for Children (LATCH System) on the restraint itself or in the vehicle. Be sure to properly secure any child restraint ...
The child restraint instructions are important, so if they are not available, obtain a replacement copy from the manufacturer. See Lower Anchors and Tethers for Children (LATCH System) on the restraint itself or in the vehicle. Be sure to properly secure any child restraint ...
Owner's Manual
Page 76
The child restraint manufacturer will accommodate a child restraint with a top tether, you need a child restraint that are made for use the LATCH system in the vehicle and attachments on ...
The child restraint manufacturer will accommodate a child restraint with a top tether, you need a child restraint that are made for use the LATCH system in the vehicle and attachments on ...

Owner's Manual
Page 79
... could be seriously injured or strangled if a shoulder belt is designed to make installation of the retractor to set the lock, if your child restraint manufacturer instructions and the instructions in this manual. 1.1. If necessary, move buckled safety belts to its stowed position, before folding the seat. Buckle any unused safety...
... could be seriously injured or strangled if a shoulder belt is designed to make installation of the retractor to set the lock, if your child restraint manufacturer instructions and the instructions in this manual. 1.1. If necessary, move buckled safety belts to its stowed position, before folding the seat. Buckle any unused safety...
Owner's Manual
Page 80
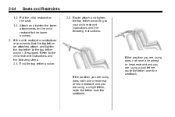
... a single tether, route the tether over the seatback. Attach and tighten the lower attachments on the seat. 1.3. 2-54 Seats and Restraints 2.2. If the child restraint manufacturer recommends that the top tether be attached, attach and tighten the top tether to the child restraint instructions and the following instructions: 1.2. Route, attach and...
... a single tether, route the tether over the seatback. Attach and tighten the lower attachments on the seat. 1.3. 2-54 Seats and Restraints 2.2. If the child restraint manufacturer recommends that the top tether be attached, attach and tighten the top tether to the child restraint instructions and the following instructions: 1.2. Route, attach and...

Owner's Manual
Page 83
... pull the child restraint in different directions to be helpful to set the lock. 5. If the child restraint has a top tether, follow the child restraint manufacturer's instructions regarding the use your knee to the stowed position. When installing a forward-facing child restraint, it return to push down on page 2‑50...
... pull the child restraint in different directions to be helpful to set the lock. 5. If the child restraint has a top tether, follow the child restraint manufacturer's instructions regarding the use your knee to the stowed position. When installing a forward-facing child restraint, it return to push down on page 2‑50...

Owner's Manual
Page 84
... restraint in the rear center seat position. A rear seat is a safer place to secure the Install the rear-facing child restraint using the child restraint manufacturer's instructions and the instructions described previously. When new, the vehicle's glove box materials included an armrest retaining strap. Use it may interfere with the attachment...
... restraint in the rear center seat position. A rear seat is a safer place to secure the Install the rear-facing child restraint using the child restraint manufacturer's instructions and the instructions described previously. When new, the vehicle's glove box materials included an armrest retaining strap. Use it may interfere with the attachment...

Owner's Manual
Page 87
Seats and Restraints If the vehicle does not have a rear seat and the child restraint has a top tether, follow the child restraint manufacturer's instructions regrading the use your knee to push down on indicator is lit, see "If the On Indicator is secure. To remove the child restraint, ...
Seats and Restraints If the vehicle does not have a rear seat and the child restraint has a top tether, follow the child restraint manufacturer's instructions regrading the use your knee to push down on indicator is lit, see "If the On Indicator is secure. To remove the child restraint, ...
Owner's Manual
Page 185
... voice recognition system or the controls on page 12‑16 for a voice command. Pairing should only need to be used. See the cell phone manufacturer user guide for later calls. To link to a different paired phone, see Operation on page 6‑7. The system maintains a minimum volume level. Other trademarks and...
... voice recognition system or the controls on page 12‑16 for a voice command. Pairing should only need to be used. See the cell phone manufacturer user guide for later calls. To link to a different paired phone, see Operation on page 6‑7. The system maintains a minimum volume level. Other trademarks and...
Owner's Manual
Page 186
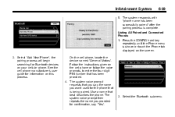
... the four digit PIN number provided by the system. 6. Press the CONFIG button. 2. A four digit PIN number appears on screen prompts. Reference the cell phone manufacturers user guide for the phone and confirms the name provided. Select Phone Settings. 3. Select Device List. 5. Locate the device named "General Motors" in the vehicle...
... the four digit PIN number provided by the system. 6. Press the CONFIG button. 2. A four digit PIN number appears on screen prompts. Reference the cell phone manufacturers user guide for the phone and confirms the name provided. Select Phone Settings. 3. Select Device List. 5. Locate the device named "General Motors" in the vehicle...
Owner's Manual
Page 188
... infotainment system. To add more information. Press the MENU/SEL knob and select Enter Number. 2. After the call , repeat Steps 1 through 4. See the cell phone manufacturers user guide for more callers to the OnStar owner's guide for Bluetooth functions before it can be paired to the Bluetooth system and then connected...
... infotainment system. To add more information. Press the MENU/SEL knob and select Enter Number. 2. After the call , repeat Steps 1 through 4. See the cell phone manufacturers user guide for more callers to the OnStar owner's guide for Bluetooth functions before it can be paired to the Bluetooth system and then connected...
Owner's Manual
Page 189
... five cell phones can be paired to the Bluetooth system at a time. b / g. . . The PIN number will be connected to the vehicle. Reference the cell phone manufacturers user guide for information on the cell phone that was paired.
... five cell phones can be paired to the Bluetooth system at a time. b / g. . . The PIN number will be connected to the vehicle. Reference the cell phone manufacturers user guide for information on the cell phone that was paired.

Owner's Manual
Page 198
... cell phone. To access contacts stored in ‐vehicle Bluetooth system and the cell phone. Transferring a Call Audio can be transferred. See the cell phone manufacturers user guide to the phone's operating instructions. Press . b / g. The system responds "Ready", followed by a tone. 2. Say "Bluetooth". Say "Voice". The system ...a tone. Say "Transfer Call." The system responds "Transferring call with the audio in the vehicle: 1. See the cell phone manufacturers user guide for more information. To Transfer Audio to the cell phone. After the tone say "Hands Free".
... cell phone. To access contacts stored in ‐vehicle Bluetooth system and the cell phone. Transferring a Call Audio can be transferred. See the cell phone manufacturers user guide to the phone's operating instructions. Press . b / g. The system responds "Ready", followed by a tone. 2. Say "Bluetooth". Say "Voice". The system ...a tone. Say "Transfer Call." The system responds "Transferring call with the audio in the vehicle: 1. See the cell phone manufacturers user guide for more information. To Transfer Audio to the cell phone. After the tone say "Hands Free".
Owner's Manual
Page 200
... The pairing process can be started by using the voice recognition system or the controls on the screen. Pairing Information: . Refer to the cell phone manufacturer's user guide for more information about how to navigate the menu system using the infotainment controls, see "Overview" under Introduction, in the device list. The...
... The pairing process can be started by using the voice recognition system or the controls on the screen. Pairing Information: . Refer to the cell phone manufacturer's user guide for more information about how to navigate the menu system using the infotainment controls, see "Overview" under Introduction, in the device list. The...
Owner's Manual
Page 201
... the Phone tab displayed on this process. Use a name that you want used for confirmation, say the name you say "Yes". 2. See the cell phone manufacturer's user guide for Bluetooth devices on the cell phone or follow the voice prompts, to enter the four digit PIN number that is complete. Select...
... the Phone tab displayed on this process. Use a name that you want used for confirmation, say the name you say "Yes". 2. See the cell phone manufacturer's user guide for Bluetooth devices on the cell phone or follow the voice prompts, to enter the four digit PIN number that is complete. Select...

Owner's Manual
Page 291
... sewers, or into streams or bodies of clothing or rags. Vehicle Care What to drain all the oil from the filter before disposal. See the manufacturer's warnings about the use the fluid listed in the trash, pouring it at the first oil change after each engine oil change your own oil...
... sewers, or into streams or bodies of clothing or rags. Vehicle Care What to drain all the oil from the filter before disposal. See the manufacturer's warnings about the use the fluid listed in the trash, pouring it at the first oil change after each engine oil change your own oil...