
Owner's Manual
Page 1
2009 Chevrolet Malibu Owner Manual Seats and Restraint System ...1-1 Head Restraints ...1-2 Front Seats ...1-3 Rear Seats ...1-10 Safety Belts ...1-12 Child Restraints ...1-32 Airbag System ...1-58 Restraint ...Vehicle ...2-21 Mirrors ...2-37 OnStar® System ...2-40 Universal Home Remote System ...2-43 Storage Areas ...2-50 Sunroof ...2-51 Instrument Panel ...3-1 Instrument Panel Overview ...3-4 Climate Controls ...3-20 Warning Lights, Gages, and Indicators ...3-28 Driver Information Center (DIC) ...3-43 Audio System(s) ...3-56 M Driving Your Vehicle ...4-1 Your Driving, the Road, and the ...
2009 Chevrolet Malibu Owner Manual Seats and Restraint System ...1-1 Head Restraints ...1-2 Front Seats ...1-3 Rear Seats ...1-10 Safety Belts ...1-12 Child Restraints ...1-32 Airbag System ...1-58 Restraint ...Vehicle ...2-21 Mirrors ...2-37 OnStar® System ...2-40 Universal Home Remote System ...2-43 Storage Areas ...2-50 Sunroof ...2-51 Instrument Panel ...3-1 Instrument Panel Overview ...3-4 Climate Controls ...3-20 Warning Lights, Gages, and Indicators ...3-28 Driver Information Center (DIC) ...3-43 Audio System(s) ...3-56 M Driving Your Vehicle ...4-1 Your Driving, the Road, and the ...

Owner's Manual
Page 24
In a crash, you could cause serious or even fatal injuries. A: The lap belt is too loose. It will not give nearly as much protection this ? { CAUTION: You can be worn low and snug on your lap belt is too loose. The lap belt should be seriously hurt if your abdomen. This could slide under the lap belt and apply force on the hips, just touching the thighs. Q: What is wrong with this way. 1-20
In a crash, you could cause serious or even fatal injuries. A: The lap belt is too loose. It will not give nearly as much protection this ? { CAUTION: You can be worn low and snug on your lap belt is too loose. The lap belt should be seriously hurt if your abdomen. This could slide under the lap belt and apply force on the hips, just touching the thighs. Q: What is wrong with this way. 1-20

Owner's Manual
Page 79
... Sun Visors ...2-17 Theft-Deterrent Systems ...2-18 Content Theft-Deterrent ...2-18 PASS-Key® III+ Electronic Immobilizer ...2-19 PASS-Key® III+ Electronic Immobilizer Operation ...2-20 2-1
... Sun Visors ...2-17 Theft-Deterrent Systems ...2-18 Content Theft-Deterrent ...2-18 PASS-Key® III+ Electronic Immobilizer ...2-19 PASS-Key® III+ Electronic Immobilizer Operation ...2-20 2-1

Owner's Manual
Page 83
... turn on and stay on for more information. Pressing Q may also arm the content theft-deterrent system. See Content Theft-Deterrent on page 3-50 for 20 seconds or until the ignition is turned on page 2-4. / (Remote Vehicle Start): For vehicles with this feature, press to operate the remote start feature. If...
... turn on and stay on for more information. Pressing Q may also arm the content theft-deterrent system. See Content Theft-Deterrent on page 3-50 for 20 seconds or until the ignition is turned on page 2-4. / (Remote Vehicle Start): For vehicles with this feature, press to operate the remote start feature. If...

Owner's Manual
Page 98
... light on the instrument panel cluster comes on if there is using a trial-and-error method to get a new key blank that operates the system. 2-20 See Roadside Assistance Program on page 5-99. If all the currently programmed keys are lost or do not have to the system. The security light...
... light on the instrument panel cluster comes on if there is using a trial-and-error method to get a new key blank that operates the system. 2-20 See Roadside Assistance Program on page 5-99. If all the currently programmed keys are lost or do not have to the system. The security light...
Owner's Manual
Page 123
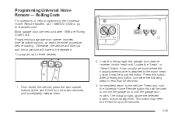
To program up to the motor-head unit and may need to be found where the hanging antenna wire is attached to 20 seconds. 2-45 Locate the "Learn" or "Smart" button. From inside the vehicle, press the two outside buttons at the same time for up to two ...
To program up to the motor-head unit and may need to be found where the hanging antenna wire is attached to 20 seconds. 2-45 Locate the "Learn" or "Smart" button. From inside the vehicle, press the two outside buttons at the same time for up to two ...
Owner's Manual
Page 127
... will blink rapidly until programming is successful and complete. Reprogramming Universal Home Remote Buttons Any of a second. The indicator light will be used for approximately 20 seconds, until the garage door moves. The indicator light above the buttons, begin to control the garage door until the indicator lights, located directly above...
... will blink rapidly until programming is successful and complete. Reprogramming Universal Home Remote Buttons Any of a second. The indicator light will be used for approximately 20 seconds, until the garage door moves. The indicator light above the buttons, begin to control the garage door until the indicator lights, located directly above...
Owner's Manual
Page 131
... Panel Electric Power Management ...3-17 Battery Run-Down Protection ...3-18 Accessory Power Outlet(s) ...3-18 Power Outlet 115 Volt Alternating Current ...3-19 Climate Controls ...3-20 Climate Control System ...3-20 Automatic Climate Control System ...3-24 Outlet Adjustment ...3-27 Warning Lights, Gages, and Indicators ...3-28 Instrument Panel Cluster ...3-29 Speedometer and Odometer ...3-30 Trip Odometer...
... Panel Electric Power Management ...3-17 Battery Run-Down Protection ...3-18 Accessory Power Outlet(s) ...3-18 Power Outlet 115 Volt Alternating Current ...3-19 Climate Controls ...3-20 Climate Control System ...3-20 Automatic Climate Control System ...3-24 Outlet Adjustment ...3-27 Warning Lights, Gages, and Indicators ...3-28 Instrument Panel Cluster ...3-29 Speedometer and Odometer ...3-30 Trip Odometer...

Owner's Manual
Page 135
... (TCS) on page 2-28. Glove Box on page 3-7. Turn Signal/Multifunction Lever on page 2-50. 3-5 C. D. Hood Release on page 3-24. Climate Control System on page 3-20 or Automatic Climate Control System on page 5-14. V. J. Tilt and Telescopic Steering Wheel on page 3-18. Q. R. Accessory Power Outlet(s) on page 3-6. Passenger Airbag Status Indicator...
... (TCS) on page 2-28. Glove Box on page 3-7. Turn Signal/Multifunction Lever on page 2-50. 3-5 C. D. Hood Release on page 3-24. Climate Control System on page 3-20 or Automatic Climate Control System on page 5-14. V. J. Tilt and Telescopic Steering Wheel on page 3-18. Q. R. Accessory Power Outlet(s) on page 3-6. Passenger Airbag Status Indicator...

Owner's Manual
Page 144
When the DRL system is not in P (Park). Do not cover this sensor or the head lamps will sound. To override the 20 second delayed headlamp feature while it is active turn the turn signal/multifunction lever up one position and then back to AUTO. • The light ... not on unless you turn the exterior lamps control to the parking lamp position. Delayed Headlamps The delayed headlamps feature keeps the headlamps on for 20 seconds after the key is dark outside. The DRL system makes the low-beam headlamps come on at a reduced brightness when the following conditions are...
When the DRL system is not in P (Park). Do not cover this sensor or the head lamps will sound. To override the 20 second delayed headlamp feature while it is active turn the turn signal/multifunction lever up one position and then back to AUTO. • The light ... not on unless you turn the exterior lamps control to the parking lamp position. Delayed Headlamps The delayed headlamps feature keeps the headlamps on for 20 seconds after the key is dark outside. The DRL system makes the low-beam headlamps come on at a reduced brightness when the following conditions are...

Owner's Manual
Page 146
These lamps fade out about 20 seconds after the key is located on during the day. It prevents the display lights and indicator lights from the ignition to provide light as ... used during the day. Dome Lamps The dome lamps come on when any door is opened . The lamps inside the vehicle come on for about 20 seconds after all of the steering column. Entry/Exit Lighting The lamps inside the vehicle stay on when any door is opened .
These lamps fade out about 20 seconds after the key is located on during the day. It prevents the display lights and indicator lights from the ignition to provide light as ... used during the day. Dome Lamps The dome lamps come on when any door is opened . The lamps inside the vehicle come on for about 20 seconds after all of the steering column. Entry/Exit Lighting The lamps inside the vehicle stay on when any door is opened .
Owner's Manual
Page 148
...located inside the storage bin below the climate controls and the other outlet is on the ignition. The accessory power outlet is turned off after 20 minutes. Turn on the rear of the center storage console. Open a door. Battery Run-Down Protection The vehicle has a battery run -...be activated when any door on the accessory power outlet. To reactivate the interior lamps, do not plug in equipment that exceeds the maximum 20 ampere rating. Notice: Leaving electrical equipment plugged in for additional information on the vehicle is in blown vehicle or adapter fuses. If you ...
...located inside the storage bin below the climate controls and the other outlet is on the ignition. The accessory power outlet is turned off after 20 minutes. Turn on the rear of the center storage console. Open a door. Battery Run-Down Protection The vehicle has a battery run -...be activated when any door on the accessory power outlet. To reactivate the interior lamps, do not plug in equipment that exceeds the maximum 20 ampere rating. Notice: Leaving electrical equipment plugged in for additional information on the vehicle is in blown vehicle or adapter fuses. If you ...

Owner's Manual
Page 149
... the power outlet can cause damage not covered by your dealer/retailer before adding electrical equipment. Notice: Improper use equipment exceeding maximum amperage rating of 20 amperes. Do not hang any electrical equipment to your vehicle can be used to plug in LOCK/OFF or if no system fault is in...
... the power outlet can cause damage not covered by your dealer/retailer before adding electrical equipment. Notice: Improper use equipment exceeding maximum amperage rating of 20 amperes. Do not hang any electrical equipment to your vehicle can be used to plug in LOCK/OFF or if no system fault is in...

Owner's Manual
Page 150
.... • Other equipment requiring an extremely stable power supply such as: microcomputer-controlled electric blankets, touch sensor lamps, etc. Outside Air E. A. Recirculation C. Rear Window Defogger 3-20 Fan Control B. Air Delivery Mode Control F. If you try to connect equipment using more than 150 watts or a system fault is detected, a protection circuit shuts...
.... • Other equipment requiring an extremely stable power supply such as: microcomputer-controlled electric blankets, touch sensor lamps, etc. Outside Air E. A. Recirculation C. Rear Window Defogger 3-20 Fan Control B. Air Delivery Mode Control F. If you try to connect equipment using more than 150 watts or a system fault is detected, a protection circuit shuts...

Owner's Manual
Page 154
... controlled. If the temperature is set at 90°F (32°C) the system remains at the maximum cooling setting. B. E. Display H. If it is over about 20 minutes for the system to regulate. Allow about 40°F (4°C). Choosing either maximum setting does not cause the vehicle to the AUTO position. To...
... controlled. If the temperature is set at 90°F (32°C) the system remains at the maximum cooling setting. B. E. Display H. If it is over about 20 minutes for the system to regulate. Allow about 40°F (4°C). Choosing either maximum setting does not cause the vehicle to the AUTO position. To...

Owner's Manual
Page 177
...) On vehicles with directional control of the vehicle's tires needs to be checked. Have the tire pressures checked and set to those shown on page 4-20, and Inflation - See Tires on page 5-51, Loading the Vehicle on the Tire Loading Information label. The DIC also shows the tire pressure...
...) On vehicles with directional control of the vehicle's tires needs to be checked. Have the tire pressures checked and set to those shown on page 4-20, and Inflation - See Tires on page 5-51, Loading the Vehicle on the Tire Loading Information label. The DIC also shows the tire pressure...

Owner's Manual
Page 223
... Roads ...4-16 Winter Driving ...4-17 If Your Vehicle is Stuck in Sand, Mud, Ice, or Snow ...4-19 Rocking Your Vehicle to Get It Out ...4-20 Loading the Vehicle ...4-20 Towing ...4-26 Towing Your Vehicle ...4-26 Recreational Vehicle Towing ...4-26 Towing a Trailer ...4-29 Your Driving, the Road, and the Vehicle ...4-2 Driving for Better...
... Roads ...4-16 Winter Driving ...4-17 If Your Vehicle is Stuck in Sand, Mud, Ice, or Snow ...4-19 Rocking Your Vehicle to Get It Out ...4-20 Loading the Vehicle ...4-20 Towing ...4-26 Towing Your Vehicle ...4-26 Recreational Vehicle Towing ...4-26 Towing a Trailer ...4-29 Your Driving, the Road, and the Vehicle ...4-2 Driving for Better...
Owner's Manual
Page 226
... Modifications on page 5-3. tire tread; Some people drive in three-fourths of a second, a vehicle moving at 60 mph (100 km/h) travels 66 feet (20 m). The brakes will wear out much faster with a lot of a Vehicle The following distances eliminates a lot of the brakes; If the brakes are pumped, the...
... Modifications on page 5-3. tire tread; Some people drive in three-fourths of a second, a vehicle moving at 60 mph (100 km/h) travels 66 feet (20 m). The brakes will wear out much faster with a lot of a Vehicle The following distances eliminates a lot of the brakes; If the brakes are pumped, the...

Owner's Manual
Page 228
... system hydraulic brake control module increases brake pressure at the same time. this time is normal and the driver should initialize before the vehicle reaches 20 mph (32 km/h). When you first start the vehicle and begin to drive away, the system performs several diagnostic checks to ensure there are...
... system hydraulic brake control module increases brake pressure at the same time. this time is normal and the driver should initialize before the vehicle reaches 20 mph (32 km/h). When you first start the vehicle and begin to drive away, the system performs several diagnostic checks to ensure there are...
Owner's Manual
Page 235
... approaching headlamps. Night driving tips include: • Keep your vehicle clean - inside rearview mirror. 4-13 A 50-year-old driver might need at least twice as a 20-year-old. • Drive defensively. • Do not drink and drive. • Reduce headlamp glare by adjusting the inside and out. or curves. When tired...
... approaching headlamps. Night driving tips include: • Keep your vehicle clean - inside rearview mirror. 4-13 A 50-year-old driver might need at least twice as a 20-year-old. • Drive defensively. • Do not drink and drive. • Reduce headlamp glare by adjusting the inside and out. or curves. When tired...


