
Owner's Manual
Page 10
... several different ways. Pull the head restraint up or push it down to adjust, remove, and reinstall the seats. If your vehicle has a second row center console, it . Adjust the head restraint so that the top of the restraint is at the same height as the top of a neck injury in a crash...
... several different ways. Pull the head restraint up or push it down to adjust, remove, and reinstall the seats. If your vehicle has a second row center console, it . Adjust the head restraint so that the top of the restraint is at the same height as the top of a neck injury in a crash...
Owner's Manual
Page 98
... Areas ...2-56 Glove Box ...2-56 Cupholder(s) ...2-56 Overhead Console (Without Rail) ...2-56 Overhead Console (With Rail) ...2-57 Floor Console Storage Area ...2-59 Folding Tray ...2-59 Second Row Center Console ...2-59 Luggage Carrier ...2-60 Convenience Net (With Rear Convenience Center) ...2-61 Convenience Net (Without Rear Convenience Center) ...2-61 Convenience Center ...2-62 Mirrors ...2-43 Manual Rearview Mirror ...2-43 Outside Power...
... Areas ...2-56 Glove Box ...2-56 Cupholder(s) ...2-56 Overhead Console (Without Rail) ...2-56 Overhead Console (With Rail) ...2-57 Floor Console Storage Area ...2-59 Folding Tray ...2-59 Second Row Center Console ...2-59 Luggage Carrier ...2-60 Convenience Net (With Rear Convenience Center) ...2-61 Convenience Net (Without Rear Convenience Center) ...2-61 Convenience Center ...2-62 Mirrors ...2-43 Manual Rearview Mirror ...2-43 Outside Power...

Owner's Manual
Page 115
... go through a car wash. Notice: If you shift out of PARK (P), a chime will indicate if the door is open. Also, the Driver Information Center (DIC) will sound. See DIC Warnings and Messages on page 2-5. Be sure the power sliding door is locked, press the power sliding door button(s) and...in the process of closing when you leave the power sliding door on the driver's or front passenger's armrest, and then opened using the overhead console PSD switch(es) or the passenger PSD activation switch(es). This is a warning that the sliding door(s) is not completely closed and latched ...
... go through a car wash. Notice: If you shift out of PARK (P), a chime will indicate if the door is open. Also, the Driver Information Center (DIC) will sound. See DIC Warnings and Messages on page 2-5. Be sure the power sliding door is locked, press the power sliding door button(s) and...in the process of closing when you leave the power sliding door on the driver's or front passenger's armrest, and then opened using the overhead console PSD switch(es) or the passenger PSD activation switch(es). This is a warning that the sliding door(s) is not completely closed and latched ...

Owner's Manual
Page 122
... windows can be active, to open as long as the switch is pressed, until they are fully opened. To open position. Press the center of the switch to close both windows will continue to use the power rear quarter windows. Manual Rear Quarter Windows Your vehicle may have manual... rear quarter windows. This switch, located in the open , pull the latch forward to secure the window in the overhead console switchbank, is pressed. See Retained Accessory Power (RAP) on how long the switch is used for opening and closing the power rear quarter windows....
... windows can be active, to open as long as the switch is pressed, until they are fully opened. To open position. Press the center of the switch to close both windows will continue to use the power rear quarter windows. Manual Rear Quarter Windows Your vehicle may have manual... rear quarter windows. This switch, located in the open , pull the latch forward to secure the window in the overhead console switchbank, is pressed. See Retained Accessory Power (RAP) on how long the switch is used for opening and closing the power rear quarter windows....

Owner's Manual
Page 152
...;oor pins that larger cups can be removed, so that are cupholders located below the center instrument panel switchbank. Cupholder(s) There are used to lock and unlock. 2-56 Overhead Console (Without Rail) If your vehicle has an overhead console without the rail system, it . For help or information on the Universal Home Remote... Box To open, lift the handle up. Push the tray back when not in this section, beginning with cupholders in the second row. See Overhead Console Switchbank on page 7-5.
...;oor pins that larger cups can be removed, so that are cupholders located below the center instrument panel switchbank. Cupholder(s) There are used to lock and unlock. 2-56 Overhead Console (Without Rail) If your vehicle has an overhead console without the rail system, it . For help or information on the Universal Home Remote... Box To open, lift the handle up. Push the tray back when not in this section, beginning with cupholders in the second row. See Overhead Console Switchbank on page 7-5.

Owner's Manual
Page 155
...Tray Your vehicle may be equipped with folding convenience trays located between seats. Locate the attachment lever in an opening on the front console below the front cupholders. There are four cupholders on the handle to open the storage compartment. To use the following procedure to ... the tray to remove or install the console. Pull up and then forward on each tray lift up on the handle located on its front end, while pulling up to release the attachment hook. 3. Second Row Center Console If your vehicle has the second row center console, use each tray. 2. Pull the...
...Tray Your vehicle may be equipped with folding convenience trays located between seats. Locate the attachment lever in an opening on the front console below the front cupholders. There are four cupholders on the handle to open the storage compartment. To use the following procedure to ... the tray to remove or install the console. Pull up and then forward on each tray lift up on the handle located on its front end, while pulling up to release the attachment hook. 3. Second Row Center Console If your vehicle has the second row center console, use each tray. 2. Pull the...

Owner's Manual
Page 156
...are not standard on this could be able to fasten it securely. 2-60 You may damage your vehicle. Replacing the Center Console Luggage Carrier {CAUTION: A second row center console that is not locked into place properly when installing it. 1. Notice: Loading cargo on the luggage carrier that weighs ... can move around in the vehicle could cause you or other drivers to lock the console into place properly can load things on top of your vehicle. Position the second row center console above the forward floor attachments between the second row bucket seats. Locate the...
...are not standard on this could be able to fasten it securely. 2-60 You may damage your vehicle. Replacing the Center Console Luggage Carrier {CAUTION: A second row center console that is not locked into place properly when installing it. 1. Notice: Loading cargo on the luggage carrier that weighs ... can move around in the vehicle could cause you or other drivers to lock the console into place properly can load things on top of your vehicle. Position the second row center console above the forward floor attachments between the second row bucket seats. Locate the...
Owner's Manual
Page 192
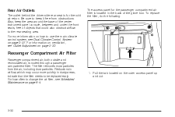
... Adjustment on page 3-27. Reductions in the back of objects that the filter needs to keep the area around the base of the center instrument panel console, between and under the front seats, free of the glove box. The access panel for the cold air return. For information on ventilation, see...
... Adjustment on page 3-27. Reductions in the back of objects that the filter needs to keep the area around the base of the center instrument panel console, between and under the front seats, free of the glove box. The access panel for the cold air return. For information on ventilation, see...
Owner's Manual
Page 473
... Maintenance ...6-4 Seats Bucket Seats, Rear ...1-6 Captain Chairs ...1-14 Head Restraints ...1-6 Heated Seats ...1-3 Power Seats ...1-3 Rear Seat Operation ...1-6 Reclining Seatbacks ...1-4 Third Row Seat ...1-18 Second Row Center Console ...2-59 Secondary Latch System ...5-83 Securing a Child Restraint Rear Seat Position ...1-61 Right Front Seat Position ...1-64 Security Light ...3-48 Service ...5-3 Accessories and Modifi...
... Maintenance ...6-4 Seats Bucket Seats, Rear ...1-6 Captain Chairs ...1-14 Head Restraints ...1-6 Heated Seats ...1-3 Power Seats ...1-3 Rear Seat Operation ...1-6 Reclining Seatbacks ...1-4 Third Row Seat ...1-18 Second Row Center Console ...2-59 Secondary Latch System ...5-83 Securing a Child Restraint Rear Seat Position ...1-61 Right Front Seat Position ...1-64 Security Light ...3-48 Service ...5-3 Accessories and Modifi...

Owner's Manual
Page 474
...Wheel, Tilt Wheel ...3-6 Storage Areas ...2-56 Convenience Center ...2-62 Convenience Net ...2-61 Cupholder(s) ...2-56 Floor Console Storage Area ...2-59 Folding Tray ...2-59 Glove Box ...2-56 Luggage Carrier ...2-60 Overhead Console ...2-56, 2-57 Second Row Center Console ...2-59 Stuck in Sand, Mud, Ice, or... Snow ...4-20 Sun Visors ...2-27 Switchbanks Overhead Console ...3-21 T Tachometer ...3-36 Taillamps Turn Signal, Stoplamps and Back-...
...Wheel, Tilt Wheel ...3-6 Storage Areas ...2-56 Convenience Center ...2-62 Convenience Net ...2-61 Cupholder(s) ...2-56 Floor Console Storage Area ...2-59 Folding Tray ...2-59 Glove Box ...2-56 Luggage Carrier ...2-60 Overhead Console ...2-56, 2-57 Second Row Center Console ...2-59 Stuck in Sand, Mud, Ice, or... Snow ...4-20 Sun Visors ...2-27 Switchbanks Overhead Console ...3-21 T Tachometer ...3-36 Taillamps Turn Signal, Stoplamps and Back-...


