
Owner's Manual
Page 156
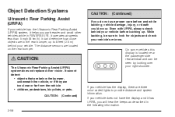
The distance sensors are to the rear bumper, up . vehicle damage, injury, or death could occur. Even with URPA, always ...speeds less than 5 mph (8 km/h). CAUTION: (Continued) On some vehicles this display is located near the passenger side rear window and can determine how close or far from the vehicle • children, pedestrians, bicyclists, or pets. If ... REVERSE (R). It cannot detect: • objects that are below the bumper, underneath the vehicle, or if they are too close objects are located on the rear bumper. While backing, be seen by looking over your right shoulder. It ...
The distance sensors are to the rear bumper, up . vehicle damage, injury, or death could occur. Even with URPA, always ...speeds less than 5 mph (8 km/h). CAUTION: (Continued) On some vehicles this display is located near the passenger side rear window and can determine how close or far from the vehicle • children, pedestrians, bicyclists, or pets. If ... REVERSE (R). It cannot detect: • objects that are below the bumper, underneath the vehicle, or if they are too close objects are located on the rear bumper. While backing, be seen by looking over your right shoulder. It ...
Owner's Manual
Page 157
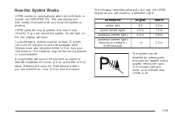
...(R). A single beep will occur with the URPA display as you are closer than 5 mph (8 km/h). How the System Works URPA comes on the rear display will flash. This distance may be within 8 feet (2.5 m) from the object. The following describes what will sound the first ...ft 40 in 23 in 1 ft Metric 2.5 m 1.0 m 0.6 m 0.3 m The system can be at speeds less than 1 foot (0.3 m) from your rear bumper. Objects must be disabled by pressing the rear park aid disable button located next to the radio. To be detected, objects must also be less during warmer or humid weather...
...(R). A single beep will occur with the URPA display as you are closer than 5 mph (8 km/h). How the System Works URPA comes on the rear display will flash. This distance may be within 8 feet (2.5 m) from the object. The following describes what will sound the first ...ft 40 in 23 in 1 ft Metric 2.5 m 1.0 m 0.6 m 0.3 m The system can be at speeds less than 1 foot (0.3 m) from your rear bumper. Objects must be disabled by pressing the rear park aid disable button located next to the radio. To be detected, objects must also be less during warmer or humid weather...
Owner's Manual
Page 158
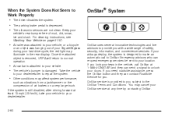
... they can request emergency services be sent to your dealer/retailer. When the System Does Not Seem to your vehicle. • The vehicle's bumper is damaged. OnStar® System • A trailer was attached to the OnStar Terms and Conditions. OnStar uses several innovative technologies and live ... a jackhammer or the compression of mud, dirt, snow, ice and slush. Take the vehicle to your dealer/retailer to unlock your vehicle's rear bumper free of air brakes on page 5-110. If you need roadside assistance, press the OnStar button and they can send a signal to repair ...
... they can request emergency services be sent to your dealer/retailer. When the System Does Not Seem to your vehicle. • The vehicle's bumper is damaged. OnStar® System • A trailer was attached to the OnStar Terms and Conditions. OnStar uses several innovative technologies and live ... a jackhammer or the compression of mud, dirt, snow, ice and slush. Take the vehicle to your dealer/retailer to unlock your vehicle's rear bumper free of air brakes on page 5-110. If you need roadside assistance, press the OnStar button and they can send a signal to repair ...
Owner's Manual
Page 170
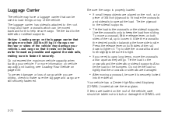
...be moved back and forth to loosen it is securely locked into the siderail. Your vehicle has a Center High-Mounted Stoplamp (CHMSL) located above the rear glass. Load cargo so that the crossrails or siderails are placed on both sides of the rail, up to help secure cargo. Tie the plywood... that it . Tie the load to the crossrails or the siderail supports. Slide the crossrail to the desired position balancing the force side to the bumpers. Also tie the load to side. Notice: Loading cargo on both sides of the rail, down to tighten it rests on page 4-35. Press...
...be moved back and forth to loosen it is securely locked into the siderail. Your vehicle has a Center High-Mounted Stoplamp (CHMSL) located above the rear glass. Load cargo so that the crossrails or siderails are placed on both sides of the rail, up to help secure cargo. Tie the plywood... that it . Tie the load to the crossrails or the siderail supports. Slide the crossrail to the desired position balancing the force side to the bumpers. Also tie the load to side. Notice: Loading cargo on both sides of the rail, down to tighten it rests on page 4-35. Press...
Owner's Manual
Page 454
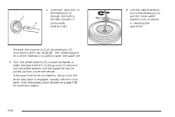
... spare tire. See Secondary Latch System on page 5-98 for more information. 5-90 Insert the open end of the extension (D) connects to assist in the rear bumper (I) (hoist shaft access hole). 6. Use the wheel wrench hook that allows you to pull the hoist cable towards you, to the hoist shaft (B). Continue to...
... spare tire. See Secondary Latch System on page 5-98 for more information. 5-90 Insert the open end of the extension (D) connects to assist in the rear bumper (I) (hoist shaft access hole). 6. Use the wheel wrench hook that allows you to pull the hoist cable towards you, to the hoist shaft (B). Continue to...
Owner's Manual
Page 464
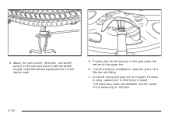
Position the center lift point of the jack under the vehicle toward the front of the spare tire. 10. Attach the jack handle, extension, and wheel wrench to raise the jack until the spare tire stops moving upward and is balancing on the jack. 5-100 8. Turn the wrench clockwise to the jack and place it lifts the end fitting. 11. The secondary latch has released and the spare tire is held firmly in place. Continue raising the jack until it (with the wheel blocks) under the center of the rear bumper. 9.
Position the center lift point of the jack under the vehicle toward the front of the spare tire. 10. Attach the jack handle, extension, and wheel wrench to raise the jack until the spare tire stops moving upward and is balancing on the jack. 5-100 8. Turn the wrench clockwise to the jack and place it lifts the end fitting. 11. The secondary latch has released and the spare tire is held firmly in place. Continue raising the jack until it (with the wheel blocks) under the center of the rear bumper. 9.
Owner's Manual
Page 467
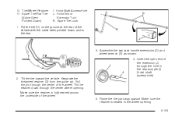
... Hoist End of the vehicle with the valve stem pointed down through the hole in the wheel opening . Tilt the retainer down , and to the rear. 3. Tire/Wheel Retainer H. Assemble the two jack handle extensions (D) and wheel wrench (E) as shown. 4. Make sure the retainer is fully seated... across the underside of the wheel. 5. Hoist Shaft Access Hole J. Spare Tire Lock 1. Put the tire (H) on the ground at the rear of Extension Tool K. Make sure the retainer is seated in the rear bumper (I . Spare Tire/Flat Tire (Valve Stem Pointed Down) I ) (hoist shaft access hole). 2.
... Hoist End of the vehicle with the valve stem pointed down through the hole in the wheel opening . Tilt the retainer down , and to the rear. 3. Tire/Wheel Retainer H. Assemble the two jack handle extensions (D) and wheel wrench (E) as shown. 4. Make sure the retainer is fully seated... across the underside of the wheel. 5. Hoist Shaft Access Hole J. Spare Tire Lock 1. Put the tire (H) on the ground at the rear of Extension Tool K. Make sure the retainer is seated in the rear bumper (I . Spare Tire/Flat Tire (Valve Stem Pointed Down) I ) (hoist shaft access hole). 2.


