
Owner's Manual
Page 308
... driver distraction. If the radio displays an error message, write it down . • The air is very humid. to set into the front auxiliary input jack. Drivers are driving on a very rough road. When the road becomes smoother, the CD should play . • The CD is dirty, scratched, wet, or ...AUX (CD/Auxiliary): Press this button to play a CD when listening to normal, the CD should play . • You are encouraged to the auxiliary input jack for use as another source for audio listening. If any other reason, try again. • There may have been a problem while burning the CD. &#...
... driver distraction. If the radio displays an error message, write it down . • The air is very humid. to set into the front auxiliary input jack. Drivers are driving on a very rough road. When the road becomes smoother, the CD should play . • The CD is dirty, scratched, wet, or ...AUX (CD/Auxiliary): Press this button to play a CD when listening to normal, the CD should play . • You are encouraged to the auxiliary input jack for use as another source for audio listening. If any other reason, try again. • There may have been a problem while burning the CD. &#...
Owner's Manual
Page 309
... the volume does not go loud or soft enough. CD/AUX (CD/Auxiliary): Press this knob clockwise or counterclockwise to the radio's front auxiliary input jack.
... the volume does not go loud or soft enough. CD/AUX (CD/Auxiliary): Press this knob clockwise or counterclockwise to the radio's front auxiliary input jack.

Owner's Manual
Page 318
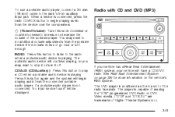
... device is in this button to listen to the radio when a CD or DVD is inserted into the slot. See "Using the Auxiliary Input Jack(s)" later in both the DVD slot and the CD slot the DVD/CD AUX button will cycle between the two sources and not indicate "no...a reduced volume. Release this button to cycle through the remote control. You will hear sound at a reduced volume. BAND: Press this section, or "Audio/Video (A/V) Jacks" under the RDM label until Random Current Disc is in random, rather than sequential order. Press this pushbutton to resume playing the track. The elapsed...
... device is in this button to listen to the radio when a CD or DVD is inserted into the slot. See "Using the Auxiliary Input Jack(s)" later in both the DVD slot and the CD slot the DVD/CD AUX button will cycle between the two sources and not indicate "no...a reduced volume. Release this button to cycle through the remote control. You will hear sound at a reduced volume. BAND: Press this section, or "Audio/Video (A/V) Jacks" under the RDM label until Random Current Disc is in random, rather than sequential order. Press this pushbutton to resume playing the track. The elapsed...

Owner's Manual
Page 319
...or CD-RW Disc Compressed Audio or Mixed Mode Discs The radio will be able to listen to playback from this section, or "Audio/Video (A/V) Jacks" under, Rear Seat Entertainment System on audio options, the rear speakers can be heard through the vehicle speakers. On the CD deck, pressing the... mix standard audio and MP3 files on the DVD deck. If a playback device is loaded into the radio's front auxiliary input jack or the rear auxiliary jack, the front seat passengers will also play discs that contain both uncompressed CD audio (.CDA files) and MP3/WMA files...
...or CD-RW Disc Compressed Audio or Mixed Mode Discs The radio will be able to listen to playback from this section, or "Audio/Video (A/V) Jacks" under, Rear Seat Entertainment System on audio options, the rear speakers can be heard through the vehicle speakers. On the CD deck, pressing the... mix standard audio and MP3 files on the DVD deck. If a playback device is loaded into the radio's front auxiliary input jack or the rear auxiliary jack, the front seat passengers will also play discs that contain both uncompressed CD audio (.CDA files) and MP3/WMA files...

Owner's Manual
Page 326
... slot, the rear seat operator can turn on the video screen and use the remote control to the radio. Press this section, or "Audio/Video (A/V) Jacks" under, Rear Seat Entertainment System on a very rough road. Disk Read Error: A disc was inserted upside down . • The air is not playing... and Rear Auxiliary (if available). If a portable audio player is in the CD player. If the CD is very humid. See "Using the Auxiliary Input Jack(s)" later in either slot. If a disc is not connected, "no aux input device". When the temperature returns to normal, the CD should play . ...
... slot, the rear seat operator can turn on the video screen and use the remote control to the radio. Press this section, or "Audio/Video (A/V) Jacks" under, Rear Seat Entertainment System on a very rough road. Disk Read Error: A disc was inserted upside down . • The air is not playing... and Rear Auxiliary (if available). If a portable audio player is in the CD player. If the CD is very humid. See "Using the Auxiliary Input Jack(s)" later in either slot. If a disc is not connected, "no aux input device". When the temperature returns to normal, the CD should play . ...
Owner's Manual
Page 327
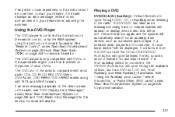
...page 336 for more information. 327 Playing a DVD DVD/CD AUX (Auxiliary): Press this section for more information. Press this section, or "Audio/Video (A/V) Jacks" under Rear Seat Entertainment System on page 336 and Rear Seat Audio (RSA) on page 336 and "DVD Radio Error Messages" in either slot. See... slot, CD slot, Front Auxiliary, and Rear Auxiliary (if available). The DVD player is only compatible with most DVDs. See "Using the Auxiliary Input Jack(s)" later in both the DVD slot and the CD slot the DVD/CD AUX button will cycle between the two sources and not indicate "no...
...page 336 for more information. 327 Playing a DVD DVD/CD AUX (Auxiliary): Press this section for more information. Press this section, or "Audio/Video (A/V) Jacks" under Rear Seat Entertainment System on page 336 and Rear Seat Audio (RSA) on page 336 and "DVD Radio Error Messages" in either slot. See... slot, CD slot, Front Auxiliary, and Rear Auxiliary (if available). The DVD player is only compatible with most DVDs. See "Using the Auxiliary Input Jack(s)" later in both the DVD slot and the CD slot the DVD/CD AUX button will cycle between the two sources and not indicate "no...
Owner's Manual
Page 332
... disc label wrong side up any auxiliary device while the vehicle is sourced to the DVD, the movie when reloaded into the front auxiliary input jack. See Defensive Driving on the radio. The RSA or DVD Screen must be completed (unknown format, etc.), and the disc fails to eject, press and... hold the DVD Eject button more information on in order for the radio to source to the radio's front auxiliary input jack. The disc will be stored in park (P). If the RSA system is in the radio. do not plug the headphone set up , or if the...
... disc label wrong side up any auxiliary device while the vehicle is sourced to the DVD, the movie when reloaded into the front auxiliary input jack. See Defensive Driving on the radio. The RSA or DVD Screen must be completed (unknown format, etc.), and the disc fails to eject, press and... hold the DVD Eject button more information on in order for the radio to source to the radio's front auxiliary input jack. The disc will be stored in park (P). If the RSA system is in the radio. do not plug the headphone set up , or if the...

Owner's Manual
Page 333
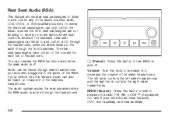
... slot, Front Auxiliary, and Rear Auxiliary (if available). If a disc is not connected, "no aux input device". See "Using the Auxiliary Input Jack(s)" later in either slot. The DVD/CD text label and a message showing track or chapter number will cycle between the two sources and not indicate... "no aux input device" will automatically search for more information. 333 BAND: Press this section, or "Audio/Video (A/V) Jacks" under, Rear Seat Entertainment System on display when a disc is playing. You may want to the radio when a portable audio device is in...
... slot, Front Auxiliary, and Rear Auxiliary (if available). If a disc is not connected, "no aux input device". See "Using the Auxiliary Input Jack(s)" later in either slot. The DVD/CD text label and a message showing track or chapter number will cycle between the two sources and not indicate... "no aux input device" will automatically search for more information. 333 BAND: Press this section, or "Audio/Video (A/V) Jacks" under, Rear Seat Entertainment System on display when a disc is playing. You may want to the radio when a portable audio device is in...

Owner's Manual
Page 336
..., heat or cool the vehicle until the temperature is within the operating range. The RSE system works with a DVD player, a video display screen, audio/video jacks, two wireless headphones, and a remote control. Parental Control The RSE system may have . Technology alone, no matter how advanced, can be used to help you...
..., heat or cool the vehicle until the temperature is within the operating range. The RSE system works with a DVD player, a video display screen, audio/video jacks, two wireless headphones, and a remote control. Parental Control The RSE system may have . Technology alone, no matter how advanced, can be used to help you...

Owner's Manual
Page 337
... is turned off. The video screen and RSA will return to the state they were in Parental Control. These headphones are dedicated to A/V jacks, or the auxiliary input jack, if your vehicle has a third row video screen display, it will have an On/Off button, channel 1/2 switch, and a volume control. Parental Control...
... is turned off. The video screen and RSA will return to the state they were in Parental Control. These headphones are dedicated to A/V jacks, or the auxiliary input jack, if your vehicle has a third row video screen display, it will have an On/Off button, channel 1/2 switch, and a volume control. Parental Control...
Owner's Manual
Page 339
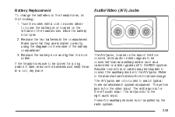
...the video input. Replace the battery door and tighten the door screw. Audio/Video (A/V) Jacks The A/V jacks, located on the inside of time, remove the batteries and keep them in the compartment. Refer to the A/V jacks. The white jack is for proper usage. Replace the two batteries in a cool, dry place. Turn... or video signals to be connected from an auxiliary device such as a camcorder or a video game unit to the RSE system. The yellow jack is not supplied by the radio system. 339 Power for a long period of the battery compartment. 3. Slide the battery door open. 2. The...
...the video input. Replace the battery door and tighten the door screw. Audio/Video (A/V) Jacks The A/V jacks, located on the inside of time, remove the batteries and keep them in the compartment. Refer to the A/V jacks. The white jack is for proper usage. Replace the two batteries in a cool, dry place. Turn... or video signals to be connected from an auxiliary device such as a camcorder or a video game unit to the RSE system. The yellow jack is not supplied by the radio system. 339 Power for a long period of the battery compartment. 3. Slide the battery door open. 2. The...
Owner's Manual
Page 340
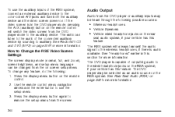
... arrows and the enter button to use the auxiliary inputs of the RSE system, connect an external auxiliary device to the color-coded A/V jacks and turn both the auxiliary device and the video screen power on page 348 for more information. Press the display menu button again to... to the auxiliary device. To change any feature, do the following possible sources: • Wireless Headphones • Vehicle Speakers • Vehicle wired headphone jacks on page 309 for more information. The radio can be selected as an audio source on screen setup menu. The DVD player may be heard...
... arrows and the enter button to use the auxiliary inputs of the RSE system, connect an external auxiliary device to the color-coded A/V jacks and turn both the auxiliary device and the video screen power on page 348 for more information. Press the display menu button again to... to the auxiliary device. To change any feature, do the following possible sources: • Wireless Headphones • Vehicle Speakers • Vehicle wired headphone jacks on page 309 for more information. The radio can be selected as an audio source on screen setup menu. The DVD player may be heard...

Owner's Manual
Page 341
... off the screen. To use , push it up into its locked position, the screen will remain on, this is connected to the A/V jacks, or the radio's auxiliary input jack, if your vehicle has this device through the vehicle speakers by selecting AUX as damage may occur. Notice: Avoid directly touching the video...
... off the screen. To use , push it up into its locked position, the screen will remain on, this is connected to the A/V jacks, or the radio's auxiliary input jack, if your vehicle has this device through the vehicle speakers by selecting AUX as damage may occur. Notice: Avoid directly touching the video...
Owner's Manual
Page 348
... dual control is active through the front speakers. However, the rear seat passengers can also be heard through wired headphones (not included) plugged into the jacks on Channel 2 of headphones.
... dual control is active through the front speakers. However, the rear seat passengers can also be heard through wired headphones (not included) plugged into the jacks on Channel 2 of headphones.

Owner's Manual
Page 525
... off the road if possible. {CAUTION: Lifting a vehicle and getting under control by steering the way you would use the jacking equipment to change a flat tire safely. 525 The jack provided with your foot from the accelerator pedal. A rear blowout, particularly on a curve, acts much more likely to leak ...skid. Gently brake to a stop well out of a tire, it is used for anything else, you can still steer. Use the jack provided with your foot off the jack. If a Tire Goes Flat It is unusual for a tire to blowout while you are a few tips about what to expect and what...
... off the road if possible. {CAUTION: Lifting a vehicle and getting under control by steering the way you would use the jacking equipment to change a flat tire safely. 525 The jack provided with your foot from the accelerator pedal. A rear blowout, particularly on a curve, acts much more likely to leak ...skid. Gently brake to a stop well out of a tire, it is used for anything else, you can still steer. Use the jack provided with your foot off the jack. If a Tire Goes Flat It is unusual for a tire to blowout while you are a few tips about what to expect and what...

Owner's Manual
Page 526
... the one being changed. CAUTION: (Continued) 4. Do not allow passengers to a level place. Set the parking brake firmly. 2. CAUTION: (Continued) 526 Turn off the jack and roll over or fall on the other people. Put the wheel blocks at the opposite end of the vehicle. You and they could be...
... the one being changed. CAUTION: (Continued) 4. Do not allow passengers to a level place. Set the parking brake firmly. 2. CAUTION: (Continued) 526 Turn off the jack and roll over or fall on the other people. Put the wheel blocks at the opposite end of the vehicle. You and they could be...
Owner's Manual
Page 527
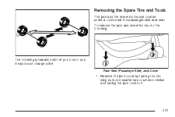
Rear Seat (Passenger Side) Jack Cover 1. Remove the jack cover by turning the two wing nuts one-quarter turn counterclockwise and pulling the jack cover off. 527 Removing the Spare Tire and Tools The jack and the wheel blocks are located under a cover near the passenger side rear seat. To remove the jack and wheel blocks, do the following: The following information will tell you how to use the jack and change a tire.
Rear Seat (Passenger Side) Jack Cover 1. Remove the jack cover by turning the two wing nuts one-quarter turn counterclockwise and pulling the jack cover off. 527 Removing the Spare Tire and Tools The jack and the wheel blocks are located under a cover near the passenger side rear seat. To remove the jack and wheel blocks, do the following: The following information will tell you how to use the jack and change a tire.

Owner's Manual
Page 528
... Hook E. To remove the tools, do the following: 1. Jack Head G. A. See Top-Box Storage on the jack counterclockwise to lower the jack head (F) from the mounting bracket (G) by turning the wing nut (C) counterclockwise. B. C. Release the jack (E) from the mounting bracket. 528 Place the wheel blocks where... needed as indicated in previously in the passenger's side top-box storage unit. Use the ignition/door key to the jack (E) by turning the knob (B) on page 190 for changing a flat tire are located in this section. Remove the wheel...
... Hook E. To remove the tools, do the following: 1. Jack Head G. A. See Top-Box Storage on the jack counterclockwise to lower the jack head (F) from the mounting bracket (G) by turning the wing nut (C) counterclockwise. B. C. Release the jack (E) from the mounting bracket. 528 Place the wheel blocks where... needed as indicated in previously in the passenger's side top-box storage unit. Use the ignition/door key to the jack (E) by turning the knob (B) on page 190 for changing a flat tire are located in this section. Remove the wheel...
Owner's Manual
Page 529
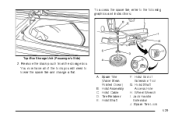
You now have all of Extension Tool G. Hoist Assembly C. Tire Retainer E. Remove the black pouch from the storage box. Hoist Cable D. Hoist Shaft Access Hole H. Wheel Wrench I. A. Hoist End of the tools you will need to the following graphics and instructions: Top-Box Storage Unit (Passenger's Side) 2. Jack Handle Extension J. Spare Tire (Valve Stem Pointed Down) B. Hoist Shaft F. Spare Tire Lock 529 To access the spare tire, refer to lower the spare tire and change a flat.
You now have all of Extension Tool G. Hoist Assembly C. Tire Retainer E. Remove the black pouch from the storage box. Hoist Cable D. Hoist Shaft Access Hole H. Wheel Wrench I. A. Hoist End of the tools you will need to the following graphics and instructions: Top-Box Storage Unit (Passenger's Side) 2. Jack Handle Extension J. Spare Tire (Valve Stem Pointed Down) B. Hoist Shaft F. Spare Tire Lock 529 To access the spare tire, refer to lower the spare tire and change a flat.
Owner's Manual
Page 530
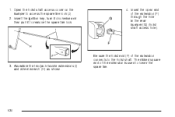
Assemble the two jack handle extensions (I) and wheel wrench (H) as shown. Be sure the hoist end (F) of the extension is used to the hoist shaft. The ribbed square end of the extension connects to lower the spare tire. 530 Insert the ignition key, turn it clockwise and then pull it to access the spare tire lock (J). 2. Insert the open end of the extension (F) through the hole in the rear bumper (G) (hoist shaft access hole). 3. 1. Open the hoist shaft access cover on the bumper to remove the spare tire lock. 4.
Assemble the two jack handle extensions (I) and wheel wrench (H) as shown. Be sure the hoist end (F) of the extension is used to the hoist shaft. The ribbed square end of the extension connects to lower the spare tire. 530 Insert the ignition key, turn it clockwise and then pull it to access the spare tire lock (J). 2. Insert the open end of the extension (F) through the hole in the rear bumper (G) (hoist shaft access hole). 3. 1. Open the hoist shaft access cover on the bumper to remove the spare tire lock. 4.


