Owner's Manual
Page 4
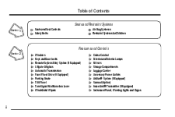
... Controls Safety Belts Air Bag Systems Restraint Systems for Children Features and Controls Section 2 Windows Keys and Door Locks Remote Keyless Entry System (If Equipped) Liftgate/Liftglass Automatic Transmission Four-Wheel Drive (If Equipped) Parking Brake Tilt Wheel Turn Signal/Multifunction Lever Windshield Wipers Cruise Control Exterior and Interior Lamps Mirrors...
... Controls Safety Belts Air Bag Systems Restraint Systems for Children Features and Controls Section 2 Windows Keys and Door Locks Remote Keyless Entry System (If Equipped) Liftgate/Liftglass Automatic Transmission Four-Wheel Drive (If Equipped) Parking Brake Tilt Wheel Turn Signal/Multifunction Lever Windshield Wipers Cruise Control Exterior and Interior Lamps Mirrors...

Owner's Manual
Page 57
To assist you 'll find anchors (A) in the rear outside seat positions. Lower Anchorages and Top Tethers for top strap tethers. 1-45 Anchor brackets for the rear seat positions are located on the floor in locating the lower anchors for this child restraint system, each seating position with the LATCH system will have the LATCH system. Do not use the rear tie-down brackets near the liftgate for Children (LATCH System) Your vehicle may have two metal tabs where the seat cushion meets the seatback. If it does, you in the cargo area of your vehicle.
To assist you 'll find anchors (A) in the rear outside seat positions. Lower Anchorages and Top Tethers for top strap tethers. 1-45 Anchor brackets for the rear seat positions are located on the floor in locating the lower anchors for this child restraint system, each seating position with the LATCH system will have the LATCH system. Do not use the rear tie-down brackets near the liftgate for Children (LATCH System) Your vehicle may have two metal tabs where the seat cushion meets the seatback. If it does, you in the cargo area of your vehicle.

Owner's Manual
Page 70
... 2-13 2-14 2-16 2-17 2-18 2-19 2-20 2-21 2-22 2-26 2-30 2-31 2-33 2-33 2-34 Windows Keys Door Locks Remote Keyless Entry System (If Equipped) Liftgate/Liftglass Theft Content Theft-Deterrent (If Equipped) PasslockR New Vehicle "Break-In" Ignition Positions Starting Your Engine Engine Coolant Heater (If Equipped) Automatic Transmission Operation...
... 2-13 2-14 2-16 2-17 2-18 2-19 2-20 2-21 2-22 2-26 2-30 2-31 2-33 2-33 2-34 Windows Keys Door Locks Remote Keyless Entry System (If Equipped) Liftgate/Liftglass Theft Content Theft-Deterrent (If Equipped) PasslockR New Vehicle "Break-In" Ignition Positions Starting Your Engine Engine Coolant Heater (If Equipped) Automatic Transmission Operation...

Owner's Manual
Page 82
...into your heating or cooling system to drive with recirculation off. Gently pry the transmitter apart. 2. Remove and replace the battery with the liftgate or liftglass open them together. 4. Align the covers and snap them all other cable connections must drive with a three-volt CR2032 or ...in the Index. See "Comfort Controls" in the Index. 1. To replace the battery in the remote keyless entry transmitter do the following: Liftgate/Liftglass CAUTION: It can be dangerous to its highest speed with the setting on or under the instrument panel, open or if electrical wiring ...
...into your heating or cooling system to drive with recirculation off. Gently pry the transmitter apart. 2. Remove and replace the battery with the liftgate or liftglass open them together. 4. Align the covers and snap them all other cable connections must drive with a three-volt CR2032 or ...in the Index. See "Comfort Controls" in the Index. 1. To replace the battery in the remote keyless entry transmitter do the following: Liftgate/Liftglass CAUTION: It can be dangerous to its highest speed with the setting on or under the instrument panel, open or if electrical wiring ...
Owner's Manual
Page 83
... the key into the pushbutton and turn it impossible to unlatch the liftgate. 4. To open the entire liftgate, lift the handle located in some vehicles the liftglass will also unlock when the liftgate is unlocked. Pry the left release lever up to steal. Pry the right release lever up ... trim plug to unlock the liftglass. Reattach the trim plug. If the liftglass does not unlock when you unlock the liftgate, you can make it counterclockwise. The liftgate cannot be opened if the liftglass is big business, especially in the center of theft-deterrent features, we know that ...
... the key into the pushbutton and turn it impossible to unlatch the liftgate. 4. To open the entire liftgate, lift the handle located in some vehicles the liftglass will also unlock when the liftgate is unlocked. Pry the left release lever up to steal. Pry the right release lever up ... trim plug to unlock the liftglass. Reattach the trim plug. If the liftglass does not unlock when you unlock the liftgate, you can make it counterclockwise. The liftgate cannot be opened if the liftglass is big business, especially in the center of theft-deterrent features, we know that ...
Owner's Manual
Page 126
... the messages will find a storage compartment on it . Convenience Net (If Equipped) You may also contain one or more information on either side of the liftgate opening (the label should be equipped with the square on each of the front doors. Your vehicle's console will be in the upper passenger's side...
... the messages will find a storage compartment on it . Convenience Net (If Equipped) You may also contain one or more information on either side of the liftgate opening (the label should be equipped with the square on each of the front doors. Your vehicle's console will be in the upper passenger's side...
Owner's Manual
Page 131
... electrical equipment such as they should. When adding electrical equipment, be compatible with the equipment. Be sure to the right of the vehicle near the liftgate. Remove the cover from the plug. Check with your warranty. NOTICE: Power outlets are designed for additional information on the rear of the power outlet...
... electrical equipment such as they should. When adding electrical equipment, be compatible with the equipment. Be sure to the right of the vehicle near the liftgate. Remove the cover from the plug. Check with your warranty. NOTICE: Power outlets are designed for additional information on the rear of the power outlet...

Owner's Manual
Page 156
Try closing the liftgate or liftglass again. Never drive with the liftgate or liftglass even partially open. Gate Ajar Fuel Gage United States Canada If this light comes on, your liftgate or liftglass is on, the fuel gage tells you about how much fuel you have remaining. 2-87 United States Canada When the ignition is ajar.
Try closing the liftgate or liftglass again. Never drive with the liftgate or liftglass even partially open. Gate Ajar Fuel Gage United States Canada If this light comes on, your liftgate or liftglass is on, the fuel gage tells you about how much fuel you have remaining. 2-87 United States Canada When the ignition is ajar.
Owner's Manual
Page 170
... acknowledge this message and clear it from the DIC display. 2-101 Take you begin driving, the brake system needs service. REAR ACCESS OPEN If the liftgate or liftglass is open while the ignition is in for the message on the display and you will appear on the DIC display. Turn off... displayed, or appears again when you vehicle in RUN, this message appears, stop as soon as possible and turn off the vehicle and check the liftgate and liftglass. Move the turn signal is left on for problems. Pressing the select button will appear on the DIC display.
... acknowledge this message and clear it from the DIC display. 2-101 Take you begin driving, the brake system needs service. REAR ACCESS OPEN If the liftgate or liftglass is open while the ignition is in for the message on the display and you will appear on the DIC display. Turn off... displayed, or appears again when you vehicle in RUN, this message appears, stop as soon as possible and turn off the vehicle and check the liftgate and liftglass. Move the turn signal is left on for problems. Pressing the select button will appear on the DIC display.
Owner's Manual
Page 361
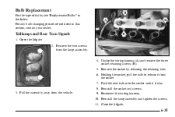
... and Rear Turn Signals 1. For any bulb changing procedure not listed in the Index. Reinstall the lamp assembly and tighten the screws. 11. Close the liftgate. 6-35 Reinstall the socket and screws. 3. Push the new bulb into the socket until it from the socket. 7. Pull the assembly away from the lamp..., pull the bulb to release it clicks. 8. Bulb Replacement For the type of bulbs, see "Replacement Bulbs" in this section, contact your dealer. Open the liftgate. 2. Remove the two screws from the vehicle. 9. Reconnect the wiring harness. 10.
... and Rear Turn Signals 1. For any bulb changing procedure not listed in the Index. Reinstall the lamp assembly and tighten the screws. 11. Close the liftgate. 6-35 Reinstall the socket and screws. 3. Push the new bulb into the socket until it from the socket. 7. Pull the assembly away from the lamp..., pull the bulb to release it clicks. 8. Bulb Replacement For the type of bulbs, see "Replacement Bulbs" in this section, contact your dealer. Open the liftgate. 2. Remove the two screws from the vehicle. 9. Reconnect the wiring harness. 10.
Owner's Manual
Page 406
... Index. Body Lubrication Service Lubricate all hood latch assembly, secondary latch, pivots, spring anchor, release pawl, rear compartment hinges, outer liftgate handle pivot points, rear door detent link, roller mechanism, liftgate handle pivot points, latch bolt, fuel door hinge, cargo door hinge, locks and folding seat hardware. See "Recommended Fluids and Lubricants...
... Index. Body Lubrication Service Lubricate all hood latch assembly, secondary latch, pivots, spring anchor, release pawl, rear compartment hinges, outer liftgate handle pivot points, rear door detent link, roller mechanism, liftgate handle pivot points, latch bolt, fuel door hinge, cargo door hinge, locks and folding seat hardware. See "Recommended Fluids and Lubricants...
Owner's Manual
Page 413
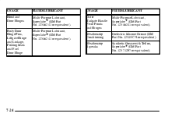
... Weatherstrip Conditioning Weatherstrip Squeaks FLUID/LUBRICANT Multi-Purpose Lubricant, SuperlubeR (GM Part No. 12346241 or equivalent). USAGE Hood and Door Hinges Body Door Hinge Pins, Liftgate Hinge and Linkage, Folding Seats and Fuel Door Hinge FLUID/LUBRICANT Multi-Purpose Lubricant, SuperlubeR (GM Part No. 12346241 or equivalent).
... Weatherstrip Conditioning Weatherstrip Squeaks FLUID/LUBRICANT Multi-Purpose Lubricant, SuperlubeR (GM Part No. 12346241 or equivalent). USAGE Hood and Door Hinges Body Door Hinge Pins, Liftgate Hinge and Linkage, Folding Seats and Fuel Door Hinge FLUID/LUBRICANT Multi-Purpose Lubricant, SuperlubeR (GM Part No. 12346241 or equivalent).