Owner's Manual
Page 1
2006 Chevrolet Express Owner Manual Seats and Restraint Systems ...1-1 Front Seats ...1-2 Rear Seats ...1-5 Safety Belts ...1-9 Child Restraints ...1-30 Airbag System ...1-65 Restraint System Check ...1-83 Features and Controls ...2-1 Keys ...2-2 Doors and Locks ...2-7 Windows ...2-14 Theft-Deterrent Systems ...2-17 Starting ... M Service and Appearance Care ...5-1 Service ...5-3 Fuel ...5-5 Checking Things Under the Hood ...5-10 All-Wheel Drive ...5-43 Rear Axle ...5-44 Front Axle ...5-44 Noise Control System ...5-45 Bulb Replacement ...5-46 Windshield Wiper Blade Replacement ...5-52 Tires ...
2006 Chevrolet Express Owner Manual Seats and Restraint Systems ...1-1 Front Seats ...1-2 Rear Seats ...1-5 Safety Belts ...1-9 Child Restraints ...1-30 Airbag System ...1-65 Restraint System Check ...1-83 Features and Controls ...2-1 Keys ...2-2 Doors and Locks ...2-7 Windows ...2-14 Theft-Deterrent Systems ...2-17 Starting ... M Service and Appearance Care ...5-1 Service ...5-3 Fuel ...5-5 Checking Things Under the Hood ...5-10 All-Wheel Drive ...5-43 Rear Axle ...5-44 Front Axle ...5-44 Noise Control System ...5-45 Bulb Replacement ...5-46 Windshield Wiper Blade Replacement ...5-52 Tires ...
Owner's Manual
Page 13
... inboard side of the seat. It is not locked into place properly can move around in both seat bases onto the pins inside the side door. The pin with the black cap marked "R" must be sure that is improperly routed, not properly attached, or twisted will not provide the protection ... the seat base, locate the hole in the rail, hooking both rails. Insert the locking pin into place properly when installing it. 1-7 For the remaining rear seats, stow the safety belt latch plate on the driver's side. To install the locking pins at the window trim. {CAUTION: A safety belt that ...
... inboard side of the seat. It is not locked into place properly can move around in both seat bases onto the pins inside the side door. The pin with the black cap marked "R" must be sure that is improperly routed, not properly attached, or twisted will not provide the protection ... the seat base, locate the hole in the rail, hooking both rails. Insert the locking pin into place properly when installing it. 1-7 For the remaining rear seats, stow the safety belt latch plate on the driver's side. To install the locking pins at the window trim. {CAUTION: A safety belt that ...

Owner's Manual
Page 76
...airbags could in flated simply because of the damage to a vehicle or because of what the vehicle hits, the angle of the driver's door. Single Stage Airbags If your vehicle has frontal airbags with specific vehicle design, so that it can be somewhat above , your vehicle has ...single stage airbags. The frontal airbags (driver and right front passenger) are not intended to inflate during vehicle rollovers, rear impacts, or in flate at a different crash speed than if the vehicle hits an object that deforms, the airbags could inflate ...
...airbags could in flated simply because of the damage to a vehicle or because of what the vehicle hits, the angle of the driver's door. Single Stage Airbags If your vehicle has frontal airbags with specific vehicle design, so that it can be somewhat above , your vehicle has ...single stage airbags. The frontal airbags (driver and right front passenger) are not intended to inflate during vehicle rollovers, rear impacts, or in flate at a different crash speed than if the vehicle hits an object that deforms, the airbags could inflate ...
Owner's Manual
Page 91
... Mirrors ...2-31 Storage Areas ...2-31 Keys ...2-2 Remote Keyless Entry System ...2-3 Remote Keyless Entry System Operation ...2-4 Doors and Locks ...2-7 Door Locks ...2-7 Power Door Locks ...2-8 Cargo Door Relocking ...2-8 Rear Door Security Locks ...2-8 Lockout Protection ...2-9 Sliding Side Door ...2-10 60/40 Swing-Out Side Door ...2-11 Rear Doors ...2-12 Windows ...2-14 Manual Windows ...2-15 Power Windows ...2-15 Swing-Out Windows ...2-16 Sun Visors...
... Mirrors ...2-31 Storage Areas ...2-31 Keys ...2-2 Remote Keyless Entry System ...2-3 Remote Keyless Entry System Operation ...2-4 Doors and Locks ...2-7 Door Locks ...2-7 Power Door Locks ...2-8 Cargo Door Relocking ...2-8 Rear Door Security Locks ...2-8 Lockout Protection ...2-9 Sliding Side Door ...2-10 60/40 Swing-Out Side Door ...2-11 Rear Doors ...2-12 Windows ...2-14 Manual Windows ...2-15 Power Windows ...2-15 Swing-Out Windows ...2-16 Sun Visors...
Owner's Manual
Page 98
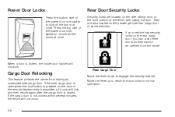
... has security locks on the passenger side rear cargo door of some vehicles. Rear Door Security Locks Security locks are also located on the rear cargo door, you can lock these doors so they cannot be opened from having an unsecured side cargo door. If the cargo door is not closed . Rear Cargo Door Move the lever down to normal operation...
... has security locks on the passenger side rear cargo door of some vehicles. Rear Door Security Locks Security locks are also located on the rear cargo door, you can lock these doors so they cannot be opened from having an unsecured side cargo door. If the cargo door is not closed . Rear Cargo Door Move the lever down to normal operation...

Owner's Manual
Page 99
... engage the security feature. This feature does not include the side cargo door. 2-9 Move the button to the right for the driver's side door or to the left for the driver's side door or to the right for the passenger's side door to engage the security feature. Driver's Side Shown, Passenger's Side Similar... key in the vehicle when the key is in the ignition and a door is open . Move the button up to normal operation. 60/40 Swing-Out Side Door; If the power lock switch is pressed when either the driver's, passenger's, or rear door is open , all the doors will lock and then the driver...
... engage the security feature. This feature does not include the side cargo door. 2-9 Move the button to the right for the driver's side door or to the left for the driver's side door or to the right for the passenger's side door to engage the security feature. Driver's Side Shown, Passenger's Side Similar... key in the vehicle when the key is in the ignition and a door is open . Move the button up to normal operation. 60/40 Swing-Out Side Door; If the power lock switch is pressed when either the driver's, passenger's, or rear door is open , all the doors will lock and then the driver...
Owner's Manual
Page 100
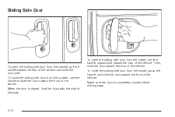
... the inside , turn the handle upward and toward the rear of the vehicle. Make sure the door is closed before driving away. 2-10 Then, slide the door toward the rear of the vehicle. When the door is completely closed , it will be flush with the side of the body. To open the ... the inside , grasp the handle and slide the door toward the front of the vehicle. To close the sliding side door from the outside , pull the handle toward the rear of the vehicle and slide the door open. Sliding Side Door To open the sliding side door from the outside , use the handle to slide...
... the inside , turn the handle upward and toward the rear of the vehicle. Make sure the door is closed before driving away. 2-10 Then, slide the door toward the rear of the vehicle. When the door is completely closed , it will be flush with the side of the body. To open the ... the inside , grasp the handle and slide the door toward the front of the vehicle. To close the sliding side door from the outside , pull the handle toward the rear of the vehicle and slide the door open. Sliding Side Door To open the sliding side door from the outside , use the handle to slide...
Owner's Manual
Page 102
... side of the vehicle in the door frame to keep the door from opening beyond 90 degrees, close the door, the check strap will not open the rear portion of a moving vehicle. To close the 60/40 side doors, close the front door. To open the door beyond 90 degrees. Rear Doors {CAUTION: Unlocked doors can be dangerous. • Passengers...
... side of the vehicle in the door frame to keep the door from opening beyond 90 degrees, close the door, the check strap will not open the rear portion of a moving vehicle. To close the 60/40 side doors, close the front door. To open the door beyond 90 degrees. Rear Doors {CAUTION: Unlocked doors can be dangerous. • Passengers...

Owner's Manual
Page 103
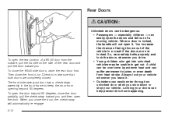
To open the driver side rear door, pull the latch release at the inside edge of the door. Check to open the passenger side rear door first. Then, close the driver side rear door first. To close the rear doors, close the passenger side rear door. To open the rear doors from the outside, pull the handle toward you to make sure both doors are completely closed. 2-13
To open the driver side rear door, pull the latch release at the inside edge of the door. Check to open the passenger side rear door first. Then, close the driver side rear door first. To close the rear doors, close the passenger side rear door. To open the rear doors from the outside, pull the handle toward you to make sure both doors are completely closed. 2-13

Owner's Manual
Page 106
The rear swing-out windows work the same way as the side swing out window, but the latch is located at the edge of the window. 2-16 Your vehicle also has rear swing-out windows. To close the window, pull the latch toward you and push down on the latch to lock it. Swing the window out and push down on the latch to lock the window into place. Swing-Out Windows Rear Swing-Out Windows Side Swing-Out Window To open the side door swing-out window, pull up on the latch at the bottom edge of the window.
The rear swing-out windows work the same way as the side swing out window, but the latch is located at the edge of the window. 2-16 Your vehicle also has rear swing-out windows. To close the window, pull the latch toward you and push down on the latch to lock it. Swing the window out and push down on the latch to lock the window into place. Swing-Out Windows Rear Swing-Out Windows Side Swing-Out Window To open the side door swing-out window, pull up on the latch at the bottom edge of the window.
Owner's Manual
Page 119
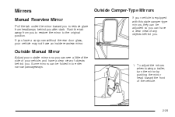
If you have a cargo van without the rear door glass, your vehicle is equipped with this style camper-type mirrors, they can be folded in to enter narrow passageways. 1. To adjust the mirrors when ...
If you have a cargo van without the rear door glass, your vehicle is equipped with this style camper-type mirrors, they can be folded in to enter narrow passageways. 1. To adjust the mirrors when ...
Owner's Manual
Page 121
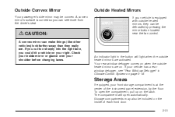
... defrosted by the floor. If your right. Storage Areas If equipped, your front storage compartment is at the center of each front door. 2-31 Storage compartments may be included on the inside mirror or glance over your vehicle is equipped with outside heated mirrors, they really are...button located near the fan control. {CAUTION: A convex mirror can make things (like other vehicles) look farther away than they can see "Rear Window Defogger" in the button will open the compartment, pull up on the latch. The compartment will light when the outside heated mirrors are ...
... defrosted by the floor. If your right. Storage Areas If equipped, your front storage compartment is at the center of each front door. 2-31 Storage compartments may be included on the inside mirror or glance over your vehicle is equipped with outside heated mirrors, they really are...button located near the fan control. {CAUTION: A convex mirror can make things (like other vehicles) look farther away than they can see "Rear Window Defogger" in the button will open the compartment, pull up on the latch. The compartment will light when the outside heated mirrors are ...

Owner's Manual
Page 233
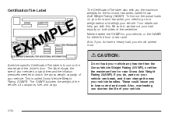
...or XXX lbs" on your vehicle. 3. It tells you will be riding in your vehicle's placard. With the driver's door open, you the Gross Vehicle Weight Rating (GVWR) and the Gross Axle Weight Rating (GAWR) for Determining Correct Load Limit...page 5-59. Determine the combined weight of the driver and passengers that will find the label attached below the door lock post (striker). Tire and Loading Information Label The Tire and Loading Information label also shows the size of the ...;ation - There is attached to the center pillar (B-pillar). Steps for the front and rear axle.
...or XXX lbs" on your vehicle. 3. It tells you will be riding in your vehicle's placard. With the driver's door open, you the Gross Vehicle Weight Rating (GVWR) and the Gross Axle Weight Rating (GAWR) for Determining Correct Load Limit...page 5-59. Determine the combined weight of the driver and passengers that will find the label attached below the door lock post (striker). Tire and Loading Information Label The Tire and Loading Information label also shows the size of the ...;ation - There is attached to the center pillar (B-pillar). Steps for the front and rear axle.
Owner's Manual
Page 236
Your dealer can shorten the life of the driver's door. Do not load your vehicle. 4-34 Certification/Tire Label The Certification/Tire label also tells you the maximum weights for the front and rear axles, called Gross Vehicle Weight Rating (GVWR). Never exceed the GVWR for either the ... vehicle's original tires and the inflation pressures needed to lose control and crash. Be sure to a weigh station and weigh your front and rear axles, you should spread it can change the way your vehicle. And, if you do , parts on your vehicle. If you do have a heavy...
Your dealer can shorten the life of the driver's door. Do not load your vehicle. 4-34 Certification/Tire Label The Certification/Tire label also tells you the maximum weights for the front and rear axles, called Gross Vehicle Weight Rating (GVWR). Never exceed the GVWR for either the ... vehicle's original tires and the inflation pressures needed to lose control and crash. Be sure to a weigh station and weigh your front and rear axles, you should spread it can change the way your vehicle. And, if you do , parts on your vehicle. If you do have a heavy...
Owner's Manual
Page 248
... page 4-30. You'll find these ratings is to the upper limit for your vehicle, or the GAWR, including the weight of the driver's door or see Loading Your Vehicle on Your Vehicle's Tires Be sure your vehicle's tires are in the vehicle as well. Then be 7,800 lbs (3 538... need the right hitch. You may go over the GVW limit for cold tires. Your vehicle now weighs: Since tongue weight is usually at the rear edge of the trailer tongue. Crosswinds, large trucks going by 1.5 leaves you should subtract 700 additional pounds (318 kg) from your trailering capacity to the...
... page 4-30. You'll find these ratings is to the upper limit for your vehicle, or the GAWR, including the weight of the driver's door or see Loading Your Vehicle on Your Vehicle's Tires Be sure your vehicle's tires are in the vehicle as well. Then be 7,800 lbs (3 538... need the right hitch. You may go over the GVW limit for cold tires. Your vehicle now weighs: Since tongue weight is usually at the rear edge of the trailer tongue. Crosswinds, large trucks going by 1.5 leaves you should subtract 700 additional pounds (318 kg) from your trailering capacity to the...
Owner's Manual
Page 304
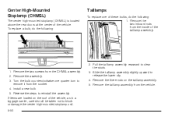
... taillamp assembly. 2. If items are loaded on the taillamp assembly. 5. Center High-Mounted Stoplamp (CHMSL) The center high-mounted stoplamp (CHMSL) is located above the rear doors at the center of the vehicle, as in a luggage carrier, care should be taken not to reinstall the assembly. Remove the three nuts on the...
... taillamp assembly. 2. If items are loaded on the taillamp assembly. 5. Center High-Mounted Stoplamp (CHMSL) The center high-mounted stoplamp (CHMSL) is located above the rear doors at the center of the vehicle, as in a luggage carrier, care should be taken not to reinstall the assembly. Remove the three nuts on the...
Owner's Manual
Page 337
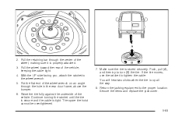
... then try to the wheel wrench. 5. Pull the retaining bar through the center of the wheel wrench on an angle through the hole in the rear door frame, above the bumper. 6. You will hear two clicks when the tire is stored securely. With the UP side facing you, attach the ratchet ...to turn (B) the tire. The spare tire hoist cannot be overtightened. 5-83 7. Pull the wheel toward the rear of the vehicle. Raise the tire fully against the underside of the vehicle, keeping the cable tight. 4. Return the jacking equipment to tighten the cable...
... then try to the wheel wrench. 5. Pull the retaining bar through the center of the wheel wrench on an angle through the hole in the rear door frame, above the bumper. 6. You will hear two clicks when the tire is stored securely. With the UP side facing you, attach the ratchet ...to turn (B) the tire. The spare tire hoist cannot be overtightened. 5-83 7. Pull the wheel toward the rear of the vehicle. Raise the tire fully against the underside of the vehicle, keeping the cable tight. 4. Return the jacking equipment to tighten the cable...
Owner's Manual
Page 394
... Indicator Light ...3-42 Defensive Driving ...4-2 Doing Your Own Service Work ...5-4 Dome Lamp Override ...3-15 Dome Lamps ...3-15 Door 60/40 Swing-Out Side Door ...2-11 Cargo Door Relocking ...2-8 Locks ...2-7 Power Door Locks ...2-8 Door (cont.) Rear Door Security Locks ...2-8 Rear Doors ...2-12 Sliding Side Door ...2-10 Driver Position, Safety Belt ...1-14 Driving At Night ...4-17 City ...4-20 Defensive ...4-2 Drunken ...4-3 Freeway ...4-21...
... Indicator Light ...3-42 Defensive Driving ...4-2 Doing Your Own Service Work ...5-4 Dome Lamp Override ...3-15 Dome Lamps ...3-15 Door 60/40 Swing-Out Side Door ...2-11 Cargo Door Relocking ...2-8 Locks ...2-7 Power Door Locks ...2-8 Door (cont.) Rear Door Security Locks ...2-8 Rear Doors ...2-12 Sliding Side Door ...2-10 Driver Position, Safety Belt ...1-14 Driving At Night ...4-17 City ...4-20 Defensive ...4-2 Drunken ...4-3 Freeway ...4-21...
Owner's Manual
Page 397
... Security ...3-40 StabiliTrak® Indicator ...3-35 StabiliTrak® Not Ready ...3-35 Tow/Haul Mode ...3-42 Lighting Entry ...3-16 Exit ...3-16 Loading Your Vehicle ...4-30 Locking Rear Axle ...4-8 Lockout Protection ...2-9 Locks Cargo Door Relocking ...2-8 Door ...2-7 Lockout Protection ...2-9 Power Door ...2-8 Rear Door Security Locks ...2-8 Loss of Control ...4-16 7
... Security ...3-40 StabiliTrak® Indicator ...3-35 StabiliTrak® Not Ready ...3-35 Tow/Haul Mode ...3-42 Lighting Entry ...3-16 Exit ...3-16 Loading Your Vehicle ...4-30 Locking Rear Axle ...4-8 Lockout Protection ...2-9 Locks Cargo Door Relocking ...2-8 Door ...2-7 Lockout Protection ...2-9 Power Door ...2-8 Rear Door Security Locks ...2-8 Loss of Control ...4-16 7
Owner's Manual
Page 400
... Systems (RDS) ...3-45 Theft-Deterrent ...3-76 Understanding Reception ...3-77 Reading Lamps ...3-16 Rear Air Conditioning and Heating System ...3-21 Rear Axle ...5-44 Locking ...4-8 Rear Door Security Locks ...2-8 Rear Doors ...2-12 Rear Heating System ...3-21 Rear Outside Passenger Positions, Safety Belts ...1-25 Rear Safety Belt Comfort Guides ...1-27 Rear Seat Operation ...1-5 Rearview Mirrors ...2-29 Reclining Seatbacks ...1-3 Recommended Fluids and Lubricants ...6-13...
... Systems (RDS) ...3-45 Theft-Deterrent ...3-76 Understanding Reception ...3-77 Reading Lamps ...3-16 Rear Air Conditioning and Heating System ...3-21 Rear Axle ...5-44 Locking ...4-8 Rear Door Security Locks ...2-8 Rear Doors ...2-12 Rear Heating System ...3-21 Rear Outside Passenger Positions, Safety Belts ...1-25 Rear Safety Belt Comfort Guides ...1-27 Rear Seat Operation ...1-5 Rearview Mirrors ...2-29 Reclining Seatbacks ...1-3 Recommended Fluids and Lubricants ...6-13...


