2006 Chevrolet Express Van Support Question
2006 Chevrolet Express Van Support Question
Find answers below for this question about 2006 Chevrolet Express Van.Need a 2006 Chevrolet Express Van manual? We have 1 online manual for this item!
Question posted by valerajarvis on April 30th, 2014
Instruction On How To Remove And Replace A Sliding Door Handle
Hello, Just wondering if anyone can help me out. Is there a video or step by step instructions on how to remove and install a sliding door handle on a 2006 Chevy Express Van? I recently accuired this van and have to chain up the sliding door every night. I bought a door handle from Amazon, but it never came with instructions. Thanks for looking in to this!
Current Answers
Related Manual Pages
Owner's Manual - Page 1
2006 Chevrolet Express Owner Manual
Seats and Restraint Systems ...1-1 Front Seats ...1-2 Rear Seats ...1-5 Safety Belts ...1-9 Child Restraints ...1-30 Airbag System ...1-65 Restraint System Check ...1-83 Features and Controls ...2-1 Keys ...2-2 Doors...Axle ...5-44 Noise Control System ...5-45 Bulb Replacement ...5-46 Windshield Wiper Blade Replacement ...5-52 Tires ...5-53 Appearance Care ...5-84 ...
Owner's Manual - Page 35
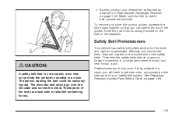
... Slide the guide into its storage pocket on page 1-25. They help the safety belts reduce a person's forward movement in Rear Outside Passenger Positions on the side of the guides. See Replacing... Belt Pretensioners
Your vehicle has safety belt pretensioners for your safety belt system. To remove and store the comfort guides, squeeze the belt edges together so that you cannot see...
Owner's Manual - Page 97
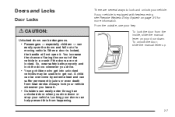
... slide the manual lever on your vehicle is locked, the handle will not open the doors and fall out of the vehicle in a crash if the doors are not locked. When a door ...CAUTION:
Unlocked doors can be dangerous. • Passengers - especially children - can easily open it . • Outsiders can help prevent this from happening. So, wear safety belts properly and lock the doors whenever you ...
Owner's Manual - Page 98
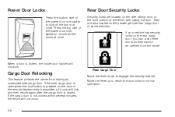
... lock all the doors at once. Rear Door Security Locks
Security locks are also located on the side sliding door, or the front portion of the 60/40 side swing-out door. If the cargo door is not closed .
Cargo Door Relocking
This feature protects the owner from the inside door handle will not occur.
2-8 Power Door Locks
Press the...
Owner's Manual - Page 99

... left for the passenger's side door to return the door locks to normal operation.
60/40 Swing-Out Side Door; Driver's Side Shown, Passenger's Side Similar
Side Sliding Door
Lockout Protection
This feature protects you from locking your key in the vehicle when the key is in the ignition and a door is open .
If the power...
Owner's Manual - Page 100
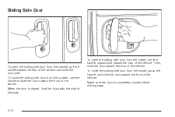
...;ush with the side of the body. To open . Then, slide the door toward the rear of the vehicle. To close the sliding side door from the outside , pull the handle toward the rear of the vehicle and slide the door open the sliding side door from the inside , grasp the handle and slide the door toward the front of the vehicle.
Owner's Manual - Page 219

.... Here are likely to see in the daytime. Even the inside of the glass can light up a film caused by approaching headlamps. Driving at Night
Night driving is more than day driving. Just as we get older these differences increase. Keep your vehicle clean - inside rearview mirror to reduce the glare
from...
Owner's Manual - Page 262

... flames, and smoking materials away from the fuel pump; never let children pump fuel. To remove the fuel cap, turn it slowly counterclockwise. Do not leave the fuel pump unattended when refueling your... when you are near fuel or refueling your vehicle - this is located behind a hinged fuel door on the driver's side of the vehicle.
Keep children away from fuel. While refueling, hang ...
Owner's Manual - Page 265
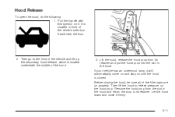
...the hood to its retainer and put the hood prop into the slot in front of the driver's side door frame near the floor.
2. Then go to the front of the vehicle and lift up the ...hood release, which is located underneath the middle of the filler caps are on the hood prop. Remove the hood prop from its retainer. Hood Release
To open the hood, do the following: 1. Let the...
Owner's Manual - Page 287

...can cause leaks and damage hoses and seals. Replace the cap and completely tighten it. 5. Then remove the cap again and look at the COLD... FILL mark. If necessary, add only enough fluid to bring the level up to Check Power Steering Fluid
To check the power steering fluid, do the following: 1. Failure to read the manufacturer's instructions...
Owner's Manual - Page 292
...remove the black, negative (−) cable from running down and you need new ones put in the wrong replacement...handling. If you do not, your brakes may no longer work well together if the vehicle is complex. The braking performance you have really good braking. This will help keep your battery from the battery.
When you replace parts of California to expect can explode.
Replacing...
Owner's Manual - Page 304
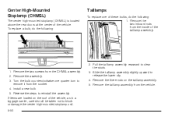
... center high-mounted stoplamp unit. 5-50 3. Install a new bulb. 5. Reverse the steps to clear the studs. 1. Remove the two inboard nuts from the socket. 4. If items are loaded on the taillamp assembly. 5. To replace a bulb, do the following:
Taillamps
To replace one quarter turn to release the lower clip. 4. Slide the taillamp assembly slightly upward to...
Owner's Manual - Page 306

... end that are removed in different ways. To remove the type with two blade claws. See Scheduled Maintenance (Gasoline Engine) on page 6-4 for wear and cracking. At the notched end, pull the insert from the wiper arm hook. 3. To install the new wiper insert, slide the notched end last, into a vertical position. 2. Replacement blades come...
Owner's Manual - Page 314

... air until you load your vehicle affects vehicle handling and ride comfort, never load your vehicle can...vehicle's center pillar (B-pillar), below the driver's door latch. A Tire and Loading Information label is ... Your Vehicle on the valve stems. They help prevent leaks by looking at them. For ...pressure with more weight than 1 mile (1.6 km). Remove the valve cap from the tire valve stem. How...
Owner's Manual - Page 336
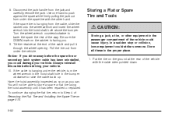
...pull it has been repaired or replaced. Disconnect the jack handle from under the spare tire with...rmly pulling the jack out from the cable, slide the ratchet onto the wheel wrench and insert the... lower the spare the rest of Removing the Flat Tire and Installing the Spare Tire on the ratchet ...equipment could cause injury. You will not be able to Step 4 of the way. If the spare tire is ...
Owner's Manual - Page 338

...at road tire repaired or replaced as soon as you can and installed back onto your vehicle....Removing the Flat Tire and Installing the Spare Tire on page 5-75 and Storing a Flat or Spare Tire and Tools on your vehicle, you need it is correctly inflated. This spare tire was developed for which they were not intended.
Use glass cleaner only on your vehicle. For instructions...
Owner's Manual - Page 339

...effectiveness of heavy pressure can damage your vehicle's doors and windows. When cleaning the glass on the label. Use of soil removal.
• Use only mild, neutral-pH soaps.... Notice: If you use abrasive cleaners when cleaning glass surfaces on your vehicle, you can also obtain a product from your GM dealer to all safety instructions...
Owner's Manual - Page 347

...removed from outside your vehicle. It appears on a plate in the VIN is the legal identifier for your vehicle's engine, specifications, and replacement... parts. This code will find the following:
This is the engine code. VIN Model designation Paint information Production options and special equipment
Be sure that this label you will help...is very helpful if you...
Owner's Manual - Page 400
... Air Conditioning and Heating System ...3-21 Rear Axle ...5-44 Locking ...4-8 Rear Door Security Locks ...2-8 Rear Doors ...2-12 Rear Heating System ...3-21 Rear Outside Passenger Positions, Safety Belts ...Keyless Entry System, Operation ...2-4 Removing the Flat Tire and Installing the Spare Tire ...5-75
Removing the Spare Tire and Tools ...5-72 Replacement Bulbs ...5-51 Reporting Safety Defects...
Owner's Manual - Page 402

...Sand, Mud, Ice or Snow ...4-29 Sun Visors ...2-17 Swing-Out Side Door, 60/40 ...2-11 Swing-Out Windows ...2-16
T
Taillamps ...5-50 Theft-...Chains ...5-69 Changing a Flat Tire ...5-71
Tires (cont.) Cleaning ...Different Size ...Dual Tire Operation ...If a Tire Goes Flat ...Inflation -- Tire Pressure ...Inspection and Rotation ...Installing the Spare Tire ...Removing the Flat Tire ...Removing...
Similar Questions

How To Remove Horn Cover O On 2000 Chevy Express Van
(Posted by samcola 9 years ago)

How To Remove Rear Rotors On A 2006 Chevy Express Van
(Posted by grdeath 10 years ago)

How To Remove Seats From 2006 Chevy Express Van
(Posted by KiBr 10 years ago)

How To Remove Plastic Housing Heater Core 1997 Chevy Express Van
(Posted by visjjtr 10 years ago)

How To Remove Interior Sliding Door Panel On 2006 Chevy Express
(Posted by beki9larl 10 years ago)