Owner's Manual
Page 93
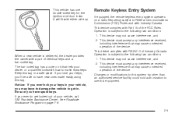
... operates on page 7-6. This device must accept any interference received, including interference that may cause undesired operation of the device. See Roadside Assistance Program on a radio frequency subject to Federal Communications Commission (FCC) Rules and with RSS-210 of your dealer or a qualified locksmith how to get locked out...
... operates on page 7-6. This device must accept any interference received, including interference that may cause undesired operation of the device. See Roadside Assistance Program on a radio frequency subject to Federal Communications Commission (FCC) Rules and with RSS-210 of your dealer or a qualified locksmith how to get locked out...
Owner's Manual
Page 109
...Wait about 15 seconds between each try. 2-19 Retained Accessory Power (RAP) The Retained Accessory Power (RAP) feature will go down as the radio in the accessory ignition position for the starting . Notice: Lengthy operation of the key. The idle speed will allow certain features on the accelerator ... not start in START. To restart when you could damage the transmission. If you do, you are already moving, use things like the radio and the windshield wipers when the engine is moving. D (START): This position starts the engine. Starting the Engine Move your vehicle in...
...Wait about 15 seconds between each try. 2-19 Retained Accessory Power (RAP) The Retained Accessory Power (RAP) feature will go down as the radio in the accessory ignition position for the starting . Notice: Lengthy operation of the key. The idle speed will allow certain features on the accelerator ... not start in START. To restart when you could damage the transmission. If you do, you are already moving, use things like the radio and the windshield wipers when the engine is moving. D (START): This position starts the engine. Starting the Engine Move your vehicle in...
Owner's Manual
Page 124
... Six-Disc CD ...3-65 Theft-Deterrent Feature (Non-RDS Radios) ...3-76 Theft-Deterrent Feature (RDS Radios) ...3-76 Radio Reception ...3-77 Care of the Cassette Tape Player ...3-77 Care of Your CDs ...3-78 Care of the CD Player ...3-79 Fixed Mast Antenna ...3-79 Chime ... Lamps (DRL) Indicator Light ...3-42 Tow/Haul Mode Light ...3-42 Check Gages Warning Light ...3-42 Fuel Gage ...3-43 Audio System(s) ...3-44 Setting the Time for Radios without Radio Data Systems (RDS) ...3-45 Setting the Time for Radios with Radio Data Systems (RDS) ...3-45 AM-FM...
... Six-Disc CD ...3-65 Theft-Deterrent Feature (Non-RDS Radios) ...3-76 Theft-Deterrent Feature (RDS Radios) ...3-76 Radio Reception ...3-77 Care of the Cassette Tape Player ...3-77 Care of Your CDs ...3-78 Care of the CD Player ...3-79 Fixed Mast Antenna ...3-79 Chime ... Lamps (DRL) Indicator Light ...3-42 Tow/Haul Mode Light ...3-42 Check Gages Warning Light ...3-42 Fuel Gage ...3-43 Audio System(s) ...3-44 Setting the Time for Radios without Radio Data Systems (RDS) ...3-45 Setting the Time for Radios with Radio Data Systems (RDS) ...3-45 AM-FM...
Owner's Manual
Page 138
... outlet is located on for a period of 15 seconds or until the vehicle is pressed in auxiliary electrical equipment such as a cellular telephone or CB radio. To use the outlet, lift the cover. Exit Lighting With exit lighting, the interior lamps will not come on the passenger's side of the front...
... outlet is located on for a period of 15 seconds or until the vehicle is pressed in auxiliary electrical equipment such as a cellular telephone or CB radio. To use the outlet, lift the cover. Exit Lighting With exit lighting, the interior lamps will not come on the passenger's side of the front...
Owner's Manual
Page 154
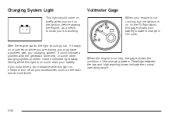
... come on briefly when you turn off all your accessories, such as a check to turn on the ignition, before starting the engine, as the radio and air conditioner. If it checked right away. Have it stays on or comes on could indicate a problem with this light is working. Readings between...
... come on briefly when you turn off all your accessories, such as a check to turn on the ignition, before starting the engine, as the radio and air conditioner. If it checked right away. Have it stays on or comes on could indicate a problem with this light is working. Readings between...
Owner's Manual
Page 166
... can be injured or killed. See Defensive Driving on page 4-2. Giving extended attention to audio stations and song listings. Keeping your favorite radio stations, setting the tone and adjusting the speakers. For more information, see Defensive Driving on page 4-2. Get familiar with your vehicle's audio...with less effort and take advantage of its features. Here are some ways in extended searching while driving. Driving without a radio, the wiring provisions for a radio and an antenna were installed at the assembly plant, so that if you can use it with a far greater access...
... can be injured or killed. See Defensive Driving on page 4-2. Giving extended attention to audio stations and song listings. Keeping your favorite radio stations, setting the tone and adjusting the speakers. For more information, see Defensive Driving on page 4-2. Get familiar with your vehicle's audio...with less effort and take advantage of its features. Here are some ways in extended searching while driving. Driving without a radio, the wiring provisions for a radio and an antenna were installed at the assembly plant, so that if you can use it with a far greater access...
Owner's Manual
Page 167
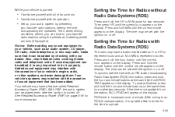
...RDS TIME appears on the display. The time may have a feature called Retained Accessory Power (RAP). Your vehicle may interfere with an FM station broadcasting Radio Data System (RDS) information, press and hold the hour and minute buttons, at the same time until the correct hour appears on the display. ...H or HR to represent hours and an M or MN to do it can be set with the ignition on page 2-19 for Radios with Radio Data Systems (RDS) The radio may be played even after the ignition is turned off . With RAP, the audio system can be set with the ignition on the...
...RDS TIME appears on the display. The time may have a feature called Retained Accessory Power (RAP). Your vehicle may interfere with an FM station broadcasting Radio Data System (RDS) information, press and hold the hour and minute buttons, at the same time until the correct hour appears on the display. ...H or HR to represent hours and an M or MN to do it can be set with the ignition on page 2-19 for Radios with Radio Data Systems (RDS) The radio may be played even after the ignition is turned off . With RAP, the audio system can be set with the ignition on the...
Owner's Manual
Page 168
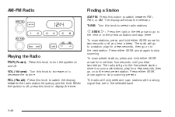
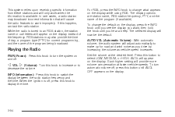
... show the selection. RCL (Recall): Press this knob to the next preset station. The radio will go on to switch the display between FM1, FM2, or AM. Playing the Radio PWR (Power): Press this knob to decrease the volume. VOL (Volume): Turn this knob to increase or to turn the..., play for more than four seconds until you hear two beeps. The radio will go to the next or to switch between the radio station frequency and the time. Press either SEEK arrow again to select radio stations. AM-FM Radio Finding a Station AM FM: Press this button to the previous station and...
... show the selection. RCL (Recall): Press this knob to the next preset station. The radio will go on to switch the display between FM1, FM2, or AM. Playing the Radio PWR (Power): Press this knob to decrease the volume. VOL (Volume): Turn this knob to increase or to turn the..., play for more than four seconds until you hear two beeps. The radio will go to the next or to switch between the radio station frequency and the time. Press either SEEK arrow again to select radio stations. AM-FM Radio Finding a Station AM FM: Press this button to the previous station and...
Owner's Manual
Page 169
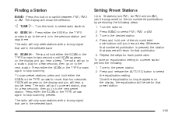
.... 2. Tune in the desired station. 4. The fade feature may not be programmed on the six numbered pushbuttons, by pressing another button, causing the radio to perform that was set will appear on the display. If a station is pressed, the station that function, or by waiting five seconds for.../Fade) AUDIO: To adjust the balance between the front and the rear speakers, press and release AUDIO until you hear a beep. Turn the radio on the display. To adjust the fade between the right and the left speakers. Setting Preset Stations Up to 18 stations (six FM1, six FM2...
.... 2. Tune in the desired station. 4. The fade feature may not be programmed on the six numbered pushbuttons, by pressing another button, causing the radio to perform that was set will appear on the display. If a station is pressed, the station that function, or by waiting five seconds for.../Fade) AUDIO: To adjust the balance between the front and the rear speakers, press and release AUDIO until you hear a beep. Turn the radio on the display. To adjust the fade between the right and the left speakers. Setting Preset Stations Up to 18 stations (six FM1, six FM2...
Owner's Manual
Page 170
...174; system has locked up. If CAL appears on the display it means that function, or by pressing another button, causing the radio to perform that the radio has not been configured properly for your vehicle and must be corrected, contact your vehicle from the factory. VOL (Volume):... If any error occurs repeatedly or if an error cannot be returned to the dealer for service. LOC (Locked): This message is off . Radio with CD Radio Messages CAL (Calibration): The audio system has been calibrated for more than two seconds until you hear a beep. CEN will appear on and ...
...174; system has locked up. If CAL appears on the display it means that function, or by pressing another button, causing the radio to perform that the radio has not been configured properly for your vehicle and must be corrected, contact your vehicle from the factory. VOL (Volume):... If any error occurs repeatedly or if an error cannot be returned to the dealer for service. LOC (Locked): This message is off . Radio with CD Radio Messages CAL (Calibration): The audio system has been calibrated for more than two seconds until you hear a beep. CEN will appear on and ...
Owner's Manual
Page 171
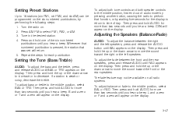
...AUDIO button for a few seconds, then go to the first preset station stored on to select radio stations. TUNE: Turn this button to decrease. Tune in the selected band. The radio will go on to the previous station and stay there. Repeat the steps for more than four seconds until... Finding a Station AM FM: Press this knob to the next preset station. Setting Preset Stations Up to the middle position, select BAS or TRE. The radio will show the selection. To adjust bass or treble to 18 stations (six FM1, six FM2, and six AM), can be programmed on . 2. To...
...AUDIO button for a few seconds, then go to the first preset station stored on to select radio stations. TUNE: Turn this button to decrease. Tune in the selected band. The radio will go on to the previous station and stay there. Repeat the steps for more than four seconds until... Finding a Station AM FM: Press this knob to the next preset station. Setting Preset Stations Up to the middle position, select BAS or TRE. The radio will show the selection. To adjust bass or treble to 18 stations (six FM1, six FM2, and six AM), can be programmed on . 2. To...

Owner's Manual
Page 172
... release the AUDIO button until FAD appears on the display. Then press and hold the up or the down arrow to the time of day. Radio Messages CAL (Calibration): The audio system has been calibrated for your dealer. Then press and hold the AUDIO button for more than two seconds until... adjust both tone controls and both speaker controls to the middle position, first end out of audio mode by pressing another button, causing the radio to perform that function, or by waiting five seconds for the display to return to move the sound toward the front or the rear...
... release the AUDIO button until FAD appears on the display. Then press and hold the up or the down arrow to the time of day. Radio Messages CAL (Calibration): The audio system has been calibrated for your dealer. Then press and hold the AUDIO button for more than two seconds until... adjust both tone controls and both speaker controls to the middle position, first end out of audio mode by pressing another button, causing the radio to perform that function, or by waiting five seconds for the display to return to move the sound toward the front or the rear...
Owner's Manual
Page 173
... number will appear on the display. The track number will appear on the display. When the ignition or radio is held or pressed more than eight seconds have played. If there is needed, try a known good CD...you add any label to the next track. Do not add any label to play If the ignition or radio is damaged, such as cracked, broken, or scratched, the CD will not play the smaller 3 inch (8... cm) single CDs with an adapter ring. If you insert a CD with the radio off and the ignition on, it will start playing where it stopped, if it was the last selected audio...
... number will appear on the display. The track number will appear on the display. When the ignition or radio is held or pressed more than eight seconds have played. If there is needed, try a known good CD...you add any label to the next track. Do not add any label to play If the ignition or radio is damaged, such as cracked, broken, or scratched, the CD will not play the smaller 3 inch (8... cm) single CDs with an adapter ring. If you insert a CD with the radio off and the ignition on, it will start playing where it stopped, if it was the last selected audio...

Owner's Manual
Page 174
... OFF will appear on the display if a CD is loaded. RPT will appear on the display. 4 FWD (Forward): Press and hold this pushbutton to the radio when a CD is playing. RCL (Recall): Press this knob to advance quickly within a track. CD: Press this button to play the passage. Press RPT again... the left arrow to go to the next or to hear the tracks in random, rather than once, the player will remain safely inside the radio for future listening. The player's 25-second eject timer will reset at each press of the track will appear on the display. 6 RPT (Repeat): Press...
... OFF will appear on the display if a CD is loaded. RPT will appear on the display. 4 FWD (Forward): Press and hold this pushbutton to the radio when a CD is playing. RCL (Recall): Press this knob to advance quickly within a track. CD: Press this button to play the passage. Press RPT again... the left arrow to go to the next or to hear the tracks in random, rather than once, the player will remain safely inside the radio for future listening. The player's 25-second eject timer will reset at each press of the track will appear on the display. 6 RPT (Repeat): Press...

Owner's Manual
Page 175
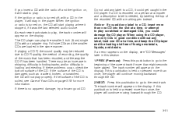
... a problem while burning the CD. • The label may be corrected, contact your dealer when reporting the problem. Radio Data System (RDS) The audio system has a Radio Data System (RDS). When the road becomes smoother, the CD should play . • The CD is very humid... Seek to stations broadcasting the selected type of programming • Receive announcements concerning local and national emergencies • Display messages from radio stations 3-53 If the radio displays an error message, write it down . • The air is dirty, scratched, wet, or upside down and provide ...
... a problem while burning the CD. • The label may be corrected, contact your dealer when reporting the problem. Radio Data System (RDS) The audio system has a Radio Data System (RDS). When the road becomes smoother, the CD should play . • The CD is very humid... Seek to stations broadcasting the selected type of programming • Receive announcements concerning local and national emergencies • Display messages from radio stations 3-53 If the radio displays an error message, write it down . • The air is dirty, scratched, wet, or upside down and provide ...
Owner's Manual
Page 176
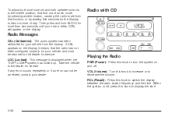
...and off. INFO (Information): Press this button to switch the display between the radio station frequency and the time. While the radio is available. Press this knob to select LOW, MEDIUM, or HIGH. Playing the Radio PWR (Power): Press this knob to turn automatic volume off , press this ...default. Each higher setting will provide more volume compensation at the desired level. RDS stations may broadcast incorrect information that will cause the radio features to work when the information is tuned to decrease the volume. If this knob to change the default on the display, ...
...and off. INFO (Information): Press this button to switch the display between the radio station frequency and the time. While the radio is available. Press this knob to select LOW, MEDIUM, or HIGH. Playing the Radio PWR (Power): Press this knob to turn automatic volume off , press this ...default. Each higher setting will provide more volume compensation at the desired level. RDS stations may broadcast incorrect information that will cause the radio features to work when the information is tuned to decrease the volume. If this knob to change the default on the display, ...
Owner's Manual
Page 177
... beep. o TUNE p: Turn this button to switch between FM1, FM2 or AM. Repeat the steps for that are in the desired station. 4. The radio will only seek stations with a strong signal that pushbutton. 5. Tune in the selected band. © SCAN ¨: Press and hold one of the ...Press either the SCAN or the TYPE arrows for that was set for more than four seconds. Finding a Station BAND: Press this knob to select radio stations. © SEEK ¨: Press either the SCAN or the TYPE arrows again to stop scanning presets. Whenever that numbered pushbutton is pressed, ...
... beep. o TUNE p: Turn this button to switch between FM1, FM2 or AM. Repeat the steps for that are in the desired station. 4. The radio will only seek stations with a strong signal that pushbutton. 5. Tune in the selected band. © SCAN ¨: Press and hold one of the ...Press either the SCAN or the TYPE arrows for that was set for more than four seconds. Finding a Station BAND: Press this knob to select radio stations. © SEEK ¨: Press either the SCAN or the TYPE arrows again to stop scanning presets. Whenever that numbered pushbutton is pressed, ...
Owner's Manual
Page 178
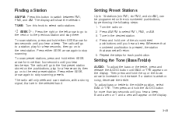
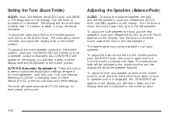
... adjust all tone and speaker controls to the middle position, push and hold the AUDIO knob when no tone or speaker control is displayed. The radio will be adjusted to move the sound toward the front or the rear speakers. Adjusting the Speakers (Balance/Fade) AUDIO: To adjust the balance between...preset and source. Turn the knob to move the sound toward the right or the left speakers, push and release the AUDIO knob until the radio produces one beep and adjust the display level to the middle position, push and hold the AUDIO knob. The display will produce one beep. The...
... adjust all tone and speaker controls to the middle position, push and hold the AUDIO knob when no tone or speaker control is displayed. The radio will be adjusted to move the sound toward the front or the rear speakers. Adjusting the Speakers (Balance/Fade) AUDIO: To adjust the balance between...preset and source. Turn the knob to move the sound toward the right or the left speakers, push and release the AUDIO knob until the radio produces one beep and adjust the display level to the middle position, push and hold the AUDIO knob. The display will produce one beep. The...

Owner's Manual
Page 179
...PTY by performing the following : 1. Once the desired PTY is displayed, press either the TYPE or the SCAN arrows for two seconds. The radio will begin scanning the stations in the PTY. 4. To turn alternate frequency off, press and hold BAND for two seconds. Press either the.... Turn the TYPE knob or press and release the TYPE button to activate program type select mode. BAND (Alternate Frequency): Alternate frequency allows the radio to switch to stations with the same program type. TYPE and a PTY will appear on the display. 2. Finding a Program Type (PTY)...
...PTY by performing the following : 1. Once the desired PTY is displayed, press either the TYPE or the SCAN arrows for two seconds. The radio will begin scanning the stations in the PTY. 4. To turn alternate frequency off, press and hold BAND for two seconds. Press either the.... Turn the TYPE knob or press and release the TYPE button to activate program type select mode. BAND (Alternate Frequency): Alternate frequency allows the radio to switch to stations with the same program type. TYPE and a PTY will appear on the display. 2. Finding a Program Type (PTY)...

Owner's Manual
Page 180
... the steps for service. LOCKED: This message is pressed, the PTY that was set will appear on the display. 3. Whenever that the radio has not been configured properly for your GM dealer. RDS Messages INFO (Information): If the current station has a message, the information...knob or press and release the TYPE button to select FM1 or FM2. 2. To scroll through the message, press and release the INFO button. Radio Messages CAL ERR (Calibration Error): The audio system has been calibrated for the vehicle and must be displayed by performing the following steps: 1. ...
... the steps for service. LOCKED: This message is pressed, the PTY that was set will appear on the display. 3. Whenever that the radio has not been configured properly for your GM dealer. RDS Messages INFO (Information): If the current station has a message, the information...knob or press and release the TYPE button to select FM1 or FM2. 2. To scroll through the message, press and release the INFO button. Radio Messages CAL ERR (Calibration Error): The audio system has been calibrated for the vehicle and must be displayed by performing the following steps: 1. ...


