Owner's Manual
Page 1
2006 Chevrolet Equinox Owner Manual Seats and Restraint Systems ...1-1 Front Seats ...1-2 Rear Seats ...1-10 Safety Belts ...1-12 Child Restraints ...1-30 Airbag System ...1-53 Restraint System Check ...1-63 Features and Controls ...2-1 Keys ...2-2 Doors and Locks ...2-6 Windows ...2-11 Theft-Deterrent Systems ...2-13 Starting and Operating Your Vehicle ...2-15 Mirrors ...2-27 OnStar® System ...2-32 Storage ...
2006 Chevrolet Equinox Owner Manual Seats and Restraint Systems ...1-1 Front Seats ...1-2 Rear Seats ...1-10 Safety Belts ...1-12 Child Restraints ...1-30 Airbag System ...1-53 Restraint System Check ...1-63 Features and Controls ...2-1 Keys ...2-2 Doors and Locks ...2-6 Windows ...2-11 Theft-Deterrent Systems ...2-13 Starting and Operating Your Vehicle ...2-15 Mirrors ...2-27 OnStar® System ...2-32 Storage ...
Owner's Manual
Page 2
This manual includes the latest information at the time it can be there if it is needed while you learn about the features and controls for Chevrolet Motor Division whenever it appears in this manual. How to Use This Manual Many people read the owner manual from : Helm, Incorporated P.O. Part ...name "General Motors of Canada Limited" for the vehicle. Box 07130 Detroit, MI 48207 GENERAL MOTORS, GM, the GM Emblem, CHEVROLET, the CHEVROLET Emblem, and the name EQUINOX are on the road. Keep this manual in the vehicle, so it will be obtained from your dealer or from beginning to ...
This manual includes the latest information at the time it can be there if it is needed while you learn about the features and controls for Chevrolet Motor Division whenever it appears in this manual. How to Use This Manual Many people read the owner manual from : Helm, Incorporated P.O. Part ...name "General Motors of Canada Limited" for the vehicle. Box 07130 Detroit, MI 48207 GENERAL MOTORS, GM, the GM Emblem, CHEVROLET, the CHEVROLET Emblem, and the name EQUINOX are on the road. Keep this manual in the vehicle, so it will be obtained from your dealer or from beginning to ...
Owner's Manual
Page 4
... also warning labels on the vehicle. They use symbols instead of a component, gage, or indicator, reference the following topics: Seats and Restraint Systems in Section 1 Features and Controls in Section 2 Instrument Panel Overview in Section 3 Climate Controls in Section 3 Warning Lights, Gages, and Indicators in Section 3 Audio System(s) in Section 3 Engine...
... also warning labels on the vehicle. They use symbols instead of a component, gage, or indicator, reference the following topics: Seats and Restraint Systems in Section 1 Features and Controls in Section 2 Instrument Panel Overview in Section 3 Climate Controls in Section 3 Warning Lights, Gages, and Indicators in Section 3 Audio System(s) in Section 3 Engine...

Owner's Manual
Page 9
... lever downward repeatedly until the seat is at the desired height. Driver Seat Height Adjuster Six-Way Power Driver Seat If your vehicle has this feature, the control is located on the outboard side of the seat near the front of the seat cushion.
... lever downward repeatedly until the seat is at the desired height. Driver Seat Height Adjuster Six-Way Power Driver Seat If your vehicle has this feature, the control is located on the outboard side of the seat near the front of the seat cushion.
Owner's Manual
Page 10
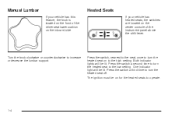
... switch a second time to turn the heated seat on the inboard side. Both indicator lights will be lit. Heated Seats If your vehicle has this feature, the knob is located on the front of the instrument panel above the shift lever. Turn the knob clockwise or counterclockwise to increase or decrease...
... switch a second time to turn the heated seat on the inboard side. Both indicator lights will be lit. Heated Seats If your vehicle has this feature, the knob is located on the front of the instrument panel above the shift lever. Turn the knob clockwise or counterclockwise to increase or decrease...
Owner's Manual
Page 31
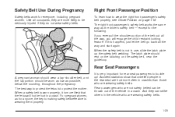
... belt, and the lap portion should rest on the stitching on page 1-18. Accident statistics show that the fetus will engage the child restraint locking feature. When a safety belt is worn properly, it is very important for anyone, the key to wear the right front passenger's safety belt properly, see Driver...
... belt, and the lap portion should rest on the stitching on page 1-18. Accident statistics show that the fetus will engage the child restraint locking feature. When a safety belt is worn properly, it is very important for anyone, the key to wear the right front passenger's safety belt properly, see Driver...
Owner's Manual
Page 68
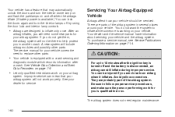
... flate during improper service. Be sure to follow proper service procedures, and make sure the person performing work for service. 1-62 Your vehicle has a feature that your airbag system will include airbag modules and possibly other parts. {CAUTION: For up to in several places around your airbag system. You can...
... flate during improper service. Be sure to follow proper service procedures, and make sure the person performing work for service. 1-62 Your vehicle has a feature that your airbag system will include airbag modules and possibly other parts. {CAUTION: For up to in several places around your airbag system. You can...
Owner's Manual
Page 71
Section 2 Features and Controls Shifting Into Park (P) ...2-23 Shifting Out of Park (P) ...2-24 Parking Over Things That Burn ...2-25 Engine Exhaust ...2-25 Running the Engine While Parked ...2-...
Section 2 Features and Controls Shifting Into Park (P) ...2-23 Shifting Out of Park (P) ...2-24 Parking Over Things That Burn ...2-25 Engine Exhaust ...2-25 Running the Engine While Parked ...2-...
Owner's Manual
Page 74
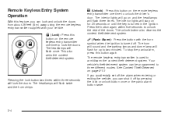
.... 2-4 Remote Keyless Entry System Operation With this button on the remote keyless entry transmitter one time to unlock the driver's door. K (Unlock): Q (Lock): Press this feature, you can be programmed to arm/disarm the content theft-deterrent system. The interior lights will go on and the headlamps will stay on for...
.... 2-4 Remote Keyless Entry System Operation With this button on the remote keyless entry transmitter one time to unlock the driver's door. K (Unlock): Q (Lock): Press this feature, you can be programmed to arm/disarm the content theft-deterrent system. The interior lights will go on and the headlamps will stay on for...
Owner's Manual
Page 77
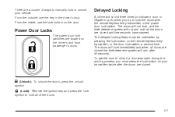
... are closed and five seconds have passed. Delayed Locking A chime will arm after 30 seconds. There are a couple of the doors. 2-7 The delayed locking feature can be overridden by pressing the lock button on the driver's and front passenger's doors. Power Door Locks The power door lock switches are located...
... are closed and five seconds have passed. Delayed Locking A chime will arm after 30 seconds. There are a couple of the doors. 2-7 The delayed locking feature can be overridden by pressing the lock button on the driver's and front passenger's doors. Power Door Locks The power door lock switches are located...
Owner's Manual
Page 78
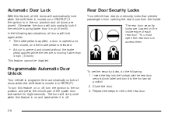
...automatically lock when the shift lever is moved out of each rear door. This feature cannot be disabled. To set the security locks, do the following two situations, ...lock above the rear door security lock label and turn the ignition to the horizontal position. 2. To turn this feature is on or off . Close the door. 3. The horn will automatically lock if the vehicle is off ,...turn it is going faster than 3 mph (5 km/h). Otherwise, the doors will chirp once when this feature on and twice when it to the run position and all doors will lock again when: Rear Door Security...
...automatically lock when the shift lever is moved out of each rear door. This feature cannot be disabled. To set the security locks, do the following two situations, ...lock above the rear door security lock label and turn the ignition to the horizontal position. 2. To turn this feature is on or off . Close the door. 3. The horn will automatically lock if the vehicle is off ,...turn it is going faster than 3 mph (5 km/h). Otherwise, the doors will chirp once when this feature on and twice when it to the run position and all doors will lock again when: Rear Door Security...
Owner's Manual
Page 82
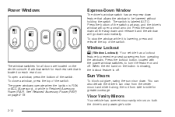
...lowered without holding the switch. Window Lockout o (Window Lockout): Sun Visors To block out glare, swing the sun visor down feature that allows the window to turn the feature on page 2-16. Press the bottom of the switch. The power windows operate when the ignition is labeled AUTO. See ... driver's window will go down automatically. A window switch for all the way down all doors are located on the button is showing, the lockout feature is lowering, press and release the top of the switch. Press the switch down and release it is off . To open a small amount. ...
...lowered without holding the switch. Window Lockout o (Window Lockout): Sun Visors To block out glare, swing the sun visor down feature that allows the window to turn the feature on page 2-16. Press the bottom of the switch. The power windows operate when the ignition is labeled AUTO. See ... driver's window will go down automatically. A window switch for all the way down all doors are located on the button is showing, the lockout feature is lowering, press and release the top of the switch. Press the switch down and release it is off . To open a small amount. ...

Owner's Manual
Page 83
... immediately. Your vehicle's theft-deterrent system can make it can be programmed to three different modes. 2-13 Although your vehicle has a number of theft-deterrent features, we know that nothing we put on the transmitter is turned off and the driver's door has been opened and closed. Passive Arming: The system...
... immediately. Your vehicle's theft-deterrent system can make it can be programmed to three different modes. 2-13 Although your vehicle has a number of theft-deterrent features, we know that nothing we put on the transmitter is turned off and the driver's door has been opened and closed. Passive Arming: The system...
Owner's Manual
Page 86
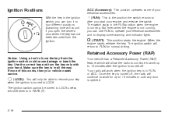
.... When the engine starts, release the key. Use the correct key and turn it to four different positions. Your vehicle has a Retained Accessory Power (RAP) feature which will allow the radio to continue to work up to 10 minutes or until any door is opened. 9 (LOCK): You will continue to work...
.... When the engine starts, release the key. Use the correct key and turn it to four different positions. Your vehicle has a Retained Accessory Power (RAP) feature which will allow the radio to continue to work up to 10 minutes or until any door is opened. 9 (LOCK): You will continue to work...
Owner's Manual
Page 87
... the accelerator pedal. When the engine starts, let go of the key. Wait about 15 seconds between each try to keep cranking. It is a safety feature. If you add electrical parts or accessories, you turn the ignition key to drain much sooner. Your engine will go down as stated earlier, when...
... the accelerator pedal. When the engine starts, let go of the key. Wait about 15 seconds between each try to keep cranking. It is a safety feature. If you add electrical parts or accessories, you turn the ignition key to drain much sooner. Your engine will go down as stated earlier, when...
Owner's Manual
Page 88
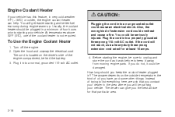
.... 4. Plug the cord into a normal, grounded 110-volt AC outlet. 2-18 Usually, the coolant heater should you will get easier starting your vehicle has this feature, in a minimum of trying to starting and better fuel economy during engine warm-up. At temperatures above 32°F (0°C), use a heavy-duty three-prong...
.... 4. Plug the cord into a normal, grounded 110-volt AC outlet. 2-18 Usually, the coolant heater should you will get easier starting your vehicle has this feature, in a minimum of trying to starting and better fuel economy during engine warm-up. At temperatures above 32°F (0°C), use a heavy-duty three-prong...
Owner's Manual
Page 97
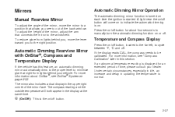
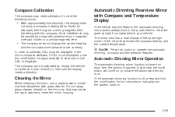
... has this section. For more information about four seconds to manually turn the automatic dimming function on or off button will both appear in this feature, an automatic dimming mirror automatically dims to the proper level to minimize glare at the same time. The mirror also includes a dual display in updating...
... has this section. For more information about four seconds to manually turn the automatic dimming function on or off button will both appear in this feature, an automatic dimming mirror automatically dims to the proper level to minimize glare at the same time. The mirror also includes a dual display in updating...
Owner's Manual
Page 99
...heading (N for North, for example), there may be caused by driving the vehicle in the mirror compass windows. Y On/Off: Press this feature, the automatic dimming mirror automatically dims to the proper level to enter the mirror housing. 2-29 Automatic Dimming Mirror Operation The automatic dimming mirror ... from lights behind your vehicle. A light near the on/off button for four seconds to operate the automatic dimming, compass and temperature features. If CAL is not displayed, push the on/off button will come on to indicate the automatic dimming is off, press and hold...
...heading (N for North, for example), there may be caused by driving the vehicle in the mirror compass windows. Y On/Off: Press this feature, the automatic dimming mirror automatically dims to the proper level to enter the mirror housing. 2-29 Automatic Dimming Mirror Operation The automatic dimming mirror ... from lights behind your vehicle. A light near the on/off button for four seconds to operate the automatic dimming, compass and temperature features. If CAL is not displayed, push the on/off button will come on to indicate the automatic dimming is off, press and hold...
Owner's Manual
Page 104
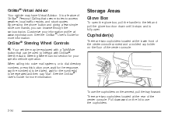
.... It is fully open the glove box, pull the handle to the left and pull the glove box door down until it stops and is a feature of the center console armrest and a molded cupholder on the armrest, pull the tray forward. Customize your specific vehicle operation. When calling into voice...
.... It is fully open the glove box, pull the handle to the left and pull the glove box door down until it stops and is a feature of the center console armrest and a molded cupholder on the armrest, pull the tray forward. Customize your specific vehicle operation. When calling into voice...
Owner's Manual
Page 108
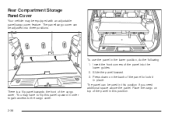
... guides. 2. You may be used in the lower position, do the following: 1. The panel/cargo cover can be equipped with an adjustable panel/cargo cover feature.
... guides. 2. You may be used in the lower position, do the following: 1. The panel/cargo cover can be equipped with an adjustable panel/cargo cover feature.

