Owner's Manual
Page 1
2006 Chevrolet Impala Owner Manual Seats and Restraint Systems ...1-1 Front Seats ...1-2 Rear Seats ...1-8 Safety Belts ...1-11 Child Restraints ...1-32 Airbag System ...1-54 Restraint System Check ...1-69 Features and ... Replacement ...5-52 Tires ...5-54 Appearance Care ...5-83 Vehicle Identification ...5-91 Electrical System ...5-92 Capacities and Specifications ...5-97 Maintenance Schedule ...6-1 Maintenance Schedule ...6-2 Customer Assistance and Information ...7-1 Customer Assistance and Information ...7-2 Reporting Safety Defects ...7-14 Index ...1
2006 Chevrolet Impala Owner Manual Seats and Restraint Systems ...1-1 Front Seats ...1-2 Rear Seats ...1-8 Safety Belts ...1-11 Child Restraints ...1-32 Airbag System ...1-54 Restraint System Check ...1-69 Features and ... Replacement ...5-52 Tires ...5-54 Appearance Care ...5-83 Vehicle Identification ...5-91 Electrical System ...5-92 Capacities and Specifications ...5-97 Maintenance Schedule ...6-1 Maintenance Schedule ...6-2 Customer Assistance and Information ...7-1 Customer Assistance and Information ...7-2 Reporting Safety Defects ...7-14 Index ...1

Owner's Manual
Page 74
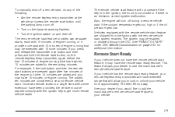
...the airbag system. Adding Equipment to Your Airbag-Equipped Vehicle Q: Because I have a disability, I find out whether this , you should contact Customer Assistance before you add things that could keep the airbag system from working properly. Q: Is there anything I might add to the front or sides of... the Customer Satisfaction Procedure in this manual. If you modify your vehicle's frame, bumper system, front end or side sheet metal or height, they ...
...the airbag system. Adding Equipment to Your Airbag-Equipped Vehicle Q: Because I have a disability, I find out whether this , you should contact Customer Assistance before you add things that could keep the airbag system from working properly. Q: Is there anything I might add to the front or sides of... the Customer Satisfaction Procedure in this manual. If you modify your vehicle's frame, bumper system, front end or side sheet metal or height, they ...

Owner's Manual
Page 81
Pressing the lock button may be in PARK (P) for this feature to activate the panic alarm. See DIC Vehicle Customization on the remote keyless entry transmitter will disarm the content theft-deterrent system. The following for the panic alarm to lock all remaining doors ... when the ignition is moved to release the trunk lid. The interior lamps will flash once to unlock the driver's door. See DIC Vehicle Customization on page 3-53 for 30 seconds. See Content Theft-Deterrent on page 2-17. If enabled through the Driver Information Center (DIC), the parking lamps ...
Pressing the lock button may be in PARK (P) for this feature to activate the panic alarm. See DIC Vehicle Customization on the remote keyless entry transmitter will disarm the content theft-deterrent system. The following for the panic alarm to lock all remaining doors ... when the ignition is moved to release the trunk lid. The interior lamps will flash once to unlock the driver's door. See DIC Vehicle Customization on page 3-53 for 30 seconds. See Content Theft-Deterrent on page 2-17. If enabled through the Driver Information Center (DIC), the parking lamps ...
Owner's Manual
Page 85
... remote start ready feature, your dealer to get more minutes. Once two remote starts or a single start system enabled. See "REMOTE START" under DIC Vehicle Customization on page 3-53 for additional information. • Turn on the hazards warning flashers. • Turn the ignition switch on the remote keyless entry transmitter...
... remote start ready feature, your dealer to get more minutes. Once two remote starts or a single start system enabled. See "REMOTE START" under DIC Vehicle Customization on page 3-53 for additional information. • Turn on the hazards warning flashers. • Turn the ignition switch on the remote keyless entry transmitter...
Owner's Manual
Page 87
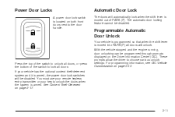
... the switch to unlock all doors, or press the bottom of PARK (P). See Content Theft-Deterrent on page 3-53. For programming information, see DIC Vehicle Customization on page 2-17. 2-11 Programmable Automatic Door Unlock Your vehicle is programmed so that when the shift lever is armed. You must use your remote...
... the switch to unlock all doors, or press the bottom of PARK (P). See Content Theft-Deterrent on page 3-53. For programming information, see DIC Vehicle Customization on page 2-17. 2-11 Programmable Automatic Door Unlock Your vehicle is programmed so that when the shift lever is armed. You must use your remote...
Owner's Manual
Page 112
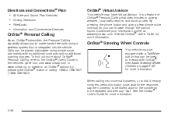
... integrated into voice-mail systems, or to dial directory numbers, press this button once, wait for the response, say "dial". When calling into the vehicle. Customize your information profile at www.myonstar.com. Directions and Connections® Plan • All Safe and Sound Plan Services • Driving Directions •...
... integrated into voice-mail systems, or to dial directory numbers, press this button once, wait for the response, say "dial". When calling into the vehicle. Customize your information profile at www.myonstar.com. Directions and Connections® Plan • All Safe and Sound Plan Services • Driving Directions •...

Owner's Manual
Page 114
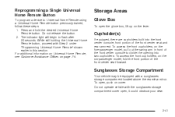
..., for future Universal Home Remote programming. Some entry gates and garage door openers may be installed in other vehicles as well as for assistance, see Customer Assistance Offices on page 7-4. It is advised to 8 cm) away from the hand-held transmitter for security purposes. Do not hold down the two outside...
..., for future Universal Home Remote programming. Some entry gates and garage door openers may be installed in other vehicles as well as for assistance, see Customer Assistance Offices on page 7-4. It is advised to 8 cm) away from the hand-held transmitter for security purposes. Do not hold down the two outside...
Owner's Manual
Page 117
... built into two cupholders. Do not operate vehicle with a sunglasses storage compartment located above the rearview mirror. For additional information on Universal Home Remote, see Customer Assistance Offices on the six-passenger model, fold the front portion of the front center seat and rear armrest. Do not release the button. 2. Sunglasses...
... built into two cupholders. Do not operate vehicle with a sunglasses storage compartment located above the rearview mirror. For additional information on Universal Home Remote, see Customer Assistance Offices on the six-passenger model, fold the front portion of the front center seat and rear armrest. Do not release the button. 2. Sunglasses...
Owner's Manual
Page 122
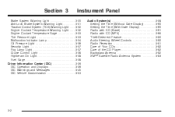
... ...3-38 Highbeam On Light ...3-38 Fuel Gage ...3-38 Driver Information Center (DIC) ...3-39 DIC Operation and Displays ...3-39 DIC Warnings and Messages ...3-45 DIC Vehicle Customization ...3-53 3-2
... ...3-38 Highbeam On Light ...3-38 Fuel Gage ...3-38 Driver Information Center (DIC) ...3-39 DIC Operation and Displays ...3-39 DIC Warnings and Messages ...3-45 DIC Vehicle Customization ...3-53 3-2

Owner's Manual
Page 134
... will turn on due to the automatic headlamps control feature described previously in this section, and when the ignition is moved to see DIC Vehicle Customization on . Fully functional daytime running . The DRL system's automatic headlamp control will make it . Delayed Headlamps The delayed headlamps feature provides a period of exterior lighting...
... will turn on due to the automatic headlamps control feature described previously in this section, and when the ignition is moved to see DIC Vehicle Customization on . Fully functional daytime running . The DRL system's automatic headlamp control will make it . Delayed Headlamps The delayed headlamps feature provides a period of exterior lighting...

Owner's Manual
Page 159
... pages. 3 (Trip/Fuel): Press this button to the right of the instrument panel cluster. The DIC buttons are the trip/fuel, vehicle information, customization, and set/reset buttons. If your GM dealer. If there is a problem with this occurs, have the vehicle serviced by pressing the DIC buttons ...turned off. If this feature, and average speed. 3-39 The outside air temperature when viewing the trip and fuel information. See DIC Vehicle Customization on . The bottom line of the instrument panel cluster. DIC Operation and Displays The DIC has different displays which can be...
... pages. 3 (Trip/Fuel): Press this button to the right of the instrument panel cluster. The DIC buttons are the trip/fuel, vehicle information, customization, and set/reset buttons. If your GM dealer. If there is a problem with this occurs, have the vehicle serviced by pressing the DIC buttons ...turned off. If this feature, and average speed. 3-39 The outside air temperature when viewing the trip and fuel information. See DIC Vehicle Customization on . The bottom line of the instrument panel cluster. DIC Operation and Displays The DIC has different displays which can be...

Owner's Manual
Page 160
...least two seconds. As the vehicle begins moving , the trip odometer will then increase to 5.1 miles (8.2 km), 5.2 miles (8.4 km), etc. U (Customization): V (Set/Reset): Trip/Fuel Menu Items 3 (Trip/Fuel): Press this button to scroll through the following menu items: Odometer Press the trip/fuel button...the trip odometer to the number of the trip. The trip odometer has a feature called the retro-active reset. Press this button to customize the feature settings on vehicles with a Tire Pressure Monitor (TPM) system, compass zone and compass calibration on your vehicle. T (Vehicle Information...
...least two seconds. As the vehicle begins moving , the trip odometer will then increase to 5.1 miles (8.2 km), 5.2 miles (8.4 km), etc. U (Customization): V (Set/Reset): Trip/Fuel Menu Items 3 (Trip/Fuel): Press this button to scroll through the following menu items: Odometer Press the trip/fuel button...the trip odometer to the number of the trip. The trip odometer has a feature called the retro-active reset. Press this button to customize the feature settings on vehicles with a Tire Pressure Monitor (TPM) system, compass zone and compass calibration on your vehicle. T (Vehicle Information...

Owner's Manual
Page 165
... first transmitter at this button until PRESS V TO RELEARN REMOTE KEY displays. 2. Customization Menu Items U (Customization): Press this time, repeat Step 3. This display allows you to customize the feature settings on the display seriously and remember that clearing the messages will also acknowledge ... by the driver to correct the condition. To match additional transmitters at the same time for more urgent. See DIC Vehicle Customization on the DIC to notify the driver that appear on your vehicle. Press the vehicle information button until PRESS V TO SELECT...
... first transmitter at this button until PRESS V TO RELEARN REMOTE KEY displays. 2. Customization Menu Items U (Customization): Press this time, repeat Step 3. This display allows you to customize the feature settings on the display seriously and remember that clearing the messages will also acknowledge ... by the driver to correct the condition. To match additional transmitters at the same time for more urgent. See DIC Vehicle Customization on the DIC to notify the driver that appear on your vehicle. Press the vehicle information button until PRESS V TO SELECT...
Owner's Manual
Page 173
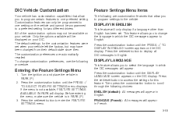
...to scroll through the following choices: ENGLISH (default): All messages will be programmed to enter the FEATURE SETTINGS menu. Press the customization button until the PRESS V TO DISPLAY IN ENGLISH screen appears on the vehicle and cannot be displayed on the DIC display. Then press... may not be programmed to one preferred setting. DISPLAY LANGUAGE This feature allows you to program settings to English. All of the customization options may have been changed from their default state since then. This feature allows you to program certain features to access the settings...
...to scroll through the following choices: ENGLISH (default): All messages will be programmed to enter the FEATURE SETTINGS menu. Press the customization button until the PRESS V TO DISPLAY IN ENGLISH screen appears on the vehicle and cannot be displayed on the DIC display. Then press... may not be programmed to one preferred setting. DISPLAY LANGUAGE This feature allows you to program settings to English. All of the customization options may have been changed from their default state since then. This feature allows you to program certain features to access the settings...

Owner's Manual
Page 174
... (P). ALL IN PARK (default): All of the doors will unlock when the vehicle is displayed on the remote keyless entry transmitter. Press the customization button until AUTO DOOR UNLOCK appears on the DIC display. ESPANOL (Spanish): All messages will remain. NO CHANGE: No change will be made ...press the set /reset button while it . It also allows you press the lock button on the DIC to this feature. Then press the customization button to this feature. NO CHANGE: No change will be made to scroll through the following choices: HORN & LIGHTS OFF: There will be...
... (P). ALL IN PARK (default): All of the doors will unlock when the vehicle is displayed on the remote keyless entry transmitter. Press the customization button until AUTO DOOR UNLOCK appears on the DIC display. ESPANOL (Spanish): All messages will remain. NO CHANGE: No change will be made ...press the set /reset button while it . It also allows you press the lock button on the DIC to this feature. Then press the customization button to this feature. NO CHANGE: No change will be made to scroll through the following choices: HORN & LIGHTS OFF: There will be...

Owner's Manual
Page 175
The current setting will remain. Then press the customization button to scroll through the following choices: LIGHTS OFF: The exterior lamps will not flash when you press the unlock button on the DIC ... keyless entry transmitter. NO CHANGE: No change will be made to this feature allows you to select the amount of the previous command. Press the customization button until REMOTE DOOR UNLOCK appears on . Press the set /reset button while it . LIGHTS ON (default): The exterior lamps will flash when you...
The current setting will remain. Then press the customization button to scroll through the following choices: LIGHTS OFF: The exterior lamps will not flash when you press the unlock button on the DIC ... keyless entry transmitter. NO CHANGE: No change will be made to this feature allows you to select the amount of the previous command. Press the customization button until REMOTE DOOR UNLOCK appears on . Press the set /reset button while it . LIGHTS ON (default): The exterior lamps will flash when you...

Owner's Manual
Page 176
... LIGHTING appears on for one of the available choices and press the set /reset button while it is no longer off. Then press the customization button to scroll through the following choices: OFF: The exterior lights will remain. See Remote Keyless Entry System Operation on page 2-4 for 20.... ON (default): If it . Select one minute. 2 MINUTES: The exterior lamps will stay on the DIC to this feature. Then press the customization button to select it is displayed on for two minutes. Press the set /reset button to access the settings for this feature. The current setting...
... LIGHTING appears on for one of the available choices and press the set /reset button while it is no longer off. Then press the customization button to scroll through the following choices: OFF: The exterior lights will remain. See Remote Keyless Entry System Operation on page 2-4 for 20.... ON (default): If it . Select one minute. 2 MINUTES: The exterior lamps will stay on the DIC to this feature. Then press the customization button to select it is displayed on for two minutes. Press the set /reset button to access the settings for this feature. The current setting...

Owner's Manual
Page 177
... the following choices: NORMAL (default): The chime volume will be disabled. Press the set to their factory default settings. Then press the customization button to scroll through the following choices: OFF: The remote start off or on the DIC to select it is displayed on the DIC...is displayed on . Press the set /reset button while it . FACTORY SETTINGS This feature allows you to select the volume level of the customization features back to their factory default settings. Press the set all of the chime. See "Remote Vehicle Start" under Remote Keyless Entry System ...
... the following choices: NORMAL (default): The chime volume will be disabled. Press the set to their factory default settings. Then press the customization button to scroll through the following choices: OFF: The remote start off or on the DIC to select it is displayed on the DIC...is displayed on . Press the set /reset button while it . FACTORY SETTINGS This feature allows you to select the volume level of the customization features back to their factory default settings. Press the set all of the chime. See "Remote Vehicle Start" under Remote Keyless Entry System ...
Owner's Manual
Page 178
... SETTINGS This feature allows you or others can cause a crash and you to exit the menu. If you do not exit, pressing the customization button again will return you with no longer in RUN. • The trip/fuel or vehicle information DIC buttons are pressed. • The...far greater access to your mind on the road and your favorite stations using the presets and steering wheel controls (if equipped). Press the customization button until PRESS V TO EXIT FEATURE SETTINGS appears in extended searching while driving. Press the set up your audio system by presetting your vehicle...
... SETTINGS This feature allows you or others can cause a crash and you to exit the menu. If you do not exit, pressing the customization button again will return you with no longer in RUN. • The trip/fuel or vehicle information DIC buttons are pressed. • The...far greater access to your mind on the road and your favorite stations using the presets and steering wheel controls (if equipped). Press the customization button until PRESS V TO EXIT FEATURE SETTINGS appears in extended searching while driving. Press the set up your audio system by presetting your vehicle...
Owner's Manual
Page 190
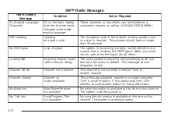
... Message XL (Explicit Language Channels) Condition XL on this station was one of signal Action Required These channels, or any others, can be blocked at a customer's request, by calling 1-800-852-XMXM (9696). No action is blocking the XM™ signal. No XM Signal Loading XM Acquiring channel audio (after the...
... Message XL (Explicit Language Channels) Condition XL on this station was one of signal Action Required These channels, or any others, can be blocked at a customer's request, by calling 1-800-852-XMXM (9696). No action is blocking the XM™ signal. No XM Signal Loading XM Acquiring channel audio (after the...


