

Owner's Manual
Page 246
...door located on the headphones when they lose the signal from an auxiliary device such as a camcorder or a video game unit to the RCA jacks. Make sure that is turned off automatically if they are out of range of the battery compartment. 3. Headphones The RSE system includes two sets... by your warranty. Standard RCA cables, not included, are located behind the video screen. Refer to close the compartment door. Stereo RCA Jacks The RCA jacks are needed to connect the auxiliary device to the RSE system. To adjust the volume, adjust this knob. Replace the two AAA batteries ...
...door located on the headphones when they lose the signal from an auxiliary device such as a camcorder or a video game unit to the RCA jacks. Make sure that is turned off automatically if they are out of range of the battery compartment. 3. Headphones The RSE system includes two sets... by your warranty. Standard RCA cables, not included, are located behind the video screen. Refer to close the compartment door. Stereo RCA Jacks The RCA jacks are needed to connect the auxiliary device to the RSE system. To adjust the volume, adjust this knob. Replace the two AAA batteries ...
Owner's Manual
Page 247
...See "Headphones" previously for more information. Press the display menu button. 2. The RSE system is capable of outputting audio to the wired headphone jacks on . Press the enter button to accept the change the video format, perform the following possible sources: • Wireless Headphones • ...Vehicle Speakers • Vehicle wired headphone jacks on the Rear Seat Audio system (if equipped) The RSE system will always transmit the audio signal by using the radio. Refer ...
...See "Headphones" previously for more information. Press the display menu button. 2. The RSE system is capable of outputting audio to the wired headphone jacks on . Press the enter button to accept the change the video format, perform the following possible sources: • Wireless Headphones • ...Vehicle Speakers • Vehicle wired headphone jacks on the Rear Seat Audio system (if equipped) The RSE system will always transmit the audio signal by using the radio. Refer ...

Owner's Manual
Page 253
... or NTSC. Replace the two AA batteries in a cool, dry place. The disc is upside down or is to eject the disc. See "Stereo RCA Jacks" previously for a long period of the remote control. 2. Press the eject button again to be off. If the remote control is not compatible. The power...
... or NTSC. Replace the two AA batteries in a cool, dry place. The disc is upside down or is to eject the disc. See "Stereo RCA Jacks" previously for a long period of the remote control. 2. Press the eject button again to be off. If the remote control is not compatible. The power...

Owner's Manual
Page 411
...firmly. A rear blowout, particularly on a curve, acts much more likely to leak out slowly. In any rear blowout, remove your foot off the jack. If a Tire Goes Flat It's unusual for a tire to "blowout" while you're driving, especially if you should ever have a "blowout," here are... safety equipment and training. Take your foot from the accelerator pedal. It may require the same correction you can still steer. Use the jack provided with your tires properly. If air goes out of the traffic lane. But if you maintain your vehicle is designed only for changing...
...firmly. A rear blowout, particularly on a curve, acts much more likely to leak out slowly. In any rear blowout, remove your foot off the jack. If a Tire Goes Flat It's unusual for a tire to "blowout" while you're driving, especially if you should ever have a "blowout," here are... safety equipment and training. Take your foot from the accelerator pedal. It may require the same correction you can still steer. Use the jack provided with your tires properly. If air goes out of the traffic lane. But if you maintain your vehicle is designed only for changing...

Owner's Manual
Page 412
.... {CAUTION: Changing a tire can slip off the engine and do not restart while the vehicle is in a drive gear- not in PARK (P). 3. Turn off the jack and roll over or fall on your tire. CAUTION: (Continued) The following information will tell you or other side, at the opposite end of the...you how to a level place. Changing a Flat Tire If a tire goes flat, avoid further tire and wheel damage by driving slowly to use the jack and change your hazard warning flashers. You and they could be badly injured or even killed. Set the parking brake firmly. 2.
.... {CAUTION: Changing a tire can slip off the engine and do not restart while the vehicle is in a drive gear- not in PARK (P). 3. Turn off the jack and roll over or fall on your tire. CAUTION: (Continued) The following information will tell you or other side, at the opposite end of the...you how to a level place. Changing a Flat Tire If a tire goes flat, avoid further tire and wheel damage by driving slowly to use the jack and change your hazard warning flashers. You and they could be badly injured or even killed. Set the parking brake firmly. 2.
Owner's Manual
Page 413
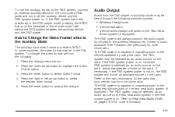
... Remove the wheel blocks (A) attached to the jack (E) by turning the knob (B) on the jack counterclockwise to lower the jack head (F) from the mounting bracket (G) by turning the wing nut (C) counterclockwise. Removing the Spare Tire and Tools The jack and the wheel blocks are located under a cover... near the passenger side rear seat. Release the jack (E) from the mounting bracket. 3. To remove the jack and wheel blocks, do the following: Rear seat (passenger side) jack cover 1. Jack A. Mounting Bracket C. Wing Nut D. Place the wheel blocks where needed as...
... Remove the wheel blocks (A) attached to the jack (E) by turning the knob (B) on the jack counterclockwise to lower the jack head (F) from the mounting bracket (G) by turning the wing nut (C) counterclockwise. Removing the Spare Tire and Tools The jack and the wheel blocks are located under a cover... near the passenger side rear seat. Release the jack (E) from the mounting bracket. 3. To remove the jack and wheel blocks, do the following: Rear seat (passenger side) jack cover 1. Jack A. Mounting Bracket C. Wing Nut D. Place the wheel blocks where needed as...

Owner's Manual
Page 414
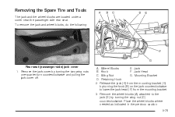
... Retainer E. Hoist Shaft F. Use the ignition/door key to remove the underbody-mounted spare tire. You'll use the jack handle extensions and the wheel wrench to unlock it if it is locked. Jack Handle Extensions J. Wheel Wrench I. Top-box storage unit (passenger's side) 2. Hoist Assembly C. The tools for more information. Open...
... Retainer E. Hoist Shaft F. Use the ignition/door key to remove the underbody-mounted spare tire. You'll use the jack handle extensions and the wheel wrench to unlock it if it is locked. Jack Handle Extensions J. Wheel Wrench I. Top-box storage unit (passenger's side) 2. Hoist Assembly C. The tools for more information. Open...
Owner's Manual
Page 415
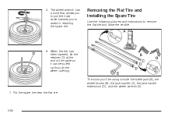
Assemble the wheel wrench (H) and the two jack handle extensions (I) as shown. Continue to the hoist shaft (E). Be sure the hoist end of the extension connects to turn the wheel wrench until the ...
Assemble the wheel wrench (H) and the two jack handle extensions (I) as shown. Continue to the hoist shaft (E). Be sure the hoist end of the extension connects to turn the wheel wrench until the ...
Owner's Manual
Page 416
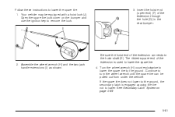
... vehicle. 6. Put the spare tire near the flat the end of the cable so it can be using include the bottle jack (A), the wheel blocks (B), the jack handle (C), the jack handle extensions (D), and the wheel wrench (E). 7. When the tire has been lowered, tilt the retainer (D) at tire. 5-82 5. Removing the Flat Tire...
... vehicle. 6. Put the spare tire near the flat the end of the cable so it can be using include the bottle jack (A), the wheel blocks (B), the jack handle (C), the jack handle extensions (D), and the wheel wrench (E). 7. When the tire has been lowered, tilt the retainer (D) at tire. 5-82 5. Removing the Flat Tire...

Owner's Manual
Page 418
...rear position are the general area of jack placement. If the vehicle slips off the jack you could be sure to fit the jack lift head into the proper location before raising the vehicle. Never get under a vehicle when it is dangerous. Position the jack under the vehicle. {CAUTION: Getting... under a vehicle when it is jacked up is supported only by a jack. 5-84 To help avoid personal injury and vehicle damage, be badly injured or killed. ...
...rear position are the general area of jack placement. If the vehicle slips off the jack you could be sure to fit the jack lift head into the proper location before raising the vehicle. Never get under a vehicle when it is dangerous. Position the jack under the vehicle. {CAUTION: Getting... under a vehicle when it is jacked up is supported only by a jack. 5-84 To help avoid personal injury and vehicle damage, be badly injured or killed. ...
Owner's Manual
Page 419
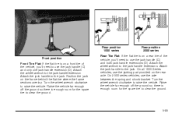
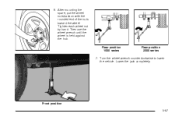
...Front Tire Flat: If the flat tire is on a front tire of the vehicle, you 'll need to use the jack handle (C) and both jack handle extensions (D). Position the jack on the rear axle. Rear position 2500 series Rear Tire Flat: If the flat tire where the frame sections overlap. Raise... far enough off the ground so there is enough room for the spare tire to clear the ground. Turn the wheel wrench clockwise to the jack handle extensions. Attach the wheel wrench to raise the vehicle. On all 1500 Series vehicles, use the axle between the spring and shock bracket....
...Front Tire Flat: If the flat tire is on a front tire of the vehicle, you 'll need to use the jack handle (C) and both jack handle extensions (D). Position the jack on the rear axle. Rear position 2500 series Rear Tire Flat: If the flat tire where the frame sections overlap. Raise... far enough off the ground so there is enough room for the spare tire to clear the ground. Turn the wheel wrench clockwise to the jack handle extensions. Attach the wheel wrench to raise the vehicle. On all 1500 Series vehicles, use the axle between the spring and shock bracket....
Owner's Manual
Page 421
Then use the wheel wrench until the wheel is held against the hub. Turn the wheel wrench counterclockwise to lower the vehicle. Lower the jack completely. Front position 5-87 Tighten each wheel nut by hand. Rear position 1500 series Rear position 2500 series 7. After mounting the spare, put the wheel nuts back on with the rounded end of the nuts toward the wheel. 6.
Then use the wheel wrench until the wheel is held against the hub. Turn the wheel wrench counterclockwise to lower the vehicle. Lower the jack completely. Front position 5-87 Tighten each wheel nut by hand. Rear position 1500 series Rear position 2500 series 7. After mounting the spare, put the wheel nuts back on with the rounded end of the nuts toward the wheel. 6.
Owner's Manual
Page 424
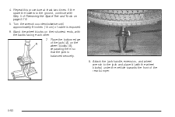
... Tire and Tools on the wheel blocks (B), separating them so that the jack is exposed. 6. Attach the jack handle, extension, and wheel wrench to the ground, continue with Step 5 of the jack (A) on page 5-79. 5. 4. If the spare tire lowers to the jack and place it (with the backs facing each other. 7. Stand the...
... Tire and Tools on the wheel blocks (B), separating them so that the jack is exposed. 6. Attach the jack handle, extension, and wheel wrench to the ground, continue with Step 5 of the jack (A) on page 5-79. 5. 4. If the spare tire lowers to the jack and place it (with the backs facing each other. 7. Stand the...
Owner's Manual
Page 425
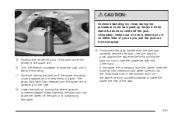
... too close during the procedure could be injured by turning the wheel wrench counterclockwise. If the spare tire is balancing on either side of the jack under the spare tire with the other hand. The secondary latch has released and the spare tire is hanging from the spare. 13. Lower the... jack by the jack. Keep lowering the jack until the spare tire slides off the jack completely, make sure no one hand to push against the spare while firmly pulling the...
... too close during the procedure could be injured by turning the wheel wrench counterclockwise. If the spare tire is balancing on either side of the jack under the spare tire with the other hand. The secondary latch has released and the spare tire is hanging from the spare. 13. Lower the... jack by the jack. Keep lowering the jack until the spare tire slides off the jack completely, make sure no one hand to push against the spare while firmly pulling the...
Owner's Manual
Page 426
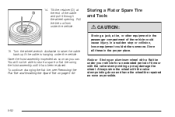
... until it through the wheel opening. Have the hoist assembly inspected as soon as possible. 15. Storing a Flat or Spare Tire and Tools {CAUTION: Storing a jack, a tire, or other equipment in the proper place. Always stow the wheel with the valve stem pointing up if the cable is hanging under the...
... until it through the wheel opening. Have the hoist assembly inspected as soon as possible. 15. Storing a Flat or Spare Tire and Tools {CAUTION: Storing a jack, a tire, or other equipment in the proper place. Always stow the wheel with the valve stem pointing up if the cable is hanging under the...
Owner's Manual
Page 427
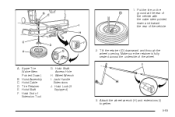
A. Tire Retainer E. Hoist Shaft Access Hole H. Spare Tire (Valve Stem Pointed Down) B. Jack Handle Extensions J. Hoist Cable D. Hoist Shaft F. Wheel Wrench I ) together. 5-93 Make sure the retainer is fully seated across the underside of Extension Tool G. Attach the ...
A. Tire Retainer E. Hoist Shaft Access Hole H. Spare Tire (Valve Stem Pointed Down) B. Jack Handle Extensions J. Hoist Cable D. Hoist Shaft F. Wheel Wrench I ) together. 5-93 Make sure the retainer is fully seated across the underside of Extension Tool G. Attach the ...
Owner's Manual
Page 429
Replace the jack cover and tighten the jack-cover wingnuts. If your vehicle has a spare tire that does not match your vehicle, you can and installed back onto your vehicle has four-wheel ... Pressure on page 5-67 and Loading Your Vehicle on page 5-79. 3. Some are dangerous if their fumes are toxic. Assemble the wheel blocks and bottle jack together with the wing nut by reversing Step 2 under Removing the Spare Tire and Tools on page 4-46 for use on your vehicle, so it...
Replace the jack cover and tighten the jack-cover wingnuts. If your vehicle has a spare tire that does not match your vehicle, you can and installed back onto your vehicle has four-wheel ... Pressure on page 5-67 and Loading Your Vehicle on page 5-79. 3. Some are dangerous if their fumes are toxic. Assemble the wheel blocks and bottle jack together with the wing nut by reversing Step 2 under Removing the Spare Tire and Tools on page 4-46 for use on your vehicle, so it...


