Owner's Manual
Page 1
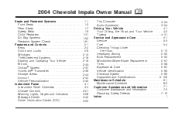
2004 Chevrolet Impala Owner Manual Seats and Restraint Systems ...1-1 Front Seats ...1-2 Rear Seats ...1-7 Safety Belts ...1-9 Child Restraints ...1-31 Air Bag Systems ...1-52 Restraint System Check ...1-61 Features and Controls ...2-1 Keys ...2-2 ...
2004 Chevrolet Impala Owner Manual Seats and Restraint Systems ...1-1 Front Seats ...1-2 Rear Seats ...1-7 Safety Belts ...1-9 Child Restraints ...1-31 Air Bag Systems ...1-52 Restraint System Check ...1-61 Features and Controls ...2-1 Keys ...2-2 ...
Owner's Manual
Page 2
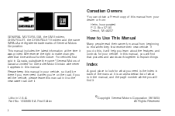
...will be there if you ever need is in the manual, and the page number where you 're on the road. Box 07130 Detroit, MI 48207 GENERAL MOTORS, GM, the GM Emblem, CHEVROLET, the CHEVROLET Emblem and the name IMPALA are registered trademarks of General Motors Corporation. For vehicles ...first sold in Canada, substitute the name "General Motors of Canada Limited" for your vehicle, so it . If you do this manual in your vehicle. Litho in ...
...will be there if you ever need is in the manual, and the page number where you 're on the road. Box 07130 Detroit, MI 48207 GENERAL MOTORS, GM, the GM Emblem, CHEVROLET, the CHEVROLET Emblem and the name IMPALA are registered trademarks of General Motors Corporation. For vehicles ...first sold in Canada, substitute the name "General Motors of Canada Limited" for your vehicle, so it . If you do this manual in your vehicle. Litho in ...

Owner's Manual
Page 4
When you read other manuals, you might see warning labels on your vehicle. Vehicle Symbols Your vehicle has components and labels that use the same words, CAUTION or NOTICE. A notice ...
When you read other manuals, you might see warning labels on your vehicle. Vehicle Symbols Your vehicle has components and labels that use the same words, CAUTION or NOTICE. A notice ...
Owner's Manual
Page 7
... Air Bag-Equipped Vehicle ...1-61 Restraint System Check ...1-61 Checking Your Restraint Systems ...1-61 Replacing Restraint System Parts After a Crash ...1-62 Front Seats ...1-2 Manual Seats ...1-2 Six-Way Power Seats ...1-3 Manual Lumbar ...1-3 Heated Seats ...1-4 Reclining Seatbacks ...1-4 Head Restraints ...1-6 Rear Seats ...1-7 Split Folding Rear Seat ...1-7 Safety Belts ...1-9 Safety Belts: They Are for Everyone ...1-9 Questions...
... Air Bag-Equipped Vehicle ...1-61 Restraint System Check ...1-61 Checking Your Restraint Systems ...1-61 Replacing Restraint System Parts After a Crash ...1-62 Front Seats ...1-2 Manual Seats ...1-2 Six-Way Power Seats ...1-3 Manual Lumbar ...1-3 Heated Seats ...1-4 Reclining Seatbacks ...1-4 Head Restraints ...1-6 Rear Seats ...1-7 Split Folding Rear Seat ...1-7 Safety Belts ...1-9 Safety Belts: They Are for Everyone ...1-9 Questions...

Owner's Manual
Page 8
If your vehicle has manual seats, lift the bar located under the front of the vehicle if you want to. Try to move the seat back and forth to adjust a manual driver's seat while the vehicle is moving . Front Seats Manual Seats {CAUTION: You can lose control of the seat to unlock it and release the bar. Slide the seat to where you try to be sure the seat is not moving . Adjust the driver's seat only when the vehicle is locked in place. 1-2 The sudden movement could startle and confuse you, or make you push a pedal when you don't want it .
If your vehicle has manual seats, lift the bar located under the front of the vehicle if you want to. Try to move the seat back and forth to adjust a manual driver's seat while the vehicle is moving . Front Seats Manual Seats {CAUTION: You can lose control of the seat to unlock it and release the bar. Slide the seat to where you try to be sure the seat is not moving . Adjust the driver's seat only when the vehicle is locked in place. 1-2 The sudden movement could startle and confuse you, or make you push a pedal when you don't want it .
Owner's Manual
Page 9
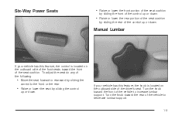
... the front of the vehicle to the front or the rear. • Raise or lower the seat by sliding the rear of the driver's seat. Manual Lumbar If your vehicle has this feature, the control is located on the outboard side of the front seats toward the front of the vehicle...
... the front of the vehicle to the front or the rear. • Raise or lower the seat by sliding the rear of the driver's seat. Manual Lumbar If your vehicle has this feature, the control is located on the outboard side of the front seats toward the front of the vehicle...

Owner's Manual
Page 15
.... {CAUTION: It is in a cargo area, inside the vehicle or be ejected from it. Do not allow people to ride in any area of the manual tells you might not be seriously injured or killed. Be sure everyone in your vehicle is extremely dangerous to be , if you should not do...
.... {CAUTION: It is in a cargo area, inside the vehicle or be ejected from it. Do not allow people to ride in any area of the manual tells you might not be seriously injured or killed. Be sure everyone in your vehicle is extremely dangerous to be , if you should not do...
Owner's Manual
Page 46
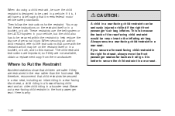
... motor vehicle safety standards. When choosing a child restraint, be sure the child restraint is designed to be used in a booklet, or both , and to this manual. You may be on the restraint itself or in the rear rather than the front seat. Then follow the instructions for the restraint. It is...
... motor vehicle safety standards. When choosing a child restraint, be sure the child restraint is designed to be used in a booklet, or both , and to this manual. You may be on the restraint itself or in the rear rather than the front seat. Then follow the instructions for the restraint. It is...

Owner's Manual
Page 55
See Manual Seats on page 1-41 if the child restraint has one. Secure the child in a rear seat. Securing a Child Restraint in the Right Front Seat Position ...
See Manual Seats on page 1-41 if the child restraint has one. Secure the child in a rear seat. Securing a Child Restraint in the Right Front Seat Position ...

Owner's Manual
Page 60
To read how, see the part of this manual called "Older Children" or "Infants and Young Children." There is designed for more information. 1-54 Young children and infants need the protection that a child restraint ...
To read how, see the part of this manual called "Older Children" or "Infants and Young Children." There is designed for more information. 1-54 Young children and infants need the protection that a child restraint ...
Owner's Manual
Page 66
You may not work properly. If you don't get them, the air bag system won 't work properly. The service manual for your vehicle covers the need some new parts for the driver's side impact air bag. The module also records speed, engine RPM, brake and ...
You may not work properly. If you don't get them, the air bag system won 't work properly. The service manual for your vehicle covers the need some new parts for the driver's side impact air bag. The module also records speed, engine RPM, brake and ...
Owner's Manual
Page 67
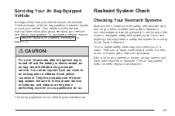
Your dealer and the service manual have them repaired or replaced. (The air bag system does not need regular maintenance. 1-61 Torn or frayed safety belts may not protect you in &#.... Also look for any opened or broken air bag covers, and have information about servicing your vehicle and the air bag systems. To purchase a service manual, see anything that might keep a safety belt system from doing its job, have it in a crash. Avoid yellow connectors. If you is torn or frayed...
Your dealer and the service manual have them repaired or replaced. (The air bag system does not need regular maintenance. 1-61 Torn or frayed safety belts may not protect you in &#.... Also look for any opened or broken air bag covers, and have information about servicing your vehicle and the air bag systems. To purchase a service manual, see anything that might keep a safety belt system from doing its job, have it in a crash. Avoid yellow connectors. If you is torn or frayed...

Owner's Manual
Page 69
... Out of Park (P) ...2-30 Parking Over Things That Burn ...2-31 Engine Exhaust ...2-31 Running Your Engine While You Are Parked ...2-32 Mirrors ...2-33 Manual Rearview Mirror ...2-33 Manual Rearview Mirror with OnStar® ...2-33 Automatic Dimming Rearview Mirror ...2-34 Automatic Dimming Rearview Mirror with OnStar® ...2-35 Outside Power Mirrors ...2-36 Outside...
... Out of Park (P) ...2-30 Parking Over Things That Burn ...2-31 Engine Exhaust ...2-31 Running Your Engine While You Are Parked ...2-32 Mirrors ...2-33 Manual Rearview Mirror ...2-33 Manual Rearview Mirror with OnStar® ...2-33 Automatic Dimming Rearview Mirror ...2-34 Automatic Dimming Rearview Mirror with OnStar® ...2-35 Outside Power Mirrors ...2-36 Outside...

Owner's Manual
Page 76
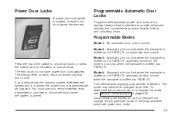
Locking your key, insert the key and turn it . From the inside , push the manual lock lever forward. To unlock the door, pull the lever rearward. 2-8 When a door is locked, the handle will not open the doors and fall out ... drive. • Young children who get into unlocked vehicles may be overcome by extreme heat and can help prevent this from the outside , use the manual or power door locks. To lock the driver's side door from happening. Doors and Locks Door Locks There are not locked. So, wear safety belts...
Locking your key, insert the key and turn it . From the inside , push the manual lock lever forward. To unlock the door, pull the lever rearward. 2-8 When a door is locked, the handle will not open the doors and fall out ... drive. • Young children who get into unlocked vehicles may be overcome by extreme heat and can help prevent this from the outside , use the manual or power door locks. To lock the driver's side door from happening. Doors and Locks Door Locks There are not locked. So, wear safety belts...
Owner's Manual
Page 77
... all doors, or press the bottom part of PARK (P); Disconnecting the battery for the driver's door only when the transaxle is intended to Mode 4. The manual lever on each front door above the armrest. You must use your remote keyless entry transmitter or your vehicle has the optional content theft-deterrent...
... all doors, or press the bottom part of PARK (P); Disconnecting the battery for the driver's door only when the transaxle is intended to Mode 4. The manual lever on each front door above the armrest. You must use your remote keyless entry transmitter or your vehicle has the optional content theft-deterrent...
Owner's Manual
Page 86
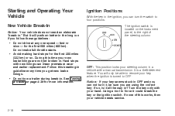
... does not need an elaborate "break-in." But it , be able to remove your key when the ignition is a theft-deterrent feature. Hard stops with a manual transmission. OFF: This position locks your hand. You will perform better in the long run if you follow these guidelines: Ignition Positions With the key...
... does not need an elaborate "break-in." But it , be able to remove your key when the ignition is a theft-deterrent feature. Hard stops with a manual transmission. OFF: This position locks your hand. You will perform better in the long run if you follow these guidelines: Ignition Positions With the key...
Owner's Manual
Page 101
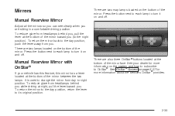
...page 2-37 for more information about the services OnStar® provides. 2-33 Press the button next to each lamp to turn it on and off . Manual Rearview Mirror with OnStar® If your dealer for more information on the system and how to subscribe to the day position, push the lever...driving position. See your vehicle has this feature, this mirror has a lever located at night, pull the lever toward you (to the night position). Mirrors Manual Rearview Mirror Adjust all the mirrors so you can see clearly when you are two lamps located on the bottom of the mirror. To reduce...
...page 2-37 for more information about the services OnStar® provides. 2-33 Press the button next to each lamp to turn it on and off . Manual Rearview Mirror with OnStar® If your dealer for more information on the system and how to subscribe to the day position, push the lever...driving position. See your vehicle has this feature, this mirror has a lever located at night, pull the lever toward you (to the night position). Mirrors Manual Rearview Mirror Adjust all the mirrors so you can see clearly when you are two lamps located on the bottom of the mirror. To reduce...
Owner's Manual
Page 112
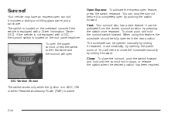
... is completely open . To open the power sunroof, press the switch to the rear twice and the sunroof will need to close the sunshade manually by sliding it forward. It can stop the sunroof before it rearward, or automatically, by pushing the switch forward. You will open by opening...sunroof, push the switch forward and hold the sunroof switch forward. The switch is located on the roof panel headliner. You can be fully opened manually by pressing the switch once rearward. Close: To close , push and hold until the sunroof motor stops, or release the switch when the desired...
... is completely open . To open the power sunroof, press the switch to the rear twice and the sunroof will need to close the sunshade manually by sliding it forward. It can stop the sunroof before it rearward, or automatically, by pushing the switch forward. You will open by opening...sunroof, push the switch forward and hold the sunroof switch forward. The switch is located on the roof panel headliner. You can be fully opened manually by pressing the switch once rearward. Close: To close , push and hold until the sunroof motor stops, or release the switch when the desired...
Owner's Manual
Page 143
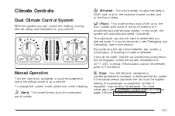
... modes, a combination of your vehicle. ) (Bi-Level): 6 (Floor): This mode allows for approximately a 50/50 split of the air directed to the floor outlets. Manual Operation Turn the right knob clockwise or counterclockwise to the instrument panel outlets. To change the current mode, select one of the following: 9 (Fan): H (Vent...
... modes, a combination of your vehicle. ) (Bi-Level): 6 (Floor): This mode allows for approximately a 50/50 split of the air directed to the floor outlets. Manual Operation Turn the right knob clockwise or counterclockwise to the instrument panel outlets. To change the current mode, select one of the following: 9 (Fan): H (Vent...
Owner's Manual
Page 148
... see in the details on the next few pages, some warning lights come on when there may be on when you are familiar with this manual's advice. Waiting to know they're working. Your vehicle may also have a Driver Information Center (DIC) that works along with the warning lights and gages...
... see in the details on the next few pages, some warning lights come on when there may be on when you are familiar with this manual's advice. Waiting to know they're working. Your vehicle may also have a Driver Information Center (DIC) that works along with the warning lights and gages...


