

Owner's Manual
Page 263
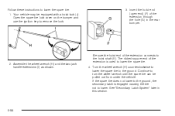
... the compartment. Keep the headphones stored in a cool, dry place. If the headphones are located below the video display screen. The RCA jacks allow you will illuminate on the headphones when they are on the left stereo audio. Headphones The RSE system includes two sets of your auxiliary... connect audio and video from an auxiliary device such as a camcorder or a video game unit to close the compartment door. Stereo RCA Jacks The RCA jacks are needed to connect the auxiliary device to be lost if the system is currently playing through the RSE. To adjust the volume, adjust...
... the compartment. Keep the headphones stored in a cool, dry place. If the headphones are located below the video display screen. The RCA jacks allow you will illuminate on the headphones when they are on the left stereo audio. Headphones The RSE system includes two sets of your auxiliary... connect audio and video from an auxiliary device such as a camcorder or a video game unit to close the compartment door. Stereo RCA Jacks The RCA jacks are needed to connect the auxiliary device to be lost if the system is currently playing through the RSE. To adjust the volume, adjust...

Owner's Manual
Page 264
..." previously for more information. If the RSE system power is capable of outputting audio to the wired headphone jacks on . Refer to select Video Format. 4. How to Change the Video Format when in the Auxiliary Mode... 5. To use the auxiliary inputs on the RSE system, connect an external auxiliary device to the color-coded RCA jacks and turn both the auxiliary device and the RSE system power on the faceplate or the remote control will toggle the... perform the following possible sources: • Wireless Headphones • Vehicle Speakers • Vehicle wired headphone jacks on .
..." previously for more information. If the RSE system power is capable of outputting audio to the wired headphone jacks on . Refer to select Video Format. 4. How to Change the Video Format when in the Auxiliary Mode... 5. To use the auxiliary inputs on the RSE system, connect an external auxiliary device to the color-coded RCA jacks and turn both the auxiliary device and the RSE system power on the faceplate or the remote control will toggle the... perform the following possible sources: • Wireless Headphones • Vehicle Speakers • Vehicle wired headphone jacks on .

Owner's Manual
Page 435
...accelerator pedal and grip the steering wheel firmly. In any rear blowout, remove your tires properly. The jack provided with your vehicle only for changing a flat tire. Use the jack provided with your vehicle is used for anything else, you want the vehicle to go. A rear blowout, ...to use in a skid. If a Tire Goes Flat It's unusual for a tire to "blowout" while you're driving, especially if you 'd use your jacking equipment to change a flat tire safely. 5-83 It may require the same correction you maintain your foot from the accelerator pedal. But if you...
...accelerator pedal and grip the steering wheel firmly. In any rear blowout, remove your tires properly. The jack provided with your vehicle only for changing a flat tire. Use the jack provided with your vehicle is used for anything else, you want the vehicle to go. A rear blowout, ...to use in a skid. If a Tire Goes Flat It's unusual for a tire to "blowout" while you're driving, especially if you 'd use your jacking equipment to change a flat tire safely. 5-83 It may require the same correction you maintain your foot from the accelerator pedal. But if you...

Owner's Manual
Page 436
... the tire farthest away from moving: 1. CAUTION: (Continued) 4. Turn on you have a four-wheel-drive vehicle, be badly injured or even killed. Turn off the jack and roll over or fall on your tire. Do not allow passengers to a level place. Changing a Flat Tire If a tire goes flat, avoid further...
... the tire farthest away from moving: 1. CAUTION: (Continued) 4. Turn on you have a four-wheel-drive vehicle, be badly injured or even killed. Turn off the jack and roll over or fall on your tire. Do not allow passengers to a level place. Changing a Flat Tire If a tire goes flat, avoid further...

Owner's Manual
Page 437
The following : 5-85 To remove the jack and wheel blocks, do the following steps will tell you how to use the jack and change a tire. Rear Seat (Passenger Side) Jack Cover 1. Removing the Spare Tire and Tools The jack and the wheel blocks are located under a cover near the passenger side rear seat. Remove the jack cover by turning the two wing nuts one-quarter turn counterclockwise and pulling the jack cover off.
The following : 5-85 To remove the jack and wheel blocks, do the following steps will tell you how to use the jack and change a tire. Rear Seat (Passenger Side) Jack Cover 1. Removing the Spare Tire and Tools The jack and the wheel blocks are located under a cover near the passenger side rear seat. Remove the jack cover by turning the two wing nuts one-quarter turn counterclockwise and pulling the jack cover off.

Owner's Manual
Page 438
...where needed as indicated in the passenger's side Top-Box storage unit. A. D. Mounting Bracket 5-86 To remove the tools, do the following: 1. Jack F. See Top-Box Storage on page 2-80 for changing a flat tire are located in the previous Caution. B. Use the ignition/door key to... lower the jack head (F) from the mounting bracket. 3. The tools for more information on the passenger's side Top-Box Storage unit. Remove the wheel blocks (A)...
...where needed as indicated in the passenger's side Top-Box storage unit. A. D. Mounting Bracket 5-86 To remove the tools, do the following: 1. Jack F. See Top-Box Storage on page 2-80 for changing a flat tire are located in the previous Caution. B. Use the ignition/door key to... lower the jack head (F) from the mounting bracket. 3. The tools for more information on the passenger's side Top-Box Storage unit. Remove the wheel blocks (A)...

Owner's Manual
Page 439
A. Jack Handle Extensions J. Hoist Lock (If Equipped) 5-87 Hoist End of the tools you will need to remove the underbody-mounted spare tire. Hoist Shaft Access Hole H. You'll use the jack handle extensions and the wheel wrench to lower the spare tire and change a flat. Hoist Shaft F. Wheel Wrench I. Remove the black pouch from the storage box. Top-Box Storage Unit (Passenger Side) 2. Hoist Cable D. Tire Retainer E. Hoist Assembly C. You now have all of Extension Tool G. Spare Tire (Valve Stem Pointed Down) B.
A. Jack Handle Extensions J. Hoist Lock (If Equipped) 5-87 Hoist End of the tools you will need to remove the underbody-mounted spare tire. Hoist Shaft Access Hole H. You'll use the jack handle extensions and the wheel wrench to lower the spare tire and change a flat. Hoist Shaft F. Wheel Wrench I. Remove the black pouch from the storage box. Top-Box Storage Unit (Passenger Side) 2. Hoist Cable D. Tire Retainer E. Hoist Assembly C. You now have all of Extension Tool G. Spare Tire (Valve Stem Pointed Down) B.
Owner's Manual
Page 440
... tire to lower the spare tire: 1. Continue to lower. See "Secondary Latch System" later in the rear bumper. 2. Assemble the wheel wrench (H) and the two jack handle extensions (I) as shown. If the spare tire does not lower to the ground, the secondary latch is used to lower the spare tire. 4. Open...
... tire to lower the spare tire: 1. Continue to lower. See "Secondary Latch System" later in the rear bumper. 2. Assemble the wheel wrench (H) and the two jack handle extensions (I) as shown. If the spare tire does not lower to the ground, the secondary latch is used to lower the spare tire. 4. Open...

Owner's Manual
Page 441
... vehicle. 6. Put the spare tire near the flat the end of the cable so it can be using include the bottle jack (A), the wheel blocks (B), the jack handle (C), the jack handle extensions (D), and the wheel wrench (E). 7. 5. The wheel wrench has a hook that allows you to pull the hoist cable towards you 'll...
... vehicle. 6. Put the spare tire near the flat the end of the cable so it can be using include the bottle jack (A), the wheel blocks (B), the jack handle (C), the jack handle extensions (D), and the wheel wrench (E). 7. 5. The wheel wrench has a hook that allows you to pull the hoist cable towards you 'll...

Owner's Manual
Page 443
... is dangerous. See text and art following for the exact jack placement. 3. Jack Positions (overall view) These locations (A) front position, (B) rear position are the general area of jack placement. If the vehicle slips off the jack you could be sure to fit the jack lift head into the proper location before raising the vehicle. To...
... is dangerous. See text and art following for the exact jack placement. 3. Jack Positions (overall view) These locations (A) front position, (B) rear position are the general area of jack placement. If the vehicle slips off the jack you could be sure to fit the jack lift head into the proper location before raising the vehicle. To...

Owner's Manual
Page 444
... Flat: If the flat tire is on a front tire of the vehicle, you 'll need to use the jack handle (C) and both jack handle extensions (D). Turn the wheel wrench clockwise to the jack handle extensions. Raise the vehicle far enough off the ground so there is enough room for the spare tire... to the jack handle extension. On 2500 series vehicles, use the jacking pad provided on the rear axle. Attach the wheel wrench to raise the vehicle. Attach the wheel wrench to clear the ...
... Flat: If the flat tire is on a front tire of the vehicle, you 'll need to use the jack handle (C) and both jack handle extensions (D). Turn the wheel wrench clockwise to the jack handle extensions. Raise the vehicle far enough off the ground so there is enough room for the spare tire... to the jack handle extension. On 2500 series vehicles, use the jacking pad provided on the rear axle. Attach the wheel wrench to raise the vehicle. Attach the wheel wrench to clear the ...

Owner's Manual
Page 447
Turn the wheel wrench counterclockwise to lower the vehicle. Lower the jack completely. 5-95 Rear Position 1500 Series Front Position Rear Position 2500 Series 7.
Turn the wheel wrench counterclockwise to lower the vehicle. Lower the jack completely. 5-95 Rear Position 1500 Series Front Position Rear Position 2500 Series 7.

Owner's Manual
Page 449
A. Tire Retainer E. Jack Handle Extensions J. Store all these in the passenger compartment of the vehicle could strike someone. Hoist Shaft F. Hoist Lock (If Equipped) 5-97 Notice: Storing an ... equipment could cause injury. Hoist Cable D. Always stow the wheel with the valve stem pointing up may damage the wheel. Storing a Flat or Spare Tire, Jack and Tools {CAUTION: Storing a jack, a tire, or other equipment in the proper place. Wheel Wrench I.
A. Tire Retainer E. Jack Handle Extensions J. Store all these in the passenger compartment of the vehicle could strike someone. Hoist Shaft F. Hoist Lock (If Equipped) 5-97 Notice: Storing an ... equipment could cause injury. Hoist Cable D. Always stow the wheel with the valve stem pointing up may damage the wheel. Storing a Flat or Spare Tire, Jack and Tools {CAUTION: Storing a jack, a tire, or other equipment in the proper place. Wheel Wrench I.

Owner's Manual
Page 451
To store the tools, follow these procedures: 1. Assemble the wheel blocks and bottle jack together with the wing nut by reversing Step 2 under "Removing the Spare Tire and Tools" earlier in the Top-Box Storage unit. 2. Reinstall the spare ...tire lock (if equipped). 5-99 Make sure the tire is stored securely. Replace the jack cover and tighten the jack-cover wingnuts. (A) Push and Pull (B) Rotate or Turn 7. If the tire moves, use the wheel wrench to rotate or turn the tire. Push...
To store the tools, follow these procedures: 1. Assemble the wheel blocks and bottle jack together with the wing nut by reversing Step 2 under "Removing the Spare Tire and Tools" earlier in the Top-Box Storage unit. 2. Reinstall the spare ...tire lock (if equipped). 5-99 Make sure the tire is stored securely. Replace the jack cover and tighten the jack-cover wingnuts. (A) Push and Pull (B) Rotate or Turn 7. If the tire moves, use the wheel wrench to rotate or turn the tire. Push...

Owner's Manual
Page 452
... work, the spare must be installed with a secondary latch system. If it is visible, first try to Step 6. See "Storing a Flat or Spare Tire, Jack and Tools" earlier in this procedure read and follow the instructions listed below. 1. To release the spare tire from suddenly falling off your vehicle. Check...
... work, the spare must be installed with a secondary latch system. If it is visible, first try to Step 6. See "Storing a Flat or Spare Tire, Jack and Tools" earlier in this procedure read and follow the instructions listed below. 1. To release the spare tire from suddenly falling off your vehicle. Check...

Owner's Manual
Page 453
Repeat this section. 5. If the spare tire lowers to the ground, continue with the backs facing each other. 7. Stand the wheel blocks on the wheel blocks, separating them so that the jack is exposed. 6. 4. Place the bottom edge of the jack on their shortest ends, with Step 5 of cable is balanced securely. 5-101 Turn the wrench counterclockwise until approximately six inches (15 cm) of "Removing the Spare Tire and Tools" earlier in this procedure at least two times.
Repeat this section. 5. If the spare tire lowers to the ground, continue with the backs facing each other. 7. Stand the wheel blocks on the wheel blocks, separating them so that the jack is exposed. 6. 4. Place the bottom edge of the jack on their shortest ends, with Step 5 of cable is balanced securely. 5-101 Turn the wrench counterclockwise until approximately six inches (15 cm) of "Removing the Spare Tire and Tools" earlier in this procedure at least two times.

Owner's Manual
Page 454
... and wheel wrench to lower the spare the rest of the spare tire. 9. Continue raising the jack until the spare tire slides off the jack completely, make sure no one hand to raise the jack until it (with the wheel blocks) under the spare tire with the other hand. The secondary latch...is balancing on either side of the rear bumper. Disconnect the jack handle from the spare. 8. Keep lowering the jack until the spare tire stops moving upward and is behind you pull the jack out from the jack and carefully remove the jack. Turn the wrench clockwise to push against the spare while ...
... and wheel wrench to lower the spare the rest of the spare tire. 9. Continue raising the jack until the spare tire slides off the jack completely, make sure no one hand to raise the jack until it (with the wheel blocks) under the spare tire with the other hand. The secondary latch...is balancing on either side of the rear bumper. Disconnect the jack handle from the spare. 8. Keep lowering the jack until the spare tire stops moving upward and is behind you pull the jack out from the jack and carefully remove the jack. Turn the wrench clockwise to push against the spare while ...
Owner's Manual
Page 520
...Starting Your Engine ...2-30 Steering ...4-14 Steering in Emergencies ...4-15 Steering Tips ...4-14 14 Steering Wheel Controls, Audio ...3-107 Stereo RCA Jacks ...3-101 Storage Areas All-Weather Cargo Area ...2-75 Center Console Storage Area ...2-63 Center Overhead Console ...2-63 Front Armrest Storage Area ...2-...63 Glove Box ...2-63 Luggage Carrier ...2-63 Rear Storage Area ...2-64 Top-Box Storage ...2-80 Storing a Flat or Spare Tire, Jack and Tools ...5-97 Stuck in Sand, Mud, Ice or Snow ...4-48 Sun Visors ...2-25 Sunroof ...2-87 T Tachometer ...3-33 Tailgate ...2-22 Tailgate...
...Starting Your Engine ...2-30 Steering ...4-14 Steering in Emergencies ...4-15 Steering Tips ...4-14 14 Steering Wheel Controls, Audio ...3-107 Stereo RCA Jacks ...3-101 Storage Areas All-Weather Cargo Area ...2-75 Center Console Storage Area ...2-63 Center Overhead Console ...2-63 Front Armrest Storage Area ...2-...63 Glove Box ...2-63 Luggage Carrier ...2-63 Rear Storage Area ...2-64 Top-Box Storage ...2-80 Storing a Flat or Spare Tire, Jack and Tools ...5-97 Stuck in Sand, Mud, Ice or Snow ...4-48 Sun Visors ...2-25 Sunroof ...2-87 T Tachometer ...3-33 Tailgate ...2-22 Tailgate...


