
Owner's Manual
Page 2
The 2003 Chevrolet Venture Owner Seats and Restraint Systems ...1-1 Front Seats ...1-3 Rear Seats ...1-7 Safety Belts ...1-30 Child Restraints ...1-55 Air Bag Systems ...1-93 Restraint System Check ...1-103 Features and Controls ...2-1 Keys ...2-3 Doors and Locks ...2-9 Winaows ...2-24 2-27 Theft-Deterrent Systems ...Starting and Operating Your Vehicle ...2-31 2-44 Mirrors ...OnStar@ System ...2-46 HomeLink@Transmitter ...2-48 Storage Areas...
The 2003 Chevrolet Venture Owner Seats and Restraint Systems ...1-1 Front Seats ...1-3 Rear Seats ...1-7 Safety Belts ...1-30 Child Restraints ...1-55 Air Bag Systems ...1-93 Restraint System Check ...1-103 Features and Controls ...2-1 Keys ...2-3 Doors and Locks ...2-9 Winaows ...2-24 2-27 Theft-Deterrent Systems ...Starting and Operating Your Vehicle ...2-31 2-44 Mirrors ...OnStar@ System ...2-46 HomeLink@Transmitter ...2-48 Storage Areas...

Owner's Manual
Page 34
.... 1-27 The ~.~!a.tha.clk R patch of hook and loop has fastener to stow the strap on the rear of the seat when not in use, or 0 from the floor pins. Make sure all items are off... removing the seat. Push and pull on the seatback to release the latches from the passenger's side sliding door, pull up on the lever to release the seatback, then push up on the seatback to pull the ...up. See "Folding the Seatback" previously. To raise the seatback, do one of the following: From the rear of the vehicle, pull up on the lever to release the seatback, then pull the strap, located on the...
.... 1-27 The ~.~!a.tha.clk R patch of hook and loop has fastener to stow the strap on the rear of the seat when not in use, or 0 from the floor pins. Make sure all items are off... removing the seat. Push and pull on the seatback to release the latches from the passenger's side sliding door, pull up on the lever to release the seatback, then push up on the seatback to pull the ...up. See "Folding the Seatback" previously. To raise the seatback, do one of the following: From the rear of the vehicle, pull up on the lever to release the seatback, then pull the strap, located on the...
Owner's Manual
Page 106
...even belted occupants can contact the steering wheel or the instrument panel. Frontal air bag modules are located in many types of collisions, including rollovers, rear impacts, and many types of the vehicle. For vehicles with a driver's and right front passenger's side impact air bag. 1-99 The air ...body, stopping the occupant more than a supplement to safety belts, and then only in moderate to the driver's and/or right front passenger's door. Air bags distribute the force of gas from the inflator, which inflates the air bag. But the frontal air bags would not help you ...
...even belted occupants can contact the steering wheel or the instrument panel. Frontal air bag modules are located in many types of collisions, including rollovers, rear impacts, and many types of the vehicle. For vehicles with a driver's and right front passenger's side impact air bag. 1-99 The air ...body, stopping the occupant more than a supplement to safety belts, and then only in moderate to the driver's and/or right front passenger's door. Air bags distribute the force of gas from the inflator, which inflates the air bag. But the frontal air bags would not help you ...
Owner's Manual
Page 112
... Mirrors ...2-45 Keys ...2.3 Remote Keyless Entry System ...2.5 Remote Keyless Entry System Operation ...2.6 Doors and Locks ...2.9 Door Locks ...2.9 Power Door Locks ...2.11 ...2-12 Last Door Closed Locking ...Programmable Automatic Door Locks ...2-12 Lockout Protection ...2-13 Leaving Your Vehicle ...2-13 Dual Sliding Doors ...2-13 Power Sliding Door (PSD) ...2-17 Liftgate ...2-22 Windows ...2.24 Manual Windows ...2-24 Power Windows ...2-25...
... Mirrors ...2-45 Keys ...2.3 Remote Keyless Entry System ...2.5 Remote Keyless Entry System Operation ...2.6 Doors and Locks ...2.9 Door Locks ...2.9 Power Door Locks ...2.11 ...2-12 Last Door Closed Locking ...Programmable Automatic Door Locks ...2-12 Lockout Protection ...2-13 Leaving Your Vehicle ...2-13 Dual Sliding Doors ...2-13 Power Sliding Door (PSD) ...2-17 Liftgate ...2-22 Windows ...2.24 Manual Windows ...2-24 Power Windows ...2-25...
Owner's Manual
Page 113
Section 2 Features and Controls Vehicle Personalization ...2.62 Entering Programming Mode ...2.63 Delayed Illumination and Exit Lighting ...2.63 Automatic Door Locks ...2.64 Last Door Locking and Lockout Deterrent ...2-65 Remote Driver Unlock Control ...2-66 Remote Lock and Unlock Confirmation ...2.67 Content Theft-Deterrent System ...2.69 Arming... Areas ...2.52 Glove Box ...2.52 Cupholder(s) ...2.52 Compact Overhead Console ...2.52 Overhead Console ...2.53 Front Seat Storage Net ...2.55 Luggage Carrier ...2.56 Rear Storage Area ...2.58 Convenience Net ...-2-58 Convenience Center ...2.59 , 2-2
Section 2 Features and Controls Vehicle Personalization ...2.62 Entering Programming Mode ...2.63 Delayed Illumination and Exit Lighting ...2.63 Automatic Door Locks ...2.64 Last Door Locking and Lockout Deterrent ...2-65 Remote Driver Unlock Control ...2-66 Remote Lock and Unlock Confirmation ...2.67 Content Theft-Deterrent System ...2.69 Arming... Areas ...2.52 Glove Box ...2.52 Cupholder(s) ...2.52 Compact Overhead Console ...2.52 Overhead Console ...2.53 Front Seat Storage Net ...2.55 Luggage Carrier ...2.56 Rear Storage Area ...2.58 Convenience Net ...-2-58 Convenience Center ...2.59 , 2-2
Owner's Manual
Page 121
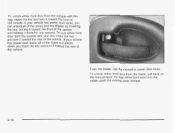
... manual lever forward. 2-10 To lock either front door from the inside , use the manual or power door locks. To unlock either front door from the outside with the key, insert the key and turn it toward the rear of the vehicle. To unlock either front door from the inside, pull back on the manual... lever. If your vehicle has power door locks, you can unlock all of the doors will unlock when you insert the key and turn it toward...
... manual lever forward. 2-10 To lock either front door from the inside , use the manual or power door locks. To unlock either front door from the outside with the key, insert the key and turn it toward the rear of the vehicle. To unlock either front door from the inside, pull back on the manual... lever. If your vehicle has power door locks, you can unlock all of the doors will unlock when you insert the key and turn it toward...
Owner's Manual
Page 122
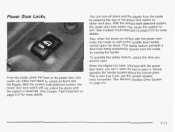
... cannot open it. To override this safety feature, unlock the door you use the remote keyless entry transmitter. Power Door Locks You can lock all doors and the liftgate from the inside by pressing the rear of the power door lock switch (on either front door. See Content Theft-Deterrent on page 2-5. See Remote Keyless Entry...
... cannot open it. To override this safety feature, unlock the door you use the remote keyless entry transmitter. Power Door Locks You can lock all doors and the liftgate from the inside by pressing the rear of the power door lock switch (on either front door. See Content Theft-Deterrent on page 2-5. See Remote Keyless Entry...

Owner's Manual
Page 124
..., take your vehicle. If this ever happens, don't try to lock the vehicle, the sliding door that is open detent position. Always remember to lock the sliding door after a sliding door is on page 2-62. 2-13 When the ignition is closed . The lockout protection feature makes ...door. Then get out and close the driver's side sliding door. If the driver's door is closed locking feature will be off, the sliding door delayed locking feature will sound and you use your door and set the locks from outside the vehicle, pull the handle out and then pull the door toward the rear...
..., take your vehicle. If this ever happens, don't try to lock the vehicle, the sliding door that is open detent position. Always remember to lock the sliding door after a sliding door is on page 2-62. 2-13 When the ignition is closed . The lockout protection feature makes ...door. Then get out and close the driver's side sliding door. If the driver's door is closed locking feature will be off, the sliding door delayed locking feature will sound and you use your door and set the locks from outside the vehicle, pull the handle out and then pull the door toward the rear...
Owner's Manual
Page 127
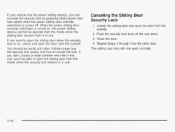
... security lock lever all the way down. 3. Canceling the Sliding Door Security Lock 1. If your vehicle has the power sliding door(s), you don't, adults or older children who ride in the rear won't be opened from the outside . 2. Close the door. 4. You should let adults and older children know how the... security lock works, and how to open the door from the inside when the sliding door security lock is turned off. If you ...
... security lock lever all the way down. 3. Canceling the Sliding Door Security Lock 1. If your vehicle has the power sliding door(s), you don't, adults or older children who ride in the rear won't be opened from the outside . 2. Close the door. 4. You should let adults and older children know how the... security lock works, and how to open the door from the inside when the sliding door security lock is turned off. If you ...
Owner's Manual
Page 133
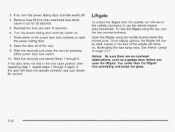
...and break the glass. 2-22 See lnferiorLamps on , turn the power sliding door override switch off. 4. Wait five seconds and repeat Steps 7 through 9 again. If the door does not rest in the rear of the vehicle will rise by pressing either of the way. 9. To lock...in the fully open position after repeating Step 7, repeat Steps 7 through 9. Open the door all of the power door lock switches to open the liftgate. Turn the power sliding door override switch on , illuminating the rear cargo area. Remove fuse 29 from the outside, turn the key counterclockwise. Reinstall the...
...and break the glass. 2-22 See lnferiorLamps on , turn the power sliding door override switch off. 4. Wait five seconds and repeat Steps 7 through 9 again. If the door does not rest in the rear of the vehicle will rise by pressing either of the way. 9. To lock...in the fully open position after repeating Step 7, repeat Steps 7 through 9. Open the door all of the power door lock switches to open the liftgate. Turn the power sliding door override switch on , illuminating the rear cargo area. Remove fuse 29 from the outside, turn the key counterclockwise. Reinstall the...
Owner's Manual
Page 136
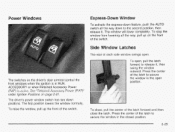
... all the way down to the second position, then release it , then swing the window outward. The window will lower completely. Side Window Latches The rear of each side window swings open position. , The switches on the front of the latch to release it . Press the center of the switch. active.... Power Windows Express-Down Window To activate the express-down feature, push the AUTO switch all the way, pull up on the driver's door armrest control the front windows when the ignition is in the open .
... all the way down to the second position, then release it , then swing the window outward. The window will lower completely. Side Window Latches The rear of each side window swings open position. , The switches on the front of the latch to release it . Press the center of the switch. active.... Power Windows Express-Down Window To activate the express-down feature, push the AUTO switch all the way, pull up on the driver's door armrest control the front windows when the ignition is in the open .
Owner's Manual
Page 143
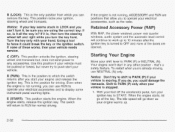
... locks your hand. D (RUN): This is the position to which you can remove the key. Retained Accessory Power (RAP) With RAP, the power windows, power rear quarter windows, audio system and the automatic level control will go of these works, then your vehicle needs service. Notice: Don't try to OFF and... none of the doors are opened. E (START): This position starts the engine. if so, is stopped. 1. If none of the key. Even when the engine is the position ...
... locks your hand. D (RUN): This is the position to which you can remove the key. Retained Accessory Power (RAP) With RAP, the power windows, power rear quarter windows, audio system and the automatic level control will go of these works, then your vehicle needs service. Notice: Don't try to OFF and... none of the doors are opened. E (START): This position starts the engine. if so, is stopped. 1. If none of the key. Even when the engine is the position ...
Owner's Manual
Page 165
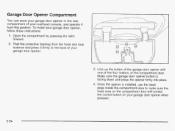
...use the black pegs inside the compartment door to the back of your garage door opener. 3. Once the opener is facing down and press the opener firmly into place. 4. Garage Door Opener Compartment You can store your garage door opener in the rear compartment of your overhead console, and ...operate it firmly to make sure the lined area on the compartment door will contact the control button on the compartment door. Peel the protective backing ...
...use the black pegs inside the compartment door to the back of your garage door opener. 3. Once the opener is facing down and press the opener firmly into place. 4. Garage Door Opener Compartment You can store your garage door opener in the rear compartment of your overhead console, and ...operate it firmly to make sure the lined area on the compartment door will contact the control button on the compartment door. Peel the protective backing ...

Owner's Manual
Page 170
... . 2. Once you take down the convenience net to extend the life o the net and f to help retain its elasticity, and to keep the rear exit clear. The convenience net has a maximum capacity of the vehicle. When not in place. 7- The convenience center cover has two automatic prop rods ... net, stretch the higher side of the net up and over the top of your vehicle, as far forward as you while holding onto the door latch and lower the convenience center cover to secure any removable convenience item isn't secured properly, it up on the floor. 3. d n e n +ha cnn\ranianrn r a n.--. ...
... . 2. Once you take down the convenience net to extend the life o the net and f to help retain its elasticity, and to keep the rear exit clear. The convenience net has a maximum capacity of the vehicle. When not in place. 7- The convenience center cover has two automatic prop rods ... net, stretch the higher side of the net up and over the top of your vehicle, as far forward as you while holding onto the door latch and lower the convenience center cover to secure any removable convenience item isn't secured properly, it up on the floor. 3. d n e n +ha cnn\ranianrn r a n.--. ...
Owner's Manual
Page 185
Section 3 Instrument Panel Entertainment System ...3-91 Rear Seat Audio (RSA) (Without Entertainment System) ...3.98 Rear Seat Audio (RSA) (With Entertainment System) ...3.100 Theft-Deterrent Feature (RDS Radios) ...3.102 Theft-Deterrent Feature (Non-RDS Radios) ...3.102 ...DVD Player ...3-104 Cleaning Your DVD Player ...3-104 Cleaning the Video Screen ...3.104 Fixed Mast Antenna ...3.104 Power Sliding Door Warning Message ...3.54 Door Ajar Warning Message ...3.55 Rear Hatch Ajar Warning Message ...3-56 PASS-Key@Ill Security Message ...3.56 All-Wheel Drive Disable Warning Message ...3.57 Low ...
Section 3 Instrument Panel Entertainment System ...3-91 Rear Seat Audio (RSA) (Without Entertainment System) ...3.98 Rear Seat Audio (RSA) (With Entertainment System) ...3.100 Theft-Deterrent Feature (RDS Radios) ...3.102 Theft-Deterrent Feature (Non-RDS Radios) ...3.102 ...DVD Player ...3-104 Cleaning Your DVD Player ...3-104 Cleaning the Video Screen ...3.104 Fixed Mast Antenna ...3.104 Power Sliding Door Warning Message ...3.54 Door Ajar Warning Message ...3.55 Rear Hatch Ajar Warning Message ...3-56 PASS-Key@Ill Security Message ...3.56 All-Wheel Drive Disable Warning Message ...3.57 Low ...
Owner's Manual
Page 203
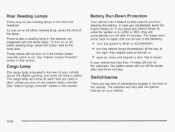
...of the vehicle. These lamps will not turn off either reading lamp, press the button next to help prevent you open (or close and reopen) a door that are two sets of your vehicle has less than 15 miles (25 km) on the odometer, the battery saver will automatically turn on . Switchbanks... on or off the lamps after 10 minutes. If you accidentally leave the interior lamps on if the interior lamps override switch is in the rear of switchbanks located in the third row headliner. If your vehicle, above the liftgate opening, and does not have a switch. To turn on . See "...
...of the vehicle. These lamps will not turn off either reading lamp, press the button next to help prevent you open (or close and reopen) a door that are two sets of your vehicle has less than 15 miles (25 km) on the odometer, the battery saver will automatically turn on . Switchbanks... on or off the lamps after 10 minutes. If you accidentally leave the interior lamps on if the interior lamps override switch is in the rear of switchbanks located in the third row headliner. If your vehicle, above the liftgate opening, and does not have a switch. To turn on . See "...
Owner's Manual
Page 204
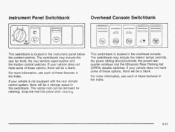
...these options, there will be removed for cleaning. The switchbank may include the interior lamps override, the power sliding door(s)/override, the power rear quarter windows and the Ultrasonic Rear Parking Aid (URPA) disable switches. The rubber mat can be a storage space in the Index. If your ...features in the Index. If your vehicle does not have some of these features in this switchbank. The switchbank may include the rear fan knob, the rear window wipedwasher and the traction control switches. For more information, see each of these options, there will be a blank. ...
...these options, there will be removed for cleaning. The switchbank may include the interior lamps override, the power sliding door(s)/override, the power rear quarter windows and the Ultrasonic Rear Parking Aid (URPA) disable switches. The rubber mat can be a storage space in the Index. If your ...features in the Index. If your vehicle does not have some of these features in this switchbank. The switchbank may include the rear fan knob, the rear window wipedwasher and the traction control switches. For more information, see each of these options, there will be a blank. ...
Owner's Manual
Page 275
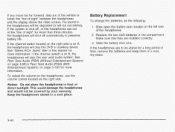
.... Notice: Do not store the headphones in the headphones will be degraded or will play the rear seat audio system. Slide open the battery door located on A, the hea'dphones will cut out entirely. Make sure that they are out of the "line of time, remove the ... headphones are installed correctly. 3. If the channel switch is shut off automatically to be covered by your warranty. See Rear Seat Audio (RSA) (Without Entertainment System) on page 3-98 or Rear Seat Audio (RSA) (With Entertainment System) on page 3-100 for more information. Keep the headphones stored in this...
.... Notice: Do not store the headphones in the headphones will be degraded or will play the rear seat audio system. Slide open the battery door located on A, the hea'dphones will cut out entirely. Make sure that they are out of the "line of time, remove the ... headphones are installed correctly. 3. If the channel switch is shut off automatically to be covered by your warranty. See Rear Seat Audio (RSA) (Without Entertainment System) on page 3-98 or Rear Seat Audio (RSA) (With Entertainment System) on page 3-100 for more information. Keep the headphones stored in this...

Owner's Manual
Page 321
...Weight Rating (GAWR). To find out the actual loads on your front and rear axles, you do, parts on your vehiclecan break, and it can change the way your load equally on the rear edge 01 the driver's door. These could cause you the maximum weights for either the maximum front or... rear GAWR. Be sure to spread out your vehicle handles. Loading Your Vehicle The Certificationflire label also...
...Weight Rating (GAWR). To find out the actual loads on your front and rear axles, you do, parts on your vehiclecan break, and it can change the way your load equally on the rear edge 01 the driver's door. These could cause you the maximum weights for either the maximum front or... rear GAWR. Be sure to spread out your vehicle handles. Loading Your Vehicle The Certificationflire label also...

Owner's Manual
Page 325
... the tongue load to the GVW because your vehicle's tires are proper. You'll find these numbers on the Certificationflire label at the rear edge of the driver's door or see if the weights are inflated to the upper limit for more information about your vehicle. Then be sure you 've loaded...
... the tongue load to the GVW because your vehicle's tires are proper. You'll find these numbers on the Certificationflire label at the rear edge of the driver's door or see if the weights are inflated to the upper limit for more information about your vehicle. Then be sure you 've loaded...


