
Owner's Manual
Page 2
The 2003 Chevrolet Venture Owner Seats and Restraint Systems ...1-1 Front Seats ...1-3 Rear Seats ...1-7 Safety Belts ...1-30 Child Restraints ...1-55 Air Bag Systems ...1-93 Restraint System Check ...1-103 Features and Controls ...2-1 Keys...52 Vehicle Personalization ...2-62 Instrument Panel ...3-1 Instrument Panel Overview ...3-4 Climate Controls ...3-25 Warning Lights, Gages and Indicators ...3-35 Message Center ...3-50 ...3-58 Driver Information Center (DIG) Manual Audio System(s) ...3-61 Driving Your Vehicle ...4-1 ...4-2 Your Driving, the Road, and Your Vehicle ...4-32 Towing Service and...
The 2003 Chevrolet Venture Owner Seats and Restraint Systems ...1-1 Front Seats ...1-3 Rear Seats ...1-7 Safety Belts ...1-30 Child Restraints ...1-55 Air Bag Systems ...1-93 Restraint System Check ...1-103 Features and Controls ...2-1 Keys...52 Vehicle Personalization ...2-62 Instrument Panel ...3-1 Instrument Panel Overview ...3-4 Climate Controls ...3-25 Warning Lights, Gages and Indicators ...3-35 Message Center ...3-50 ...3-58 Driver Information Center (DIG) Manual Audio System(s) ...3-61 Driving Your Vehicle ...4-1 ...4-2 Your Driving, the Road, and Your Vehicle ...4-32 Towing Service and...
Owner's Manual
Page 8
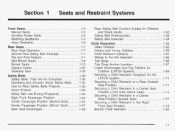
... Where to Wear Safety Belts Properly ...1-35 Driver Position 1 -36 Safety Belt Use During Pregnancy ...1-44 Right Front Passenger Position ...1.45 Center Passenger Position (Bucket Seat) ...1-45 Center Passenger Position (Bench Seat) ...1-47 Rear Seat Passengers ...1-48 Manual Seats ...1-3 Six-Way Power Seats ...1.4 Reclining Seatbacks ...1-4 Head Restraints ...1.6 Rear Seats ...1.7 Rear Seat Operation ...17 . Second Row Safety Belt Stowage...
... Where to Wear Safety Belts Properly ...1-35 Driver Position 1 -36 Safety Belt Use During Pregnancy ...1-44 Right Front Passenger Position ...1.45 Center Passenger Position (Bucket Seat) ...1-45 Center Passenger Position (Bench Seat) ...1-47 Rear Seat Passengers ...1-48 Manual Seats ...1-3 Six-Way Power Seats ...1.4 Reclining Seatbacks ...1-4 Head Restraints ...1.6 Rear Seats ...1.7 Rear Seat Operation ...17 . Second Row Safety Belt Stowage...
Owner's Manual
Page 10
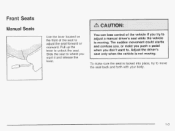
J ~~ ~ ~ ...< / \ You can lose control of the seat to whereyou want Adjust driver's to unlock the seat. To make you push a pedal when don't you , or make sure the seat is locked into place, try to move the seat back and forth with your body. 1 -3 The sudden movement could startle...release the lever. . Pull up the lever to . Slide the seat to adiust the seat forward or rearward. Front Seats Manual Seats Use the lever located on the front of the vehicle if you try to adjust a manual driver's seat while the vehicle is not moving . the seatonlywhenthevehicle is moving ....
J ~~ ~ ~ ...< / \ You can lose control of the seat to whereyou want Adjust driver's to unlock the seat. To make you push a pedal when don't you , or make sure the seat is locked into place, try to move the seat back and forth with your body. 1 -3 The sudden movement could startle...release the lever. . Pull up the lever to . Slide the seat to adiust the seat forward or rearward. Front Seats Manual Seats Use the lever located on the front of the vehicle if you try to adjust a manual driver's seat while the vehicle is not moving . the seatonlywhenthevehicle is moving ....
Owner's Manual
Page 11
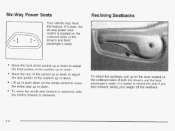
e Move the front of the control up or down to adjust the rear portion of the driver's and front passenger's seats. a e To move the entire seat up on the lever located on the outboard sides of the cushion up or down . It is located on the outboard sides of the cushion ... the rear of the control up or down to adjust the front portion of both the driver's and the front Passenger's seats. To adjust the seatback, pull up or down on the whole control to recline the seat if YOU lean forward, taking your weight off the seatback. If it does, the six...
e Move the front of the control up or down to adjust the rear portion of the driver's and front passenger's seats. a e To move the entire seat up on the lever located on the outboard sides of the cushion up or down . It is located on the outboard sides of the cushion ... the rear of the control up or down to adjust the front portion of both the driver's and the front Passenger's seats. To adjust the seatback, pull up or down on the whole control to recline the seat if YOU lean forward, taking your weight off the seatback. If it does, the six...

Owner's Manual
Page 43
Adjust the seat so you can sit up the latch plate and pull the belt across you. Close and lock the door. 2. Then pull the belt across you more slowly. 1-36 Lap-Shoulder Belt The driver has a lap-shoulder belt. Here's how to unlock it. To see how, see "Seats" in the Index. 3. Don't let it properly. 1. Driver Position This part describes the driver's restraint system. Pick up straight. If this happens, let the belt go back slightly to wear it get twisted. The shoulder belt may lock if you pull the belt across you very quickly.
Adjust the seat so you can sit up the latch plate and pull the belt across you. Close and lock the door. 2. Then pull the belt across you more slowly. 1-36 Lap-Shoulder Belt The driver has a lap-shoulder belt. Here's how to unlock it. To see how, see "Seats" in the Index. 3. Don't let it properly. 1. Driver Position This part describes the driver's restraint system. Pick up straight. If this happens, let the belt go back slightly to wear it get twisted. The shoulder belt may lock if you pull the belt across you very quickly.

Owner's Manual
Page 52
For pregnant women, as the driver's safety belt - except for anyone, the key to making safety belts effective is wearing them properly. The best way to protect the fetus is worn properly, it's more likely that the fetus won't be hurt in a crash. Center Passenger Position (Bucket Seat) Right Front Passenger Position To... of the belt out all the way and start again. 1-45 When a safety belt is to wear the right front passenger's safety belt properly, see Driver Position on page 7-36.
For pregnant women, as the driver's safety belt - except for anyone, the key to making safety belts effective is wearing them properly. The best way to protect the fetus is worn properly, it's more likely that the fetus won't be hurt in a crash. Center Passenger Position (Bucket Seat) Right Front Passenger Position To... of the belt out all the way and start again. 1-45 When a safety belt is to wear the right front passenger's safety belt properly, see Driver Position on page 7-36.
Owner's Manual
Page 59
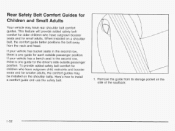
... the second row, there is one guide for the driver's side outside passenger position. Remove the guide from the neck and head. If your vehicle has bucket seats in the second row, there is one guide for each outside passenger position. To provide added safety belt comfort for ... have rear shoulder belt comfort guides. This feature will provide added safety belt comfort for older children who have outgrown child restraints and booster seats and for Children and Small Adults Your vehicle may be installed on the side of the seatback. 1-52 When installed on a shoulder belt...
... the second row, there is one guide for the driver's side outside passenger position. Remove the guide from the neck and head. If your vehicle has bucket seats in the second row, there is one guide for each outside passenger position. To provide added safety belt comfort for ... have rear shoulder belt comfort guides. This feature will provide added safety belt comfort for older children who have outgrown child restraints and booster seats and for Children and Small Adults Your vehicle may be installed on the side of the seatback. 1-52 When installed on a shoulder belt...
Owner's Manual
Page 61
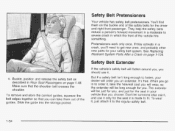
...an extender. You'll find them out of the safety belts for the driver and right front passenger. Safety Belt Extender If the vehicle's safety belt will order you should use... on page 1- 104. Don't let someone else use it, and use it to severe crash in Rear Seat Passengers on the buckle end of the guides. Pretensioners work only once. To wear it, just attach it ... Belt Pretensioners Your vehicle has safety belt pretensioners. When you choose. The extender will be just for the seat in to fit. To remove and store the comfort guides, squeeze the belt edges together so that you...
...an extender. You'll find them out of the safety belts for the driver and right front passenger. Safety Belt Extender If the vehicle's safety belt will order you should use... on page 1- 104. Don't let someone else use it, and use it to severe crash in Rear Seat Passengers on the buckle end of the guides. Pretensioners work only once. To wear it, just attach it ... Belt Pretensioners Your vehicle has safety belt pretensioners. When you choose. The extender will be just for the seat in to fit. To remove and store the comfort guides, squeeze the belt edges together so that you...
Owner's Manual
Page 111
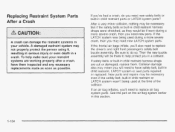
...restraint parts or LATCH system parts? New parts and repairs may be necessary even if the safety belt, built-in child restraint, LATCH system or seat parts repaired or replaced. Be sure to replace air bag system parts. If an air bag inflates, you 'll also need to do you ... possible. A damaged restraint system may need to have them inspected and any necessary replacements made as soon as they would be there to replace the driver's and right front passenger's safety belt buckle assembly. If the LATCH system was being used during a more severe crash, then you will be if ...
...restraint parts or LATCH system parts? New parts and repairs may be necessary even if the safety belt, built-in child restraint, LATCH system or seat parts repaired or replaced. Be sure to replace air bag system parts. If an air bag inflates, you 'll also need to do you ... possible. A damaged restraint system may need to have them inspected and any necessary replacements made as soon as they would be there to replace the driver's and right front passenger's safety belt buckle assembly. If the LATCH system was being used during a more severe crash, then you will be if ...
Owner's Manual
Page 113
...Programming Mode ...2.63 Delayed Illumination and Exit Lighting ...2.63 Automatic Door Locks ...2.64 Last Door Locking and Lockout Deterrent ...2-65 Remote Driver Unlock Control ...2-66 Remote Lock and Unlock Confirmation ...2.67 Content Theft-Deterrent System ...2.69 Arming and Disarming the Content Theft-Deterrent System... ...2.49 Storage Areas ...2.52 Glove Box ...2.52 Cupholder(s) ...2.52 Compact Overhead Console ...2.52 Overhead Console ...2.53 Front Seat Storage Net ...2.55 Luggage Carrier ...2.56 Rear Storage Area ...2.58 Convenience Net ...-2-58 Convenience Center ...2.59 , 2-2
...Programming Mode ...2.63 Delayed Illumination and Exit Lighting ...2.63 Automatic Door Locks ...2.64 Last Door Locking and Lockout Deterrent ...2-65 Remote Driver Unlock Control ...2-66 Remote Lock and Unlock Confirmation ...2.67 Content Theft-Deterrent System ...2.69 Arming and Disarming the Content Theft-Deterrent System... ...2.49 Storage Areas ...2.52 Glove Box ...2.52 Cupholder(s) ...2.52 Compact Overhead Console ...2.52 Overhead Console ...2.53 Front Seat Storage Net ...2.55 Luggage Carrier ...2.56 Rear Storage Area ...2.58 Convenience Net ...-2-58 Convenience Center ...2.59 , 2-2
Owner's Manual
Page 152
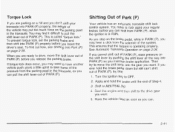
... shift from the solenoid of the system. A , : e + L n m -h;$+ tr\ 3 L a I L LI IC GI IYII IC UI t u LI IGI I J I 1 1 1 1 LW +hn Ar;,,,-, CI IU UI a v you leave the driver's seat. You may put too much force on the parking pawl in PARK (P), you maintain brake application. If torque lock does occur, you mayneed to have...
... shift from the solenoid of the system. A , : e + L n m -h;$+ tr\ 3 L a I L LI IC GI IYII IC UI t u LI IGI I J I 1 1 1 1 LW +hn Ar;,,,-, CI IU UI a v you leave the driver's seat. You may put too much force on the parking pawl in PARK (P), you maintain brake application. If torque lock does occur, you mayneed to have...

Owner's Manual
Page 156
A convex mirror's surface is convex. Check your inside mirror or glance over your right. A convex mirror can see more from the driver's seat. See "Rear Window Defogger" in C/imate Control System on your shoulder before changing lanes. 2-45 If you cut too sharply into the right lane, you ...
A convex mirror's surface is convex. Check your inside mirror or glance over your right. A convex mirror can see more from the driver's seat. See "Rear Window Defogger" in C/imate Control System on your shoulder before changing lanes. 2-45 If you cut too sharply into the right lane, you ...
Owner's Manual
Page 163
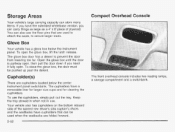
To close the glove box, the door must be used to attach the seats, to prevent the door from lowering too far. Keep the tray stowed in when not in use the cupholders, simply pull out the tray. You ...can also use the floor pins that can carry things as large as a 4' x 8' piece of the second row driver's side captain's chairs and the seatbacks have cupholders that are used when the seatbacks are cupholders located below the instrument panel. Your vehicle also has...
To close the glove box, the door must be used to attach the seats, to prevent the door from lowering too far. Keep the tray stowed in when not in use the cupholders, simply pull out the tray. You ...can also use the floor pins that can carry things as large as a 4' x 8' piece of the second row driver's side captain's chairs and the seatbacks have cupholders that are used when the seatbacks are cupholders located below the instrument panel. Your vehicle also has...

Owner's Manual
Page 166
..., it . There may be a storage net that you press on it is recommended that stretches between the front seats. Front Seat Storage Net 5. The net does not detach from the driver's seat. Pull the hooks towards the passenger's seat and insert them into the holes. T, +he I W alWlG L I I G I I b L , --+ I;$+ thn hr\Al/c 1 1 1 ~ l l ' i r I IWWI\V ~ In ~ u y UI n n ,-,,I+ d u VUL r\f +ha...
..., it . There may be a storage net that you press on it is recommended that stretches between the front seats. Front Seat Storage Net 5. The net does not detach from the driver's seat. Pull the hooks towards the passenger's seat and insert them into the holes. T, +he I W alWlG L I I G I I b L , --+ I;$+ thn hr\Al/c 1 1 1 ~ l l ' i r I IWWI\V ~ In ~ u y UI n n ,-,,I+ d u VUL r\f +ha...

Owner's Manual
Page 169
The label on either side of your vehicle, inside the liftgate. Install the convenience net at the rear of the liftgate opening. Attach the upper loops to the third row seat(s). 1. Convenience Net Your vehicle may have a convenience net. To use the convenience net, do the following: Rear Storage Area Your vehicle has a storage compartment and may have a cupholder on the driver's side of the vehicle, next to the posts on the net should be in the upper left-hand corner. 2-58 The convenience net is designed to help keep small loads, like grocery bags, from falling over.
The label on either side of your vehicle, inside the liftgate. Install the convenience net at the rear of the liftgate opening. Attach the upper loops to the third row seat(s). 1. Convenience Net Your vehicle may have a convenience net. To use the convenience net, do the following: Rear Storage Area Your vehicle has a storage compartment and may have a cupholder on the driver's side of the vehicle, next to the posts on the net should be in the upper left-hand corner. 2-58 The convenience net is designed to help keep small loads, like grocery bags, from falling over.
Owner's Manual
Page 185
Section 3 Instrument Panel Entertainment System ...3-91 Rear Seat Audio (RSA) (Without Entertainment System) ...3.98 Rear Seat Audio (RSA) (With Entertainment System) ...3.100 Theft-Deterrent Feature (RDS Radios) ...3.102 Theft-Deterrent Feature (Non-RDS Radios) ...3.102 DVD Distortion ...Rear Hatch Ajar Warning Message ...3-56 PASS-Key@Ill Security Message ...3.56 All-Wheel Drive Disable Warning Message ...3.57 Low Fuel Warning Message ...3.57 Driver Information Center (DIC) ...3.58 Audio System(s) ...3.61 Setting the Time for Radios without Radio Data Systems (RDS) ...3.61 Setting the Time for...
Section 3 Instrument Panel Entertainment System ...3-91 Rear Seat Audio (RSA) (Without Entertainment System) ...3.98 Rear Seat Audio (RSA) (With Entertainment System) ...3.100 Theft-Deterrent Feature (RDS Radios) ...3.102 Theft-Deterrent Feature (Non-RDS Radios) ...3.102 DVD Distortion ...Rear Hatch Ajar Warning Message ...3-56 PASS-Key@Ill Security Message ...3.56 All-Wheel Drive Disable Warning Message ...3.57 Low Fuel Warning Message ...3.57 Driver Information Center (DIC) ...3.58 Audio System(s) ...3.61 Setting the Time for Radios without Radio Data Systems (RDS) ...3.61 Setting the Time for...

Owner's Manual
Page 211
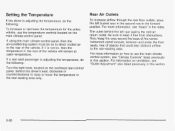
... performance of the system. 0 system on the hood that may have a rear climate-control system that allows the driver to adjust the fan speed or a rear-seat passenger to adjust the fan speed for the rear-seating area. Use this knob to set a separate temperature and adjust the fan speed, for the rear...-seat passengers, from the air inlets on the instrument panel switchbank. Outlet Adjustment Rear Climate Control System (Without Entertainment System) Your vehicle may block the flow ...
... performance of the system. 0 system on the hood that may have a rear climate-control system that allows the driver to adjust the fan speed or a rear-seat passenger to adjust the fan speed for the rear-seating area. Use this knob to set a separate temperature and adjust the fan speed, for the rear...-seat passengers, from the air inlets on the instrument panel switchbank. Outlet Adjustment Rear Climate Control System (Without Entertainment System) Your vehicle may block the flow ...

Owner's Manual
Page 212
... floor outlets are overhead, on the control panel located behind the driver's seat. A rear-seat passenger can use these controls to use the right knob located on either rear fan control to numeral 1, 2, or 3 to increase or decrease airflow to the rear-seating area. Pertorming t t w action disabies tne fan knob on ... to personally adjust the temperature and the fan speed for heating. L Selecting the Fan Speed These controls are used for the rear-seating area. To return control to that knob, turn off the fan. 3-29 Directing the Airflow 1 2 To direct the airflow to the rear of...
... floor outlets are overhead, on the control panel located behind the driver's seat. A rear-seat passenger can use these controls to use the right knob located on either rear fan control to numeral 1, 2, or 3 to increase or decrease airflow to the rear-seating area. Pertorming t t w action disabies tne fan knob on ... to personally adjust the temperature and the fan speed for heating. L Selecting the Fan Speed These controls are used for the rear-seating area. To return control to that knob, turn off the fan. 3-29 Directing the Airflow 1 2 To direct the airflow to the rear of...
Owner's Manual
Page 213
... adjusting the temperature, do the following : Turn the right knob, located on the overhead rear-control panel, behind the driver's seat, clockwise or counterclockwise to the rear-seating area. If using the main climate-control panel, then the air-conditioning system must be on to direct cooled air to the...to raise or lower the temperature in this section. Setting the Temperature If the driver is not on, then the temperature in the rear of the vehicle will remain at cabin temperature. If a rear-seat passenger is the cold air return outlet. For information on the main climate-control...
... adjusting the temperature, do the following : Turn the right knob, located on the overhead rear-control panel, behind the driver's seat, clockwise or counterclockwise to the rear-seating area. If using the main climate-control panel, then the air-conditioning system must be on to direct cooled air to the...to raise or lower the temperature in this section. Setting the Temperature If the driver is not on, then the temperature in the rear of the vehicle will remain at cabin temperature. If a rear-seat passenger is the cold air return outlet. For information on the main climate-control...

Owner's Manual
Page 214
... is located below the main climate-control system on the control panel located behind the front seats. A rear-seat passenger can use the controls located on the switchbank must be turned to R (Rear) to allow the rear-seat passengers to use these controls to personally adjust the temperature and the fan speed for... button is not in your vehicle. I' 3-31 Rear Climate Control System (With Entertainment System) Your vehicle may have a rear climate-control system that allows the driver to adjust the fan speed or a rear-seat passenger to adjust the fan speed for the rear...
... is located below the main climate-control system on the control panel located behind the front seats. A rear-seat passenger can use the controls located on the switchbank must be turned to R (Rear) to allow the rear-seat passengers to use these controls to personally adjust the temperature and the fan speed for... button is not in your vehicle. I' 3-31 Rear Climate Control System (With Entertainment System) Your vehicle may have a rear climate-control system that allows the driver to adjust the fan speed or a rear-seat passenger to adjust the fan speed for the rear...


