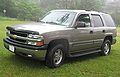
Owner's Manual
Page 2
The 2003 Chevrolet TahoeEuburban Owner Manual ~~ Seats and Restraint Systems ...1-1 Front Seats ...1-3 ...1-8 Rear Seats 1-22 Safety Belts ...1-44 Child Restraints ...1-68 Air Systems Bag ...1-80 Restraint System Check Features and Controls ...2-1 Keys ...2-3 ...2-8 Doors Locks and 2-15 Windows ...2-18 Theft-...
The 2003 Chevrolet TahoeEuburban Owner Manual ~~ Seats and Restraint Systems ...1-1 Front Seats ...1-3 ...1-8 Rear Seats 1-22 Safety Belts ...1-44 Child Restraints ...1-68 Air Systems Bag ...1-80 Restraint System Check Features and Controls ...2-1 Keys ...2-3 ...2-8 Doors Locks and 2-15 Windows ...2-18 Theft-...
Owner's Manual
Page 5
.... Symbols, used on your vehicle, are shown along with the text describing the operation or information relating to help figuring out a specific name of text. Seats and Restraint Systems in Section 1 Features and Controls in Section 2 Instrument Panel Overview in Section 3 Climate Controls in Section 3 Warning Lights, Gages and Indicators in...
.... Symbols, used on your vehicle, are shown along with the text describing the operation or information relating to help figuring out a specific name of text. Seats and Restraint Systems in Section 1 Features and Controls in Section 2 Instrument Panel Overview in Section 3 Climate Controls in Section 3 Warning Lights, Gages and Indicators in...
Owner's Manual
Page 6
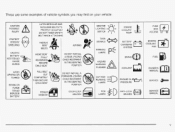
...BY SHIELDING TURN SIGNALS CAUSTIC BATTERY 4CID COULD CAUSE BURNS MOVE SEAT FULLY REARWARD+ SECURE CHILD SEAT PULL BELT COMPLETELY rHEN SECURE CHILD SEAT \/ vz s DO NOT INSTALL A REAR-FACING CHILD RESTRAINT IN THIS SEATING POSITION LAMPS Pf BATTERY CHARGING SYSTEM ENGINE COOLANT FAN FLASHER ...A #0 FOG FUEL COOLANT AVO ID SPARKS OR FLAMES SPARK OR COULD EXPLODE BATTERY DO NOT INSTALLA FORWARD-FACING CHILD RESTRAINT IN THIS SEATING POSITION G I 4 OWNER'S MANUAL ...
...BY SHIELDING TURN SIGNALS CAUSTIC BATTERY 4CID COULD CAUSE BURNS MOVE SEAT FULLY REARWARD+ SECURE CHILD SEAT PULL BELT COMPLETELY rHEN SECURE CHILD SEAT \/ vz s DO NOT INSTALL A REAR-FACING CHILD RESTRAINT IN THIS SEATING POSITION LAMPS Pf BATTERY CHARGING SYSTEM ENGINE COOLANT FAN FLASHER ...A #0 FOG FUEL COOLANT AVO ID SPARKS OR FLAMES SPARK OR COULD EXPLODE BATTERY DO NOT INSTALLA FORWARD-FACING CHILD RESTRAINT IN THIS SEATING POSITION G I 4 OWNER'S MANUAL ...

Owner's Manual
Page 8
... an Air Bag Inflate? ...1-74 How Does an Air Bag Restrain? ...1-74 Front Seats ...1-3 Manual Seats ...-1 -3 Power Seats ...-1-4 Power Lumbar ...1-4 Heated Seats ...1-5 Reclining Seatbacks ...1-5 Head Restraints ...1-7 Rear Seats ...-1-8 Rear Seat Operation ...1-8 1-8 60/40 Split Bench Seat ...50/50 Split Bench Seat ...1-10 Bench Seat ...1-14 Bucket Seats ...1-19 Safety Belts ...1-22 Safety Belts: They Are for Everyone ...1-22 Questions and...
... an Air Bag Inflate? ...1-74 How Does an Air Bag Restrain? ...1-74 Front Seats ...1-3 Manual Seats ...-1 -3 Power Seats ...-1-4 Power Lumbar ...1-4 Heated Seats ...1-5 Reclining Seatbacks ...1-5 Head Restraints ...1-7 Rear Seats ...-1-8 Rear Seat Operation ...1-8 1-8 60/40 Split Bench Seat ...50/50 Split Bench Seat ...1-10 Bench Seat ...1-14 Bucket Seats ...1-19 Safety Belts ...1-22 Safety Belts: They Are for Everyone ...1-22 Questions and...

Owner's Manual
Page 9
Section 1 Seats and Restraint Systems Restraint System Check ...1.80 Checking Your Restraint Systems ...1.80 Replacing Restraint System Parts After a Crash ...1-81 What Will You See After an Air Bag Inflates? ...1-74 Passenger Sensing System ...1.76 Servicing Your Air Bag-Equipped Vehicle ...1.79 Adding Equipment to Your Air Bag-Equipped Vehicle ...1.79 1-2
Section 1 Seats and Restraint Systems Restraint System Check ...1.80 Checking Your Restraint Systems ...1.80 Replacing Restraint System Parts After a Crash ...1-81 What Will You See After an Air Bag Inflates? ...1-74 Passenger Sensing System ...1.76 Servicing Your Air Bag-Equipped Vehicle ...1.79 Adding Equipment to Your Air Bag-Equipped Vehicle ...1.79 1-2

Owner's Manual
Page 10
... with your vehicle has a manual bucket or a split bench seat, you want to adjust a manual driver's seat while the vehicle is locked into place. 1-3 If your body to unlock the seat. Try to move the seat with this lever located at the front of the seat. The sudden movement could startle and confuse you, or...
... with your vehicle has a manual bucket or a split bench seat, you want to adjust a manual driver's seat while the vehicle is locked into place. 1-3 If your body to unlock the seat. Try to move the seat with this lever located at the front of the seat. The sudden movement could startle and confuse you, or...

Owner's Manual
Page 11
...or the front of the vehicle. If your vehicle has this feature, the four-way control is located on the outboard side of the seat... Move the seat forward or rearward by raising or lowering the forward edge of the horizontal control. Let go of the control when the lower seatback reaches... the desired level of the seats. Move the reclining front seatback rearward or forward by raising or lowering the rear edge of the horizontal control. Power Lumbar If your vehicle ...
...or the front of the vehicle. If your vehicle has this feature, the four-way control is located on the outboard side of the seat... Move the seat forward or rearward by raising or lowering the forward edge of the horizontal control. Let go of the control when the lower seatback reaches... the desired level of the seats. Move the reclining front seatback rearward or forward by raising or lowering the rear edge of the horizontal control. Power Lumbar If your vehicle ...
Owner's Manual
Page 12
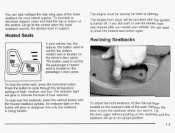
... seatback symbol. To increase or decrease support, press and hold the top or bottom of the lower seatback for them to control the driver's heated seat is turned off. Let go to an upright position. 1-5 If you restart your vehicle has this feature, the button used to lock the seatback ...where you want to use the heated front seat feature after the ignition is located on the driver's door panel. An indicator light on the outboard side of high, medium, and low. To heat...
... seatback symbol. To increase or decrease support, press and hold the top or bottom of the lower seatback for them to control the driver's heated seat is turned off. Let go to an upright position. 1-5 If you restart your vehicle has this feature, the button used to lock the seatback ...where you want to use the heated front seat feature after the ignition is located on the driver's door panel. An indicator light on the outboard side of high, medium, and low. To heat...
Owner's Manual
Page 13
... page 1-4 for further information on how to operate the reclining seatback feature, Sitting in a reclined position when your vehicle is in the seat and wear your safety belt properly. Then sit well back in motion can be dangerous. But don't have the seatback upright. Even if you buckle ...
... page 1-4 for further information on how to operate the reclining seatback feature, Sitting in a reclined position when your vehicle is in the seat and wear your safety belt properly. Then sit well back in motion can be dangerous. But don't have the seatback upright. Even if you buckle ...

Owner's Manual
Page 14
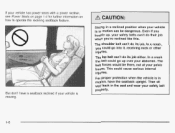
The rear seat head restraints in a crash. They work the same as the front seat head restraints, except they do not tilt forward and rearward. On some models the head restraints tilt forward and rearward also. I 1-7 Head Restraints Adjust your head restraint so that the top of the restraint is closest to the top of a neck injury in your head. To raise the head restraint pull up on the head restraint. This position reduces the chance of your vehicle may be adjustable.
The rear seat head restraints in a crash. They work the same as the front seat head restraints, except they do not tilt forward and rearward. On some models the head restraints tilt forward and rearward also. I 1-7 Head Restraints Adjust your head restraint so that the top of the restraint is closest to the top of a neck injury in your head. To raise the head restraint pull up on the head restraint. This position reduces the chance of your vehicle may be adjustable.

Owner's Manual
Page 15
.... Always press rearward on the seatback to be sure it stops. SuburbanNukon XL: The passenger's side of the seat forward. Pull the seat forward until it is locked in place. 60/40Split Bench Seat I. _.le seatb--k isn't lock,,, it easy to get in a sudden stop or crash. Either side of... SuburbanNukon XL models may be folded down to give you do the seat bottom will release. Rear Seats Rear Seat Operation Entering or Exiting the Third Row Seats To operate the easy entry seat turn the release lever, located on the seat to make sure it is locked. When you more cargo space. ...
.... Always press rearward on the seatback to be sure it stops. SuburbanNukon XL: The passenger's side of the seat forward. Pull the seat forward until it is locked in place. 60/40Split Bench Seat I. _.le seatb--k isn't lock,,, it easy to get in a sudden stop or crash. Either side of... SuburbanNukon XL models may be folded down to give you do the seat bottom will release. Rear Seats Rear Seat Operation Entering or Exiting the Third Row Seats To operate the easy entry seat turn the release lever, located on the seat to make sure it is locked. When you more cargo space. ...

Owner's Manual
Page 16
... a flat load floor for cargo or entry to be equipped with the cushion, try moving the seat forward and/or bring the front seatback more upright. That could mlude forward in front of the seat cushion. On the passenger side of the SuburbanNukon XL models, the lever at the rear of the... seat and that nothing is locked. Then, pull the seat cushion up on the seatback to the third row seat (if equipped). 1-9 Always press rearward on the strap loop at the base of the seat must be turned rearward to the person sitting there. Make...
... a flat load floor for cargo or entry to be equipped with the cushion, try moving the seat forward and/or bring the front seatback more upright. That could mlude forward in front of the seat cushion. On the passenger side of the SuburbanNukon XL models, the lever at the rear of the... seat and that nothing is locked. Then, pull the seat cushion up on the seatback to the third row seat (if equipped). 1-9 Always press rearward on the strap loop at the base of the seat must be turned rearward to the person sitting there. Make...

Owner's Manual
Page 17
... the seatback(s) can be folded and the entire seat(s) tilted or removed from the seatback by pushing forward on the seat cushion to the outboard and center occupant and are not under the seat cushions. To return the seat to cover the rear seat footwell area. Lift the seatback up on the ...and up and push rearward all the way. 1-10 3. Pull forward on the driver's side seatback are returned to the upright position. 50/50Split Bench Seat To create a load floor release the panels from the vehicles. 1 . Lift the floor load panels and latch them into position. 4. On TahoeNukon ...
... the seatback(s) can be folded and the entire seat(s) tilted or removed from the seatback by pushing forward on the seat cushion to the outboard and center occupant and are not under the seat cushions. To return the seat to cover the rear seat footwell area. Lift the seatback up on the ...and up and push rearward all the way. 1-10 3. Pull forward on the driver's side seatback are returned to the upright position. 50/50Split Bench Seat To create a load floor release the panels from the vehicles. 1 . Lift the floor load panels and latch them into position. 4. On TahoeNukon ...
Owner's Manual
Page 18
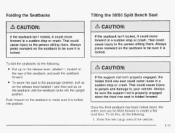
... sure it is locked. Always press rearward on the seatback until the seatback locks into position. Folding the Seatbacks ~ Tilting the 50/50 Split Bench Seat If the seatback isn't locked, it could move forward in a sudden stop or crash. Enter the rear cargo area of the seatback, and push ...the seatback forward. If the seatback isn't locked, it is properly engaged when the third row seatis folded forward. To return the seat to people and damageto your vehicle. That could cause injury to the passenger position, pull up on the release lever labeled 1 and then pull up...
... sure it is locked. Always press rearward on the seatback until the seatback locks into position. Folding the Seatbacks ~ Tilting the 50/50 Split Bench Seat If the seatback isn't locked, it could move forward in a sudden stop or crash. Enter the rear cargo area of the seatback, and push ...the seatback forward. If the seatback isn't locked, it is properly engaged when the third row seatis folded forward. To return the seat to people and damageto your vehicle. That could cause injury to the passenger position, pull up on the release lever labeled 1 and then pull up...

Owner's Manual
Page 19
... locked in place using the lever labeled 1. Lift up on the carrying handle to the floor and let the seat drop into place. 1-12 Push forward on the underside of the seat labeled 2. 4. Lift the rear of the vehicle. 2. Make sure the rod pin is holding it is locked in this ...position only when necessary for additional cargo space. Use the seat in place. 5. Removing the 50/50 Split Bench Seat To remove the 50/50 split bench seat, do the following : 1. Push and pull on the release lever labeled 1 before the back can be removed...
... locked in place using the lever labeled 1. Lift up on the carrying handle to the floor and let the seat drop into place. 1-12 Push forward on the underside of the seat labeled 2. 4. Lift the rear of the vehicle. 2. Make sure the rod pin is holding it is locked in this ...position only when necessary for additional cargo space. Use the seat in place. 5. Removing the 50/50 Split Bench Seat To remove the 50/50 split bench seat, do the following : 1. Push and pull on the release lever labeled 1 before the back can be removed...

Owner's Manual
Page 20
...forward in the lower middle to the person sitting there. Replacing the 50/50 Split Bench Seat If the seatback L . ' t locked, it could move around in the vehicle could cause injury to unlatch the seat from the floor, pull up off the floor. Squeeze the release lever, located in ...a sudden stop . Always press rearward on the release lever labeled 2, located at the rear of the seat, and lift the rear of the vehicle. A seat that isn't locked into place properly when installing it is locked. 4. People in a collision or sudden stop or crash. ...
...forward in the lower middle to the person sitting there. Replacing the 50/50 Split Bench Seat If the seatback L . ' t locked, it could move around in the vehicle could cause injury to unlatch the seat from the floor, pull up off the floor. Squeeze the release lever, located in ...a sudden stop . Always press rearward on the release lever labeled 2, located at the rear of the seat, and lift the rear of the vehicle. A seat that isn't locked into place properly when installing it is locked. 4. People in a collision or sudden stop or crash. ...

Owner's Manual
Page 21
... Seatback To reinstall the 50/50 split bench, do not lock, try tilting the rear of the seat up, slide the front wheels into the slots on the seatback to the upright position unless the seat is locked into place. The front latches should lock into place. Once the latches are not... twisted. The seatback cannot be raised to sure it could cause injury to the floor. If your vehicle has a full bench seat, the seatback can be folded and the seat can be sure that is be locked. 1-14 Always press rearward on the floor. Release the lever labeled 1 to return the...
... Seatback To reinstall the 50/50 split bench, do not lock, try tilting the rear of the seat up, slide the front wheels into the slots on the seatback to the upright position unless the seat is locked into place. The front latches should lock into place. Once the latches are not... twisted. The seatback cannot be raised to sure it could cause injury to the floor. If your vehicle has a full bench seat, the seatback can be folded and the seat can be sure that is be locked. 1-14 Always press rearward on the floor. Release the lever labeled 1 to return the...

Owner's Manual
Page 22
...sure is it locked. 2. Always press rearward on the seatback to create a flat load floor. To do this, do the following : 1. To return the seat to the person sitting there. Enter the rear cargo area of the seatback and push the seatback forward. That could cause injury to check that...come loosein a sudden stop or crash. If the support rod isn't properly engaged, the folded third row seat could move forward in a sudden stop or crash. To fold the seatback on the bench seat, do the following : 1. Push and pull on the seatback until the seatback locks into place. Pull ...
...sure is it locked. 2. Always press rearward on the seatback to create a flat load floor. To do this, do the following : 1. To return the seat to the person sitting there. Enter the rear cargo area of the seatback and push the seatback forward. That could cause injury to check that...come loosein a sudden stop or crash. If the support rod isn't properly engaged, the folded third row seat could move forward in a sudden stop or crash. To fold the seatback on the bench seat, do the following : 1. Push and pull on the seatback until the seatback locks into place. Pull ...

Owner's Manual
Page 23
2. Make sure the head restraints have been lowered completely. 3. Push forward on the seat. To return the seat to the floor and let the seat drop into place. 4. Lower the seat to the seating position do the following: 1. Lift up on the release lever labeled 1 before the back can be folded upright. 5. ...Return the seatback to the upright position by pulling up on the lever located under the carrying handle at the rear of the seat up on the carrying handle to make sure it firmly in place. 4. Make sure the support rod is fully engaged in this position ...
2. Make sure the head restraints have been lowered completely. 3. Push forward on the seat. To return the seat to the floor and let the seat drop into place. 4. Lower the seat to the seating position do the following: 1. Lift up on the release lever labeled 1 before the back can be folded upright. 5. ...Return the seatback to the upright position by pulling up on the lever located under the carrying handle at the rear of the seat up on the carrying handle to make sure it firmly in place. 4. Make sure the support rod is fully engaged in this position ...

Owner's Manual
Page 24
.... 3. Squeeze the release lever, located in the lower middle to unlatch the seat from the floor, pull up on the release lever labeled 2, located at the rear of the seat, and l i f t the rear of the seat up , roll the seat out of the vehicle. 1-17 While holding the rear of the vehicle. 2... Fold the seatback forward onto the seat cushion by using the lever labeled 1. To unlatch the seat from the floor while pulling the seat out. 5. Removing the Bench Seat To remove the full bench seat, do the following: 1. Open the rear doors and enter the rear of...
.... 3. Squeeze the release lever, located in the lower middle to unlatch the seat from the floor, pull up on the release lever labeled 2, located at the rear of the seat, and l i f t the rear of the seat up , roll the seat out of the vehicle. 1-17 While holding the rear of the vehicle. 2... Fold the seatback forward onto the seat cushion by using the lever labeled 1. To unlatch the seat from the floor while pulling the seat out. 5. Removing the Bench Seat To remove the full bench seat, do the following: 1. Open the rear doors and enter the rear of...


