
Owner's Manual
Page 41
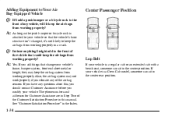
... "Customer Satisfaction Procedure" in the center position. Q: A: Lap Belt If your vehicle is a Crew Cab model, someone can sit in the center rear position. 1-34 Also, the air bag system may keep the air bags from working properly in this , you should contact Customer Assistance before you modify... Vehicle Center Passenger Position Q: A: If I might add to the front of the vehicle that change your vehicle's frame, bumper system, front end sheet metal or height, they may not work properly if you relocate any questions about this manual. As long as the push bumper or bicycle...
... "Customer Satisfaction Procedure" in the center position. Q: A: Lap Belt If your vehicle is a Crew Cab model, someone can sit in the center rear position. 1-34 Also, the air bag system may keep the air bags from working properly in this , you should contact Customer Assistance before you modify... Vehicle Center Passenger Position Q: A: If I might add to the front of the vehicle that change your vehicle's frame, bumper system, front end sheet metal or height, they may not work properly if you relocate any questions about this manual. As long as the push bumper or bicycle...
Owner's Manual
Page 166
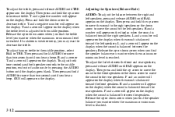
.... Then press and hold the up arrow to move the sound to the right speakers or the down arrow to move the sound to the rear speakers. L and a number will appear on the display. To adjust the fade between the right and left speakers. Then press and hold AUDIO for more... display. R and a number will appear on the display. T and a positive number will appear on the display. To adjust bass or treble to the middle position, end out of audio mode by pressing the AUDIO button until TRE appears on the display when the sound is reached. To adjust both tone controls...
.... Then press and hold the up arrow to move the sound to the right speakers or the down arrow to move the sound to the rear speakers. L and a number will appear on the display. To adjust the fade between the right and left speakers. Then press and hold AUDIO for more... display. R and a number will appear on the display. T and a positive number will appear on the display. To adjust bass or treble to the middle position, end out of audio mode by pressing the AUDIO button until TRE appears on the display when the sound is reached. To adjust both tone controls...
Owner's Manual
Page 220
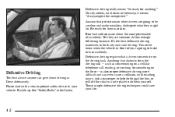
... concentrating on a cellular telephone call, reading, or reaching for something on the driving task. These simple defensive driving techniques could save your vehicle: Buckle up. Rear-end collisions are common. Ask a passenger to help do things like this, or pull off the road in a safe place to be ready for their mistakes...
... concentrating on a cellular telephone call, reading, or reaching for something on the driving task. These simple defensive driving techniques could save your vehicle: Buckle up. Rear-end collisions are common. Ask a passenger to help do things like this, or pull off the road in a safe place to be ready for their mistakes...
Owner's Manual
Page 241
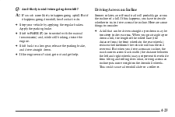
... across an incline puts more likely to happen going uphill. and drive straight down may not prevent the vehicle from the front wheels to the rear wheels) reduces the likelihood the vehicle will probably go straight up or down . D A hill that can be D Shift back to a low gear, release the... whether to try to drive across the incline of the wheel base (the distance from tilting and rolling over end. Driving Across an Incline Sooner or later, an off-road trail will tumble end over . Q: A: Am I likely to stall when going downhill, here's what to do. This could cause a downhill ...
... across an incline puts more likely to happen going uphill. and drive straight down may not prevent the vehicle from the front wheels to the rear wheels) reduces the likelihood the vehicle will probably go straight up or down . D A hill that can be D Shift back to a low gear, release the... whether to try to drive across the incline of the wheel base (the distance from tilting and rolling over end. Driving Across an Incline Sooner or later, an off-road trail will tumble end over . Q: A: Am I likely to stall when going downhill, here's what to do. This could cause a downhill ...
Owner's Manual
Page 265
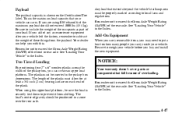
... an upper load platform. The planks must be sure the load is shown on each end of the rear axle. See "Loading Your Vehicle" in the Index. See "Loading Your Vehicle" in a zone over the rear axle. Be sure to include the weight of the occupants as part of the front... not to exceed the Gross Axle Weight Rating (GAWR) of overloading. When using E85 ethanol fuel the maximum payload should be inserted in the pickup box depressions. NOTICE: Your warranty doesn't cover parts or components that your vehicle before you are using this . This is the maximum load capacity...
... an upper load platform. The planks must be sure the load is shown on each end of the rear axle. See "Loading Your Vehicle" in the Index. See "Loading Your Vehicle" in a zone over the rear axle. Be sure to include the weight of the occupants as part of the front... not to exceed the Gross Axle Weight Rating (GAWR) of overloading. When using E85 ethanol fuel the maximum payload should be inserted in the pickup box depressions. NOTICE: Your warranty doesn't cover parts or components that your vehicle before you are using this . This is the maximum load capacity...
Owner's Manual
Page 296
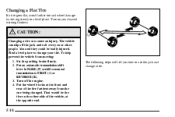
... and wheel damage by driving slowly to FIRST (1) or REVERSE (R). 3. Put the wheel blocks at the opposite end. The following steps will tell you or other side of the vehicle, at the front and rear of the tire farthest away from moving: 1. Find a level place to use the jack and change your...
... and wheel damage by driving slowly to FIRST (1) or REVERSE (R). 3. Put the wheel blocks at the opposite end. The following steps will tell you or other side of the vehicle, at the front and rear of the tire farthest away from moving: 1. Find a level place to use the jack and change your...
Owner's Manual
Page 298
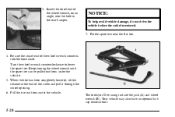
Be sure the chisel end of the wheel wrench, on an angle, into the hoist shaft. NOTICE: To help avoid vehicle damage, do not drive the vehicle before the cable .... 4. Turn the wheel wrench counterclockwise to lower the spare tire. Insert the chisel end of the wheel wrench connects into the hole in the rear bumper. When the tire has been completely lowered, tilt the retainer at the end of the cable and pull it through the wheel opening. 6. Pull the tire out...
Be sure the chisel end of the wheel wrench, on an angle, into the hoist shaft. NOTICE: To help avoid vehicle damage, do not drive the vehicle before the cable .... 4. Turn the wheel wrench counterclockwise to lower the spare tire. Insert the chisel end of the wheel wrench connects into the hole in the rear bumper. When the tire has been completely lowered, tilt the retainer at the end of the cable and pull it through the wheel opening. 6. Pull the tire out...
Owner's Manual
Page 305
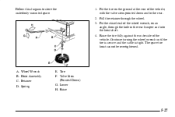
...the hoist shaft. 4. Continue turning the wheel wrench until the tire is secure and the cable is tight. Raise 5-27 Follow this diagram to the rear. 2. Put the tire on an angle, through the wheel. 3. Raise the tire fully against the underside of the vehicle, with the valve stem ...pointed down and to store the underbody-mounted spare. 1. Lower H. D. C. Put the chisel end of the wheel wrench, on the ground at the rear of the vehicle. The spare tire hoist cannot be overtightened. Valve Stem (Pointed Down) G. B.
...the hoist shaft. 4. Continue turning the wheel wrench until the tire is secure and the cable is tight. Raise 5-27 Follow this diagram to the rear. 2. Put the tire on an angle, through the wheel. 3. Raise the tire fully against the underside of the vehicle, with the valve stem ...pointed down and to store the underbody-mounted spare. 1. Lower H. D. C. Put the chisel end of the wheel wrench, on the ground at the rear of the vehicle. The spare tire hoist cannot be overtightened. Valve Stem (Pointed Down) G. B.
Owner's Manual
Page 365
... that will fit, install them . If you can damage your vehicle because there's not enough clearance. Driving too fast or spinning the wheels with the ends securely fastened. The area damaged by the tire chains could cause you must. To help avoid damage to the brakes, suspension or other than P235... when you to lose control of traction device only if its manufacturer recommends it stops. Install them as tightly as possible with chains on the rear tires. 6-55
... that will fit, install them . If you can damage your vehicle because there's not enough clearance. Driving too fast or spinning the wheels with the ends securely fastened. The area damaged by the tire chains could cause you must. To help avoid damage to the brakes, suspension or other than P235... when you to lose control of traction device only if its manufacturer recommends it stops. Install them as tightly as possible with chains on the rear tires. 6-55


