Owner's Manual
Page 19
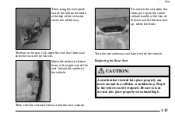
.... Move the seatback release lever, at the top of the retractor cover, out of the way. Turn the seat sideways and take it . Replacing the Rear Seat CAUTION: A seat that isn't locked into place properly can move around in the vehicle could be injured. To remove the seat, fully open the... rear load doors and enter the back of the vehicle. yellowblue Then, hang the latch plate end of the belt on the center release handle at the rear of the seat and lift the rear seat up on the hook at the right...
.... Move the seatback release lever, at the top of the retractor cover, out of the way. Turn the seat sideways and take it . Replacing the Rear Seat CAUTION: A seat that isn't locked into place properly can move around in the vehicle could be injured. To remove the seat, fully open the... rear load doors and enter the back of the vehicle. yellowblue Then, hang the latch plate end of the belt on the center release handle at the rear of the seat and lift the rear seat up on the hook at the right...

Owner's Manual
Page 42
... the front of the air bag sensors. See "Customer Satisfaction Procedure" in the Index.) Q: A: Lap Belt If your vehicle has front and rear bench seats, someone can sit in this , you should contact Customer Assistance before you relocate any questions about this manual. yellowblue Adding Equipment to ... Vehicle Center Passenger Position Q: A: If I might add to the front of the vehicle that change your vehicle's frame, bumper system, front end sheet metal or height, they may not work properly if you modify your vehicle so that the vehicle's basic structure isn't changed, it keep...
... the front of the air bag sensors. See "Customer Satisfaction Procedure" in the Index.) Q: A: Lap Belt If your vehicle has front and rear bench seats, someone can sit in this , you should contact Customer Assistance before you relocate any questions about this manual. yellowblue Adding Equipment to ... Vehicle Center Passenger Position Q: A: If I might add to the front of the vehicle that change your vehicle's frame, bumper system, front end sheet metal or height, they may not work properly if you modify your vehicle so that the vehicle's basic structure isn't changed, it keep...
Owner's Manual
Page 80
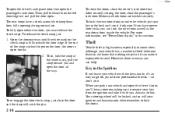
The rear doors have power door locks, you can help. To fully open the door all the way. If the end of theft-deterrent features, we know that nothing we put your ...number of the strap catches the pin on it can lock the side doors as well as the rear doors from fully opening during normal use. Key in some cities. When you must release the check...professional thieves -- Then, hold the strap at the white mark, pull the strap toward you and open either rear door, you park your ignition and transmission. Also remember to steal. yellowblue To open the driver's side panel ...
The rear doors have power door locks, you can help. To fully open the door all the way. If the end of theft-deterrent features, we know that nothing we put your ...number of the strap catches the pin on it can lock the side doors as well as the rear doors from fully opening during normal use. Key in some cities. When you must release the check...professional thieves -- Then, hold the strap at the white mark, pull the strap toward you and open either rear door, you park your ignition and transmission. Also remember to steal. yellowblue To open the driver's side panel ...
Owner's Manual
Page 130
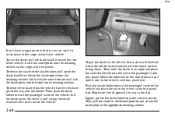
... rearward with the round surface facing down. To remove the shade from the retaining sockets. Then, hold it out of the vehicle. Move the other end of the shade forward and hold the shade at an angle and place the shade holder tab into the holder. To return the shade to... in the driver's side trim panel slot. yellowblue If you have a cargo security shade, you can use the shade, pull the shade handle toward the rear of the vehicle. Make sure the tab goes all the way into the slot in the appropriate retaining sockets. 2-60 Latch the shade posts into...
... rearward with the round surface facing down. To remove the shade from the retaining sockets. Then, hold it out of the vehicle. Move the other end of the shade forward and hold the shade at an angle and place the shade holder tab into the holder. To return the shade to... in the driver's side trim panel slot. yellowblue If you have a cargo security shade, you can use the shade, pull the shade handle toward the rear of the vehicle. Make sure the tab goes all the way into the slot in the appropriate retaining sockets. 2-60 Latch the shade posts into...
Owner's Manual
Page 184
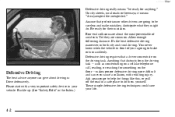
... could save your vehicle: Buckle up. (See "Safety Belts" in a safe place to do things like this, or pull off the road in the Index.) 4-2 Rear-end collisions are common.
... could save your vehicle: Buckle up. (See "Safety Belts" in a safe place to do things like this, or pull off the road in the Index.) 4-2 Rear-end collisions are common.

Owner's Manual
Page 205
... by applying the regular brakes. too steep to stall when going downhill? Driving Across an Incline Sooner or later, an off-road trail will tumble end over . This could cause a downhill slide or a rollover. D Surface conditions can be driven straight up or down a hill, the length of a hill. If this ...out and get help. Loose gravel, muddy spots, or even wet grass can be a problem when you have to decide whether to try to the rear wheels) reduces the likelihood the vehicle will probably go straight up or down . yellowblue Q: A: Am I likely to drive across. the engine.
... by applying the regular brakes. too steep to stall when going downhill? Driving Across an Incline Sooner or later, an off-road trail will tumble end over . This could cause a downhill slide or a rollover. D Surface conditions can be driven straight up or down a hill, the length of a hill. If this ...out and get help. Loose gravel, muddy spots, or even wet grass can be a problem when you have to decide whether to try to the rear wheels) reduces the likelihood the vehicle will probably go straight up or down . yellowblue Q: A: Am I likely to drive across. the engine.
Owner's Manual
Page 239
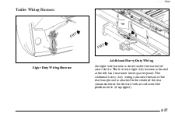
The five-wire light-duty harness is attached to the center of the rear crossmember or the forward vertical surface of the platform hitch (if equipped). 4-57 The additional heavy-duty wiring is located forward of your vehicle. yellowblue Trailer Wiring Harness Additional Heavy-Duty Wiring Light-Duty Wiring Harness An eight-wire harness is stored under the rear end of the rear bumper and is located at the left hand rear inner lower quarter panel.
The five-wire light-duty harness is attached to the center of the rear crossmember or the forward vertical surface of the platform hitch (if equipped). 4-57 The additional heavy-duty wiring is located forward of your vehicle. yellowblue Trailer Wiring Harness Additional Heavy-Duty Wiring Light-Duty Wiring Harness An eight-wire harness is stored under the rear end of the rear bumper and is located at the left hand rear inner lower quarter panel.
Owner's Manual
Page 262
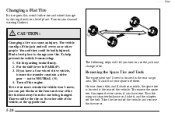
... a level place to change a tire. Put the shift lever in the rear cargo area. Take the tire out of the vehicle, at the front and rear of the vehicle. To help prevent the vehicle from the one . To ...be sure the transfer case is located at the rear of the tire farthest away from moving: 1. You'll also find your spare tire there. The...side of the vehicle and remove the tire cover. 5-20 If you can put blocks at the opposite end. You and they could be the tire on your hazard warning flashers. CAUTION: Changing a tire can ...
... a level place to change a tire. Put the shift lever in the rear cargo area. Take the tire out of the vehicle, at the front and rear of the vehicle. To help prevent the vehicle from the one . To ...be sure the transfer case is located at the rear of the tire farthest away from moving: 1. You'll also find your spare tire there. The...side of the vehicle and remove the tire cover. 5-20 If you can put blocks at the opposite end. You and they could be the tire on your hazard warning flashers. CAUTION: Changing a tire can ...

Owner's Manual
Page 263
... illustrated) with the DOWN marking facing you. When the tire has been lowered, tilt the retainer at the end of the cable so it can be pulled out from under the vehicle in the rear bumper and into the hoist shaft. 2. Assemble the ratchet to turn the ratchet until the spare tire... can be pulled up through the hole in an underbody carrier. Turn the ratchet to lower the spare tire to lower the spare tire: 1. Put the spare tire near the end of...
... illustrated) with the DOWN marking facing you. When the tire has been lowered, tilt the retainer at the end of the cable so it can be pulled out from under the vehicle in the rear bumper and into the hoist shaft. 2. Assemble the ratchet to turn the ratchet until the spare tire... can be pulled up through the hole in an underbody carrier. Turn the ratchet to lower the spare tire to lower the spare tire: 1. Put the spare tire near the end of...

Owner's Manual
Page 271
Lower the jack completely. 9. Lower the vehicle by rotating the wheel wrench clockwise. Tighten each wheel nut by hand using the wheel wrench until the wheel is held against the hub. 8. yellowblue 7. Replace the wheel nuts with the rounded end of the nuts toward the wheel. Front Position Rear Position 5-29 Tighten each wheel nut by rotating the ratchet and wheel wrench counterclockwise.
Lower the jack completely. 9. Lower the vehicle by rotating the wheel wrench clockwise. Tighten each wheel nut by hand using the wheel wrench until the wheel is held against the hub. 8. yellowblue 7. Replace the wheel nuts with the rounded end of the nuts toward the wheel. Front Position Rear Position 5-29 Tighten each wheel nut by rotating the ratchet and wheel wrench counterclockwise.

Owner's Manual
Page 278
.... Don't spin the wheels above 35 mph (55 km/h) as shown on the ground at the rear of the vehicle. Attach the ratchet, with an underbody spare tire carrier, follow these instructions to be... as "rocking" can explode, and you or others could cause an engine compartment fire or other end, on an angle, through the wheel opening. yellowblue For four-door utility models equipped with the UP... mark facing you, near the hook at the end of the jack handle. Continue turning the ratchet until there are two "clicks" or "ratchets." The...
.... Don't spin the wheels above 35 mph (55 km/h) as shown on the ground at the rear of the vehicle. Attach the ratchet, with an underbody spare tire carrier, follow these instructions to be... as "rocking" can explode, and you or others could cause an engine compartment fire or other end, on an angle, through the wheel opening. yellowblue For four-door utility models equipped with the UP... mark facing you, near the hook at the end of the jack handle. Continue turning the ratchet until there are two "clicks" or "ratchets." The...

Owner's Manual
Page 330
... on will fit, install them . Drive slowly and follow the chain manufacturer's instructions. Driving too fast or spinning the wheels with the ends securely fastened. yellowblue Used Replacement Wheels NOTICE (Continued) CAUTION: Putting a used or how far it stops. If you must. Use chains...a new GM original equipment wheel. If the contact continues, slow down until it 's been driven. Tighten them on the tires of the rear axle. It could fail suddenly and cause an accident. If you do find traction devices that manufacturer's instructions. You can damage your wheels....
... on will fit, install them . Drive slowly and follow the chain manufacturer's instructions. Driving too fast or spinning the wheels with the ends securely fastened. yellowblue Used Replacement Wheels NOTICE (Continued) CAUTION: Putting a used or how far it stops. If you must. Use chains...a new GM original equipment wheel. If the contact continues, slow down until it 's been driven. Tighten them on the tires of the rear axle. It could fail suddenly and cause an accident. If you do find traction devices that manufacturer's instructions. You can damage your wheels....
Owner's Manual
Page 343
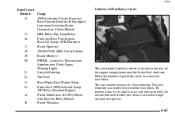
...with a fuse extractor. To remove fuses if you don't have a fuse extractor, hold the end of the engine compartment near the brake fluid reservoir. The fuse extractor is located in the rear of the fuse between your thumb and index finger and pull straight out. 6-63 yellowblue Fuse/...VCM, ABS, Cruise Control 19 Radio (Battery) 20 PRNDL, Automatic Transmission, Speedometer, Check Gages, Warning Lights 21 Security/Steering 22 Not Used 23 Rear Wiper, Rear Washer Pump 24 Front Axle, 4WD Indicator Lamp, TP2 Relay (Gasoline Engine) A Power Door Lock, Six-Way Power Seat, Keyless Entry Module B ...
...with a fuse extractor. To remove fuses if you don't have a fuse extractor, hold the end of the engine compartment near the brake fluid reservoir. The fuse extractor is located in the rear of the fuse between your thumb and index finger and pull straight out. 6-63 yellowblue Fuse/...VCM, ABS, Cruise Control 19 Radio (Battery) 20 PRNDL, Automatic Transmission, Speedometer, Check Gages, Warning Lights 21 Security/Steering 22 Not Used 23 Rear Wiper, Rear Washer Pump 24 Front Axle, 4WD Indicator Lamp, TP2 Relay (Gasoline Engine) A Power Door Lock, Six-Way Power Seat, Keyless Entry Module B ...


