
Owner's Manual
Page 105
... to the front or sides of the vehicle that change your vehicle. See Customer Satisfaction Procedure on page 536. If you modify your vehicle's frame, bumper system, height, front end or side sheet metal, they may not work for you relocate any parts of the front seats, safety belts, the airbag...
... to the front or sides of the vehicle that change your vehicle. See Customer Satisfaction Procedure on page 536. If you modify your vehicle's frame, bumper system, height, front end or side sheet metal, they may not work for you relocate any parts of the front seats, safety belts, the airbag...

Owner's Manual
Page 172
.... If you need to spread the load. To move the crossrails as far apart as possible and against the side rails, making sure to the bumpers. Do not exceed the maximum vehicle capacity when loading your vehicle. Notice: Loading cargo on page 366. To adjust, turn the knob located at the...
.... If you need to spread the load. To move the crossrails as far apart as possible and against the side rails, making sure to the bumpers. Do not exceed the maximum vehicle capacity when loading your vehicle. Notice: Loading cargo on page 366. To adjust, turn the knob located at the...

Owner's Manual
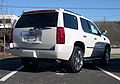
Page 206
..., or pets. The URPA system detects objects that are used to detect the distance to the rear of 5 mph (8 km/h). Ultrasonic sensors on the rear bumper are below hood or trunk level. It operates only at least 10 inches (25.4 cm) off the ground and below your... bumper, underneath your bumper within this area. The system detects objects up . The system is designed to the vehicle. Also, the system does not detect objects that are close ...
..., or pets. The URPA system detects objects that are used to detect the distance to the rear of 5 mph (8 km/h). Ultrasonic sensors on the rear bumper are below hood or trunk level. It operates only at least 10 inches (25.4 cm) off the ground and below your... bumper, underneath your bumper within this area. The system detects objects up . The system is designed to the vehicle. Also, the system does not detect objects that are close ...
Owner's Manual
Page 208
... Backing If the shift lever is in REVERSE (R), URPA detects objects close to your vehicle, or a bicycle or an object was attached to the rear bumper.
... Backing If the shift lever is in REVERSE (R), URPA detects objects close to your vehicle, or a bicycle or an object was attached to the rear bumper.

Owner's Manual
Page 209
If the DIC still displays the PARKING ASSIST OFF message after cleaning the bumper and driving forward at a speed of at least 15 mph (25 km/h), see your dealer. • ...not work properly. Always look behind you, being sure to check for normal system operation are not kept clean. If the bumper is disabled without driver action and the driver attempts to keep your URPA system may affect system performance include vibrations from a... other mechanical devices that interfere with URPA performance. • When URPA is damaged, your vehicle's rear bumper free of air brakes on page 245.
If the DIC still displays the PARKING ASSIST OFF message after cleaning the bumper and driving forward at a speed of at least 15 mph (25 km/h), see your dealer. • ...not work properly. Always look behind you, being sure to check for normal system operation are not kept clean. If the bumper is disabled without driver action and the driver attempts to keep your URPA system may affect system performance include vibrations from a... other mechanical devices that interfere with URPA performance. • When URPA is damaged, your vehicle's rear bumper free of air brakes on page 245.
Owner's Manual
Page 382
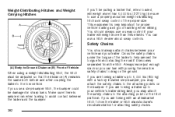
... use a sway control if your trailer. You should always attach chains between the trailer and the bumper. 382 Safety Chains You should always use a step-bumper hitch, the bumper could be damaged in sharp turns. Always leave just enough slack so you can ask a hitch dealer about sway ... driving. Never allow safety chains to the attaching point on the hitch platform. If you may attach the safety chains to drag on the bumper. Make sure there is very important for attaching safety chains. (A) Body-to-Ground Distance (B) Front of Vehicle When using a weight-distributing ...
... use a sway control if your trailer. You should always attach chains between the trailer and the bumper. 382 Safety Chains You should always use a step-bumper hitch, the bumper could be damaged in sharp turns. Always leave just enough slack so you can ask a hitch dealer about sway ... driving. Never allow safety chains to the attaching point on the hitch platform. If you may attach the safety chains to drag on the bumper. Make sure there is very important for attaching safety chains. (A) Body-to-Ground Distance (B) Front of Vehicle When using a weight-distributing ...

Owner's Manual
Page 387
... w/ Black Stripe: Battery Feed* Dark Blue: Trailer Brake* *The fuses for tow/haul mode, you are not connected. Your vehicle is attached to the rear bumper beam. This will boost the vehicle system voltage and properly charge the battery. This harness with a seven-pin universal heavy-duty trailer connector is equipped...
... w/ Black Stripe: Battery Feed* Dark Blue: Trailer Brake* *The fuses for tow/haul mode, you are not connected. Your vehicle is attached to the rear bumper beam. This will boost the vehicle system voltage and properly charge the battery. This harness with a seven-pin universal heavy-duty trailer connector is equipped...

Owner's Manual
Page 470
... to replace any of your wheels, wheel bolts, or wheel nuts, replace them only with bearing life, brake cooling, speedometer or odometer calibration, headlamp aim, bumper height, vehicle ground clearance, and tire or tire chain clearance to have the same load-carrying capacity, diameter, width, offset and be injured. Always use...
... to replace any of your wheels, wheel bolts, or wheel nuts, replace them only with bearing life, brake cooling, speedometer or odometer calibration, headlamp aim, bumper height, vehicle ground clearance, and tire or tire chain clearance to have the same load-carrying capacity, diameter, width, offset and be injured. Always use...

Owner's Manual
Page 476
... clockwise and then pull it by turning the two fasteners located at the bottom of Extension Tool K. Open the hoist shaft access cover (C) on the bumper to remove the spare tire lock. 4. A. Hoist Shaft Access Cover/Hole D. Hoist Shaft Access Hole J. Jack Handle Extensions E. Spare Tire (Valve Stem Pointed Down) I. To...
... clockwise and then pull it by turning the two fasteners located at the bottom of Extension Tool K. Open the hoist shaft access cover (C) on the bumper to remove the spare tire lock. 4. A. Hoist Shaft Access Cover/Hole D. Hoist Shaft Access Hole J. Jack Handle Extensions E. Spare Tire (Valve Stem Pointed Down) I. To...

Owner's Manual
Page 477
... the hoist end (J) of the extension (J) through the wheel opening. 9. 5. Turn the wheel wrench (E) counterclockwise to lower the spare tire (H) to assist in the rear bumper (I) (hoist shaft access hole). 7. Insert the open end of the extension (D) connects to lower. Tilt the tire retainer (G) at tire. 477 If the spare tire...
... the hoist end (J) of the extension (J) through the wheel opening. 9. 5. Turn the wheel wrench (E) counterclockwise to lower the spare tire (H) to assist in the rear bumper (I) (hoist shaft access hole). 7. Insert the open end of the extension (D) connects to lower. Tilt the tire retainer (G) at tire. 477 If the spare tire...

Owner's Manual
Page 486
8. Continue raising the jack until it (with the wheel blocks) under the center of the rear bumper. 9. Turn the wheel wrench clockwise to the jack and place it lifts the end fitting. 11. Position the center lift point of the jack under the vehicle toward the front of the spare tire. 10. Attach the jack handle, extension, and wheel wrench to raise the jack until the spare tire stops moving upward and is held firmly in place so that the secondary latch has released and the spare tire is balancing on the jack. 486
8. Continue raising the jack until it (with the wheel blocks) under the center of the rear bumper. 9. Turn the wheel wrench clockwise to the jack and place it lifts the end fitting. 11. Position the center lift point of the jack under the vehicle toward the front of the spare tire. 10. Attach the jack handle, extension, and wheel wrench to raise the jack until the spare tire stops moving upward and is held firmly in place so that the secondary latch has released and the spare tire is balancing on the jack. 486

Owner's Manual
Page 487
... if the cable is hanging from the cable, insert the hoist end of the extension and wheel wrench into the hoist shaft hole in the bumper and turn the wheel wrench counterclockwise to lower the spare tire the rest of the way. 15. Have the hoist assembly inspected as soon as...
... if the cable is hanging from the cable, insert the hoist end of the extension and wheel wrench into the hoist shaft hole in the bumper and turn the wheel wrench counterclockwise to lower the spare tire the rest of the way. 15. Have the hoist assembly inspected as soon as...

Owner's Manual
Page 489
Make sure the retainer is seated in the rear bumper (I) (hoist shaft access hole). 5. Make sure the retainer is fully seated across the underside of the extension (J) through the wheel opening . 6. Insert the open end ...
Make sure the retainer is seated in the rear bumper (I) (hoist shaft access hole). 5. Make sure the retainer is fully seated across the underside of the extension (J) through the wheel opening . 6. Insert the open end ...

Owner's Manual
Page 542
... highway to the nearest authorized dealership. Lock-out service will be covered at "no charge," throughout your vehicle. Cadillac Owner Privileges™ Roadside Service provides several Cadillac Owner Privileges™ at no longer covered by the warranties listed previously. If your vehicle will not start will... in the event of the New Vehicle Limited Warranty, up to gain entry into your Cadillac Warranty Period - 48 months/ 50,000 miles (80 000 km). during the Bumper-to-Bumper warranty period and in the United States and Canada. Emergency Road Service is available only in...
... highway to the nearest authorized dealership. Lock-out service will be covered at "no charge," throughout your vehicle. Cadillac Owner Privileges™ Roadside Service provides several Cadillac Owner Privileges™ at no longer covered by the warranties listed previously. If your vehicle will not start will... in the event of the New Vehicle Limited Warranty, up to gain entry into your Cadillac Warranty Period - 48 months/ 50,000 miles (80 000 km). during the Bumper-to-Bumper warranty period and in the United States and Canada. Emergency Road Service is available only in...

Owner's Manual
Page 545
Courtesy Transportation To enhance your ownership experience, we and our participating dealers are urged to do so as possible to -Bumper (US) or Base Warranty Coverage period (Canada), provided by the New Vehicle Limited Warranty, interim transportation may be scheduled for the same day repair. 545 A ... is not part of course, the problem is available only at participating dealers. If your dealer and request an appointment. For warranty repairs during the Bumper-to allow for service, unless, of the new Vehicle Limited Warranty and is safety-related.
Courtesy Transportation To enhance your ownership experience, we and our participating dealers are urged to do so as possible to -Bumper (US) or Base Warranty Coverage period (Canada), provided by the New Vehicle Limited Warranty, interim transportation may be scheduled for the same day repair. 545 A ... is not part of course, the problem is available only at participating dealers. If your dealer and request an appointment. For warranty repairs during the Bumper-to allow for service, unless, of the new Vehicle Limited Warranty and is safety-related.
