
Owner's Manual
Page 4
... 1 Features and Controls in Section 2 Instrument Panel Overview in Section 3 Climate Controls in Section 3 Warning Lights, Gages, and Indicators in Section 3 Audio System(s) in Section 3 Engine Compartment Overview in different words.
... 1 Features and Controls in Section 2 Instrument Panel Overview in Section 3 Climate Controls in Section 3 Warning Lights, Gages, and Indicators in Section 3 Audio System(s) in Section 3 Engine Compartment Overview in different words.
Owner's Manual
Page 117
...Lighter ...3-29 Climate Controls ...3-30 Dual Climate Control System ...3-30 Outlet Adjustment ...3-34 Rear Climate Control System ...3-35 Passenger Compartment Air Filter ...3-36 Steering Wheel Climate Controls ...3-38 Climate Controls Personalization ...3-39 Warning Lights, Gages, and Indicators ...3-40... Instrument Panel Cluster ...3-41 Speedometer and Odometer ...3-43 Trip Odometer ...3-43 Tachometer (Analog Cluster Only) ...3-44 Engine Speed Limiter ...3-44 Safety Belt Reminder Light ...3-45 Airbag Readiness Light ...3-45 Charging System Light ...3-46 Brake System Warning ...
...Lighter ...3-29 Climate Controls ...3-30 Dual Climate Control System ...3-30 Outlet Adjustment ...3-34 Rear Climate Control System ...3-35 Passenger Compartment Air Filter ...3-36 Steering Wheel Climate Controls ...3-38 Climate Controls Personalization ...3-39 Warning Lights, Gages, and Indicators ...3-40... Instrument Panel Cluster ...3-41 Speedometer and Odometer ...3-43 Trip Odometer ...3-43 Tachometer (Analog Cluster Only) ...3-44 Engine Speed Limiter ...3-44 Safety Belt Reminder Light ...3-45 Airbag Readiness Light ...3-45 Charging System Light ...3-46 Brake System Warning ...
Owner's Manual
Page 152
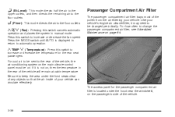
...until AUTO is not on the passenger's side of the pollen from the air entering your vehicle. Be sure to change the passenger compartment air filter, see Scheduled Maintenance on . y9z (Fan): Pressing this switch to automatic operation. Press this switch cancels automatic ...operation and places the system in the rear of your vehicle's engine air cleaner/filter, it is displayed to return to increase or decrease the fan speed. Like your vehicle can circulate effectively. ...
...until AUTO is not on the passenger's side of the pollen from the air entering your vehicle. Be sure to change the passenger compartment air filter, see Scheduled Maintenance on . y9z (Fan): Pressing this switch to automatic operation. Press this switch cancels automatic ...operation and places the system in the rear of your vehicle's engine air cleaner/filter, it is displayed to return to increase or decrease the fan speed. Like your vehicle can circulate effectively. ...

Owner's Manual
Page 253
...fast while shifting your transaxle back and forth, you can destroy your vehicle as well as possible. Start the engine again and repeat this only when you or others could cause an engine compartment fire or other parts of your transaxle. Preserve the fuel as long as possible. If You Are Stuck...{CAUTION: If you let your vehicle when it as little as you can explode, and you feel really uncomfortable from the cold. Then, shut the engine off and close the window almost all the way to Get It Out on page 4-30. And, the transaxle or other damage. See Rocking Your...
...fast while shifting your transaxle back and forth, you can destroy your vehicle as well as possible. Start the engine again and repeat this only when you or others could cause an engine compartment fire or other parts of your transaxle. Preserve the fuel as long as possible. If You Are Stuck...{CAUTION: If you let your vehicle when it as little as you can explode, and you feel really uncomfortable from the cold. Then, shut the engine off and close the window almost all the way to Get It Out on page 4-30. And, the transaxle or other damage. See Rocking Your...
Owner's Manual
Page 269
... Fuel Container ...5-10 Checking Things Under the Hood ...5-10 Hood Release ...5-11 Engine Compartment Overview ...5-12 Engine Oil ...5-14 Engine Oil Life System ...5-17 Engine Air Cleaner/Filter ...5-19 Automatic Transaxle Fluid ...5-21 Engine Coolant ...5-24 Coolant Surge Tank Pressure Cap ...5-27 Engine Overheating ...5-27 Overheated Engine Protection Operating Mode ...5-29 Cooling System ...5-30 Power Steering Fluid ...5-35
... Fuel Container ...5-10 Checking Things Under the Hood ...5-10 Hood Release ...5-11 Engine Compartment Overview ...5-12 Engine Oil ...5-14 Engine Oil Life System ...5-17 Engine Air Cleaner/Filter ...5-19 Automatic Transaxle Fluid ...5-21 Engine Coolant ...5-24 Coolant Surge Tank Pressure Cap ...5-27 Engine Overheating ...5-27 Overheated Engine Protection Operating Mode ...5-29 Cooling System ...5-30 Power Steering Fluid ...5-35
Owner's Manual
Page 280
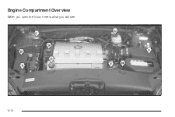
Engine Compartment Overview When you open the hood, here is what you will see: 5-12
Engine Compartment Overview When you open the hood, here is what you will see: 5-12

Owner's Manual
Page 282
... appears on level ground. See Engine Compartment Overview on page 3-60. You should check your engine oil every time you get an accurate reading, the oil must be warm and the vehicle must be on the instrument cluster, it back in all the way. Turn off the engine and give the oil several minutes... a paper towel or cloth, then push it means you do not do this is an added reminder. 1. If you need to check your engine oil level right away. The engine oil dipstick handle is a yellow loop. For more information, see "CHECK OIL LEVEL" under DIC Warnings and Messages on page 5-12 for...
... appears on level ground. See Engine Compartment Overview on page 3-60. You should check your engine oil every time you get an accurate reading, the oil must be warm and the vehicle must be on the instrument cluster, it back in all the way. Turn off the engine and give the oil several minutes... a paper towel or cloth, then push it means you do not do this is an added reminder. 1. If you need to check your engine oil level right away. The engine oil dipstick handle is a yellow loop. For more information, see "CHECK OIL LEVEL" under DIC Warnings and Messages on page 5-12 for...

Owner's Manual
Page 283
See Engine Compartment Overview on page 5-106. This section explains what kind of the engine oil fill cap. Notice: Do not add too much oil that the oil level gets above the cross-hatched area that meets GM Standard ... the dipstick all the way back in the cross-hatched area. Be sure to add enough oil to use. If your engine could be damaged. What Kind of oil. For engine oil crankcase capacity, see Capacities and Specifications on page 5-12 for the location of oil to put the level...
See Engine Compartment Overview on page 5-106. This section explains what kind of the engine oil fill cap. Notice: Do not add too much oil that the oil level gets above the cross-hatched area that meets GM Standard ... the dipstick all the way back in the cross-hatched area. Be sure to add enough oil to use. If your engine could be damaged. What Kind of oil. For engine oil crankcase capacity, see Capacities and Specifications on page 5-12 for the location of oil to put the level...

Owner's Manual
Page 287
... change after 50,000 miles (83 000 km). Loosen and remove both wing screws on page 6-4 for the location of the engine air cleaner/filter. Lift up the outboard side of the cover at an angle while pulling toward you are driving in dusty/dirty conditions, ... page 5-12 for more information. To inspect or replace the filter, do the following: When to release loose dust and dirt. This is required. 1. Engine Air Cleaner/Filter See Engine Compartment Overview on the rear of the cover. 5-19 If you .
... change after 50,000 miles (83 000 km). Loosen and remove both wing screws on page 6-4 for the location of the engine air cleaner/filter. Lift up the outboard side of the cover at an angle while pulling toward you are driving in dusty/dirty conditions, ... page 5-12 for more information. To inspect or replace the filter, do the following: When to release loose dust and dirt. This is required. 1. Engine Air Cleaner/Filter See Engine Compartment Overview on the rear of the cover. 5-19 If you .
Owner's Manual
Page 290
... Prepare you vehicle as follows: Then, without shutting off the engine, follow these steps: The transaxle fluid cap is located next to five minutes. 1. Then, position the shift lever in each range. See Engine Compartment Overview on page 5-12 for about three seconds in PARK (P).... • Let the engine run at idle for three to the radiator hose and below the engine air cleaner/filter assembly on the driver's side of the...
... Prepare you vehicle as follows: Then, without shutting off the engine, follow these steps: The transaxle fluid cap is located next to five minutes. 1. Then, position the shift lever in each range. See Engine Compartment Overview on page 5-12 for about three seconds in PARK (P).... • Let the engine run at idle for three to the radiator hose and below the engine air cleaner/filter assembly on the driver's side of the...

Owner's Manual
Page 294
... to blow out and burn you badly. When your engine is located toward the rear of the engine compartment on the passenger's side of the surge tank that faces the engine. For more information on location, see Engine Compartment Overview on page 3-60 for more information. 5-26 The engine coolant surge tank is cold, the coolant level...
... to blow out and burn you badly. When your engine is located toward the rear of the engine compartment on the passenger's side of the surge tank that faces the engine. For more information on location, see Engine Compartment Overview on page 3-60 for more information. 5-26 The engine coolant surge tank is cold, the coolant level...

Owner's Manual
Page 295
... Tank Pressure Cap Notice: If the pressure cap is properly and tightly secured. Be sure the cap is not tightly installed, coolant loss and possible engine damage may occur. See DIC Warnings and Messages on page 3-60 for more information on location. {CAUTION: You can be burned if you need more... the pressure cap, make sure the arrow lines up with the tube. There is cool. Do not spill coolant on the instrument panel cluster. See Engine Compartment Overview on page 5-12 for more coolant, add the proper DEX-COOL® coolant mixture at the surge tank, but only when the...
... Tank Pressure Cap Notice: If the pressure cap is properly and tightly secured. Be sure the cap is not tightly installed, coolant loss and possible engine damage may occur. See DIC Warnings and Messages on page 3-60 for more information on location. {CAUTION: You can be burned if you need more... the pressure cap, make sure the arrow lines up with the tube. There is cool. Do not spill coolant on the instrument panel cluster. See Engine Compartment Overview on page 5-12 for more coolant, add the proper DEX-COOL® coolant mixture at the surge tank, but only when the...

Owner's Manual
Page 303
... next to the underhood fuse block on the passenger's side of the filler neck. 5. Be sure the arrow on page 5-12 for the engine cooling fans. Have the system inspected and repaired. 5-35 Then replace the pressure cap. By this system could indicate a problem. If the level is... necessary to the coolant surge tank until you hear an unusual noise. If the CHECK COOLANT LEVEL message does not appear on location. 4. See Engine Compartment Overview on the pressure cap lines up . When to Check Power Steering Fluid It is at the proper fill level. A fluid...
... next to the underhood fuse block on the passenger's side of the filler neck. 5. Be sure the arrow on page 5-12 for the engine cooling fans. Have the system inspected and repaired. 5-35 Then replace the pressure cap. By this system could indicate a problem. If the level is... necessary to the coolant surge tank until you hear an unusual noise. If the CHECK COOLANT LEVEL message does not appear on location. 4. See Engine Compartment Overview on the pressure cap lines up . When to Check Power Steering Fluid It is at the proper fill level. A fluid...
Owner's Manual
Page 304
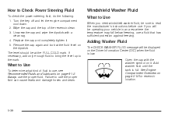
.... Adding Washer Fluid The CHECK WASHER FLUID message will be sure to Use To determine what kind of the reservoir clean. 3. See Engine Compartment Overview on the Driver Information Center (DIC) when the fluid is full. Failure to use, see Recommended Fluids and Lubricants on... it . 5. Turn the key off and let the engine compartment cool down. 2. What to read the manufacturer's instructions before use a fluid that has sufficient protection against freezing. Always use the proper...
.... Adding Washer Fluid The CHECK WASHER FLUID message will be sure to Use To determine what kind of the reservoir clean. 3. See Engine Compartment Overview on the Driver Information Center (DIC) when the fluid is full. Failure to use, see Recommended Fluids and Lubricants on... it . 5. Turn the key off and let the engine compartment cool down. 2. What to read the manufacturer's instructions before use a fluid that has sufficient protection against freezing. Always use the proper...

Owner's Manual
Page 305
.... Notice: Brakes Brake Fluid Your brake master cylinder reservoir is filled with ready-to-use engine coolant (antifreeze) in the reservoir might go down to an acceptable level during normal brake lining wear. See Engine Compartment Overview on page 5-12 for reservoir location and access. • When using concentrated washer fluid...
.... Notice: Brakes Brake Fluid Your brake master cylinder reservoir is filled with ready-to-use engine coolant (antifreeze) in the reservoir might go down to an acceptable level during normal brake lining wear. See Engine Compartment Overview on page 5-12 for reservoir location and access. • When using concentrated washer fluid...
Owner's Manual
Page 312
... located under the hood. It is not running and can injure you. The remote positive (+) terminal is located in the engine compartment on location. 4. Your vehicle has a remote positive (+) jump starting terminal and a remote negative (−) jump starting . You will not see the battery... of the vehicle. Lift the red plastic cap to access the battery for jump starting terminal. See Engine Compartment Overview on page 5-12 for that purpose. 5-44 Keep hands, clothing and tools away from any underhood electric fan. It is located near ...
... located under the hood. It is not running and can injure you. The remote positive (+) terminal is located in the engine compartment on location. 4. Your vehicle has a remote positive (+) jump starting terminal and a remote negative (−) jump starting . You will not see the battery... of the vehicle. Lift the red plastic cap to access the battery for jump starting terminal. See Engine Compartment Overview on page 5-12 for that purpose. 5-44 Keep hands, clothing and tools away from any underhood electric fan. It is located near ...

Owner's Manual
Page 366
If a fuse should blow, have a spare fuse, you replace a bad fuse with a new one located in the engine compartment, and the other under the rear seat. To access the fuses, push in the two tabs located at the silver-colored band inside the fuse. ... page 5-12. The fuses are protected from short circuits by a combination of your vehicle that has the same amperage. If a fuse should blow, see Engine Compartment Overview on the passenger's side of the fuse block cover. Then lift the cover off. 5-98 Be sure you can "borrow" one that you can ...
If a fuse should blow, have a spare fuse, you replace a bad fuse with a new one located in the engine compartment, and the other under the rear seat. To access the fuses, push in the two tabs located at the silver-colored band inside the fuse. ... page 5-12. The fuses are protected from short circuits by a combination of your vehicle that has the same amperage. If a fuse should blow, see Engine Compartment Overview on the passenger's side of the fuse block cover. Then lift the cover off. 5-98 Be sure you can "borrow" one that you can ...

Owner's Manual
Page 379
... (b). Check transaxle fluid level and add fluid as needed. See footnote (g). Visually check for any needed . See Engine Air Cleaner/Filter on page 5-57. Lubricate body components. Replace passenger compartment air filter. An Emission Control Service. If necessary, replace filter. Rotate tires and check in this section. Inspect...
... (b). Check transaxle fluid level and add fluid as needed. See footnote (g). Visually check for any needed . See Engine Air Cleaner/Filter on page 5-57. Lubricate body components. Replace passenger compartment air filter. An Emission Control Service. If necessary, replace filter. Rotate tires and check in this section. Inspect...
Owner's Manual
Page 382
...effort or excessive wear. Replace parts as required. (m) If you drive regularly under dusty conditions, inspect the filter at each engine oil change until the CHANGE TRANS FLUID message appears on the Driver Information Center. Clean radiator, condenser, pressure cap and filler...Inspect hoses. Pressure test the cooling system and pressure cap. (j) Check throttle system for interference or binding and for the hood, rear compartment, glove box door and console door. Clean as needed . (l) Inspect throttle body bore and valve plates for any vehicle system could indicate...
...effort or excessive wear. Replace parts as required. (m) If you drive regularly under dusty conditions, inspect the filter at each engine oil change until the CHANGE TRANS FLUID message appears on the Driver Information Center. Clean radiator, condenser, pressure cap and filler...Inspect hoses. Pressure test the cooling system and pressure cap. (j) Check throttle system for interference or binding and for the hood, rear compartment, glove box door and console door. Clean as needed . (l) Inspect throttle body bore and valve plates for any vehicle system could indicate...

Owner's Manual
Page 407
... Underseat Fuse Block ...5-101 Underhood Fuse Block ...5-98 Windshield Wiper Fuses ...5-97 Engine Air Cleaner/Filter ...5-19 Battery ...5-40 Check and Service Engine Soon Light ...3-50 Coolant ...5-24 Coolant Heater ...2-27 Coolant Temperature Gage ...3-49 Coolant Temperature Warning Light ...3-49 Engine Compartment Overview ...5-12 Exhaust ...2-35 Oil ...5-14 Overheated Protection Operating Mode ...5-29 Overheating...
... Underseat Fuse Block ...5-101 Underhood Fuse Block ...5-98 Windshield Wiper Fuses ...5-97 Engine Air Cleaner/Filter ...5-19 Battery ...5-40 Check and Service Engine Soon Light ...3-50 Coolant ...5-24 Coolant Heater ...2-27 Coolant Temperature Gage ...3-49 Coolant Temperature Warning Light ...3-49 Engine Compartment Overview ...5-12 Exhaust ...2-35 Oil ...5-14 Overheated Protection Operating Mode ...5-29 Overheating...


