

Owner's Manual
Page 33
Rear shoulder belt comfort guides will provide added safety belt comfort for older children who have outgrown booster seats and for each outside passenger position in the rear seat. Remove the guide from the neck and head. Rear Safety Belt Comfort Guides {CAUTION: You can be seriously hurt if your body. There is too...
Rear shoulder belt comfort guides will provide added safety belt comfort for older children who have outgrown booster seats and for each outside passenger position in the rear seat. Remove the guide from the neck and head. Rear Safety Belt Comfort Guides {CAUTION: You can be seriously hurt if your body. There is too...

Owner's Manual
Page 35
To remove and store the comfort guides, squeeze the belt edges together so that the shoulder belt crosses the shoulder. Safety Belt Pretensioners Your vehicle has safety ... shoulder and across the chest. Although you cannot see them, they activate in a crash. They help the safety belts reduce a person's forward movement in Rear Seat Passengers on the retractor part of the seatback. Make sure that you will need to take them out of the guides. Pretensioners work only once...
To remove and store the comfort guides, squeeze the belt edges together so that the shoulder belt crosses the shoulder. Safety Belt Pretensioners Your vehicle has safety ... shoulder and across the chest. Although you cannot see them, they activate in a crash. They help the safety belts reduce a person's forward movement in Rear Seat Passengers on the retractor part of the seatback. Make sure that you will need to take them out of the guides. Pretensioners work only once...

Owner's Manual
Page 54
... to tighten the lap portion of the belt to the top tether anchor, disconnect it. To remove the child restraint, if the top tether is secure. 1-48 A child in a child restraint in the center front seat can be badly injured or killed by the right front passenger's airbag if it infl... restraint, pull the shoulder portion of the belt and feed the shoulder belt back into the retractor. Do not secure a child restraint in the rear seat. To tighten the belt, push down on page 1-41. 7. Refer to work for Children (LATCH) on the child restraint as you tighten the belt. 6. It...
... to tighten the lap portion of the belt to the top tether anchor, disconnect it. To remove the child restraint, if the top tether is secure. 1-48 A child in a child restraint in the center front seat can be badly injured or killed by the right front passenger's airbag if it infl... restraint, pull the shoulder portion of the belt and feed the shoulder belt back into the retractor. Do not secure a child restraint in the rear seat. To tighten the belt, push down on page 1-41. 7. Refer to work for Children (LATCH) on the child restraint as you tighten the belt. 6. It...
Owner's Manual
Page 58
... in the vehicle and check with federal regulations. 1-52 If the on indicator is not pressing the child restraint into the seat cushion. To remove the child restraint, just unbuckle the vehicle's safety belt and let it go back all the way. Frontal airbags are designed to do their job ...and comply with your dealer. Remove the child restraint from the force of injury from the vehicle and reinstall the child restraint. If this happens, adjust the head restraint. Airbag System...
... in the vehicle and check with federal regulations. 1-52 If the on indicator is not pressing the child restraint into the seat cushion. To remove the child restraint, just unbuckle the vehicle's safety belt and let it go back all the way. Frontal airbags are designed to do their job ...and comply with your dealer. Remove the child restraint from the force of injury from the vehicle and reinstall the child restraint. If this happens, adjust the head restraint. Airbag System...

Owner's Manual
Page 71
...to be enabled, the on indicator is still lit, check to Securing a Child Restraint in a booster seat • a right front passenger takes his/her weight off . 1-65 Remove the child restraint from the vehicle and reinstall the child restraint following the child restraint manufacturer's directions and ...refer to make sure the child restraint is still lit, secure the child in the child restraint in a rear seat position in the right ...
...to be enabled, the on indicator is still lit, check to Securing a Child Restraint in a booster seat • a right front passenger takes his/her weight off . 1-65 Remove the child restraint from the vehicle and reinstall the child restraint following the child restraint manufacturer's directions and ...refer to make sure the child restraint is still lit, secure the child in the child restraint in a rear seat position in the right ...

Owner's Manual
Page 106
...To find out how, see Shifting Into Park (P) on page 2-25. If you do the following: • Prevent the ignition key from being removed unless the shift lever is in PARK (P). • Prevent movement of the console shift lever out of PARK (P) unless the ignition is called "torque lock... (P). The shift lock control system is designed to pull the shift lever out of PARK (P). If torque lock does occur, you leave the driver's seat. See Automatic Transaxle Operation on page 2-29. When you are still having a problem shifting, then have another vehicle push yours a little uphill to ...
...To find out how, see Shifting Into Park (P) on page 2-25. If you do the following: • Prevent the ignition key from being removed unless the shift lever is in PARK (P). • Prevent movement of the console shift lever out of PARK (P) unless the ignition is called "torque lock... (P). The shift lock control system is designed to pull the shift lever out of PARK (P). If torque lock does occur, you leave the driver's seat. See Automatic Transaxle Operation on page 2-29. When you are still having a problem shifting, then have another vehicle push yours a little uphill to ...

Owner's Manual
Page 120
... access the full floor console cupholder slide the cover back. To remove, pull bin out. 2-44 Cupholder(s) There are located in the rear armrest. To access the center seat console cupholder, turn the front portion of the center seat console. In addition to reveal the front bin and accessory outlet. For additional...
... access the full floor console cupholder slide the cover back. To remove, pull bin out. 2-44 Cupholder(s) There are located in the rear armrest. To access the center seat console cupholder, turn the front portion of the center seat console. In addition to reveal the front bin and accessory outlet. For additional...

Owner's Manual
Page 123
...see your positions in PARK (P). The seat and outside mirrors. To save your GM dealer for the driver's seat and the outside mirrors will move to the position previously stored for more information. If the memory position is removed. Memory Seat and Mirrors Your vehicle may stop recall ...movement of the memory feature at any time, press one of the power seat controls, memory buttons, or power mirror buttons. To recall your vehicle...
...see your positions in PARK (P). The seat and outside mirrors. To save your GM dealer for the driver's seat and the outside mirrors will move to the position previously stored for more information. If the memory position is removed. Memory Seat and Mirrors Your vehicle may stop recall ...movement of the memory feature at any time, press one of the power seat controls, memory buttons, or power mirror buttons. To recall your vehicle...

Owner's Manual
Page 124
... on in PARK (P), the exit position can be recalled by pressing the exit button. You will move back. If the easy exit seat feature is removed from the ignition. Further programming for more information. The driver's seat will hear a single beep. You can select or not select the following: • The easy exit...
... on in PARK (P), the exit position can be recalled by pressing the exit button. You will move back. If the easy exit seat feature is removed from the ignition. Further programming for more information. The driver's seat will hear a single beep. You can select or not select the following: • The easy exit...

Owner's Manual
Page 195
...choices and press the set /reset button to removing the key again. The current setting will stay in the display. Select one time after the key is displayed on the DIC to scroll through the following choices: OFF (default): No seat exit recall will be tilted down when the vehicle... REVERSE (R). BOTH MIRRORS: The driver's and passenger's outside mirror will be tilted down when the vehicle is shifted into REVERSE (R). EASY EXIT SEAT If the vehicle has this feature. Then press the customization button to select it is displayed on the DIC to access the settings for this...
...choices and press the set /reset button to removing the key again. The current setting will stay in the display. Select one time after the key is displayed on the DIC to scroll through the following choices: OFF (default): No seat exit recall will be tilted down when the vehicle... REVERSE (R). BOTH MIRRORS: The driver's and passenger's outside mirror will be tilted down when the vehicle is shifted into REVERSE (R). EASY EXIT SEAT If the vehicle has this feature. Then press the customization button to select it is displayed on the DIC to access the settings for this...

Owner's Manual
Page 305
A hiss means there is no longer hot. 4. You can be lower. If the level is hand-tight and fully seated. 5-37 Do not spill coolant on the side of the proper mixture to stop. With the coolant surge tank cap off, start the engine and ... mixture to the FULL COLD mark on a hot engine. Be sure the cap is lower, add more of the coolant surge tank. {CAUTION: You can remove the coolant surge tank pressure cap when the cooling system, including the coolant surge tank pressure cap and upper radiator hose, is still some pressure...
A hiss means there is no longer hot. 4. You can be lower. If the level is hand-tight and fully seated. 5-37 Do not spill coolant on the side of the proper mixture to stop. With the coolant surge tank cap off, start the engine and ... mixture to the FULL COLD mark on a hot engine. Be sure the cap is lower, add more of the coolant surge tank. {CAUTION: You can remove the coolant surge tank pressure cap when the cooling system, including the coolant surge tank pressure cap and upper radiator hose, is still some pressure...
Owner's Manual
Page 310
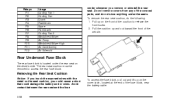
... really good braking. When it is located under Rear Underseat Fuse Block on the original battery's label. To access the battery, see "Removing the Rear Seat Cushion" under the rear seat cushion. You do not, your brakes may no longer work well together if the vehicle is to cause cancer and reproductive harm...
... really good braking. When it is located under Rear Underseat Fuse Block on the original battery's label. To access the battery, see "Removing the Rear Seat Cushion" under the rear seat cushion. You do not, your brakes may no longer work well together if the vehicle is to cause cancer and reproductive harm...
Owner's Manual
Page 364
... cable. 5-96 The rear seat cushion must be removed to release the front hooks. 2. To remove the rear seat cushion, do not store anything under the rear seat on the cover latch, located at the end of the vehicle. Pull up on the seat cushion, you remove or reinstall the rear seat. Removing the Rear Seat Cushion Notice: If you... whenever you could cause a short that could damage the battery and or wires. Rear Underseat Fuse Block The rear fuse block is located under the seats. Do not remove covers from any of the cushion to access the rear fuse block.
... cable. 5-96 The rear seat cushion must be removed to release the front hooks. 2. To remove the rear seat cushion, do not store anything under the rear seat on the cover latch, located at the end of the vehicle. Pull up on the seat cushion, you remove or reinstall the rear seat. Removing the Rear Seat Cushion Notice: If you... whenever you could cause a short that could damage the battery and or wires. Rear Underseat Fuse Block The rear fuse block is located under the seats. Do not remove covers from any of the cushion to access the rear fuse block.
Owner's Manual
Page 412
...Seat Passengers, Safety Belts ...1-25 Rearview Mirror, Automatic Dimming ...2-33 Rearview Mirror, Automatic Dimming with Compass ...2-33 Rearview Mirror with Compass and Temperature ...1-10 Rearview Mirrors ...2-33 Reclining Seatbacks ...1-6 Recommended Fluids and Lubricants ...6-12 Recreational Vehicle Towing ...4-34 Remote Keyless Entry System ...2-5 Remote Keyless Entry System, Operation ...2-6 Removing... the Flat Tire and Installing the Spare Tire ...5-75 Removing the Spare Tire and Tools ...5-74 Replacement Bulbs ...
...Seat Passengers, Safety Belts ...1-25 Rearview Mirror, Automatic Dimming ...2-33 Rearview Mirror, Automatic Dimming with Compass ...2-33 Rearview Mirror with Compass and Temperature ...1-10 Rearview Mirrors ...2-33 Reclining Seatbacks ...1-6 Recommended Fluids and Lubricants ...6-12 Recreational Vehicle Towing ...4-34 Remote Keyless Entry System ...2-5 Remote Keyless Entry System, Operation ...2-6 Removing... the Flat Tire and Installing the Spare Tire ...5-75 Removing the Spare Tire and Tools ...5-74 Replacement Bulbs ...
Owner's Manual
Page 414
... Out of Park (P) ...2-30 Shoulder Belt Height Adjuster ...1-22 Signals, Turn and Lane-Change ...3-7 Spare Tire Compact ...5-82 Installing ...5-75 Removing ...5-74 Storing ...5-81 Specifications, Capacities ...5-101 Speedometer ...3-35 StabiliTrak® System ...4-10 StabiliTrak® Indicator Light ...3-42 Starting ... Area ...2-45 Center Flex Storage Unit ...2-45 Convenience Net ...2-46 Cupholder(s) ...2-44 Front Storage Area ...2-44 Glove Box ...2-44 Rear Seat Armrest ...2-46 Stuck in Sand, Mud, Ice or Snow ...4-28 Sun Visors ...2-18 Sunroof ...2-46 T Tachometer ...3-35 Taillamps Back-...
... Out of Park (P) ...2-30 Shoulder Belt Height Adjuster ...1-22 Signals, Turn and Lane-Change ...3-7 Spare Tire Compact ...5-82 Installing ...5-75 Removing ...5-74 Storing ...5-81 Specifications, Capacities ...5-101 Speedometer ...3-35 StabiliTrak® System ...4-10 StabiliTrak® Indicator Light ...3-42 Starting ... Area ...2-45 Center Flex Storage Unit ...2-45 Convenience Net ...2-46 Cupholder(s) ...2-44 Front Storage Area ...2-44 Glove Box ...2-44 Rear Seat Armrest ...2-46 Stuck in Sand, Mud, Ice or Snow ...4-28 Sun Visors ...2-18 Sunroof ...2-46 T Tachometer ...3-35 Taillamps Back-...

Owner's Manual
Page 415
Tire Pressure ...5-62 Inspection and Rotation ...5-65 Installing the Spare Tire ...5-75 Removing the Flat Tire ...5-75 Removing the Spare Tire and Tools ...5-74 Storing a Flat or Spare Tire and Tools ...5-81 Tire Sidewall Labeling ...5-57 Tire Terminology and Definitions ...5-59 ... Vehicle Data Collection and Event Data Recorders ...7-9 Vehicle Identification Number (VIN) ...5-92 Service Parts Identification Label ...5-92 Vehicle Personalization ...2-46 Memory Seat and Mirrors ...2-47 Ventilation Adjustment ...3-31 Visors ...2-18 13 Tires (cont.) Inflation -
Tire Pressure ...5-62 Inspection and Rotation ...5-65 Installing the Spare Tire ...5-75 Removing the Flat Tire ...5-75 Removing the Spare Tire and Tools ...5-74 Storing a Flat or Spare Tire and Tools ...5-81 Tire Sidewall Labeling ...5-57 Tire Terminology and Definitions ...5-59 ... Vehicle Data Collection and Event Data Recorders ...7-9 Vehicle Identification Number (VIN) ...5-92 Service Parts Identification Label ...5-92 Vehicle Personalization ...2-46 Memory Seat and Mirrors ...2-47 Ventilation Adjustment ...3-31 Visors ...2-18 13 Tires (cont.) Inflation -


