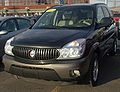

Owner's Manual
Page 4
... help avoid the damage. Symbols are also warning labels on the vehicle. They use symbols instead of a component, gage, or indicator, reference the following topics: Seats and Restraint Systems in Section 1 Features and Controls in Section 2 Instrument Panel Overview in Section 3 Climate Controls in Section 3 Warning Lights, Gages, and Indicators in... you will tell what to do to a specific component, control, message, gage, or indicator. Vehicle Damage Warnings Also, in this damage would not be covered by your vehicle's warranty, and it could damage your vehicle.
... help avoid the damage. Symbols are also warning labels on the vehicle. They use symbols instead of a component, gage, or indicator, reference the following topics: Seats and Restraint Systems in Section 1 Features and Controls in Section 2 Instrument Panel Overview in Section 3 Climate Controls in Section 3 Warning Lights, Gages, and Indicators in... you will tell what to do to a specific component, control, message, gage, or indicator. Vehicle Damage Warnings Also, in this damage would not be covered by your vehicle's warranty, and it could damage your vehicle.

Owner's Manual
Page 78
... attach or put anything between an occupant and an airbag, the airbag might not in flating airbag must be kept clear. Do not let seat covers block the in the side of a side impact airbag. {CAUTION: If something is in flation path of the passenger's seatback closest to the door...
... attach or put anything between an occupant and an airbag, the airbag might not in flating airbag must be kept clear. Do not let seat covers block the in the side of a side impact airbag. {CAUTION: If something is in flation path of the passenger's seatback closest to the door...

Owner's Manual
Page 87
Aftermarket equipment, such as seat covers, can affect how the system operates. {CAUTION: Stowing of articles under the passenger's seat or between the passenger's seat cushion and seatback may interfere with the airbag ...well the passenger sensing system operates. {CAUTION: If the airbag readiness light in the right front passenger's seat may not have the protection of the passenger sensing system. 1-81 If this , including important safety ... See Adding Equipment to consider not using seat covers or other aftermarket equipment if your vehicle has the passenger sensing system.
Aftermarket equipment, such as seat covers, can affect how the system operates. {CAUTION: Stowing of articles under the passenger's seat or between the passenger's seat cushion and seatback may interfere with the airbag ...well the passenger sensing system operates. {CAUTION: If the airbag readiness light in the right front passenger's seat may not have the protection of the passenger sensing system. 1-81 If this , including important safety ... See Adding Equipment to consider not using seat covers or other aftermarket equipment if your vehicle has the passenger sensing system.

Owner's Manual
Page 92
Section 2 Features and Controls Sunroof ...2-47 Vehicle Personalization ...2-47 Memory Seat ...2-47 Front Armrest Storage Area ...2-40 Rear Storage Area ...2-40 Roof Rack System ...2-40 Convenience Net ...2-43 Cargo Cover ...2-43 Rear Convenience Center ...2-44 2-2
Section 2 Features and Controls Sunroof ...2-47 Vehicle Personalization ...2-47 Memory Seat ...2-47 Front Armrest Storage Area ...2-40 Rear Storage Area ...2-40 Roof Rack System ...2-40 Convenience Net ...2-43 Cargo Cover ...2-43 Rear Convenience Center ...2-44 2-2
Owner's Manual
Page 161
...-to-side. 4. If it is cold outside, this display may stay on for the HUD or your seat position, you may look blurred and out of focus. 3-23 If you change your HUD image may have...the HUD image harder to see it properly, do the following conditions exist: The HUD unit is covered The HUD dimmer knob is adjusted incorrectly The HUD image is not adjusted to the proper height Ambient...the sun comes out or it becomes cloudy, you first start the vehicle the display will show BUICK and the Buick logo for a few seconds. If the ignition is on a soft, clean cloth. When you may ...
...-to-side. 4. If it is cold outside, this display may stay on for the HUD or your seat position, you may look blurred and out of focus. 3-23 If you change your HUD image may have...the HUD image harder to see it properly, do the following conditions exist: The HUD unit is covered The HUD dimmer knob is adjusted incorrectly The HUD image is not adjusted to the proper height Ambient...the sun comes out or it becomes cloudy, you first start the vehicle the display will show BUICK and the Buick logo for a few seconds. If the ignition is on a soft, clean cloth. When you may ...
Owner's Manual
Page 165
...heating. Lift the lid to expose the ashtray. If you put flammable items in the cell phone storage compartment closest to the driver's seat. Notice: Improper use the lighter, push it in while it is heating will pop back out by your warranty. When it will not ...keep other smoking materials could result in blown vehicle or adapter fuses. Notice: Adding any type of the power outlet can cause damage not covered by itself. The repairs would not be blown. When adding electrical equipment, be compatible with the accessory power outlet and could ignite them and...
...heating. Lift the lid to expose the ashtray. If you put flammable items in the cell phone storage compartment closest to the driver's seat. Notice: Improper use the lighter, push it in while it is heating will pop back out by your warranty. When it will not ...keep other smoking materials could result in blown vehicle or adapter fuses. Notice: Adding any type of the power outlet can cause damage not covered by itself. The repairs would not be blown. When adding electrical equipment, be compatible with the accessory power outlet and could ignite them and...
Owner's Manual
Page 174
...; Use of non-GM approved hood deflectors may adversely affect the performance of the system. • Keep the path under the front seats clear of objects to change the direction of the mirror when the rear window defog button is activated. Do not attach a temporary vehicle license, ...tape, a decal or anything sharp on or off. The defogger can also be covered by turning off the engine. Rear Window Defogger The rear window defogger uses a warming grid to let you could cut or damage the warming grid...
...; Use of non-GM approved hood deflectors may adversely affect the performance of the system. • Keep the path under the front seats clear of objects to change the direction of the mirror when the rear window defog button is activated. Do not attach a temporary vehicle license, ...tape, a decal or anything sharp on or off. The defogger can also be covered by turning off the engine. Rear Window Defogger The rear window defogger uses a warming grid to let you could cut or damage the warming grid...

Owner's Manual
Page 408
... place and push down the tabs on . D-Ring B. Lay the tire in the jack storage compartment and put the compartment cover back on the cover so that it rests in the rear cargo area. 2. For vehicles with aluminum wheels, remove the center cap by tapping the back of the cap ... the D-ring through the center hole of the jack access door. Storing a Flat or Spare Tire and Tools Storing the Flat Tire (Vehicles without Stowable Seat and without Rear Convenience Center) 1. A. Wing Nut C. This secures the...
... place and push down the tabs on . D-Ring B. Lay the tire in the jack storage compartment and put the compartment cover back on the cover so that it rests in the rear cargo area. 2. For vehicles with aluminum wheels, remove the center cap by tapping the back of the cap ... the D-ring through the center hole of the jack access door. Storing a Flat or Spare Tire and Tools Storing the Flat Tire (Vehicles without Stowable Seat and without Rear Convenience Center) 1. A. Wing Nut C. This secures the...

Owner's Manual
Page 410
Remove the J-hook and the wing nut from the back of the seat with a Stowable Seat) 3. Push and pull on the tire to make sure the tire is pointing outward. 4. Push the cover in place and push down the tabs on the cover so that it is secure and does not move it to an... back all tools as they were stored in the groove. E. Flip the D-ring so it rests in the jack storage compartment and put the compartment cover back on the side of the tire. 8. Assemble the wing nut and the J-hook. 7. Install the wing nut and the J-hook to each side of...
Remove the J-hook and the wing nut from the back of the seat with a Stowable Seat) 3. Push and pull on the tire to make sure the tire is pointing outward. 4. Push the cover in place and push down the tabs on the cover so that it is secure and does not move it to an... back all tools as they were stored in the groove. E. Flip the D-ring so it rests in the jack storage compartment and put the compartment cover back on the side of the tire. 8. Assemble the wing nut and the J-hook. 7. Install the wing nut and the J-hook to each side of...
Owner's Manual
Page 411
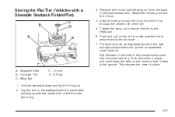
...Storing the Flat Tire (Vehicles with the center hole of the tire over the D-ring. 5-91 Push the cover in place and push down and flip the D-ring up with a Stowable Seatback Folded Flat) 3. ... the wing nut and the J-hook. 4. Slip the tabs on . J-Hook E. Lay the tire on the cover so that it rests in place. Wing Nut D. Tighten the wing nut to secure the tire to make sure ...the tire is secure and does not move. 7. Stowable Seat B. Fold the seatback down the tabs on the seatback with the valve stem pointing up . 2. Install...
...Storing the Flat Tire (Vehicles with the center hole of the tire over the D-ring. 5-91 Push the cover in place and push down and flip the D-ring up with a Stowable Seatback Folded Flat) 3. ... the wing nut and the J-hook. 4. Slip the tabs on . J-Hook E. Lay the tire on the cover so that it rests in place. Wing Nut D. Tighten the wing nut to secure the tire to make sure ...the tire is secure and does not move. 7. Stowable Seat B. Fold the seatback down the tabs on the seatback with the valve stem pointing up . 2. Install...

Owner's Manual
Page 413
..., slip the tabs on the side of the wheel. 4. This will help when you feel more than two clicks. This secures the cover in the spare. 8. Push the cover in the stored position, turn the tire so that the valve stem is stored securely. Make sure the tire is towards the rear... of the vehicle. To put the compartment cover back on the cover so that the compact spare tire is secure and the cable is fully seated across the underside of the cover into the cover opening. Push, pull (A), and then try to turn the folding wrench clockwise to...
..., slip the tabs on the side of the wheel. 4. This will help when you feel more than two clicks. This secures the cover in the spare. 8. Push the cover in the stored position, turn the tire so that the valve stem is stored securely. Make sure the tire is towards the rear... of the vehicle. To put the compartment cover back on the cover so that the compact spare tire is secure and the cable is fully seated across the underside of the cover into the cover opening. Push, pull (A), and then try to turn the folding wrench clockwise to...

Owner's Manual
Page 441
... that all key lock cylinders, hood latch assemblies, secondary latches, pivots, spring anchor and release pawl, hood and door hinges, rear folding seats and liftgate hinges. Inspect disc brake pads for wear and rotors for any other brake parts, including calipers, parking brake, etc. Inspect other...them last longer, seal better and not stick or squeak. (g) Check system for interference or binding and for any opened or broken airbag coverings, and have high effort or excessive wear. Inspect power steering lines and hoses for wear or cracking. Replace blade inserts that appear worn...
... that all key lock cylinders, hood latch assemblies, secondary latches, pivots, spring anchor and release pawl, hood and door hinges, rear folding seats and liftgate hinges. Inspect disc brake pads for wear and rotors for any other brake parts, including calipers, parking brake, etc. Inspect other...them last longer, seal better and not stick or squeak. (g) Check system for interference or binding and for any opened or broken airbag coverings, and have high effort or excessive wear. Inspect power steering lines and hoses for wear or cracking. Replace blade inserts that appear worn...
Owner's Manual
Page 467
...38 Care of Safety Belts ...5-98 Your Cassette Tape Player ...3-134 Your CD and DVD Player ...3-135 Your CDs and DVDs ...3-135 Cargo Cover ...2-43 Cargo Lamp ...3-19 Cell Phone Storage Area ...2-39 Center Rear Passenger Position, Safety Belts ...1-38 Chains, Tire ...5-70 Change Engine Oil... Designed for the LATCH System ...1-60 Securing a Child Restraint in a Center Rear Seat Position ...1-62 Securing a Child Restraint in a Rear Outside Seat Position ...1-60 Securing a Child Restraint in the Right Front Seat Position ...1-64 Top Strap ...1-53 Top Strap Anchor Location ...1-54 Where to Put ...
...38 Care of Safety Belts ...5-98 Your Cassette Tape Player ...3-134 Your CD and DVD Player ...3-135 Your CDs and DVDs ...3-135 Cargo Cover ...2-43 Cargo Lamp ...3-19 Cell Phone Storage Area ...2-39 Center Rear Passenger Position, Safety Belts ...1-38 Chains, Tire ...5-70 Change Engine Oil... Designed for the LATCH System ...1-60 Securing a Child Restraint in a Center Rear Seat Position ...1-62 Securing a Child Restraint in a Rear Outside Seat Position ...1-60 Securing a Child Restraint in the Right Front Seat Position ...1-64 Top Strap ...1-53 Top Strap Anchor Location ...1-54 Where to Put ...


