Owner's Manual
Page 1
2005 Buick Century Owner Manual Seats and Restraint Systems ...1-1 Front Seats ...1-2 Rear Seats ...1-6 Safety Belts ...1-6 Child Restraints ...1-27 Airbag System ...1-49 Restraint System Check ...1-58 Features and Controls ...2-1 Keys ...2-2 Doors and Locks ...2-10 Windows ...2-14 Theft-Deterrent Systems ...2-16 Starting and Operating Your Vehicle ...2-17 Mirrors ...2-29 OnStar® System ...2-31 Storage Areas ...2-33 Instrument Panel...
2005 Buick Century Owner Manual Seats and Restraint Systems ...1-1 Front Seats ...1-2 Rear Seats ...1-6 Safety Belts ...1-6 Child Restraints ...1-27 Airbag System ...1-49 Restraint System Check ...1-58 Features and Controls ...2-1 Keys ...2-2 Doors and Locks ...2-10 Windows ...2-14 Theft-Deterrent Systems ...2-16 Starting and Operating Your Vehicle ...2-17 Mirrors ...2-29 OnStar® System ...2-31 Storage Areas ...2-33 Instrument Panel...

Owner's Manual
Page 18
... aware that there are different rules for smaller children and babies. First, you . Pick up straight. Close and lock the door. 2. Follow those rules for people of adult size. The shoulder belt may lock if you pull the belt across you very quickly. If this happens, let the belt go back slightly to...
... aware that there are different rules for smaller children and babies. First, you . Pick up straight. Close and lock the door. 2. Follow those rules for people of adult size. The shoulder belt may lock if you pull the belt across you very quickly. If this happens, let the belt go back slightly to...

Owner's Manual
Page 67
... ...2-33 Glove Box ...2-33 Front Storage Area ...2-33 Convenience Net ...2-33 Keys ...2-2 Remote Keyless Entry System ...2-4 Remote Keyless Entry System Operation ...2-5 Doors and Locks ...2-10 Door Locks ...2-10 Power Door Locks ...2-11 Programmable Automatic Door Locks ...2-11 Lockout Protection ...2-12 Leaving Your Vehicle ...2-12 Trunk ...2-12 Windows ...2-14 Power Windows ...2-15 Sun Visors ...2-15 Theft-Deterrent Systems ...2-16...
... ...2-33 Glove Box ...2-33 Front Storage Area ...2-33 Convenience Net ...2-33 Keys ...2-2 Remote Keyless Entry System ...2-4 Remote Keyless Entry System Operation ...2-5 Doors and Locks ...2-10 Door Locks ...2-10 Power Door Locks ...2-11 Programmable Automatic Door Locks ...2-11 Lockout Protection ...2-12 Leaving Your Vehicle ...2-12 Trunk ...2-12 Windows ...2-14 Power Windows ...2-15 Sun Visors ...2-15 Theft-Deterrent Systems ...2-16...

Owner's Manual
Page 69
... Contact your vehicle, you have spare keys. The door key is for the driver door and all other locks. 2-3 Notice: If you ever lock your keys in . The keys have to damage the vehicle to help prevent theft. Your dealer or Buick Roadside Assistance can provide the correct codes for separate... functions. See OnStar® System on page 2-16 for more information. If the vehicle has the OnStar ® system with an active subscription, and the keys were locked inside, a command could be...
... Contact your vehicle, you have spare keys. The door key is for the driver door and all other locks. 2-3 Notice: If you ever lock your keys in . The keys have to damage the vehicle to help prevent theft. Your dealer or Buick Roadside Assistance can provide the correct codes for separate... functions. See OnStar® System on page 2-16 for more information. If the vehicle has the OnStar ® system with an active subscription, and the keys were locked inside, a command could be...
Owner's Manual
Page 71
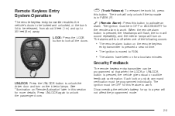
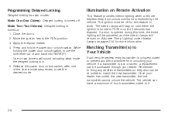
...8226; The ignition is pressed, the vehicle gives visual or audible feedback confirmation. LOCK: Press the LOCK button to unlock the passenger doors. 2-5 L (Remote Alarm): Press this button. Each lock or unlock command verification must be in PARK (P). The ignition must be OFF .... See "Illumination on the interior lamps. Remote Keyless Entry System Operation The remote keyless entry transmitter enables the vehicle's doors to be locked and unlocked, or the trunk lid to be released, from about two minutes. Security Feedback The remote keyless entry transmitter...
...8226; The ignition is pressed, the vehicle gives visual or audible feedback confirmation. LOCK: Press the LOCK button to unlock the passenger doors. 2-5 L (Remote Alarm): Press this button. Each lock or unlock command verification must be in PARK (P). The ignition must be OFF .... See "Illumination on the interior lamps. Remote Keyless Entry System Operation The remote keyless entry transmitter enables the vehicle's doors to be locked and unlocked, or the trunk lid to be released, from about two minutes. Security Feedback The remote keyless entry transmitter...

Owner's Manual
Page 72
... mode, release the power door LOCK switch after the chime sequence of one to the current lock mode. 4. Close all doors and turn the ignition key to Mode 3. The mode may have been changed since then. Press and hold the power door lock switch in the LOCK position, press and release the... remote keyless entry transmitter LOCK button. Mode 1 (One Chime): No Verification Mode 2 (Two Chimes): Horn Chirp Mode 3 ...
... mode, release the power door LOCK switch after the chime sequence of one to the current lock mode. 4. Close all doors and turn the ignition key to Mode 3. The mode may have been changed since then. Press and hold the power door lock switch in the LOCK position, press and release the... remote keyless entry transmitter LOCK button. Mode 1 (One Chime): No Verification Mode 2 (Two Chimes): Horn Chirp Mode 3 ...
Owner's Manual
Page 73
... button to advance to Mode 3. To set a mode, release the power door unlock switch after the LOCK position on the power door lock, or the LOCK button on . If a door is opened before five seconds, the delayed lock is on the remote keyless entry transmitter is pressed and the last...To determine the current unlock mode, or to the current unlock mode. 4. Press and hold the power door lock switch in the ignition and a door is heard. While holding the power door lock switch in the unlock position, press and release the remote keyless entry transmitter UNLOCK button. If cycled beyond ...
... button to advance to Mode 3. To set a mode, release the power door unlock switch after the LOCK position on the power door lock, or the LOCK button on . If a door is opened before five seconds, the delayed lock is on the remote keyless entry transmitter is pressed and the last...To determine the current unlock mode, or to the current unlock mode. 4. Press and hold the power door lock switch in the ignition and a door is heard. While holding the power door lock switch in the unlock position, press and release the remote keyless entry transmitter UNLOCK button. If cycled beyond ...
Owner's Manual
Page 74
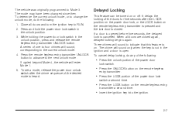
... a replacement can be re-coded to the RUN position. 3. Mode Two (Two Chimes): Delayed locking is in. 5. Press and hold the power door unlock switch. Release the power door unlock switch, after one of the chime mode sequences, to RUN or until either the ignition is ... Once your vehicle. Apply the regular brakes. 4. One or two chimes will be purchased through your dealer. Programming Delayed Locking Delayed locking has two modes. Close the doors. 2. Illumination on until 40 seconds has elapsed. The ignition must be off . The interior lamps will remain on page...
... a replacement can be re-coded to the RUN position. 3. Mode Two (Two Chimes): Delayed locking is in. 5. Press and hold the power door unlock switch. Release the power door unlock switch, after one of the chime mode sequences, to RUN or until either the ignition is ... Once your vehicle. Apply the regular brakes. 4. One or two chimes will be purchased through your dealer. Programming Delayed Locking Delayed locking has two modes. Close the doors. 2. Illumination on until 40 seconds has elapsed. The ignition must be off . The interior lamps will remain on page...
Owner's Manual
Page 76
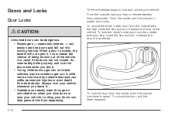
... leave it . From the inside , push the manual lock lever forward. To unlock the door, pull the lever rearward. 2-10 When a door is locked, the handle will not open the doors and fall out of the vehicle. To unlock the driver's side door from heat stroke. From the outside with your vehicle. Doors and Locks Door Locks There are not...
... leave it . From the inside , push the manual lock lever forward. To unlock the door, pull the lever rearward. 2-10 When a door is locked, the handle will not open the doors and fall out of the vehicle. To unlock the driver's side door from heat stroke. From the outside with your vehicle. Doors and Locks Door Locks There are not...

Owner's Manual
Page 77
...the ignition key to provide enhanced security and convenience by automatically locking and unlocking doors under certain conditions. Programmable Automatic Door Locks Programmable power door locks are intended to RUN. 2. Mode 4: All doors automatically lock when the transaxle is shifted out of PARK (P) and automatically... is shifted into PARK (P). Press and hold the power door lock switch in the LOCK position. 6. Mode 3: All doors automatically lock when the transaxle is shifted out of PARK (P) but do not lock or unlock automatically when the transaxle is shifted out of ...
...the ignition key to provide enhanced security and convenience by automatically locking and unlocking doors under certain conditions. Programmable Automatic Door Locks Programmable power door locks are intended to RUN. 2. Mode 4: All doors automatically lock when the transaxle is shifted out of PARK (P) and automatically... is shifted into PARK (P). Press and hold the power door lock switch in the LOCK position. 6. Mode 3: All doors automatically lock when the transaxle is shifted out of PARK (P) but do not lock or unlock automatically when the transaxle is shifted out of ...
Owner's Manual
Page 78
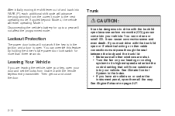
... seal between the body and the trunk lid: • Make sure all the way. Lockout Protection The power door locks will enter operating Mode 1. It can come into your door and set the locks from the current mode to its highest speed and select the control setting that will not affect the programmed... Index. • If you are shut. • Turn the fan on page 2-27. You can override this feature by holding the driver's side power door lock switch for up to drive with the trunk lid open or if electrical wiring or other cable connections must drive with the trunk lid open...
... seal between the body and the trunk lid: • Make sure all the way. Lockout Protection The power door locks will enter operating Mode 1. It can come into your door and set the locks from the current mode to its highest speed and select the control setting that will not affect the programmed... Index. • If you are shut. • Turn the fan on page 2-27. You can override this feature by holding the driver's side power door lock switch for up to drive with the trunk lid open or if electrical wiring or other cable connections must drive with the trunk lid open...
Owner's Manual
Page 113
... Lamps Instrument Panel Lights Headlamps: Pull the control out all the doors. 3. Press and hold LOCK on due to RUN. 2. Turn the ignition to the automatic headlamp control feature described previously. While holding LOCK on the door lock switch, cycle the exterior lamps control on the parking lamps together ...with the previously listed lamps and lights. The headlamps will sound if the driver's door is opened when the ignition is turned to OFF, LOCK or ACCESSORY and the headlamps are on the power door lock switch. Close all the way, to the second position, to turn on . 3-...
... Lamps Instrument Panel Lights Headlamps: Pull the control out all the doors. 3. Press and hold LOCK on due to RUN. 2. Turn the ignition to the automatic headlamp control feature described previously. While holding LOCK on the door lock switch, cycle the exterior lamps control on the parking lamps together ...with the previously listed lamps and lights. The headlamps will sound if the driver's door is opened when the ignition is turned to OFF, LOCK or ACCESSORY and the headlamps are on the power door lock switch. Close all the way, to the second position, to turn on . 3-...

Owner's Manual
Page 114
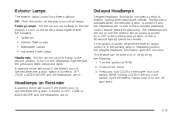
... than 10 seconds. 5. After releasing the unlock position on the power door switch, a single chime will not be heard if the delayed headlamp illumination function has been turned off. Release the power door LOCK switch. While holding the unlock position, turn the exterior lamps control on... the power door switch. Release the unlock position on and off . • The parking brake is ...
... than 10 seconds. 5. After releasing the unlock position on the power door switch, a single chime will not be heard if the delayed headlamp illumination function has been turned off. Release the power door LOCK switch. While holding the unlock position, turn the exterior lamps control on... the power door switch. Release the unlock position on and off . • The parking brake is ...

Owner's Manual
Page 117
If the vehicle has less than 15 miles (25 km) on . • Open a door. Press the button next to each lamp to work. Delayed Exit Lighting This feature illuminates the interior for delayed exit lighting to turn it on ... off, they will automatically turn off the lamps after the ignition key is removed from draining the battery in RUN. • The power door locks are left on while the ignition is opened, the timed illumination period will remain on. • Turn the ignition on the underside of these lamps ...
If the vehicle has less than 15 miles (25 km) on . • Open a door. Press the button next to each lamp to work. Delayed Exit Lighting This feature illuminates the interior for delayed exit lighting to turn it on ... off, they will automatically turn off the lamps after the ignition key is removed from draining the battery in RUN. • The power door locks are left on while the ignition is opened, the timed illumination period will remain on. • Turn the ignition on the underside of these lamps ...

Owner's Manual
Page 198
...64258;ation pressures (D). Determine the combined weight of the driver and passengers that will find the label attached below the door lock post (striker). Tire and Loading Information Label The Tire and Loading Information label also lists the tire size of occupant seating ...States version shown, Canada similar The Tire and Loading Information label is also important loading information on your vehicle. 3. With the driver's door open, you the Gross Vehicle Weight Rating (GVWR) and the Gross Axle Weight Rating (GAWR) for Determining Correct Load Limit 1. Locate...
...64258;ation pressures (D). Determine the combined weight of the driver and passengers that will find the label attached below the door lock post (striker). Tire and Loading Information Label The Tire and Loading Information label also lists the tire size of occupant seating ...States version shown, Canada similar The Tire and Loading Information label is also important loading information on your vehicle. 3. With the driver's door open, you the Gross Vehicle Weight Rating (GVWR) and the Gross Axle Weight Rating (GAWR) for Determining Correct Load Limit 1. Locate...

Owner's Manual
Page 302
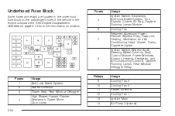
.... Cluster, PCM & BCM Powertrain Control Module, Body Control Module Blank Blank Blank ACCY PWR BUS DR/ LCK Not Used Not Used Not Used Interior Lamps Door Locks 5-92
.... Cluster, PCM & BCM Powertrain Control Module, Body Control Module Blank Blank Blank ACCY PWR BUS DR/ LCK Not Used Not Used Not Used Interior Lamps Door Locks 5-92
Owner's Manual
Page 304
... Solenoid Cooling Fan 1 Ignition Main Air Pump (Optional) 7 8 Fuses 1 2 3 4 Usage Anti-Lock Brake System Starter Solenoid Power Seat, Rear Window Defogger High Blower, Hazard Flasher, Stoplamps, Power Mirror, Door Locks Relays 9 10 11 12 13 14 5-94 Fuses 5 6 Usage Ignition Switch, Stoplamps, Anti...-Lock Brake System, Turn Signals, Cluster, Air Bag, Daytime Running Lamps Module Cooling Fan Retained...
... Solenoid Cooling Fan 1 Ignition Main Air Pump (Optional) 7 8 Fuses 1 2 3 4 Usage Anti-Lock Brake System Starter Solenoid Power Seat, Rear Window Defogger High Blower, Hazard Flasher, Stoplamps, Power Mirror, Door Locks Relays 9 10 11 12 13 14 5-94 Fuses 5 6 Usage Ignition Switch, Stoplamps, Anti...-Lock Brake System, Turn Signals, Cluster, Air Bag, Daytime Running Lamps Module Cooling Fan Retained...

Owner's Manual
Page 340
... System ...3-14 Defensive Driving ...4-2 Delayed Entry Lighting ...3-16 Delayed Exit Lighting ...3-17 Delayed Headlamps ...3-13 Doing Your Own Service Work ...5-4 Dome Lamp ...3-16 Door Locks ...2-10 Power Door Locks ...2-11 Programmable Automatic Door Locks ...2-11 Trunk Ajar Warning Light ...3-42 Driver Position, Safety Belt ...1-12 Driving At Night ...4-16 City ...4-20 Defensive ...4-2 Drunken ...4-3 Freeway ...4-21 Hill...
... System ...3-14 Defensive Driving ...4-2 Delayed Entry Lighting ...3-16 Delayed Exit Lighting ...3-17 Delayed Headlamps ...3-13 Doing Your Own Service Work ...5-4 Dome Lamp ...3-16 Door Locks ...2-10 Power Door Locks ...2-11 Programmable Automatic Door Locks ...2-11 Trunk Ajar Warning Light ...3-42 Driver Position, Safety Belt ...1-12 Driving At Night ...4-16 City ...4-20 Defensive ...4-2 Drunken ...4-3 Freeway ...4-21 Hill...

Owner's Manual
Page 343
...Designed for the LATCH System ...Leaving Your Vehicle ...Light Airbag Readiness ...Anti-Lock Brake System Warning ...Brake System Warning ...Change Engine Oil ...Charging System ...Cruise Control ...Door/Trunk Ajar Warning ...Engine Coolant Temperature Warning ...Enhanced Traction System (ETS) ...3-43 3-34 3-41 3-36 3-40 3-30 3-41 3-42 3-36 3-16 3-17 3-16 Lockout Protection ...Locks Door ...Leaving Your Vehicle ...Lockout Protection ...Power Door ...Programmable Automatic Door Locks ...Loss of Control ...Low Fuel Warning Light ...Low Traction Light ...Low Washer Fluid Warning Light ... 2-12 2-10...
...Designed for the LATCH System ...Leaving Your Vehicle ...Light Airbag Readiness ...Anti-Lock Brake System Warning ...Brake System Warning ...Change Engine Oil ...Charging System ...Cruise Control ...Door/Trunk Ajar Warning ...Engine Coolant Temperature Warning ...Enhanced Traction System (ETS) ...3-43 3-34 3-41 3-36 3-40 3-30 3-41 3-42 3-36 3-16 3-17 3-16 Lockout Protection ...Locks Door ...Leaving Your Vehicle ...Lockout Protection ...Power Door ...Programmable Automatic Door Locks ...Loss of Control ...Low Fuel Warning Light ...Low Traction Light ...Low Washer Fluid Warning Light ... 2-12 2-10...
Owner's Manual
Page 344
... Things That Burn ...2-27 Passenger Compartment Air Filter ...3-26 Passing ...4-13 PASS-Key® II ...2-16 Power Door Locks ...2-11 Electrical System ...5-91 Retained Accessory (RAP) ...2-19 Seat ...1-3 Steering Fluid ...5-34 Windows ...2-15 Programmable Automatic Door Locks ...2-11 O Odometer ...3-30 Odometer, Trip ...3-30 Off-Road Recovery ...4-13 Oil Change Engine Oil Light ...3-40 Engine...
... Things That Burn ...2-27 Passenger Compartment Air Filter ...3-26 Passing ...4-13 PASS-Key® II ...2-16 Power Door Locks ...2-11 Electrical System ...5-91 Retained Accessory (RAP) ...2-19 Seat ...1-3 Steering Fluid ...5-34 Windows ...2-15 Programmable Automatic Door Locks ...2-11 O Odometer ...3-30 Odometer, Trip ...3-30 Off-Road Recovery ...4-13 Oil Change Engine Oil Light ...3-40 Engine...


