
Owner's Manual
Page 1
2004 Buick LeSabre Owner Manual Seats and Restraint Systems ...1-1 Front Seats ...1-2 Safety Belts ...1-6 Child Restraints ...1-27 Air Bag Systems ...1-47 Restraint System Check ...1-56 ...2-1 Features and Controls Keys ...2-3 Doors and Locks ...2-9 Windows ...2-16 Theft-Deterrent Systems ...2-18 Starting and Operating Your Vehicle ...2-21 Mirrors ...2-33 OnStar® System ...2-37 HomeLink® Transmitter ...2-38 Storage Areas ...2-42 Sunroof ...2-43 Vehicle Personalization ...2-44 ...3-1 Instrument Panel Instrument Panel Overview ...3-4 Climate Controls ...3-24 Warning Lights, Gages and ...
2004 Buick LeSabre Owner Manual Seats and Restraint Systems ...1-1 Front Seats ...1-2 Safety Belts ...1-6 Child Restraints ...1-27 Air Bag Systems ...1-47 Restraint System Check ...1-56 ...2-1 Features and Controls Keys ...2-3 Doors and Locks ...2-9 Windows ...2-16 Theft-Deterrent Systems ...2-18 Starting and Operating Your Vehicle ...2-21 Mirrors ...2-33 OnStar® System ...2-37 HomeLink® Transmitter ...2-38 Storage Areas ...2-42 Sunroof ...2-43 Vehicle Personalization ...2-44 ...3-1 Instrument Panel Instrument Panel Overview ...3-4 Climate Controls ...3-24 Warning Lights, Gages and ...

Owner's Manual
Page 8
... rear edge of the vehicle. Move the seat higher or lower by pressing the control toward the front or rear of the control up or down . Adjust the driver's seat only when the vehicle is moving . Move the seat forward or rearward by holding the whole control up or down . 1-2 Front Seats Manual Seats Power Seats {CAUTION: You can lose control of the seat to unlock it and release the bar...
... rear edge of the vehicle. Move the seat higher or lower by pressing the control toward the front or rear of the control up or down . Adjust the driver's seat only when the vehicle is moving . Move the seat forward or rearward by holding the whole control up or down . 1-2 Front Seats Manual Seats Power Seats {CAUTION: You can lose control of the seat to unlock it and release the bar...

Owner's Manual
Page 65
...Brake ...2-27 Shifting Into Park (P) ...2-28 Shifting Out of Park (P) ...2-30 Parking Over Things That Burn ...2-31 Engine Exhaust ...2-31 Running Your Engine While You Are Parked ...2-32 Mirrors ...2-33 Manual Rearview Mirror ...2-33 Automatic Dimming Rearview Mirror ...2-33 Automatic Dimming Rearview Mirror with Compass ...2-33 Outside Power Mirrors ...2-35 Outside Curb View Assist Mirror ...2-36 Outside Convex Mirror ...2-36 Outside Automatic Dimming Heated Mirror ...2-36 Keys ...2-3 Remote Keyless Entry System ...2-5 Remote Keyless Entry System Operation ...2-5 Doors and Locks ...2-9 Door...
...Brake ...2-27 Shifting Into Park (P) ...2-28 Shifting Out of Park (P) ...2-30 Parking Over Things That Burn ...2-31 Engine Exhaust ...2-31 Running Your Engine While You Are Parked ...2-32 Mirrors ...2-33 Manual Rearview Mirror ...2-33 Automatic Dimming Rearview Mirror ...2-33 Automatic Dimming Rearview Mirror with Compass ...2-33 Outside Power Mirrors ...2-35 Outside Curb View Assist Mirror ...2-36 Outside Convex Mirror ...2-36 Outside Automatic Dimming Heated Mirror ...2-36 Keys ...2-3 Remote Keyless Entry System ...2-5 Remote Keyless Entry System Operation ...2-5 Doors and Locks ...2-9 Door...

Owner's Manual
Page 70
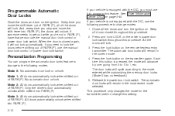
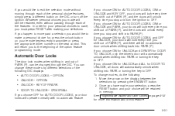
... correspond to the driver when the vehicle receives a command from the remote keyless entry transmitter. 2-6 If your vehicle is equipped with a key. Personalization Features The following features, if available on page 3-17. • Automatic Door Locks: This feature programs your door locks to automatically lock or unlock when shifting in PARK (P) or NEUTRAL (N). Q (Lock): Press this button to 30 seconds. This can be turned off the instant alarm by turning the ignition on , but only...
... correspond to the driver when the vehicle receives a command from the remote keyless entry transmitter. 2-6 If your vehicle is equipped with a key. Personalization Features The following features, if available on page 3-17. • Automatic Door Locks: This feature programs your door locks to automatically lock or unlock when shifting in PARK (P) or NEUTRAL (N). Q (Lock): Press this button to 30 seconds. This can be turned off the instant alarm by turning the ignition on , but only...
Owner's Manual
Page 76
... automatic door locks feature to change modes: 1. Programmable Automatic Door Locks Close the doors and turn the ignition on the remote keyless entry transmitter. When the door is not equipped with the DIC, you move the shift lever into PARK (P), the doors will lock. 3. If your vehicle is closed throughout this procedure. See Driver Information Center (DIC) on the driver's power door lock switch throughout this procedure. 2. All the doors will unlock. Every time you must use the manual door lock control or power door lock switch...
... automatic door locks feature to change modes: 1. Programmable Automatic Door Locks Close the doors and turn the ignition on the remote keyless entry transmitter. When the door is not equipped with the DIC, you move the shift lever into PARK (P), the doors will lock. 3. If your vehicle is closed throughout this procedure. See Driver Information Center (DIC) on the driver's power door lock switch throughout this procedure. 2. All the doors will unlock. Every time you must use the manual door lock control or power door lock switch...
Owner's Manual
Page 81
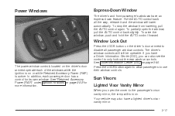
... passenger's windows have a lighted driver's visor vanity mirror. 2-17 release it and the window will still be operable. In addition, each of the windows while the ignition is active. To partially open the cover to disable all the way; To raise the window, push and hold the AUTO control forward. See Driver Information Center (DIC) on or while Retained Accessory Power (RAP) is on page 3-45. Press the LOCK...
... passenger's windows have a lighted driver's visor vanity mirror. 2-17 release it and the window will still be operable. In addition, each of the windows while the ignition is active. To partially open the cover to disable all the way; To raise the window, push and hold the AUTO control forward. See Driver Information Center (DIC) on or while Retained Accessory Power (RAP) is on page 3-45. Press the LOCK...
Owner's Manual
Page 84
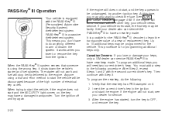
... to the following : 1. Turn the ignition off and try another ignition key. See your vehicle needs service. Canadian Owners: If you insert or remove the key from the ignition. Then continue with the other key, your dealer who can service PASS-Key® III to learn the transponder value of electrical key codes. If the engine will not start, see your vehicle does start and the SECURITY light comes on, the...
... to the following : 1. Turn the ignition off and try another ignition key. See your vehicle needs service. Canadian Owners: If you insert or remove the key from the ignition. Then continue with the other key, your dealer who can service PASS-Key® III to learn the transponder value of electrical key codes. If the engine will not start, see your vehicle does start and the SECURITY light comes on, the...
Owner's Manual
Page 86
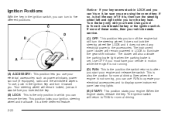
... the gear shift indicator. Your steering wheel will remain powered in ? Notice: If your key seems stuck in LOCK and you can't turn it is also the position for normal driving. (A) ACCESSORY: This position lets you can use your engine and release the switch. If it , be sure you can turn to the accessories. The instrument panel cluster will remain locked, just as power windows, power sunroof (if equipped), radio and the windshield wipers. It...
... the gear shift indicator. Your steering wheel will remain powered in ? Notice: If your key seems stuck in LOCK and you can't turn it is also the position for normal driving. (A) ACCESSORY: This position lets you can use your engine and release the switch. If it , be sure you can turn to the accessories. The instrument panel cluster will remain locked, just as power windows, power sunroof (if equipped), radio and the windshield wipers. It...

Owner's Manual
Page 87
... Accessory Power (RAP) After you turn your starter motor. The instrument panel cluster lights will stay on for five or six seconds to clear the extra gasoline from the engine. Wait about three seconds. This time keep the pedal down as the power windows, audio steering wheel controls (if equipped), clock, sunroof (if equipped) and the radio for about 10 seconds at a time will cause your battery to PARK (P) or NEUTRAL...
... Accessory Power (RAP) After you turn your starter motor. The instrument panel cluster lights will stay on for five or six seconds to clear the extra gasoline from the engine. Wait about three seconds. This time keep the pedal down as the power windows, audio steering wheel controls (if equipped), clock, sunroof (if equipped) and the radio for about 10 seconds at a time will cause your battery to PARK (P) or NEUTRAL...

Owner's Manual
Page 107
...glass panel to help reduce noise and make passengers more than one and a half seconds, the express open the glass panel and sunshade. The comfort stop position. The sunroof switch has a number of positions that control the ...sunroof movement. The sunshade can be opened to provide a better seal. Sunroof Your vehicle may be fully opened by pushing the switch upward. If you press and hold the switch in a partially-opened position. See "Retained Accessory Power (RAP)" under Ignition Positions on the headliner between the sun visors. Open: Press and hold the switch...
...glass panel to help reduce noise and make passengers more than one and a half seconds, the express open the glass panel and sunshade. The comfort stop position. The sunroof switch has a number of positions that control the ...sunroof movement. The sunshade can be opened to provide a better seal. Sunroof Your vehicle may be fully opened by pushing the switch upward. If you press and hold the switch in a partially-opened position. See "Retained Accessory Power (RAP)" under Ignition Positions on the headliner between the sun visors. Open: Press and hold the switch...

Owner's Manual
Page 115
... Hood Release on page 3-7. Glove Box. F. Traction Control Button (If Equipped). Parking Brake. See "Cruise Control" under Turn Signal/Multifunction Lever on page 5-11. Air Outlets. E. Hazard Warning Flashers. See Traction Control System (TCS) on page 3-14. H. See Exterior Lamps on page 4-9. See Glove Box on page 3-55. Instrument Panel Cluster. Audio System. See Audio System(s) on page 2-42. 3-5 Climate Controls. K. Steering Wheel Controls (If Equipped). See Turn Signal/Multifunction Lever on page 3-7. Hood Release...
... Hood Release on page 3-7. Glove Box. F. Traction Control Button (If Equipped). Parking Brake. See "Cruise Control" under Turn Signal/Multifunction Lever on page 5-11. Air Outlets. E. Hazard Warning Flashers. See Traction Control System (TCS) on page 3-14. H. See Exterior Lamps on page 4-9. See Glove Box on page 3-55. Instrument Panel Cluster. Audio System. See Audio System(s) on page 2-42. 3-5 Climate Controls. K. Steering Wheel Controls (If Equipped). See Turn Signal/Multifunction Lever on page 3-7. Hood Release...

Owner's Manual
Page 138
...limit the amount of your vehicle has cooled, turn off the engine. The outside air to flow through your vehicle to cool down. Selecting the VENT and AUTO buttons at the full cold position for long periods of the airflow to the ...time will be at the same time allows the system to control the airflow automatically without the air conditioning compressor working. It can be used to prevent outside air coming into the vehicle. The recirculation mode cannot be used with some airflow to the outboard outlets (for the side windows) and the windshield. To turn...
...limit the amount of your vehicle has cooled, turn off the engine. The outside air to flow through your vehicle to cool down. Selecting the VENT and AUTO buttons at the full cold position for long periods of the airflow to the ...time will be at the same time allows the system to control the airflow automatically without the air conditioning compressor working. It can be used to prevent outside air coming into the vehicle. The recirculation mode cannot be used with some airflow to the outboard outlets (for the side windows) and the windshield. To turn...
Owner's Manual
Page 161
... choice features, simply press a different button on the seat control. To change these modes by pressing the ENG/MET button. 2. Automatic Door Locks The door lock modes when shifting in memory. If you choose ON for UNLOCK and DRIVER for your personal choices to save, you choose OFF for AUTO DOOR LOCKS, your remote keyless entry transmitter or press the appropriate driver number on the DIC or turn the ignition...
... choice features, simply press a different button on the seat control. To change these modes by pressing the ENG/MET button. 2. Automatic Door Locks The door lock modes when shifting in memory. If you choose ON for UNLOCK and DRIVER for your personal choices to save, you choose OFF for AUTO DOOR LOCKS, your remote keyless entry transmitter or press the appropriate driver number on the DIC or turn the ignition...

Owner's Manual
Page 244
... to work properly. Notice: Your vehicle was not designed for fuel that will be hard to find. Do not use leaded gasoline or any other fuel not recommended in the previous text on . It can reduce the life of spark plugs and the performance of the emission control system may be covered under your emission control system to clean air...
... to work properly. Notice: Your vehicle was not designed for fuel that will be hard to find. Do not use leaded gasoline or any other fuel not recommended in the previous text on . It can reduce the life of spark plugs and the performance of the emission control system may be covered under your emission control system to clean air...

Owner's Manual
Page 300
... the tire section width in inches. (F) Service Description: These characters represent the load range and the speed rating of a tire. Air pressure is certified to carry a load. The speed rating is the maximum speed a tire is expressed in item "C" of the illustration, it would mean that indicates the tire height-to-width measurements. Aspect Ratio: The relationship of optional accessories are, automatic transmission, power steering, power brakes, power windows, power seats, and air conditioning. The...
... the tire section width in inches. (F) Service Description: These characters represent the load range and the speed rating of a tire. Air pressure is certified to carry a load. The speed rating is the maximum speed a tire is expressed in item "C" of the illustration, it would mean that indicates the tire height-to-width measurements. Aspect Ratio: The relationship of optional accessories are, automatic transmission, power steering, power brakes, power windows, power seats, and air conditioning. The...
Owner's Manual
Page 302
... Ply tire: A pneumatic tire in flation pressure. Vehicle Placard: A label permanently attached to curb weight, accessory weight, occupant weight and cargo weight. UTQGS: Uniform Tire Quality Grading Standards, a tire information system that extend to the centerline of tread remains. Vehicle Maximum Load on the Tire: Load on page 5-70. Speed Rating: An alphanumeric code assigned to a tire indicating the maximum speed at 90 degrees to the beads are seated. Tread...
... Ply tire: A pneumatic tire in flation pressure. Vehicle Placard: A label permanently attached to curb weight, accessory weight, occupant weight and cargo weight. UTQGS: Uniform Tire Quality Grading Standards, a tire information system that extend to the centerline of tread remains. Vehicle Maximum Load on the Tire: Load on page 5-70. Speed Rating: An alphanumeric code assigned to a tire indicating the maximum speed at 90 degrees to the beads are seated. Tread...
Owner's Manual
Page 375
... us. RETAIL SELL PRICE: $120.00 Reporting Safety Defects to General Motors In addition to notifying NHTSA (or Transport Canada) in addition to notifying General Motors of Canada Limited Customer Communication Centre, 163-005 1908 Colonel Sam Drive Oshawa, Ontario L1H 8P7 Transmission, Transaxle, Transfer Case Unit Repair Manual This manual provides information on engines, transmission, axle, suspension, brakes, electrical, steering, body, etc. RETAIL SELL PRICE: $50.00...
... us. RETAIL SELL PRICE: $120.00 Reporting Safety Defects to General Motors In addition to notifying NHTSA (or Transport Canada) in addition to notifying General Motors of Canada Limited Customer Communication Centre, 163-005 1908 Colonel Sam Drive Oshawa, Ontario L1H 8P7 Transmission, Transaxle, Transfer Case Unit Repair Manual This manual provides information on engines, transmission, axle, suspension, brakes, electrical, steering, body, etc. RETAIL SELL PRICE: $50.00...

Owner's Manual
Page 383
... How to Check Power Steering Fluid ...5-36 How to Inspect the Engine Air Cleaner/Filter ...5-18 How to Use This Manual ...ii How to Wear Safety Belts Properly ...1-11 Hydroplaning ...4-19 Inadvertent Power Battery Saver ...3-19 Infants and Young Children, Restraints ...1-29 Inflation - Periodic Maintenance ...6-21 Steering, Suspension and Front Drive Axle Boot and Seal ...6-21 Throttle System ...6-22 Instrument Panel Cluster ...3-33 Overview ...3-4 Instrument Panel Brightness ...3-17 Interior Lamps ...3-17...
... How to Check Power Steering Fluid ...5-36 How to Inspect the Engine Air Cleaner/Filter ...5-18 How to Use This Manual ...ii How to Wear Safety Belts Properly ...1-11 Hydroplaning ...4-19 Inadvertent Power Battery Saver ...3-19 Infants and Young Children, Restraints ...1-29 Inflation - Periodic Maintenance ...6-21 Steering, Suspension and Front Drive Axle Boot and Seal ...6-21 Throttle System ...6-22 Instrument Panel Cluster ...3-33 Overview ...3-4 Instrument Panel Brightness ...3-17 Interior Lamps ...3-17...

Owner's Manual
Page 385
Scheduled Maintenance Services ...6-4 Part B - Maintenance Record ...6-24 Selecting the Right Schedule ...6-5 Short Trip/City Scheduled Maintenance ...6-6 Steering, Suspension and Front Drive Axle Boot and Seal Inspection ...6-21 Throttle System Inspection ...6-22 Using Your ...6-4 Your Vehicle and the Environment ...6-2 Maintenance When Trailer Towing ...4-46 Making Turns ...4-44 Malfunction Indicator Light ...3-40 Manual Lumbar Controls ...1-3 Manual Operation ...3-27 Manual Seats ...1-2 Matching Transmitter(s) to Your Vehicle ...2-8 Memory Mirrors ...2-44 Memory Seat ...2-44 Memory Seats ...
Scheduled Maintenance Services ...6-4 Part B - Maintenance Record ...6-24 Selecting the Right Schedule ...6-5 Short Trip/City Scheduled Maintenance ...6-6 Steering, Suspension and Front Drive Axle Boot and Seal Inspection ...6-21 Throttle System Inspection ...6-22 Using Your ...6-4 Your Vehicle and the Environment ...6-2 Maintenance When Trailer Towing ...4-46 Making Turns ...4-44 Malfunction Indicator Light ...3-40 Manual Lumbar Controls ...1-3 Manual Operation ...3-27 Manual Seats ...1-2 Matching Transmitter(s) to Your Vehicle ...2-8 Memory Mirrors ...2-44 Memory Seat ...2-44 Memory Seats ...
Owner's Manual
Page 387
..., Safety Belts ...1-21 Rear Underseat Fuse Block ...5-96 Rear Window Defogger ...3-26, 3-29 Rearview Mirror, Automatic Dimming ...2-33 Rearview Mirror, Automatic Dimming with Compass ...2-33 Rearview Mirrors ...2-33 Reclining Seatbacks ...1-4 Recreational Vehicle Towing ...4-32 Remote Keyless Entry System ...2-5 Remote Keyless Entry System, Operation ...2-5 Remote Trunk Release Lockout ...2-14 Removing the Flat Tire and Installing the Spare Tire ...5-77 Removing the Spare Tire and Tools ...5-75 Removing the Wheel Covers and Wheel Nut Caps ...5-76 Replacement Bulbs ...5-56 Replacing Brake...
..., Safety Belts ...1-21 Rear Underseat Fuse Block ...5-96 Rear Window Defogger ...3-26, 3-29 Rearview Mirror, Automatic Dimming ...2-33 Rearview Mirror, Automatic Dimming with Compass ...2-33 Rearview Mirrors ...2-33 Reclining Seatbacks ...1-4 Recreational Vehicle Towing ...4-32 Remote Keyless Entry System ...2-5 Remote Keyless Entry System, Operation ...2-5 Remote Trunk Release Lockout ...2-14 Removing the Flat Tire and Installing the Spare Tire ...5-77 Removing the Spare Tire and Tools ...5-75 Removing the Wheel Covers and Wheel Nut Caps ...5-76 Replacement Bulbs ...5-56 Replacing Brake...


