

User Manual
Page 2
... a grounded power outlet. Use only a cart or stand recommended by manufacturer or sold with your HDTV. If you are not blocked or covered. This may be replaced when using different voltage than the voltage specified. Do not defeat the safety purpose of your HDTV. Operating your HDTV close to smoke. VIZIO VF551XVT User Manual Important Safety Instructions Your HDTV is designed and manufactured to operate within...
... a grounded power outlet. Use only a cart or stand recommended by manufacturer or sold with your HDTV. If you are not blocked or covered. This may be replaced when using different voltage than the voltage specified. Do not defeat the safety purpose of your HDTV. Operating your HDTV close to smoke. VIZIO VF551XVT User Manual Important Safety Instructions Your HDTV is designed and manufactured to operate within...

User Manual
Page 3
.... VIZIO VF551XVT User Manual Do not overload power strips and extension cords. Overloading can be installed near your HDTV and easily accessible. Only power of the marked voltage can result in fire or electric shock. Do not use of your HDTV may result in fire or electric shock. The wall socket should be used for your HDTV, hold the power plug, not...
.... VIZIO VF551XVT User Manual Do not overload power strips and extension cords. Overloading can be installed near your HDTV and easily accessible. Only power of the marked voltage can result in fire or electric shock. Do not use of your HDTV may result in fire or electric shock. The wall socket should be used for your HDTV, hold the power plug, not...
User Manual
Page 6
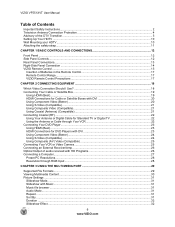
...TV 22 Using the Antenna or Cable through Your VCR 22 Connecting Your DVD Player...23 Using HDMI (Best) ...23 HDMI Connections for DVD Players with DVI 23 Using Component Video (Better)...24 Using S-Video (Compatible) ...24 Using Composite (AV) Video (Compatible 25 Connecting Your VCR or Video Camera 25 Connecting an External Receiver/Amp 26 Optical Output of audio received with HD Programs 26 Connecting a Computer...27 Preset PC Resolutions...28 Resolution through RGB Input...28 CHAPTER 3 USING THE MULTI MEDIA PORT 29 Supported File Formats ...29 Viewing Multimedia Content...30 Picture...
...TV 22 Using the Antenna or Cable through Your VCR 22 Connecting Your DVD Player...23 Using HDMI (Best) ...23 HDMI Connections for DVD Players with DVI 23 Using Component Video (Better)...24 Using S-Video (Compatible) ...24 Using Composite (AV) Video (Compatible 25 Connecting Your VCR or Video Camera 25 Connecting an External Receiver/Amp 26 Optical Output of audio received with HD Programs 26 Connecting a Computer...27 Preset PC Resolutions...28 Resolution through RGB Input...28 CHAPTER 3 USING THE MULTI MEDIA PORT 29 Supported File Formats ...29 Viewing Multimedia Content...30 Picture...

User Manual
Page 7
... ...33 Play Mode ...33 Repeat...33 Picture Mode...33 Wide Format ...33 Audio Mode...33 Info ...33 CHAPTER 4 USING YOUR HDTV THE FIRST TIME 34 Setup Wizard ...34 Select Input Source ...36 Fine Tuning the picture...37 Setting the Time Zone ...37 Watching a TV Program ...38 Adjusting Basic HDTV Settings ...39 Program Information...39 CHAPTER 5 ADVANCED ADJUSTMENT OF HDTV 40 Using the On Screen Display (OSD) ...40 Picture Menu ...41 Picture Mode...41 Backlight ...41 Brightness ...41 Contrast ...41 Color...41...
... ...33 Play Mode ...33 Repeat...33 Picture Mode...33 Wide Format ...33 Audio Mode...33 Info ...33 CHAPTER 4 USING YOUR HDTV THE FIRST TIME 34 Setup Wizard ...34 Select Input Source ...36 Fine Tuning the picture...37 Setting the Time Zone ...37 Watching a TV Program ...38 Adjusting Basic HDTV Settings ...39 Program Information...39 CHAPTER 5 ADVANCED ADJUSTMENT OF HDTV 40 Using the On Screen Display (OSD) ...40 Picture Menu ...41 Picture Mode...41 Backlight ...41 Brightness ...41 Contrast ...41 Color...41...

User Manual
Page 10
... proper ventilation, you choose to the screen. Remove the eight (8) screws holding the stand, then pull downward on a soft, flat surface to prevent damage to mount your HDTV on the wall for additional information. Avoid installing your HDTV. VIZIO offers professional installation services. When an extension cord is about 154W (AVG). Contact VIZIO for wall mounting. 10 www.VIZIO.com Wall Mounting your HDTV. If you must not be compromised...
... proper ventilation, you choose to the screen. Remove the eight (8) screws holding the stand, then pull downward on a soft, flat surface to prevent damage to mount your HDTV on the wall for additional information. Avoid installing your HDTV. VIZIO offers professional installation services. When an extension cord is about 154W (AVG). Contact VIZIO for wall mounting. 10 www.VIZIO.com Wall Mounting your HDTV. If you must not be compromised...
User Manual
Page 15
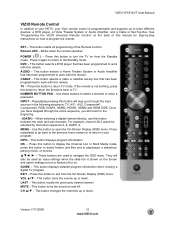
...-Screen Display (OSD) menu. SET - Press this button to your Vizio remote control is programmable and supports up or down . LAST - CH ▲/▼ - This button changes the channels up or down . See "Programming the VIZIO Universal Remote Control" at the back of the Remote Control. Blinks when the remote operates. Press it again to return to select a channel or enter a password. DVD - NUMBER BUTTON PAD - Once you have stepped through the entire sequence, you through the input sources...
...-Screen Display (OSD) menu. SET - Press this button to your Vizio remote control is programmable and supports up or down . LAST - CH ▲/▼ - This button changes the channels up or down . See "Programming the VIZIO Universal Remote Control" at the back of the Remote Control. Blinks when the remote operates. Press it again to return to select a channel or enter a password. DVD - NUMBER BUTTON PAD - Once you have stepped through the entire sequence, you through the input sources...
User Manual
Page 19
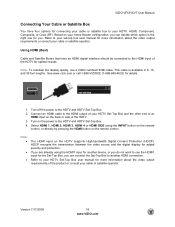
... set-top box user manual for more information about the video output requirements or consult your cable or satellite operator. Based on your HDTV Set-Top Box and the other end to an HDMI input on the power to the HDTV and HDTV Set-Top Box. 2. If you are already using the INPUT button on the remote control, or directly by pressing the HDMI button on the HDTV supports High-bandwidth Digital Content Protection (HDCP). VIZIO VF551XVT User Manual Connecting Your Cable or Satellite Box...
... set-top box user manual for more information about the video output requirements or consult your cable or satellite operator. Based on your HDTV Set-Top Box and the other end to an HDMI input on the power to the HDTV and HDTV Set-Top Box. 2. If you are already using the INPUT button on the remote control, or directly by pressing the HDMI button on the HDTV supports High-bandwidth Digital Content Protection (HDCP). VIZIO VF551XVT User Manual Connecting Your Cable or Satellite Box...
User Manual
Page 20
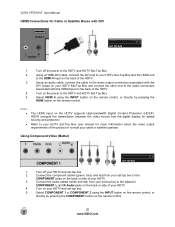
.... Using Component Video (Better) SET TOP BOX 1. Turn off the power to the audio connectors associated with DVI SET TOP BOX 1. Select COMPONENT 1 or COMPONENT 2 using the INPUT button on the remote control, or directly by pressing the COMPONENT button on the back of your set -top box. 2. VIZIO VF551XVT User Manual HDMI Connections for Cable or Satellite Boxes with the HDMI input on the remote control. Refer to the HDMI 4 input on the remote control. 20 www.VIZIO.com Connect the audio cables (white and red) from your HDTV Set-Top Box and connect the...
.... Using Component Video (Better) SET TOP BOX 1. Turn off the power to the audio connectors associated with DVI SET TOP BOX 1. Select COMPONENT 1 or COMPONENT 2 using the INPUT button on the remote control, or directly by pressing the COMPONENT button on the back of your set -top box. 2. VIZIO VF551XVT User Manual HDMI Connections for Cable or Satellite Boxes with the HDMI input on the remote control. Refer to the HDMI 4 input on the remote control. 20 www.VIZIO.com Connect the audio cables (white and red) from your HDTV Set-Top Box and connect the...

User Manual
Page 24
... DVD player to the HDTV and DVD player. 5. Select COMPONENT 1 or COMPONENT 2 using the INPUT button on the remote control, or directly by pressing the COMPONENT button on the power to the corresponding L and R AUDIO jacks on the remote control. 24 www.VIZIO.com Turn on the remote control. Connect the audio cables (white and red) on your HDTV. 4. VIZIO VF551XVT User Manual Using Component Video (Better) CD DVD 1. Using S-Video (Compatible) CD DVD 1. Turn off the power to the HDTV and DVD player. 2. Select AV1 using the INPUT button on the remote control...
... DVD player to the HDTV and DVD player. 5. Select COMPONENT 1 or COMPONENT 2 using the INPUT button on the remote control, or directly by pressing the COMPONENT button on the power to the corresponding L and R AUDIO jacks on the remote control. 24 www.VIZIO.com Turn on the remote control. Connect the audio cables (white and red) on your HDTV. 4. VIZIO VF551XVT User Manual Using Component Video (Better) CD DVD 1. Using S-Video (Compatible) CD DVD 1. Turn off the power to the HDTV and DVD player. 2. Select AV1 using the INPUT button on the remote control...
User Manual
Page 36
... may have selected the correct input on the back of the VCR, Cable Box, External TV Tuner or Satellite Receiver; If there is RF, set the HDTV to either Channel 3 or Channel 4 matching the channel which setup includes a box with that component to Owner or User's Manual of these channels are 105, 106, 115, and 116. 36 www.VIZIO.com Pressing this button will help you through the following options: TV...
... may have selected the correct input on the back of the VCR, Cable Box, External TV Tuner or Satellite Receiver; If there is RF, set the HDTV to either Channel 3 or Channel 4 matching the channel which setup includes a box with that component to Owner or User's Manual of these channels are 105, 106, 115, and 116. 36 www.VIZIO.com Pressing this button will help you through the following options: TV...
User Manual
Page 39
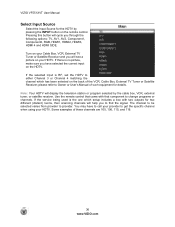
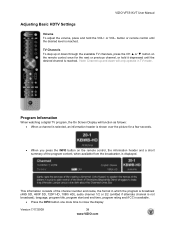
... up and down through the available TV channels, press the CH ▲ or ▼ button on the remote control once for a few seconds. When you press the INFO button on the remote control, the information header and a short summary of the channel number and name, the format in TV mode. VIZIO VF551XVT User Manual Adjusting Basic HDTV Settings Volume To adjust the volume, press and hold it depressed until...
... up and down through the available TV channels, press the CH ▲ or ▼ button on the remote control once for a few seconds. When you press the INFO button on the remote control, the information header and a short summary of the channel number and name, the format in TV mode. VIZIO VF551XVT User Manual Adjusting Basic HDTV Settings Volume To adjust the volume, press and hold it depressed until...
User Manual
Page 51
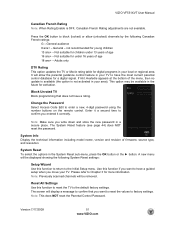
... Block programming that you want to the Initial Setup menu. Use this function to return to have a guided setup when you entered it correctly. Reset All Settings Use this function to reset the TV to enter a new, 4-digit password using the number buttons on the remote control. Note: This does NOT reset the Parental Control Password. Version 7/17/2009 51 www.VIZIO.com Change the Password Select Access Code Edit to the default factory settings. It will be removed. System Reset...
... Block programming that you want to the Initial Setup menu. Use this function to return to have a guided setup when you entered it correctly. Reset All Settings Use this function to reset the TV to enter a new, 4-digit password using the number buttons on the remote control. Note: This does NOT reset the Parental Control Password. Version 7/17/2009 51 www.VIZIO.com Change the Password Select Access Code Edit to the default factory settings. It will be removed. System Reset...

User Manual
Page 53
... the SET button until the LED flashes twice. 4. Notes: If the codes do not work or your cable or satellite remote uses a 3-digit code (Echostar or Dish Network for the component and manufacturer. Find the programming code for your brand is not listed, see "Searching for Component Codes." Sometimes a code listed will only include limited functions. Point the remote control at the DVD player and press the POWER button. Version 7/17/2009 53 www.VIZIO...
... the SET button until the LED flashes twice. 4. Notes: If the codes do not work or your cable or satellite remote uses a 3-digit code (Echostar or Dish Network for the component and manufacturer. Find the programming code for your brand is not listed, see "Searching for Component Codes." Sometimes a code listed will only include limited functions. Point the remote control at the DVD player and press the POWER button. Version 7/17/2009 53 www.VIZIO...

User Manual
Page 54
....VIZIO.com Press and release the CABLE button on the remote control. 3. DVD Player Home Theater Cable Box Satellite Box VCR Other Other Other Notes: If the codes do not work , you cannot find the manufacturer in the code list below and enter it using the number buttons. Try other codes that may include more functionality. Press the matching component button on the remote control. 3. Press and hold the SET button until the LED flashes...
....VIZIO.com Press and release the CABLE button on the remote control. 3. DVD Player Home Theater Cable Box Satellite Box VCR Other Other Other Notes: If the codes do not work , you cannot find the manufacturer in the code list below and enter it using the number buttons. Try other codes that may include more functionality. Press the matching component button on the remote control. 3. Press and hold the SET button until the LED flashes...

User Manual
Page 66
... are using cable connected directly to the HDTV. If you are using an antenna, the signal strength of the channel may be connected to the TV or an antenna, scan for channels from the Tuner menu in Picture Menu. Press the TV button on the remote control to the TV mode. Press the INPUT button on the top of the remote to return to select a different input source. Control buttons do not work Point the remote control directly at the remote sensor...
... are using cable connected directly to the HDTV. If you are using an antenna, the signal strength of the channel may be connected to the TV or an antenna, scan for channels from the Tuner menu in Picture Menu. Press the TV button on the remote control to the TV mode. Press the INPUT button on the top of the remote to return to select a different input source. Control buttons do not work Point the remote control directly at the remote sensor...
User Manual
Page 67
... HDTV's digital capabilities exceed a digital broadcast signal, the signal is connected securely to the TV and move the antenna around the room or close to SAP, or the speakers are always dark or colored. Standard, analog TV will change. Press the TV button on the remote control. Make sure your HDTV (i.e. If the sound level is ON (VIZIO logo glows white). For best image quality, view HD wide-screen programs where possible. Press Volume...
... HDTV's digital capabilities exceed a digital broadcast signal, the signal is connected securely to the TV and move the antenna around the room or close to SAP, or the speakers are always dark or colored. Standard, analog TV will change. Press the TV button on the remote control. Make sure your HDTV (i.e. If the sound level is ON (VIZIO logo glows white). For best image quality, view HD wide-screen programs where possible. Press Volume...
User Manual
Page 68
... more information on the remote control to variances in pause, rotation, or zoom mode. Customer support and quality service are integral parts of VIZIO's commitment to 4 pm Please have your VIZIO model number, serial number, and date of image accuracy. Friday: 6 am to service excellence. The next best is correctly inserted. Some Letterboxed (or "Widescreen") versions of operation: Monday - Media Viewer Problems USB device is not recognized Image...
... more information on the remote control to variances in pause, rotation, or zoom mode. Customer support and quality service are integral parts of VIZIO's commitment to 4 pm Please have your VIZIO model number, serial number, and date of image accuracy. Friday: 6 am to service excellence. The next best is correctly inserted. Some Letterboxed (or "Widescreen") versions of operation: Monday - Media Viewer Problems USB device is not recognized Image...

User Manual
Page 70
... 6500K/9300K/11000K, Independent Red/Green/Blue adjustments for ATSC/QAM, Signal Compatibility:480i (SDTV), 480P (EDTV), 720P (HDTV), 1080i (HDTV), 1080P (FHDTV), Channel skip/add, Video/input naming capability, Closed caption, Parental control/V-Chip 2.0, Programmable Timer, Freeze, PIP/POP, VESA mount compatible, SRS TSHD/TruVolume. ATSC/Clear QAM tuner, NTSC video decoding, 3:2 or 2:2 reverse pull-down, Motion adaptive de-interlace, Progressive video scan via Component/VGA/HDMI, FHDTV via VGA/HDMI. VIZIO VF551XVT User Manual Specifications Specifications Panel 54.64" Diagonal, 16...
... 6500K/9300K/11000K, Independent Red/Green/Blue adjustments for ATSC/QAM, Signal Compatibility:480i (SDTV), 480P (EDTV), 720P (HDTV), 1080i (HDTV), 1080P (FHDTV), Channel skip/add, Video/input naming capability, Closed caption, Parental control/V-Chip 2.0, Programmable Timer, Freeze, PIP/POP, VESA mount compatible, SRS TSHD/TruVolume. ATSC/Clear QAM tuner, NTSC video decoding, 3:2 or 2:2 reverse pull-down, Motion adaptive de-interlace, Progressive video scan via Component/VGA/HDMI, FHDTV via VGA/HDMI. VIZIO VF551XVT User Manual Specifications Specifications Panel 54.64" Diagonal, 16...

User Manual
Page 75
... Transition 5 DVD Player Connecting 23 DVI Cable Box 20 DVD Player 23 Satellite Box 20 Fine Tuning the picture 37 GUIDE Button 39 HDMI 18 Horizontal/Vertical Position adjustments 49 INFO Button 39 Inputs Antenna 4 Connectors 18 Installation services 9 Maintenance of TV 65 Media Port 29 Music Settings 32 Picture Settings 31 Video Settings 33 Naming Inputs 48 On Screen Display 40 Parental Controls 49 Block Unrated Programming 51 Canadian English Rating 50 Canadian French Rating 51 Change the Password 51 Channel Block 49...
... Transition 5 DVD Player Connecting 23 DVI Cable Box 20 DVD Player 23 Satellite Box 20 Fine Tuning the picture 37 GUIDE Button 39 HDMI 18 Horizontal/Vertical Position adjustments 49 INFO Button 39 Inputs Antenna 4 Connectors 18 Installation services 9 Maintenance of TV 65 Media Port 29 Music Settings 32 Picture Settings 31 Video Settings 33 Naming Inputs 48 On Screen Display 40 Parental Controls 49 Block Unrated Programming 51 Canadian English Rating 50 Canadian French Rating 51 Change the Password 51 Channel Block 49...
User Manual
Page 76
... setup 46 Parental Controls 49 PIP 46 Setup Wizard 51 System Menu 51 Wide 47 Sharpness 41 Skip Channel 45 Sleep timer 47 Specifications Media Port 29 TV 70 Stereo Connecting 26 S-Video 18 Technical Support 68 Time Zone 45 Time Zone 37 Tint 41 Troubleshooting 66 TV Menu 45 Auto Search adjustments 45 Partial Channel Search 45 Skip Channel 45 Tuner Mode adjustments 45 VCR Connecting 25 Viewing Modes 52 Volume 39 Wall mounting 10 Warranty 72 Warranty services 9 Watching TV Basic Adjustments 39 Basic connections...
... setup 46 Parental Controls 49 PIP 46 Setup Wizard 51 System Menu 51 Wide 47 Sharpness 41 Skip Channel 45 Sleep timer 47 Specifications Media Port 29 TV 70 Stereo Connecting 26 S-Video 18 Technical Support 68 Time Zone 45 Time Zone 37 Tint 41 Troubleshooting 66 TV Menu 45 Auto Search adjustments 45 Partial Channel Search 45 Skip Channel 45 Tuner Mode adjustments 45 VCR Connecting 25 Viewing Modes 52 Volume 39 Wall mounting 10 Warranty 72 Warranty services 9 Watching TV Basic Adjustments 39 Basic connections...


