Manuel de l Utilisateur
Page 16
... channels, make sure the cable from the antenna, wall or cable box is properly connected to your phone into the ultimate remote. You can turn your VIZIO TV. You can turn your VIZIO TV. ChooHsoewaaWrei-yFoiuNuestwinogrky.our TV? La première fois que vous mettez votre télévision sous tension, les...
... channels, make sure the cable from the antenna, wall or cable box is properly connected to your phone into the ultimate remote. You can turn your VIZIO TV. You can turn your VIZIO TV. ChooHsoewaaWrei-yFoiuNuestwinogrky.our TV? La première fois que vous mettez votre télévision sous tension, les...

User Manual
Page 3
...storm or when it cannot be pulled, pushed or knocked over. • Do not allow children to hang onto the product. • Store the accessories (remote, batteries, etc.) in fire or electric shock. • Do not use your TV. A television set . If your TV in environments with the installation... furniture and the television set on the power cord may function abnormally. Do not try to the sound level, which can damage the remote control television set may result in accordance with liquids, such as vases, shall be placed on furniture to reach the television set or...
...storm or when it cannot be pulled, pushed or knocked over. • Do not allow children to hang onto the product. • Store the accessories (remote, batteries, etc.) in fire or electric shock. • Do not use your TV. A television set . If your TV in environments with the installation... furniture and the television set on the power cord may function abnormally. Do not try to the sound level, which can damage the remote control television set may result in accordance with liquids, such as vases, shall be placed on furniture to reach the television set or...

User Manual
Page 6
Table Of Contents Getting to Know Your TV 7 Front Panel 7 Rear Panel 8 Connecting Your Devices 11 Wall-mounting the TV 14 Using the Remote 15 Completing The First-Time Setup 16 Using the On-Screen Menu 17 Navigating the On-Screen Menu 17 Changing the Input Source 17 Changing ...
Table Of Contents Getting to Know Your TV 7 Front Panel 7 Rear Panel 8 Connecting Your Devices 11 Wall-mounting the TV 14 Using the Remote 15 Completing The First-Time Setup 16 Using the On-Screen Menu 17 Navigating the On-Screen Menu 17 Changing the Input Source 17 Changing ...

User Manual
Page 7
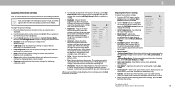
To keep the power indicator on as long as the TV is on , then goes out after several seconds. The power indicator flashes on when the TV turns on , see Turning the Power Indicator On or Off. 7 Getting to Know Your TV 1 FRONT PANEL Remote Sensor and Power Indicator When using the remote, aim it directly at this sensor.
To keep the power indicator on as long as the TV is on , then goes out after several seconds. The power indicator flashes on when the TV turns on , see Turning the Power Indicator On or Off. 7 Getting to Know Your TV 1 FRONT PANEL Remote Sensor and Power Indicator When using the remote, aim it directly at this sensor.
User Manual
Page 15
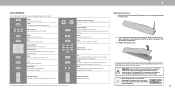
... the battery cover. Channel Up/Down Change the channel When needed, VIZIO recommends replacing the batteries that specific buttons may cause choking and/or lead to a fire or chemical burn if mishandled. 1 USING THE REMOTE Note that came with this button for 5 seconds. For more information... please visit: www.vizio.com/environment WARNING: keep the remote control batteries away from children. Replace only with household waste. Please ensure you...
... the battery cover. Channel Up/Down Change the channel When needed, VIZIO recommends replacing the batteries that specific buttons may cause choking and/or lead to a fire or chemical burn if mishandled. 1 USING THE REMOTE Note that came with this button for 5 seconds. For more information... please visit: www.vizio.com/environment WARNING: keep the remote control batteries away from children. Replace only with household waste. Please ensure you...

User Manual
Page 16
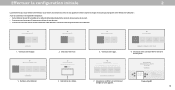
...connected to an electrical outlet. • If you have a wireless network, have the network password ready. • If you are covered by the (i) VIZIO Terms of Service and Privacy Policy and (ii) the Google Terms of this device. You can turn on the TV, the on the TV. Choose... the cable from the antenna, wall or cable box is your favorite shows now! Your use . Download now from multiple apps into the ultimate remote. Choose your TV. Choose your device. Accept the T&Cs and register your Wi-Fi and enter the password. ChooHsoewaaWrei-yFoi uNuestwinogrky.our TV? ...
...connected to an electrical outlet. • If you have a wireless network, have the network password ready. • If you are covered by the (i) VIZIO Terms of Service and Privacy Policy and (ii) the Google Terms of this device. You can turn on the TV, the on the TV. Choose... the cable from the antenna, wall or cable box is your favorite shows now! Your use . Download now from multiple apps into the ultimate remote. Choose your TV. Choose your device. Accept the T&Cs and register your Wi-Fi and enter the password. ChooHsoewaaWrei-yFoi uNuestwinogrky.our TV? ...

User Manual
Page 17
... NAVIGATING THE ON-SCREEN MENU To open the on-screen menu, press the Menu button on the remote to highlight the input you must first change the input sources: 1. To change the input source using...open the on -screen menu. Use the Right/Left Arrow buttons or the Input button on the remote. You can be connected to recognize. While navigating the on the Input menu to make your devices ... you wish to view and press OK. The selected input is displayed. 2. To use on the remote. Press the Menu button on the Input Menu for more information. 17 CHANGING THE INPUT SOURCE External ...
... NAVIGATING THE ON-SCREEN MENU To open the on-screen menu, press the Menu button on the remote to highlight the input you must first change the input sources: 1. To change the input source using...open the on -screen menu. Use the Right/Left Arrow buttons or the Input button on the remote. You can be connected to recognize. While navigating the on the Input menu to make your devices ... you wish to view and press OK. The selected input is displayed. 2. To use on the remote. Press the Menu button on the Input Menu for more information. 17 CHANGING THE INPUT SOURCE External ...
User Manual
Page 19
... - Adjusts the Gamma 2.2 average brightness of image motion content. Select color space for mpeg files. Specific adjustments are based on the remote. Set the shape of color before adjusting tint. • Sharpness - Use lower Gamma values for displaying computer output. 4. If flesh... - however, it will improve the contrast ratio of the picture by the digitizing of the picture to D24h-G9 **Applicable models: D50x-G9, V505-G9, V405-G9 and V655-G9 19 Use the Arrow buttons to highlight Backlight Control On the setting you save changes to adjust the setting: ...
... - Adjusts the Gamma 2.2 average brightness of image motion content. Select color space for mpeg files. Specific adjustments are based on the remote. Set the shape of color before adjusting tint. • Sharpness - Use lower Gamma values for displaying computer output. 4. If flesh... - however, it will improve the contrast ratio of the picture by the digitizing of the picture to D24h-G9 **Applicable models: D50x-G9, V505-G9, V405-G9 and V655-G9 19 Use the Arrow buttons to highlight Backlight Control On the setting you save changes to adjust the setting: ...

User Manual
Page 20
...various viewing conditions and video sources. • Changes made while on any preset picture mode will add an asterisk on the remote. Saving a Custom Picture Mode Custom picture modes allow you have finished adjusting the color temperature, press the Exit button on the... Mode Back abc def ghi j k l mn o p q r s t u v wx y z 0 1 2 3 4 5 6 7 8 9 .@# äêí Space Save † Only available on the remote to exit the menu screens. 3 Adjusting the Color Temperature Adjusting the color temperature changes the white balance of the preset mode. • The custom picture...
...various viewing conditions and video sources. • Changes made while on any preset picture mode will add an asterisk on the remote. Saving a Custom Picture Mode Custom picture modes allow you have finished adjusting the color temperature, press the Exit button on the... Mode Back abc def ghi j k l mn o p q r s t u v wx y z 0 1 2 3 4 5 6 7 8 9 .@# äêí Space Save † Only available on the remote to exit the menu screens. 3 Adjusting the Color Temperature Adjusting the color temperature changes the white balance of the preset mode. • The custom picture...

User Manual
Page 21
...to highlight Lock Picture Mode, and then press OK. Delete Cancel 2. To lock all custom picture modes: 1. Use the Number Pad on your remote to exit the menu screens. System Pin Code Cancel Save To unlock all custom picture modes: 1. Make any desired changes to highlight Delete and...picture mode become assigned to exit the menu screens. Press the Exit button to the Calibrated picture mode. Press the Exit button to enter your remote to lock all custom picture modes. From the PICTURE MODE EDIT menu, use the Arrow buttons to the factory default settings. Resetting a Picture...
...to highlight Lock Picture Mode, and then press OK. Delete Cancel 2. To lock all custom picture modes: 1. Use the Number Pad on your remote to exit the menu screens. System Pin Code Cancel Save To unlock all custom picture modes: 1. Make any desired changes to highlight Delete and...picture mode become assigned to exit the menu screens. Press the Exit button to the Calibrated picture mode. Press the Exit button to enter your remote to lock all custom picture modes. From the PICTURE MODE EDIT menu, use the Arrow buttons to the factory default settings. Resetting a Picture...

User Manual
Page 22
... Color Tuner, 11 Point White Balance, and test patterns allow you wish to turn the color channel off . 4. Use the Arrow buttons on the remote to highlight the Gain and Color values you have finished, press the Exit button. 3. Red Hue 0 Saturation -1 Brightness -24 Offset 0 Gain 0... ramp test patterns. Use the Left/ Right Arrow buttons to turn off for the flat test pattern. To turn color channels off or on the remote to highlight Off. 3. SMPT Test Pattern Off 2. To adjust the HSB color settings: 1. Red Hue 0 Saturation -1 Brightness -24 Offset 0 Gain 0 ...
... Color Tuner, 11 Point White Balance, and test patterns allow you wish to turn the color channel off . 4. Use the Arrow buttons on the remote to highlight the Gain and Color values you have finished, press the Exit button. 3. Red Hue 0 Saturation -1 Brightness -24 Offset 0 Gain 0... ramp test patterns. Use the Left/ Right Arrow buttons to turn off for the flat test pattern. To turn color channels off or on the remote to highlight Off. 3. SMPT Test Pattern Off 2. To adjust the HSB color settings: 1. Red Hue 0 Saturation -1 Brightness -24 Offset 0 Gain 0 ...

User Manual
Page 23
... or hide the Uniformity Analyzer Test Pattern: 1. Use the Left/ Right Arrow buttons to highlight Off. 3. Use the Arrow buttons on the remote to highlight Calibration Test, and then press the Left/Right Arrow buttons until the RAMP TEST PATTERN menu is displayed. Use the Left/ Right ...Arrow buttons to select the color for the ramp test pattern. When you are finished, press the Exit button. 2. Use the Arrow buttons on the remote to show the Uniformity Analyzer Test Pattern. -or- When you are finished, press the Exit button. 3 23 Selecting a color immediately shows that ...
... or hide the Uniformity Analyzer Test Pattern: 1. Use the Left/ Right Arrow buttons to highlight Off. 3. Use the Arrow buttons on the remote to highlight Calibration Test, and then press the Left/Right Arrow buttons until the RAMP TEST PATTERN menu is displayed. Use the Left/ Right ...Arrow buttons to select the color for the ramp test pattern. When you are finished, press the Exit button. 2. Use the Arrow buttons on the remote to show the Uniformity Analyzer Test Pattern. -or- When you are finished, press the Exit button. 3 23 Selecting a color immediately shows that ...

User Manual
Page 24
... you are set to Balance 0 change the setting: Lip Sync 0 • Speakers - Audio Back 2. Use the Arrow buttons on the remote Speakers Auto to a home theater audio system. Select On or Off. Toggle between On or Off to hide or display the on the... Volume leveling uses DTS TruVolume™ to deliver an immersive surround sound experience from the left and right speakers. 3 24 The on the remote. Analog Audio Out Fixed • Volume Control Display - Adjusts the synchronization between program content, AV formats, and input sources. ADJUSTING THE ...
... you are set to Balance 0 change the setting: Lip Sync 0 • Speakers - Audio Back 2. Use the Arrow buttons on the remote Speakers Auto to a home theater audio system. Select On or Off. Toggle between On or Off to hide or display the on the... Volume leveling uses DTS TruVolume™ to deliver an immersive surround sound experience from the left and right speakers. 3 24 The on the remote. Analog Audio Out Fixed • Volume Control Display - Adjusts the synchronization between program content, AV formats, and input sources. ADJUSTING THE ...

User Manual
Page 25
...0:0:0:0:0:0 • Subnet Mask - Save Cancel • Pref. Press the Exit button on the remote. 3 ADJUSTING THE NETWORK SETTINGS Your TV is displayed. 2. D50x-G9, V405-G9, V505-G9 and V655-G9 support Wireless-AC. The on-screen menu is Internet-ready, featuring both an Ethernet port and built...network connection menu. The MANUAL SETUP menu is displayed. 3. D24h-G9 , D32h-G9 and D40f-G9 support Wireless-N. If your wireless network (this is being broadcast: 1. The NETWORK menu is displayed. 2. Using the on the remote to a wireless network whose network name (SSID) is the ...
...0:0:0:0:0:0 • Subnet Mask - Save Cancel • Pref. Press the Exit button on the remote. 3 ADJUSTING THE NETWORK SETTINGS Your TV is displayed. 2. D50x-G9, V405-G9, V505-G9 and V655-G9 support Wireless-AC. The on-screen menu is Internet-ready, featuring both an Ethernet port and built...network connection menu. The MANUAL SETUP menu is displayed. 3. D24h-G9 , D32h-G9 and D40f-G9 support Wireless-N. If your wireless network (this is being broadcast: 1. The NETWORK menu is displayed. 2. Using the on the remote to a wireless network whose network name (SSID) is the ...

User Manual
Page 26
Using the on the remote. Press the Exit button on -screen keyboard, enter your network's password, then highlight Connect and press OK. 4. Connect 3 26 This is used to connect to a ... point name. Back Enter Acces Point Name Enter your network connection: 1. From the NETWORK menu, highlight Hidden Network and press OK. Using the on the remote. From the NETWORK menu, highlight Test Connection and press OK. 2. The TEST CONNECTION screen displays the connection method, network name, signal strength, and download speed...
Using the on the remote. Press the Exit button on -screen keyboard, enter your network's password, then highlight Connect and press OK. 4. Connect 3 26 This is used to connect to a ... point name. Back Enter Acces Point Name Enter your network connection: 1. From the NETWORK menu, highlight Hidden Network and press OK. Using the on the remote. From the NETWORK menu, highlight Test Connection and press OK. 2. The TEST CONNECTION screen displays the connection method, network name, signal strength, and download speed...

User Manual
Page 27
... off. To use the Up/Down Arrow buttons on or off time, press the Exit button on the remote. Press the OK button to highlight Blank Screen. 2. Sleep Timer Auto Power Off Blank Screen Off 10 ... feature: 1. To exit Blank Screen, press any key. 27 Use the Left/Right Arrow buttons on the remote to highlight the period of time. 1. When you don't want the TV to go to change the setting... to Off. 4. Use the Left/Right Arrow buttons on the remote to sleep: 30, 60, 90, 120, or 180 minutes. Press the Menu button on -screen menu is...
... off. To use the Up/Down Arrow buttons on or off time, press the Exit button on the remote. Press the OK button to highlight Blank Screen. 2. Sleep Timer Auto Power Off Blank Screen Off 10 ... feature: 1. To exit Blank Screen, press any key. 27 Use the Left/Right Arrow buttons on the remote to highlight the period of time. 1. When you don't want the TV to go to change the setting... to Off. 4. Use the Left/Right Arrow buttons on the remote to sleep: 30, 60, 90, 120, or 180 minutes. Press the Menu button on -screen menu is...

User Manual
Page 28
...highlight Find Channels, and press OK. From the CHANNELS menu, highlight Skip Channel, and press OK. Press the Exit button on the remote to scan for channels before it can display programs and their associated information. If you have been removed with different channels requires the TV ... also be viewed if the channel is canceled, the channels that some channels you wish to remove, use the Up/Down Arrow buttons on the remote. To perform an Auto Channel Scan: 1. To remove a channel: 1. Skip Channels Back 2. A P appears to the right of the channels you ...
...highlight Find Channels, and press OK. From the CHANNELS menu, highlight Skip Channel, and press OK. Press the Exit button on the remote to scan for channels before it can display programs and their associated information. If you have been removed with different channels requires the TV ... also be viewed if the channel is canceled, the channels that some channels you wish to remove, use the Up/Down Arrow buttons on the remote. To perform an Auto Channel Scan: 1. To remove a channel: 1. Skip Channels Back 2. A P appears to the right of the channels you ...

User Manual
Page 29
...Stereo 2. To use the Analog Audio feature: 1. The DIGITAL LANGUAGE menu is being broadcast with Secondary Audio Programming. Press the Exit button on the remote. Digital Audio Back English Spanish/ Video Description French To use the Digital Language feature: 1. Press the Exit button on the... remote. 3 29 The Analog Audio Language feature only works when the program being viewed is displayed. 2. From the CHANNELS menu, highlight Digital Audio ...
...Stereo 2. To use the Analog Audio feature: 1. The DIGITAL LANGUAGE menu is being broadcast with Secondary Audio Programming. Press the Exit button on the remote. Digital Audio Back English Spanish/ Video Description French To use the Digital Language feature: 1. Press the Exit button on the... remote. 3 29 The Analog Audio Language feature only works when the program being viewed is displayed. 2. From the CHANNELS menu, highlight Digital Audio ...

User Manual
Page 30
... unlocked. When a channel is displayed. 2. Enabling or Disabling Program Ratings To manage program content according to block content based on the remote to highlight Parental Controls and press OK. 4. The LOCKS menu is unblocked, the Lock icon appears unlocked. Select On or Off and...to block all unrated content, highlight Block Unrated Shows and use the Arrow buttons on its rating: 1. Press the Menu button on the remote. 30 To lock or unlock a channel: 1. You may not want to prevent children from displaying certain channels or programs without a password...
... unlocked. When a channel is displayed. 2. Enabling or Disabling Program Ratings To manage program content according to block content based on the remote to highlight Parental Controls and press OK. 4. The LOCKS menu is unblocked, the Lock icon appears unlocked. Select On or Off and...to block all unrated content, highlight Block Unrated Shows and use the Arrow buttons on its rating: 1. Press the Menu button on the remote. 30 To lock or unlock a channel: 1. You may not want to prevent children from displaying certain channels or programs without a password...

User Manual
Page 31
... captions display a transcription of the text. Change the color of a program's dialogue. Use the Left/Right Arrow buttons on the remote to display, then press Exit. If the program you are viewing is Closed Captions Back displayed. Closed Captions Off 2. Test Size Large... As Broadcast Background Opacity As Broadcast Window Color As Broadcast Window Opacity As Broadcast • Window Color - The on the remote to highlight the setting you wish to highlight either Analog or Digital Closed Captions. 5. Analog Closed Captions Digital Closed Captions Digital...
... captions display a transcription of the text. Change the color of a program's dialogue. Use the Left/Right Arrow buttons on the remote to display, then press Exit. If the program you are viewing is Closed Captions Back displayed. Closed Captions Off 2. Test Size Large... As Broadcast Background Opacity As Broadcast Window Color As Broadcast Window Opacity As Broadcast • Window Color - The on the remote to highlight the setting you wish to highlight either Analog or Digital Closed Captions. 5. Analog Closed Captions Digital Closed Captions Digital...


