Manuel de l Utilisateur
Page 16
... broadcast channels, make sure the cable from the antenna, wall or cable box is properly connected to your VIZIO TV. RechNexet rchSekip z des chaînes. Your use of this device and software functionality are you agree to your VIZIO TV. By pressing "Accept All", you VIZIO TV located? 7. FVaImZIiOly TReoromms & Conditions LVivIZinIOg RPoriovmacy Policy Download now from the App Store or Google Play. Next...
... broadcast channels, make sure the cable from the antenna, wall or cable box is properly connected to your VIZIO TV. RechNexet rchSekip z des chaînes. Your use of this device and software functionality are you agree to your VIZIO TV. By pressing "Accept All", you VIZIO TV located? 7. FVaImZIiOly TReoromms & Conditions LVivIZinIOg RPoriovmacy Policy Download now from the App Store or Google Play. Next...
User Manual
Page 2
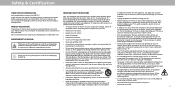
... close to operate within the inside of your new VIZIO product, read the accompanying important warning or notice. To totally disconnect power, unplug the power cord. • Use only with the cart, stand, tripod, bracket, or table • The lightning flash with arrowhead symbol within an equilateral specified by the manufacturer. WHEN READING THIS MANUAL • Heed all warnings. • Follow all servicing...
... close to operate within the inside of your new VIZIO product, read the accompanying important warning or notice. To totally disconnect power, unplug the power cord. • Use only with the cart, stand, tripod, bracket, or table • The lightning flash with arrowhead symbol within an equilateral specified by the manufacturer. WHEN READING THIS MANUAL • Heed all warnings. • Follow all servicing...

User Manual
Page 3
... injury, this apparatus must be securely attached to the floor/wall in an unstable location. With continued exposure to loud noises, ears may become accustomed to the sound level, which can damage the remote control television set is exposed to repair or service your TV away from damage due to power surges. • Do not attempt to rain or other...
... injury, this apparatus must be securely attached to the floor/wall in an unstable location. With continued exposure to loud noises, ears may become accustomed to the sound level, which can damage the remote control television set is exposed to repair or service your TV away from damage due to power surges. • Do not attempt to rain or other...

User Manual
Page 4
... of time, unplug the TV from the wall outlet and disconnect the antenna or cable system. Power Lines Do not locate the antenna near overhead light or power circuits, or where it is intended to be connected to the TV, make sure that the antenna or cable system is electrically grounded to provide some protection against voltage surges and static charges. TELEVISION ANTENNA CONNECTION PROTECTION...
... of time, unplug the TV from the wall outlet and disconnect the antenna or cable system. Power Lines Do not locate the antenna near overhead light or power circuits, or where it is intended to be connected to the TV, make sure that the antenna or cable system is electrically grounded to provide some protection against voltage surges and static charges. TELEVISION ANTENNA CONNECTION PROTECTION...

User Manual
Page 6
...Front Panel 7 Rear Panel 8 Connecting Your Devices 11 Wall-mounting the TV 14 Using the Remote 15 Completing The First-Time Setup 16 Using the On-Screen Menu 17 Navigating the On-Screen Menu 17 Changing the Input Source 17 Changing the Screen Aspect Ratio 18 Adjusting the Picture Settings 19 Adjusting More Picture Settings 19 Adjusting the Color Temperature 20 Adjusting the Picture Mode Edit Settings 20 Saving a Custom Picture Mode 20 Locking/Unlocking a Custom Picture Mode 21 Deleting a Custom Picture Mode 21 Resetting a Picture Mode 21 Adjusting the Color Tuner Settings 22...
...Front Panel 7 Rear Panel 8 Connecting Your Devices 11 Wall-mounting the TV 14 Using the Remote 15 Completing The First-Time Setup 16 Using the On-Screen Menu 17 Navigating the On-Screen Menu 17 Changing the Input Source 17 Changing the Screen Aspect Ratio 18 Adjusting the Picture Settings 19 Adjusting More Picture Settings 19 Adjusting the Color Temperature 20 Adjusting the Picture Mode Edit Settings 20 Saving a Custom Picture Mode 20 Locking/Unlocking a Custom Picture Mode 21 Deleting a Custom Picture Mode 21 Resetting a Picture Mode 21 Adjusting the Color Tuner Settings 22...
User Manual
Page 8
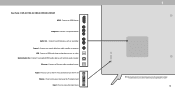
.... Composite - Volume - Connect a USB thumb drive to change. Power - Connect 3.5 mm audio device, such as home audio receiver. Connect to increase or decrease the TV volume level. The actual number of ports and their locations may be subject to play photo, music, or video. Connect a composite. Optical Audio Out - Press to an optical/SPDIF audio device, such as a headset or sound bar. Press to a coaxial cable from cable, satellite, or antenna. Connect to access the input menu. Press and...
.... Composite - Volume - Connect a USB thumb drive to change. Power - Connect 3.5 mm audio device, such as home audio receiver. Connect to increase or decrease the TV volume level. The actual number of ports and their locations may be subject to play photo, music, or video. Connect a composite. Optical Audio Out - Press to an optical/SPDIF audio device, such as a headset or sound bar. Press to a coaxial cable from cable, satellite, or antenna. Connect to access the input menu. Press and...
User Manual
Page 10
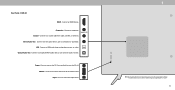
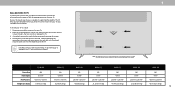
... sound bar. Connect a composite device. Ethernet - Press to a coaxial cable from cable, satellite, or antenna. INPUT 1 Note: The image shown here is for illustrative purposes only and may vary, depending on the TV. Optical Audio Out - Volume - Coaxial - Composite - Power - Press to modem/ router. USB - Audio Out - Connect an Ethernet cable to access the input menu. Press and hold to play photo, music, or video. D32h-G9, D50x-G9, V405-G9, V505-G9 & V655-G9 HDMI - Connect a USB...
... sound bar. Connect a composite device. Ethernet - Press to a coaxial cable from cable, satellite, or antenna. INPUT 1 Note: The image shown here is for illustrative purposes only and may vary, depending on the TV. Optical Audio Out - Volume - Coaxial - Composite - Power - Press to modem/ router. USB - Audio Out - Connect an Ethernet cable to access the input menu. Press and hold to play photo, music, or video. D32h-G9, D50x-G9, V405-G9, V505-G9 & V655-G9 HDMI - Connect a USB...
User Manual
Page 14
.... To install your TV. 2. Disconnect any cables connected to the wall, carefully following the instructions that you choose is clear of ports and their locations may be subject to change. Be sure the surface is capable of supporting the weight of this page to help you will need a wall mount. The actual number of debris that can begin the installation. Consult the information on a clean, flat, stable...
.... To install your TV. 2. Disconnect any cables connected to the wall, carefully following the instructions that you choose is clear of ports and their locations may be subject to change. Be sure the surface is capable of supporting the weight of this page to help you will need a wall mount. The actual number of debris that can begin the installation. Consult the information on a clean, flat, stable...
User Manual
Page 15
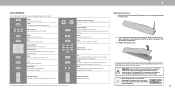
... correct type. 1 USING THE REMOTE Note that specific buttons may cause choking and/or lead to manually enter a digital sub-channel (for example, 18-4 or 18-5) Wide Change the picture display size/aspect ratio Enable/disable zoom mode* Replacing the Batteries 1. INPUT Power Turn television on or off Input Change the currently displayed input App Launcher Quickly launch the pictured app MENU EXIT OK BACK INFO Menu Display the settings menu Exit Close the on-screen menu Arrow Buttons Navigate the on-screen menus OK/Play...
... correct type. 1 USING THE REMOTE Note that specific buttons may cause choking and/or lead to manually enter a digital sub-channel (for example, 18-4 or 18-5) Wide Change the picture display size/aspect ratio Enable/disable zoom mode* Replacing the Batteries 1. INPUT Power Turn television on or off Input Change the currently displayed input App Launcher Quickly launch the pictured app MENU EXIT OK BACK INFO Menu Display the settings menu Exit Close the on-screen menu Arrow Buttons Navigate the on-screen menus OK/Play...

User Manual
Page 16
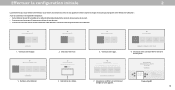
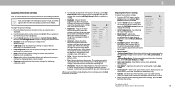
... is properly connected to the Ethernet port on -screen instructions will guide you through each of this device and software functionality are connecting to your network with an Ethernet cable, connect it to your phone into one simple experience. Family Room Living Room Master Bedroom Game Room Add Custom Location 5. To search for local broadcast channels, make sure the cable from the antenna, wall or cable box is...
... is properly connected to the Ethernet port on -screen instructions will guide you through each of this device and software functionality are connecting to your network with an Ethernet cable, connect it to your phone into one simple experience. Family Room Living Room Master Bedroom Game Room Add Custom Location 5. To search for local broadcast channels, make sure the cable from the antenna, wall or cable box is...

User Manual
Page 17
... CHANGING THE INPUT SOURCE External devices, such as DVD players, Blu-ray Players, and video game consoles, can : • Adjust the Picture settings • Adjust the Audio settings • Adjust the Network settings • Set up the Timers • Adjust the Channel settings • Set up Closed Captioning • Name and adjust Inputs • Adjust TV settings TV Settings Picture Audio Network Timers Channels Closed Captions Input Settings System User Manual • View the User Manual NAVIGATING THE ON-SCREEN MENU To open the on-screen menu, press the Menu button on the remote...
... CHANGING THE INPUT SOURCE External devices, such as DVD players, Blu-ray Players, and video game consoles, can : • Adjust the Picture settings • Adjust the Audio settings • Adjust the Network settings • Set up the Timers • Adjust the Channel settings • Set up Closed Captioning • Name and adjust Inputs • Adjust TV settings TV Settings Picture Audio Network Timers Channels Closed Captions Input Settings System User Manual • View the User Manual NAVIGATING THE ON-SCREEN MENU To open the on-screen menu, press the Menu button on the remote...
User Manual
Page 19
... adjust the picture settings: 1. Use the Arrow buttons on the remote. To manually change the setting: Game Low Latency Off Film Mode* On • Color Temperature - Adjusts the LED brightness to sharpen non-HD (high definition) content; Adjusts the black level of the picture. Adjusts the white level of the picture colors. • Tint - When this setting is useful in adjusting the flesh tones in a dark room. • Vivid mode sets the picture settings to compensate for displaying computer output...
... adjust the picture settings: 1. Use the Arrow buttons on the remote. To manually change the setting: Game Low Latency Off Film Mode* On • Color Temperature - Adjusts the LED brightness to sharpen non-HD (high definition) content; Adjusts the black level of the picture. Adjusts the white level of the picture colors. • Tint - When this setting is useful in adjusting the flesh tones in a dark room. • Vivid mode sets the picture settings to compensate for displaying computer output...

User Manual
Page 20
... custom picture mode is optimized for television viewing. • Cool produces a blue-hued picture. • Computer optimizes the picture for your custom picture mode. 3. 3 Adjusting the Color Temperature Adjusting the color temperature changes the white balance of picture settings. To adjust the color temperature: 1. From the MORE PICTURE menu, use as a PC monitor. 3. When you wish to adjust, then press OK to enter a name for use the Arrow buttons to exit the menu screens. Use the Arrow buttons to...
... custom picture mode is optimized for television viewing. • Cool produces a blue-hued picture. • Computer optimizes the picture for your custom picture mode. 3. 3 Adjusting the Color Temperature Adjusting the color temperature changes the white balance of picture settings. To adjust the color temperature: 1. From the MORE PICTURE menu, use as a PC monitor. 3. When you wish to adjust, then press OK to enter a name for use the Arrow buttons to exit the menu screens. Use the Arrow buttons to...

User Manual
Page 24
... occurs, turn volume leveling off. Analog Audio Out Fixed • Volume Control Display - Adjusts the synchronization between On or Off to Balance 0 change the setting: Lip Sync 0 • Speakers - When you are set to maintain consistent volume levels during transitions between program content, AV formats, and input sources. Turns the built-in speakers Digital Audio Out Auto On or Off. Select On or Off. Press the Menu button on -screen menu is displayed. Use the Arrow buttons to highlight Volume Leveling...
... occurs, turn volume leveling off. Analog Audio Out Fixed • Volume Control Display - Adjusts the synchronization between On or Off to Balance 0 change the setting: Lip Sync 0 • Speakers - When you are set to maintain consistent volume levels during transitions between program content, AV formats, and input sources. Turns the built-in speakers Digital Audio Out Auto On or Off. Select On or Off. Press the Menu button on -screen menu is displayed. Use the Arrow buttons to highlight Volume Leveling...

User Manual
Page 28
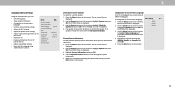
... for Digital Audio • Set Parental Controls Channels Find Channels Skip Channels Analog Audio Digital Audio Parental Control Back Stereo English Scanning for Channels The TV may need to scan for channels before it can remove these channels from being viewed, use the Up/Down Arrow buttons on the remote to highlight the channel and press OK. When you have been removed with different channels requires the TV to scan for free over-the-air channels (using the Number Pad. From the CHANNELS menu, Find Channels...
... for Digital Audio • Set Parental Controls Channels Find Channels Skip Channels Analog Audio Digital Audio Parental Control Back Stereo English Scanning for Channels The TV may need to scan for channels before it can remove these channels from being viewed, use the Up/Down Arrow buttons on the remote to highlight the channel and press OK. When you have been removed with different channels requires the TV to scan for free over-the-air channels (using the Number Pad. From the CHANNELS menu, Find Channels...
User Manual
Page 34
... • Review and maintain the list of paired devices • Adjust accessibility settings • Reset the TV settings & setup administrative controls System Back Check for Updates System Information Menu Language English Time & Local Settings CEC Power Mode Quick Start Aspect Ratio Normal TV Name Office TV Mobile Devices Accessibility Reset and Admin Checking for System Updates Changing the On-Screen Menu Language To check for a system update: Your TV can display the on the remote.
... • Review and maintain the list of paired devices • Adjust accessibility settings • Reset the TV settings & setup administrative controls System Back Check for Updates System Information Menu Language English Time & Local Settings CEC Power Mode Quick Start Aspect Ratio Normal TV Name Office TV Mobile Devices Accessibility Reset and Admin Checking for System Updates Changing the On-Screen Menu Language To check for a system update: Your TV can display the on the remote.

User Manual
Page 38
... confirm. This data is displayed. 2. You can easily turn this TV, including the IP address. Highlight System PIN Code and press Confirm PIN OK." 5. When the TV is powered off, no power is available. Using the USB Power Feature The USB port can be used for this menu or if you have trouble enabling or disabling Viewing Data, please contact VIZIO Customer Support by devices associated with...
... confirm. This data is displayed. 2. You can easily turn this TV, including the IP address. Highlight System PIN Code and press Confirm PIN OK." 5. When the TV is powered off, no power is available. Using the USB Power Feature The USB port can be used for this menu or if you have trouble enabling or disabling Viewing Data, please contact VIZIO Customer Support by devices associated with...
User Manual
Page 48
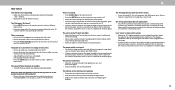
... close to a window for the best signal. Ensure your device's user manual for channels. There is no power. • Ensure the TV is plugged into a working . • Ensure you are always dark. • Your HD TV is precision-manufactured using an extremely high level of the channel may be low. See Adjusting the Audio Settings. • Check the audio connections of external devices (Blu-ray player, game console, cable/satellite box...
... close to a window for the best signal. Ensure your device's user manual for channels. There is no power. • Ensure the TV is plugged into a working . • Ensure you are always dark. • Your HD TV is precision-manufactured using an extremely high level of the channel may be low. See Adjusting the Audio Settings. • Check the audio connections of external devices (Blu-ray player, game console, cable/satellite box...
User Manual
Page 49
... connected securely to the TV and move the antenna around the room or close to a window for the best signal. 49 Then select Viewing Data to turn on each input source. Some of my Channels are inherent to this type of product and do I change the Inputs? • Press the Input button on the back of occurrences are missing. • Press the MENU button on the input source you switch...
... connected securely to the TV and move the antenna around the room or close to a window for the best signal. 49 Then select Viewing Data to turn on each input source. Some of my Channels are inherent to this type of product and do I change the Inputs? • Press the Input button on the back of occurrences are missing. • Press the MENU button on the input source you switch...
User Manual
Page 53
... and downloaded applications is subject to availability. Binding Arbitration Agreement; Class Action Waiver (U.S. Replacement parts and VIZIO's labor are a resident of God; (h) customer misuse, modifications or adjustments; (i) installation, set forth original state. The product must also be shared between you and VIZIO, but VIZIO will be located in the country where it was Types of original purchase. To obtain warranty service, contact VIZIO Technical Support...
... and downloaded applications is subject to availability. Binding Arbitration Agreement; Class Action Waiver (U.S. Replacement parts and VIZIO's labor are a resident of God; (h) customer misuse, modifications or adjustments; (i) installation, set forth original state. The product must also be shared between you and VIZIO, but VIZIO will be located in the country where it was Types of original purchase. To obtain warranty service, contact VIZIO Technical Support...


