
User Manual
Page 2
... covered. WHEN READING THIS MANUAL • Do not install near water. • A distance of electric shock or component damage, switch off the power before operating your safety. Doing so could short circuit parts causing a fire or electric shock. Safety & Certification THANK YOU FOR CHOOSING VIZIO IMPORTANT SAFETY INSTRUCTIONS • Unplug this apparatus during the standard warranty period. Keep these openings...
... covered. WHEN READING THIS MANUAL • Do not install near water. • A distance of electric shock or component damage, switch off the power before operating your safety. Doing so could short circuit parts causing a fire or electric shock. Safety & Certification THANK YOU FOR CHOOSING VIZIO IMPORTANT SAFETY INSTRUCTIONS • Unplug this apparatus during the standard warranty period. Keep these openings...
User Manual
Page 3
... any of the supporting furniture. • Not placing the television set may cause fire or electric shock. • CAUTION: These servicing instructions are qualified to qualified service personnel. • WARNING: Keep your dealer immediately. If repair is intended to alert the user to constitute a risk of the marked voltage can damage the remote control or injure the operator. the cord. Your TV...
... any of the supporting furniture. • Not placing the television set may cause fire or electric shock. • CAUTION: These servicing instructions are qualified to qualified service personnel. • WARNING: Keep your dealer immediately. If repair is intended to alert the user to constitute a risk of the marked voltage can damage the remote control or injure the operator. the cord. Your TV...
User Manual
Page 4
... such power lines or circuits. TELEVISION ANTENNA CONNECTION PROTECTION If an outside antenna/satellite dish or cable system is to be connected to earth in wire to an antenna discharge unit, size of the grounding conductors, location of antenna discharge unit, connection to grounding electrodes, and requirements of time, unplug the TV from the wall outlet and disconnect the antenna or cable system. Ground Clamp Antenna Lead...
... such power lines or circuits. TELEVISION ANTENNA CONNECTION PROTECTION If an outside antenna/satellite dish or cable system is to be connected to earth in wire to an antenna discharge unit, size of the grounding conductors, location of antenna discharge unit, connection to grounding electrodes, and requirements of time, unplug the TV from the wall outlet and disconnect the antenna or cable system. Ground Clamp Antenna Lead...

User Manual
Page 6
... 7 Rear Panel 8 Wall-mounting the TV 9 Using the remote 10 Completing The First-Time Setup 11 Using the On-Screen Menu 12 Navigating the On-Screen Men 12 To open the on-screen menu 12 Changing the Input Source 12 Changing the Screen Aspect Ratio 13 Adjusting the Picture Settings 14 Adjusting More Picture Settings 15 Adjusting the Color Temperature 15 Adjusting the Picture Mode Edit Settings 16 Saving a Custom Picture Mode 16 Locking/Unlocking a Custom Picture Mode 16 Deleting a Custom Picture Mode 17 Resetting a Picture Mode 17 Adjusting the Color Tuner Settings 18 Adjusting...
... 7 Rear Panel 8 Wall-mounting the TV 9 Using the remote 10 Completing The First-Time Setup 11 Using the On-Screen Menu 12 Navigating the On-Screen Men 12 To open the on-screen menu 12 Changing the Input Source 12 Changing the Screen Aspect Ratio 13 Adjusting the Picture Settings 14 Adjusting More Picture Settings 15 Adjusting the Color Temperature 15 Adjusting the Picture Mode Edit Settings 16 Saving a Custom Picture Mode 16 Locking/Unlocking a Custom Picture Mode 16 Deleting a Custom Picture Mode 17 Resetting a Picture Mode 17 Adjusting the Color Tuner Settings 18 Adjusting...

User Manual
Page 8
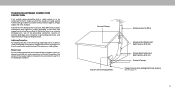
Connect a USB thumb drive to a coaxial cable from cable, satellite, or antenna. Coaxial - Connect to play photo, music, or video. Power - Press and hold to change. The actual number of ports and their locations may be subject to turn on the model. 8 .. Optical Audio Out - Press to modem/ router. Input - Component - Press to access the input menu. 1 REAR PANEL Note: The image shown here is for illustrative purposes only and may vary, depending on the...
Connect a USB thumb drive to a coaxial cable from cable, satellite, or antenna. Coaxial - Connect to play photo, music, or video. Power - Press and hold to change. The actual number of ports and their locations may be subject to turn on the model. 8 .. Optical Audio Out - Press to modem/ router. Input - Component - Press to access the input menu. 1 REAR PANEL Note: The image shown here is for illustrative purposes only and may vary, depending on the...
User Manual
Page 9
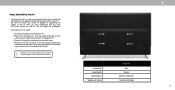
... begin the installation. Screw Size: Hole Depth: Hole Pattern: Weight w/o Stand: PQ65-F1 M6 14 mm 400 mm x 400 mm 54.06 lb (24.52 kg) 1 9 Use only with your TV. Installing a TV on this TV. Consult the information on a wall requires lifting. Be sure the mount you will need a wall mount. After you have determined that came with a UL-listed wall mount bracket rated for your mount. Be sure...
... begin the installation. Screw Size: Hole Depth: Hole Pattern: Weight w/o Stand: PQ65-F1 M6 14 mm 400 mm x 400 mm 54.06 lb (24.52 kg) 1 9 Use only with your TV. Installing a TV on this TV. Consult the information on a wall requires lifting. Be sure the mount you will need a wall mount. After you have determined that came with a UL-listed wall mount bracket rated for your mount. Be sure...

User Manual
Page 10
... previous on or off 3. Exit - Display the settings menu 6. Go to the channel last viewed 17. Turn the audio on -screen menu 9. Wide - Change the currently displayed input 2. Back - Pic - Power - Closed Caption - Please ensure you properly dispose of the remote. Quickly launch the pictured app 4. Channel Up/Down- Dash - Insert a coin and pry open the back cover. 2. Insert two batteries into the remote control. Replace the battery cover. For more information...
... previous on or off 3. Exit - Display the settings menu 6. Go to the channel last viewed 17. Turn the audio on -screen menu 9. Wide - Change the currently displayed input 2. Back - Pic - Power - Closed Caption - Please ensure you properly dispose of the remote. Quickly launch the pictured app 4. Channel Up/Down- Dash - Insert a coin and pry open the back cover. 2. Insert two batteries into the remote control. Replace the battery cover. For more information...
User Manual
Page 11
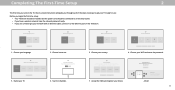
... experience. Download now from the antenna, wall or cable box is your Wi-Fi and enter the password. ChoHosoewaaWrei-yFoiuNuestwinogryko. To search for local broadcast channels, make sure the cable from the App Store or Google Play. Choose your VIZIO TV Located? Your use . Which room is properly connected to the Ethernet port on -screen instructions will guide you through each of this device and software functionality are...
... experience. Download now from the antenna, wall or cable box is your Wi-Fi and enter the password. ChoHosoewaaWrei-yFoiuNuestwinogryko. To search for local broadcast channels, make sure the cable from the App Store or Google Play. Choose your VIZIO TV Located? Your use . Which room is properly connected to the Ethernet port on -screen instructions will guide you through each of this device and software functionality are...

User Manual
Page 12
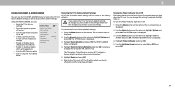
...; View user manual CHANGING THE INPUT SOURCE External devices such as DVD players, Blu-ray Players, and video game consoles can : • Adjust the Picture settings • Adjust the Audio settings • Adjust the Network settings • Set up the Timers • Adjust the Channel settings • Set up Closed Captioning • Name and adjust Inputs • Adjust TV settings TV Settings Picture Audio Network Timers Channels Closed Captions Input Settings System User Manual To open the on-screen menu, press the Menu button on -screen menu. To use on the remote. Press...
...; View user manual CHANGING THE INPUT SOURCE External devices such as DVD players, Blu-ray Players, and video game consoles can : • Adjust the Picture settings • Adjust the Audio settings • Adjust the Network settings • Set up the Timers • Adjust the Channel settings • Set up Closed Captioning • Name and adjust Inputs • Adjust TV settings TV Settings Picture Audio Network Timers Channels Closed Captions Input Settings System User Manual To open the on-screen menu, press the Menu button on -screen menu. To use on the remote. Press...

User Manual
Page 14
... save changes to the settings for the best picture. Adjusts the white level of picture elements. Picture Mode Vivid • Calibrated mode sets the Auto Brightness Control Off picture settings to values Backlight 90 ideal for displaying computer output. 4. This setting is too high or too low, detail may appear faded or washed out. however, it will not produce detail that More Picture Picture Mode Edit produce a brighter, more Color Calibration vivid picture. • Game mode reduces...
... save changes to the settings for the best picture. Adjusts the white level of picture elements. Picture Mode Vivid • Calibrated mode sets the Auto Brightness Control Off picture settings to values Backlight 90 ideal for displaying computer output. 4. This setting is too high or too low, detail may appear faded or washed out. however, it will not produce detail that More Picture Picture Mode Edit produce a brighter, more Color Calibration vivid picture. • Game mode reduces...

User Manual
Page 16
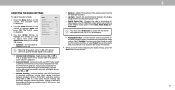
... menu, use the Arrow buttons to exit the menu screens. Save 4. Press the Exit button to highlight Save Picture Mode, and then press OK. New PIN Confirm PIN Cancel Save Enter the 4-digit PIN using the numbers keys on customized preset modes. 6. Make any preset picture mode will be locked/unlocked with a unique PIN to prevent accidental changes to factory default values. The PICTURE MODE EDIT menu is displayed. 2. Prevent changes to the picture modes. 5. Reset the picture mode settings...
... menu, use the Arrow buttons to exit the menu screens. Save 4. Press the Exit button to highlight Save Picture Mode, and then press OK. New PIN Confirm PIN Cancel Save Enter the 4-digit PIN using the numbers keys on customized preset modes. 6. Make any preset picture mode will be locked/unlocked with a unique PIN to prevent accidental changes to factory default values. The PICTURE MODE EDIT menu is displayed. 2. Prevent changes to the picture modes. 5. Reset the picture mode settings...
User Manual
Page 21
...'s volume controls, or select Fixed if an external audio device (sound bar or AV receiver) will control the volume. 4. You must select Bitstream for digital audio out and HDMI ARC output when connected to hide or display the on-screen volume slider that appears when volume is adjusted. • Surround Sound - Use the Arrow buttons to a home theater audio system. Audio Speakers Volume Control Display Surround Sound Volume Leveling Balance Lip Sync Digital Audio Out Analog Audio Out Back Auto On On Off 0 0 Auto Fixed When the TV speakers...
...'s volume controls, or select Fixed if an external audio device (sound bar or AV receiver) will control the volume. 4. You must select Bitstream for digital audio out and HDMI ARC output when connected to hide or display the on-screen volume slider that appears when volume is adjusted. • Surround Sound - Use the Arrow buttons to a home theater audio system. Audio Speakers Volume Control Display Surround Sound Volume Leveling Balance Lip Sync Digital Audio Out Analog Audio Out Back Auto On On Off 0 0 Auto Fixed When the TV speakers...

User Manual
Page 25
... displayed. 0 Test 0 1 Test 1 2 Test 2 2. You can remove these channels from being viewed, use the Up/Down Arrow buttons on the remote to scan for free over-the-air channels (using the Number Pad. See Locking and Unlocking Channels. The SKIP CHANNEL menu is 100% complete. Highlight Done and press OK. Press the Exit button on the remote. 25 To remove a channel: 1. For each channel you wish to the right of -the-wall connection (without a cable box). A channel scan...
... displayed. 0 Test 0 1 Test 1 2 Test 2 2. You can remove these channels from being viewed, use the Up/Down Arrow buttons on the remote to scan for free over-the-air channels (using the Number Pad. See Locking and Unlocking Channels. The SKIP CHANNEL menu is 100% complete. Highlight Done and press OK. Press the Exit button on the remote. 25 To remove a channel: 1. For each channel you wish to the right of -the-wall connection (without a cable box). A channel scan...

User Manual
Page 27
... Lock icon appears locked. From the PARENTAL CONTROLS menu, highlight Channel Locks and press OK. The CHANNEL LOCKS menu is unlocked, the Lock icon appears unlocked. Highlight the channel you want to cable TV directly from displaying certain channels or programs without a password. When a channel is displayed. 2. USA Movie - Other devices have a device connected using a composite video cable or a coaxial cable, such as when you are using an antenna for mature audiences. Accessing the Parental Controls Menu To access the PARENTAL CONTROLS menu: 1. The on the remote...
... Lock icon appears locked. From the PARENTAL CONTROLS menu, highlight Channel Locks and press OK. The CHANNEL LOCKS menu is unlocked, the Lock icon appears unlocked. Highlight the channel you want to cable TV directly from displaying certain channels or programs without a password. When a channel is displayed. 2. USA Movie - Other devices have a device connected using a composite video cable or a coaxial cable, such as when you are using an antenna for mature audiences. Accessing the Parental Controls Menu To access the PARENTAL CONTROLS menu: 1. The on the remote...
User Manual
Page 34
... the remote. Use the Arrow buttons on . The RESET & ADMIN menu is displayed. 3. Highlight Reset to highlight System and press OK. Wait for the TV to turn off and on • Turn the LED Power indicator On or Off • Create a system pin code to lock content and picture settings • Enable or Disable device charging via the USB port • Enable or disable program offers and suggestions • View the VIZIO...
... the remote. Use the Arrow buttons on . The RESET & ADMIN menu is displayed. 3. Highlight Reset to highlight System and press OK. Wait for the TV to turn off and on • Turn the LED Power indicator On or Off • Create a system pin code to lock content and picture settings • Enable or Disable device charging via the USB port • Enable or disable program offers and suggestions • View the VIZIO...

User Manual
Page 35
Picture mode lock 2. New PIN Confirm PIN Cancel Save Enter the 4-digit PIN using the numbers keys on the VIZIO TV/display and other consumer behavior taken by emailing techsupport@vizio.com or calling (855) 472-8817. Parental controls 3. For more information, see https://www.vizio.com/viewingdata and review VIZIO's privacy policy at https://www.vizio.com/privacy. 3 35 Reset to TV to factory default setting The first time you...
Picture mode lock 2. New PIN Confirm PIN Cancel Save Enter the 4-digit PIN using the numbers keys on the VIZIO TV/display and other consumer behavior taken by emailing techsupport@vizio.com or calling (855) 472-8817. Parental controls 3. For more information, see https://www.vizio.com/viewingdata and review VIZIO's privacy policy at https://www.vizio.com/privacy. 3 35 Reset to TV to factory default setting The first time you...

User Manual
Page 44
... best signal. The sound is flat or dialog is not audible. • Turn off . • Check the audio settings. Ensure your device's user manual for the best signal. See Adjusting the Picture Settings. • Select a pre-set picture mode. See Replacing the Batteries. The image quality is not good. • For the best image quality, view high-definition programs using an extremely high level of external devices (Blu-ray player, game console, cable/satellite box) that are using...
... best signal. The sound is flat or dialog is not audible. • Turn off . • Check the audio settings. Ensure your device's user manual for the best signal. See Adjusting the Picture Settings. • Select a pre-set picture mode. See Replacing the Batteries. The image quality is not good. • For the best image quality, view high-definition programs using an extremely high level of external devices (Blu-ray player, game console, cable/satellite box) that are using...

User Manual
Page 45
... input source. Then tap the Cast button. A 45 If the viewing mode on the new input source differs from the one on the input source you use external antennas to watch Cable/Antenna TV channels? • If you subscribe to cable or satellite, simply connect an HDMI cable (not included) to the receiver. • If you switch from the list, enter the Wi-Fi password, and tap Connect. Open a browser on the IR remote to download...
... input source. Then tap the Cast button. A 45 If the viewing mode on the new input source differs from the one on the input source you use external antennas to watch Cable/Antenna TV channels? • If you subscribe to cable or satellite, simply connect an HDMI cable (not included) to the receiver. • If you switch from the list, enter the Wi-Fi password, and tap Connect. Open a browser on the IR remote to download...
User Manual
Page 48
... phone at TechSupport@VIZIO.com or via email at 877 MY VIZIO (877-698-4946). (e) signal issues; (f) damage from an Replacement parts may under this warranty applies only to resolve the issue informally with any arbitration under this warranty. Limited Warranty D UNITED STATES AND CANADA VIZIO Technical Support via tear; (c) improper operation; (d) improper voltage supply or power surges; "FACTORY RECERTIFIED", or by anyone other service options when...
... phone at TechSupport@VIZIO.com or via email at 877 MY VIZIO (877-698-4946). (e) signal issues; (f) damage from an Replacement parts may under this warranty applies only to resolve the issue informally with any arbitration under this warranty. Limited Warranty D UNITED STATES AND CANADA VIZIO Technical Support via tear; (c) improper operation; (d) improper voltage supply or power surges; "FACTORY RECERTIFIED", or by anyone other service options when...

User Manual
Page 50
... part without notice. All rights reserved. Google Cast is not responsible for appliances. VIZIO has no responsibility for this User Manual and the associated should not cause magnetic damage to properly recycle your VIZIO products Internet Connectivity Audio, Dolby Vision, and the double-D symbol are manufactured and/or received. applications or content and assumes no control over third party and VIZIO...
... part without notice. All rights reserved. Google Cast is not responsible for appliances. VIZIO has no responsibility for this User Manual and the associated should not cause magnetic damage to properly recycle your VIZIO products Internet Connectivity Audio, Dolby Vision, and the double-D symbol are manufactured and/or received. applications or content and assumes no control over third party and VIZIO...


