
M320NV User Manual
Page 2
... the housing. To ensure reliable operation of power source indicated on your HDTV. This plug will fit only into your HDTV from tip-over. For more information, contact your HDTV. VIZIO M320NV and M370NV User Manual Important Safety Instructions Your HDTV is designed and manufactured to smoke. Overloading can injure a person and cause serious damage to your HDTV close to smoke or moisture may cause...
... the housing. To ensure reliable operation of power source indicated on your HDTV. This plug will fit only into your HDTV from tip-over. For more information, contact your HDTV. VIZIO M320NV and M370NV User Manual Important Safety Instructions Your HDTV is designed and manufactured to smoke. Overloading can injure a person and cause serious damage to your HDTV close to smoke or moisture may cause...

M320NV User Manual
Page 3
... to rain or other hazards. o Your HDTV is damaged, the internal components may damage the wires inside the cord and cause fire or electric shock. VIZIO M320NV and M370NV User Manual The wall socket should be installed near your HDTV and easily accessible. Only power of the marked voltage can damage the remote control or injure the operator. If any of the...
... to rain or other hazards. o Your HDTV is damaged, the internal components may damage the wires inside the cord and cause fire or electric shock. VIZIO M320NV and M370NV User Manual The wall socket should be installed near your HDTV and easily accessible. Only power of the marked voltage can damage the remote control or injure the operator. If any of the...

M320NV User Manual
Page 6
...14 Rear Panel Connections...14 CHAPTER 3 VIZIO REMOTE CONTROL 15 Installing the Batteries ...15 Remote Control Range...15 VIZIO Remote Control Precautions...15 Remote Control Buttons ...16 CHAPTER 4 GETTING STARTED 17 CHAPTER 5 USING YOUR HDTV FOR THE FIRST TIME 18 Select an Input Source ...18 Watching a TV Program ...18 Viewing Digital TV Program Information 19 CHAPTER 6 CONNECTING EQUIPMENT 20 Which Video Connection Should I Use 20 Connecting Your Cable or Satellite Box 21 Using HDMI (Best) ...21 HDMI Connections for Cable or Satellite Boxes with DVI 21 Using Component Video (Better...
...14 Rear Panel Connections...14 CHAPTER 3 VIZIO REMOTE CONTROL 15 Installing the Batteries ...15 Remote Control Range...15 VIZIO Remote Control Precautions...15 Remote Control Buttons ...16 CHAPTER 4 GETTING STARTED 17 CHAPTER 5 USING YOUR HDTV FOR THE FIRST TIME 18 Select an Input Source ...18 Watching a TV Program ...18 Viewing Digital TV Program Information 19 CHAPTER 6 CONNECTING EQUIPMENT 20 Which Video Connection Should I Use 20 Connecting Your Cable or Satellite Box 21 Using HDMI (Best) ...21 HDMI Connections for Cable or Satellite Boxes with DVI 21 Using Component Video (Better...

M320NV User Manual
Page 7
... User Manual CHAPTER 7 VIEWING PICTURES 28 Viewing Pictures ...28 Adjusting Photo Settings ...28 Adjusting Photo Settings ...29 Slideshow Mode...29 Repeat...29 Sort By ...29 Duration ...29 Slideshow Effect ...29 Thumbnail Size ...29 Info ...29 CHAPTER 8 ADJUSTING YOUR HDTV SETTINGS 30 Using the On-screen Display (OSD) ...30 Input Menu...30 Wide Menu ...31 Normal...31 Wide ...31 Panoramic...31 Stretch...31 CC (Closed Caption) Menu ...32 Adjust closed caption options...32 Analog Closed Caption ...32 Digital Closed Caption ...32 Digital CC Style...32 Sleep Timer Menu...
... User Manual CHAPTER 7 VIEWING PICTURES 28 Viewing Pictures ...28 Adjusting Photo Settings ...28 Adjusting Photo Settings ...29 Slideshow Mode...29 Repeat...29 Sort By ...29 Duration ...29 Slideshow Effect ...29 Thumbnail Size ...29 Info ...29 CHAPTER 8 ADJUSTING YOUR HDTV SETTINGS 30 Using the On-screen Display (OSD) ...30 Input Menu...30 Wide Menu ...31 Normal...31 Wide ...31 Panoramic...31 Stretch...31 CC (Closed Caption) Menu ...32 Adjust closed caption options...32 Analog Closed Caption ...32 Digital Closed Caption ...32 Digital CC Style...32 Sleep Timer Menu...

M320NV User Manual
Page 13
... turn your HDTV on and orange when powered off. POWER 'VIZIO' LIGHT-The VIZIO name lights white when powered on . Press and hold the Jag wheel for two seconds, scroll the wheel up and down to highlight an option, and then press in the wheel again to the beginning. o Volume-Press to your HDTV off . VIZIO M320NV and M370NV User Manual Chapter 2 Basic Controls and Connections Front Panel...
... turn your HDTV on and orange when powered off. POWER 'VIZIO' LIGHT-The VIZIO name lights white when powered on . Press and hold the Jag wheel for two seconds, scroll the wheel up and down to highlight an option, and then press in the wheel again to the beginning. o Volume-Press to your HDTV off . VIZIO M320NV and M370NV User Manual Chapter 2 Basic Controls and Connections Front Panel...

M320NV User Manual
Page 14
...; ANALOG L/R-Connect the audio from the HDTV speakers. 14 www.VIZIO.com For Cable and Satellite Set Top Boxes, we recommend that you want the sound to come from the HDTV to view pictures. Service port for high definition image quality. 6. VIZIO M320NV and M370NV User Manual Side Panel Connections 1. COMPONENT (Y Pb/Cb Pr/Cr with the programming will be connected directly here. 5. Connect to a VIZIO Sound Bar or your area visit www.antennaweb.org. Rear Panel Connections 1. Use the white...
...; ANALOG L/R-Connect the audio from the HDTV speakers. 14 www.VIZIO.com For Cable and Satellite Set Top Boxes, we recommend that you want the sound to come from the HDTV to view pictures. Service port for high definition image quality. 6. VIZIO M320NV and M370NV User Manual Side Panel Connections 1. COMPONENT (Y Pb/Cb Pr/Cr with the programming will be connected directly here. 5. Connect to a VIZIO Sound Bar or your area visit www.antennaweb.org. Rear Panel Connections 1. Use the white...

M320NV User Manual
Page 18
..., make sure you will light up white. 2. Select the input to which has been selected on the back of the VCR, Cable Box, External TV Tuner or Satellite Receiver. When using HDMI, Component, or AV inputs. 18 www.VIZIO.com VIZIO M320NV and M370NV User Manual Chapter 5 Using your HDTV for the first time Select an Input Source Select the input source for details. Press the power button on the remote control. Pressing this button will cycle through the...
..., make sure you will light up white. 2. Select the input to which has been selected on the back of the VCR, Cable Box, External TV Tuner or Satellite Receiver. When using HDMI, Component, or AV inputs. 18 www.VIZIO.com VIZIO M320NV and M370NV User Manual Chapter 5 Using your HDTV for the first time Select an Input Source Select the input source for details. Press the power button on the remote control. Pressing this button will cycle through the...
M320NV User Manual
Page 21
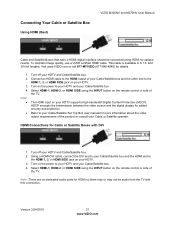
... HDTV and Cable/Satellite box. 2. To maintain image quality, use a VIZIO certified HDMI cable. Version 3/24/2010 21 www.VIZIO.com Visit www.VIZIO.com or call 877-MYVIZIO (877-698-4946) for added security and protection. Turn on the remote control or side of the TV. HDCP encrypts the transmission between the video source and the digital display for details. 1. 2. 3. 4. Connecting Your Cable or Satellite Box Using HDMI (Best) VIZIO M320NV and M370NV User Manual Cable...
... HDTV and Cable/Satellite box. 2. To maintain image quality, use a VIZIO certified HDMI cable. Version 3/24/2010 21 www.VIZIO.com Visit www.VIZIO.com or call 877-MYVIZIO (877-698-4946) for added security and protection. Turn on the remote control or side of the TV. HDCP encrypts the transmission between the video source and the digital display for details. 1. 2. 3. 4. Connecting Your Cable or Satellite Box Using HDMI (Best) VIZIO M320NV and M370NV User Manual Cable...

M320NV User Manual
Page 23
... HDTV. Select HDMI-1, HDMI-2, or HDMI SIDE using the INPUT button on the remote control or side of the TV. Note: Turn off your DVD player user manual for optimal results. HDCP encrypts the transmission between the video source and the digital display for details. 1. 2. 3. 4. Select HDMI-1, HDMI-2, or HDMI SIDE using the INPUT button on the power to your HDTV and DVD player. 2. Turn on the remote control or side of the TV. Connecting Your DVD Player Using HDMI (Best) VIZIO M320NV and M370NV User Manual DVD players that have a HDMI digital...
... HDTV. Select HDMI-1, HDMI-2, or HDMI SIDE using the INPUT button on the remote control or side of the TV. Note: Turn off your DVD player user manual for optimal results. HDCP encrypts the transmission between the video source and the digital display for details. 1. 2. 3. 4. Select HDMI-1, HDMI-2, or HDMI SIDE using the INPUT button on the power to your HDTV and DVD player. 2. Turn on the remote control or side of the TV. Connecting Your DVD Player Using HDMI (Best) VIZIO M320NV and M370NV User Manual DVD players that have a HDMI digital...

M320NV User Manual
Page 36
... or to select the range of different frequencies. Reset Audio Mode Return all Audio settings to accept it . Press the ► button to cancel it . VIZIO M320NV and M370NV User Manual Equalizer Settings To select the options in TV input mode. Settings Menu Tuner Note: The tuner option can only be selected when your programs. Partial Channel Search If you believe channels are 120Hz, 500Hz, 1.5kHz, 5kHz and 10kHz. 1. Be...
... or to select the range of different frequencies. Reset Audio Mode Return all Audio settings to accept it . Press the ► button to cancel it . VIZIO M320NV and M370NV User Manual Equalizer Settings To select the options in TV input mode. Settings Menu Tuner Note: The tuner option can only be selected when your programs. Partial Channel Search If you believe channels are 120Hz, 500Hz, 1.5kHz, 5kHz and 10kHz. 1. Be...

M320NV User Manual
Page 43
... and remote control. Remove the power adapter cable from the Tuner menu in the OSD. Press the TV button on the remote control to a window. No power. If the screen is black. Make sure the power button is very fragile. VIZIO recommends using cable connected directly to the TV mode. Such chemicals may be connected to the HDTV. Press the TV button on the remote control to select a different input source. Check the connections of external...
... and remote control. Remove the power adapter cable from the Tuner menu in the OSD. Press the TV button on the remote control to a window. No power. If the screen is black. Make sure the power button is very fragile. VIZIO recommends using cable connected directly to the TV mode. Such chemicals may be connected to the HDTV. Press the TV button on the remote control to select a different input source. Check the connections of external...
M320NV User Manual
Page 44
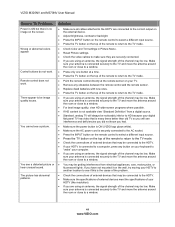
VIZIO M320NV and M370NV User Manual General TV Problems Power is ON but there is connected securely to the TV and move the antenna around the room or close to the TV mode. If you are using an antenna, the signal strength of the channel may be getting interference from a digital source. Standard, analog TV will always be noticeably inferior to HD because your digital flat panel TV has...
VIZIO M320NV and M370NV User Manual General TV Problems Power is ON but there is connected securely to the TV and move the antenna around the room or close to the TV mode. If you are using an antenna, the signal strength of the channel may be getting interference from a digital source. Standard, analog TV will always be noticeably inferior to HD because your digital flat panel TV has...
M320NV User Manual
Page 45
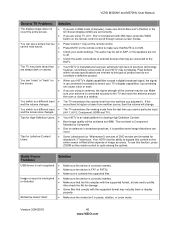
VIZIO M320NV and M370NV User Manual General TV Problems Solution The display image does not cover the entire screen. If you are in RGB mode (Computer), make sure that H-Size and V-Position in the On Screen Display (OSD) are set correctly. If you used a particular input and the screen size changes. (AV-1, AV-2, Component, HDMI and TV). You see a picture but you Press Volume + (Up) on the remote control. You switch to...
VIZIO M320NV and M370NV User Manual General TV Problems Solution The display image does not cover the entire screen. If you are in RGB mode (Computer), make sure that H-Size and V-Position in the On Screen Display (OSD) are set correctly. If you used a particular input and the screen size changes. (AV-1, AV-2, Component, HDMI and TV). You see a picture but you Press Volume + (Up) on the remote control. You switch to...

M320NV User Manual
Page 47
... Stereo Audio 1x USB (side) Outputs 1x 5.1 S/PDIF Optical Digital Audio, 1x Stereo Audio Features 60 Hz E-LED panel, 1080P FHDTV, HDMI v1.3, 3D Comb Filter, Digital Audio Amplifier, Dolby Digital for ATSC/QAM, Signal Compatibility: 480I(SDTV), 480P(EDTV), 720P(HDTV), 1080I(HDTV), 1080P(FHDTV), Channel Skip/Add, VIDEO/INPUT Naming Capability, Closed Caption, Parental Control/V-CHIP 2.0, Programmable Timer, PIP/POP, SRS TSHD,SRS TruVolume ,HD Game Port, Noise Reduction, MTS Stereo Decoder, Dolby Digital for ATSC/QAM, VESA Mount...
... Stereo Audio 1x USB (side) Outputs 1x 5.1 S/PDIF Optical Digital Audio, 1x Stereo Audio Features 60 Hz E-LED panel, 1080P FHDTV, HDMI v1.3, 3D Comb Filter, Digital Audio Amplifier, Dolby Digital for ATSC/QAM, Signal Compatibility: 480I(SDTV), 480P(EDTV), 720P(HDTV), 1080I(HDTV), 1080P(FHDTV), Channel Skip/Add, VIDEO/INPUT Naming Capability, Closed Caption, Parental Control/V-CHIP 2.0, Programmable Timer, PIP/POP, SRS TSHD,SRS TruVolume ,HD Game Port, Noise Reduction, MTS Stereo Decoder, Dolby Digital for ATSC/QAM, VESA Mount...

M320NV User Manual
Page 51
... work the HDTV, refer to your Cable or Satellite remote user guide for more information on your DVD player in the table provided. If your Cable or Satellite remote uses a 5-digit code (like most Direct TV units), first try 1758 and then 0178 as expected on your codes, write them in the code list below are the steps for programming your Cable or Satellite remote uses a 3-digit code (Echostar or Dish Network for your VIZIO universal remote control. 3. Turn...
... work the HDTV, refer to your Cable or Satellite remote user guide for more information on your DVD player in the table provided. If your Cable or Satellite remote uses a 5-digit code (like most Direct TV units), first try 1758 and then 0178 as expected on your codes, write them in the code list below are the steps for programming your Cable or Satellite remote uses a 3-digit code (Echostar or Dish Network for your VIZIO universal remote control. 3. Turn...
M320NV User Manual
Page 61
.... Items not covered include but VIZIO will either the original carton box and shipping material or a replacement box and material provided by a non-authorized reseller. THIS WARRANTY GIVES YOU SPECIFIC LEGAL RIGHTS, AND YOU MAY ALSO HAVE OTHER RIGHTS, WHICH VARY FROM STATE TO STATE. VIZIO M320NV and M370NV User Manual Warranty ONE-YEAR LIMITED WARRANTY ON PARTS AND LABOR (Covers units purchased...
.... Items not covered include but VIZIO will either the original carton box and shipping material or a replacement box and material provided by a non-authorized reseller. THIS WARRANTY GIVES YOU SPECIFIC LEGAL RIGHTS, AND YOU MAY ALSO HAVE OTHER RIGHTS, WHICH VARY FROM STATE TO STATE. VIZIO M320NV and M370NV User Manual Warranty ONE-YEAR LIMITED WARRANTY ON PARTS AND LABOR (Covers units purchased...

M320NV User Manual
Page 62
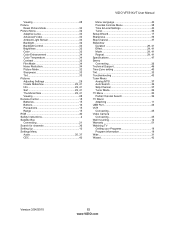
VIZIO VF551XVT User Manual Index 16:9 31 4:3 31 Accessories 9 Adjustments Advanced 30 Advanced Adjustments 30 Ambient Light Sensor 34 Antenna 20 Aspect Ratio 31 Audio Menu Advanced Audio 35 Analog Audio Out adjustments 35 Audio Mode adjustments 35 Balance adjustments 35 Digital Audio Out 35 Equalizer adjustments 36 Lip Sync adjustments 35 Reset Audio Mode 36 Speaker adjustments 35 SRS TruVolume 35 SRS TSHD (surround sound) adjustments ..........35 AV connector 20 Blackbars 31 Blocking Channels 38 Brightness 32 Cable Box Connecting 21 CC Closed Caption 32...
VIZIO VF551XVT User Manual Index 16:9 31 4:3 31 Accessories 9 Adjustments Advanced 30 Advanced Adjustments 30 Ambient Light Sensor 34 Antenna 20 Aspect Ratio 31 Audio Menu Advanced Audio 35 Analog Audio Out adjustments 35 Audio Mode adjustments 35 Balance adjustments 35 Digital Audio Out 35 Equalizer adjustments 36 Lip Sync adjustments 35 Reset Audio Mode 36 Speaker adjustments 35 SRS TruVolume 35 SRS TSHD (surround sound) adjustments ..........35 AV connector 20 Blackbars 31 Blocking Channels 38 Brightness 32 Cable Box Connecting 21 CC Closed Caption 32...
M320NV User Manual
Page 63
... VIZIO VF551XVT User Manual Menu Language 40 Parental Controls Menu 38 Time & Local Settings 40 Tuner 36 Setup Wizard 17 Sharpness 33 Skip Channel 37 Slideshow Duration 29, 41 Effect 29, 41 Mode 29, 41 Repeat 29, 41 Specifications 47 Stereo Connecting 26 Technical Support 46 Time Zone setting 40 Tint 33 Troubleshooting 43 Tuner Menu Analog MTS 37 Auto Search 36 Skip Channel 37 Tuner Mode 36 TV Menu 30 Partial Channel Search 36 TV Stand Attaching 11 USB Port...
... VIZIO VF551XVT User Manual Menu Language 40 Parental Controls Menu 38 Time & Local Settings 40 Tuner 36 Setup Wizard 17 Sharpness 33 Skip Channel 37 Slideshow Duration 29, 41 Effect 29, 41 Mode 29, 41 Repeat 29, 41 Specifications 47 Stereo Connecting 26 Technical Support 46 Time Zone setting 40 Tint 33 Troubleshooting 43 Tuner Menu Analog MTS 37 Auto Search 36 Skip Channel 37 Tuner Mode 36 TV Menu 30 Partial Channel Search 36 TV Stand Attaching 11 USB Port...
M320NV QSG
Page 1
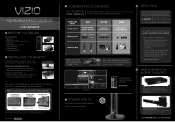
...; M320NV / M370NV LCD LED HDTV 1 BEFORE YOU BEGIN What's In the Box • VIZIO HDTV • VIZIO Remote Control (including 2 AAA batteries) • Power Cord • User Manual (read Safety Guidelines) • Registration Card • Quickstart Guide • Screen Cleaning Cloth 2 INSTALLING YOUR HDTV We provide professional installation services. Insert screws and tighten. (see fig. 1) FIG. 2 4. Connect using an off -air HD signals, and for compatibility with lifelike detail and High Definition Audio puts you have components...
...; M320NV / M370NV LCD LED HDTV 1 BEFORE YOU BEGIN What's In the Box • VIZIO HDTV • VIZIO Remote Control (including 2 AAA batteries) • Power Cord • User Manual (read Safety Guidelines) • Registration Card • Quickstart Guide • Screen Cleaning Cloth 2 INSTALLING YOUR HDTV We provide professional installation services. Insert screws and tighten. (see fig. 1) FIG. 2 4. Connect using an off -air HD signals, and for compatibility with lifelike detail and High Definition Audio puts you have components...
M320NV QSG
Page 2
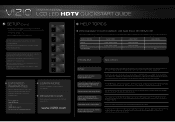
... your digital flat panel TV has video that is ON . REGISTER NOW Register your remote repeatedly until a picture re-appears. Make sure the AC power cord is correct, highligh scan channels, then press the OK key. Press the MENU button. Use the arrows to navigate to access them. Once signal source is securely connected to reappear. After powering on the TV, press the INPUT button on your product today and receive...
... your digital flat panel TV has video that is ON . REGISTER NOW Register your remote repeatedly until a picture re-appears. Make sure the AC power cord is correct, highligh scan channels, then press the OK key. Press the MENU button. Use the arrows to navigate to access them. Once signal source is securely connected to reappear. After powering on the TV, press the INPUT button on your product today and receive...


