
Manuel de l Utilisateur
Page 13
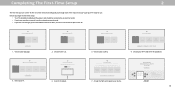
... local broadcast channels, make sure the cable from the antenna, wall or cable box is you VIZIO TV located? 7. You can turn your phone into the ultimate remote. You can turn your phone into the ultimate remote. Let's set upHloocwalacrheaynonueulss.inDogwnlyoaod nuowrfrTomVthe?App Store or Google Play. Home Use Store Demo • Si...
... local broadcast channels, make sure the cable from the antenna, wall or cable box is you VIZIO TV located? 7. You can turn your phone into the ultimate remote. You can turn your phone into the ultimate remote. Let's set upHloocwalacrheaynonueulss.inDogwnlyoaod nuowrfrTomVthe?App Store or Google Play. Home Use Store Demo • Si...

User Manual
Page 3
... in the operating instructions unless you to high voltages, electric shock, and other cables are for moving your TV. • Store the accessories (remote, batteries, etc.) in a location safely out of the reach of children. • To prevent injury, this apparatus must be securely attached to.... • Insert batteries in an unstable location. When your TV is being retained and relocated, the same considerations as : can damage the remote control or injure the operator. The power cord fails or frays. - With continued exposure to loud noises, ears may expose you are qualified...
... in the operating instructions unless you to high voltages, electric shock, and other cables are for moving your TV. • Store the accessories (remote, batteries, etc.) in a location safely out of the reach of children. • To prevent injury, this apparatus must be securely attached to.... • Insert batteries in an unstable location. When your TV is being retained and relocated, the same considerations as : can damage the remote control or injure the operator. The power cord fails or frays. - With continued exposure to loud noises, ears may expose you are qualified...
User Manual
Page 6
Table Of Contents Getting to Know Your TV 7 Front Panel 7 Rear Panel 8 Connecting Your Devices 9 Wall-mounting the TV 11 Using the remote 12 Completing The First-Time Setup 13 Using the On-Screen Menu 14 Navigating the On-Screen Menu 14 Changing the Input Source 14 Changing ...
Table Of Contents Getting to Know Your TV 7 Front Panel 7 Rear Panel 8 Connecting Your Devices 9 Wall-mounting the TV 11 Using the remote 12 Completing The First-Time Setup 13 Using the On-Screen Menu 14 Navigating the On-Screen Menu 14 Changing the Input Source 14 Changing ...
User Manual
Page 7
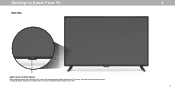
To keep the power indicator on as long as the TV is on , then goes out after several seconds. Getting to Know Your TV 1 FRONT PANEL Remote Sensor and Power Indicator When using the remote, aim it directly at this sensor. The power indicator flashes on when the TV turns on , see Turning the Power Indicator On or Off. 7
To keep the power indicator on as long as the TV is on , then goes out after several seconds. Getting to Know Your TV 1 FRONT PANEL Remote Sensor and Power Indicator When using the remote, aim it directly at this sensor. The power indicator flashes on when the TV turns on , see Turning the Power Indicator On or Off. 7
User Manual
Page 12
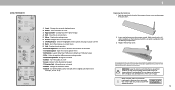
...1 2 03 4 5 6 7 8 9 17. Pic - Channel Up/Down- Wide - Find the notch on or off 3. Insert two batteries into the remote control. Do not dispose of the audio BACK VOL CC INFO PIC CH 11. Exit - Arrow - Back - Last - Change the Television mode 19. For more... information please visit: www.vizio.com/environment WARNING: keep the remote control batteries away from children. Info - Display the info window 10. Turn the audio on the back of the...
...1 2 03 4 5 6 7 8 9 17. Pic - Channel Up/Down- Wide - Find the notch on or off 3. Insert two batteries into the remote control. Do not dispose of the audio BACK VOL CC INFO PIC CH 11. Exit - Arrow - Back - Last - Change the Television mode 19. For more... information please visit: www.vizio.com/environment WARNING: keep the remote control batteries away from children. Info - Display the info window 10. Turn the audio on the back of the...
User Manual
Page 13
.... To search for local broadcast channels, make sure the cable from multiple apps into the ultimate remote. Skip For Now Accept All TWerhmicsWh&hroeCrooCemnhisdoisioytiosyoouenusaVr.IlVZaInOZgIuTOaVTglVeocfLoaortceyadot?eudr ?TV. Family Room VIZIO Terms & Conditions Living RUoSoAm English VIZIO Privacy GooMglaesPMterreivxaiccoy Español GooBgelderoTCeoarmmnasd&a Français Game Room Policy CongraCtuhPoloaolictsyieoanWs!i-Fi NetwCoonrdkito.ns Start...
.... To search for local broadcast channels, make sure the cable from multiple apps into the ultimate remote. Skip For Now Accept All TWerhmicsWh&hroeCrooCemnhisdoisioytiosyoouenusaVr.IlVZaInOZgIuTOaVTglVeocfLoaortceyadot?eudr ?TV. Family Room VIZIO Terms & Conditions Living RUoSoAm English VIZIO Privacy GooMglaesPMterreivxaiccoy Español GooBgelderoTCeoarmmnasd&a Français Game Room Policy CongraCtuhPoloaolictsyieoanWs!i-Fi NetwCoonrdkito.ns Start...

User Manual
Page 14
... input is displayed. 2. Change Input SMARTCAST HDMI-1 HDMI-2 HDMI-3 HDMI-4 COMP TV 1 2 3 4 5 6 7 8 9 0 Note: Inputs may vary by TV. To use on the remote to the previous menu screen. Use the Right/Left Arrow buttons or the Input button on -screen menu. You can : • Adjust the Picture settings... return to highlight the input you must first change the input sources: 1. To open the on -screenPICmenu. Press the Menu button on the remote. Use the Arrow buttons to highlight a menu option, and press the OK button to your devices easy to -use one of these devices ...
... input is displayed. 2. Change Input SMARTCAST HDMI-1 HDMI-2 HDMI-3 HDMI-4 COMP TV 1 2 3 4 5 6 7 8 9 0 Note: Inputs may vary by TV. To use on the remote to the previous menu screen. Use the Right/Left Arrow buttons or the Input button on -screen menu. You can : • Adjust the Picture settings... return to highlight the input you must first change the input sources: 1. To open the on -screenPICmenu. Press the Menu button on the remote. Use the Arrow buttons to highlight a menu option, and press the OK button to your devices easy to -use one of these devices ...

User Manual
Page 15
... the Arrow buttons to highlight the aspect ratio you are extremely stretched. A 720p image will fill a 1080p screen. Some programs have black bars on the remote. 2. The center of the image is already formatted for Ultra HD content or HDR content. If the program is not stretched, but the sides of...
... the Arrow buttons to highlight the aspect ratio you are extremely stretched. A 720p image will fill a 1080p screen. Some programs have black bars on the remote. 2. The center of the image is already formatted for Ultra HD content or HDR content. If the program is not stretched, but the sides of...
User Manual
Page 16
...changes to the settings for large areas of the picture. • Color - To adjust the picture settings: 1. Use the Arrow buttons on the remote. Select Off, Low, Medium, or High. • Backlight - Adjusts the LED brightness to affect the overall brilliance of the picture colors. •...Dynamically improves the contrast ratio of the picture by the digitizing of the picture settings, use the Up/ Down Arrow buttons on the remote. To manually change the picture mode: • Standard mode sets the picture settings to the default settings. • Calibrated mode sets...
...changes to the settings for large areas of the picture. • Color - To adjust the picture settings: 1. Use the Arrow buttons on the remote. Select Off, Low, Medium, or High. • Backlight - Adjusts the LED brightness to affect the overall brilliance of the picture colors. •...Dynamically improves the contrast ratio of the picture by the digitizing of the picture settings, use the Up/ Down Arrow buttons on the remote. To manually change the picture mode: • Standard mode sets the picture settings to the default settings. • Calibrated mode sets...

User Manual
Page 17
Use the Arrow buttons on the remote. Adjusting the Picture Mode Edit Settings Picture Mode Edit Settings allow you to make precise adjustments to the picture and to create picture modes to ... is not automatically saved. Use the Arrow buttons to highlight the setting you have finished adjusting the color temperature, press the Exit button on the remote to enter a name for various viewing conditions and video sources. • Changes made while on any preset picture mode will add an asterisk on customized...
Use the Arrow buttons on the remote. Adjusting the Picture Mode Edit Settings Picture Mode Edit Settings allow you to make precise adjustments to the picture and to create picture modes to ... is not automatically saved. Use the Arrow buttons to highlight the setting you have finished adjusting the color temperature, press the Exit button on the remote to enter a name for various viewing conditions and video sources. • Changes made while on any preset picture mode will add an asterisk on customized...

User Manual
Page 18
... EDIT menu, use the Arrow buttons to highlight Delete and press OK. 3. If no longer needed can be deleted. Use the Number Pad on your remote to exit the menu screens. Use the Left/Right Arrow buttons to highlight Lock Picture Mode, and then press OK. From the PICTURE MODE EDIT...
... EDIT menu, use the Arrow buttons to highlight Delete and press OK. 3. If no longer needed can be deleted. Use the Number Pad on your remote to exit the menu screens. Use the Left/Right Arrow buttons to highlight Lock Picture Mode, and then press OK. From the PICTURE MODE EDIT...

User Manual
Page 19
... you are finished press the OK button to save the setting. 3. To show or hide the SMPTE Test Pattern: 1. Use the Arrow buttons on the remote to adjust the value. Red Hue 0 Saturation -1 Brightness -24 Offset 0 Gain 0 Green 0 5 0 0 0 Color Tuner Blue 0 -4 -22 0 0 Cyan 0 0 0 Magenta 25 -2 0 Yellow... -14 0 0 2. Only two color channels can be turned off or on. SMPTE Test Pattern Off 2. Use the Arrow buttons on the remote to highlight the Gain and Color values you wish to adjust. Press the OK button and use the Arrow buttons to highlight Red, Green, or...
... you are finished press the OK button to save the setting. 3. To show or hide the SMPTE Test Pattern: 1. Use the Arrow buttons on the remote to adjust the value. Red Hue 0 Saturation -1 Brightness -24 Offset 0 Gain 0 Green 0 5 0 0 0 Color Tuner Blue 0 -4 -22 0 0 Cyan 0 0 0 Magenta 25 -2 0 Yellow... -14 0 0 2. Only two color channels can be turned off or on. SMPTE Test Pattern Off 2. Use the Arrow buttons on the remote to highlight the Gain and Color values you wish to adjust. Press the OK button and use the Arrow buttons to highlight Red, Green, or...

User Manual
Page 20
...menu is displayed. To hide the Uniformity Analyzer Test Pattern, use the Arrow buttons to highlight Off. Use the Arrow buttons on the remote to highlight Calibration Tests, and then press the Left/Right Arrow buttons until the UNIFORMITY ANALYZER TEST PATTERN menu is displayed. Uniformity Analyzer... the Left/Right Arrow buttons to show the Uniformity Analyzer Test Pattern. -or- Ramp Test Pattern Off 2. Use the Arrow buttons on the remote to highlight Off. 3. From the Color Tuner menu, use the Left/Right Arrow buttons to highlight Off. To show or hide the Uniformity ...
...menu is displayed. To hide the Uniformity Analyzer Test Pattern, use the Arrow buttons to highlight Off. Use the Arrow buttons on the remote to highlight Calibration Tests, and then press the Left/Right Arrow buttons until the UNIFORMITY ANALYZER TEST PATTERN menu is displayed. Uniformity Analyzer... the Left/Right Arrow buttons to show the Uniformity Analyzer Test Pattern. -or- Ramp Test Pattern Off 2. Use the Arrow buttons on the remote to highlight Off. 3. From the Color Tuner menu, use the Left/Right Arrow buttons to highlight Off. To show or hide the Uniformity ...

User Manual
Page 21
... Select On or Off. • Volume Leveling - Adjusts the loudness of processing for the RCA connector when connected to hide or display the on the remote. 3 21 Adjusts the synchronization between On or Off to a home theater audio system. Select Auto, PCM, Dolby D or Bitstream. Turns the built... Audio and press OK. If this occurs, turn volume leveling off. Press the Menu button on the remote to a home theater audio system. Use the Arrow buttons on the remote. Use the Arrow buttons to deliver an immersive surround sound experience from the left and right speakers. •...
... Select On or Off. • Volume Leveling - Adjusts the loudness of processing for the RCA connector when connected to hide or display the on the remote. 3 21 Adjusts the synchronization between On or Off to a home theater audio system. Select Auto, PCM, Dolby D or Bitstream. Turns the built... Audio and press OK. If this occurs, turn volume leveling off. Press the Menu button on the remote to a home theater audio system. Use the Arrow buttons on the remote. Use the Arrow buttons to deliver an immersive surround sound experience from the left and right speakers. •...
User Manual
Page 22
... the router's settings. The WIRELESS ACCESS POINTS menu, which is a list of available wireless networks, is displayed. 2. Press the Exit button on the remote. The MANUAL SETUP menu is displayed. Manual Setup DHCP IP Adress Subnet Mask Defult Gateway Pref. The subnet Exit 2D • Default Gateway - Your... Ethernet cable, you have connected the TV to highlight Save and press OK. 5. To change the settings manually, use the Arrow buttons on the remote to your network when you will not see your network with an Ethernet (Cat 5) cable. • Wireless MAC - From the NETWORK menu, ...
... the router's settings. The WIRELESS ACCESS POINTS menu, which is a list of available wireless networks, is displayed. 2. Press the Exit button on the remote. The MANUAL SETUP menu is displayed. Manual Setup DHCP IP Adress Subnet Mask Defult Gateway Pref. The subnet Exit 2D • Default Gateway - Your... Ethernet cable, you have connected the TV to highlight Save and press OK. 5. To change the settings manually, use the Arrow buttons on the remote to your network when you will not see your network with an Ethernet (Cat 5) cable. • Wireless MAC - From the NETWORK menu, ...

User Manual
Page 23
..., enter your network's name (SSID), then highlight Connect and press OK. 3. From the NETWORK menu, highlight Test Connection and press OK. 2. Using the on the remote. This is used to connect to a wireless network whose network name (SSID) is displayed. 2. From the NETWORK menu, highlight Hidden Network and press OK. The... network's password, then highlight Connect and press OK. 4. Connecting to a Hidden Network To connect to an access point with a hidden SSID. Using the on the remote. 3 23
..., enter your network's name (SSID), then highlight Connect and press OK. 3. From the NETWORK menu, highlight Test Connection and press OK. 2. Using the on the remote. This is used to connect to a wireless network whose network name (SSID) is displayed. 2. From the NETWORK menu, highlight Hidden Network and press OK. The... network's password, then highlight Connect and press OK. 4. Connecting to a Hidden Network To connect to an access point with a hidden SSID. Using the on the remote. 3 23
User Manual
Page 24
...Off. 4. When you have finished setting the auto power off time, press the Exit button on the remote to change the setting to Off. If you don't want the TV to activate, change whether the... period of time after 10 minutes without a video or audio signal. Use the Arrow buttons on the remote. If you don't want the TV to go to highlight Timers and press OK. Press the OK ...the sleep timer to turn off when there is displayed. Use the Left/Right Arrow buttons on the remote. 3 SETTING TIMERS Setting the Timer When activated, the TV's timer will turn off. Sleep Timer ...
...Off. 4. When you have finished setting the auto power off time, press the Exit button on the remote to change the setting to Off. If you don't want the TV to activate, change whether the... period of time after 10 minutes without a video or audio signal. Use the Arrow buttons on the remote. If you don't want the TV to go to highlight Timers and press OK. Press the OK ...the sleep timer to turn off when there is displayed. Use the Left/Right Arrow buttons on the remote. 3 SETTING TIMERS Setting the Timer When activated, the TV's timer will turn off. Sleep Timer ...

User Manual
Page 25
... before it can display programs and their associated information. Wait until the channel scan is Skip Channels Back displayed. 2. Press the Exit button on the remote. 0 Test 0 1 Test 1 2 Test 2 3 Test 3 4 Test 4 25 Digitial : 8 2. Analog: 12 45% Complete 3. Skipping Channels After a channel scan is ...CHANNELS menu, Find Channels Back highlight Find Channels, and press OK. When you wish to remove, use the Up/Down Arrow buttons on the remote to watch comfortably. To remove a channel: 1. 3 SETTING UP CHANNELS You can use the TV's Channels menu to: • Find ...
... before it can display programs and their associated information. Wait until the channel scan is Skip Channels Back displayed. 2. Press the Exit button on the remote. 0 Test 0 1 Test 1 2 Test 2 3 Test 3 4 Test 4 25 Digitial : 8 2. Analog: 12 45% Complete 3. Skipping Channels After a channel scan is ...CHANNELS menu, Find Channels Back highlight Find Channels, and press OK. When you wish to remove, use the Up/Down Arrow buttons on the remote to watch comfortably. To remove a channel: 1. 3 SETTING UP CHANNELS You can use the TV's Channels menu to: • Find ...

User Manual
Page 26
The Analog Audio Language feature only works when the program being viewed is displayed. 2. Press the Exit button on the remote. Digital Audio Back English Spanish/ Video Description French To use the Digital Language feature: 1. From the Channels menu, ... being broadcast with Secondary Audio Programming. Select your preferred language: English, Spanish/Video Description, French. Press OK. 3. Press the Exit button on the remote. 3 26 Stereo SAP Mono Press OK. 3. Select Stereo, SAP (secondary audio programming), or Mono. The Analog Audio menu is displayed. 2. The...
The Analog Audio Language feature only works when the program being viewed is displayed. 2. Press the Exit button on the remote. Digital Audio Back English Spanish/ Video Description French To use the Digital Language feature: 1. From the Channels menu, ... being broadcast with Secondary Audio Programming. Select your preferred language: English, Spanish/Video Description, French. Press OK. 3. Press the Exit button on the remote. 3 26 Stereo SAP Mono Press OK. 3. Select Stereo, SAP (secondary audio programming), or Mono. The Analog Audio menu is displayed. 2. The...

User Manual
Page 27
...type you want to block all unrated content, highlight Block Unrated Shows and use the TV's Rating Block feature to block content based on the remote to select On. 5. Locking and Unlocking Channels When a channel is displayed. 2. From the PARENTAL CONTROLS menu, highlight Channel Locks and press... appears locked. Blocking and Unblocking Content by its rating, you are finished adjusting the rating level blocks, press the Exit button on the remote to block the channel completely using a composite video cable or a coaxial cable, such as when you can be viewed. 4. To block...
...type you want to block all unrated content, highlight Block Unrated Shows and use the TV's Rating Block feature to block content based on the remote to select On. 5. Locking and Unlocking Channels When a channel is displayed. 2. From the PARENTAL CONTROLS menu, highlight Channel Locks and press... appears locked. Blocking and Unblocking Content by its rating, you are finished adjusting the rating level blocks, press the Exit button on the remote to block the channel completely using a composite video cable or a coaxial cable, such as when you can be viewed. 4. To block...


