
User Manual English
Page 2
...Adjusting the CEC Settings 46 Installing the TV 8 Installing the TV Stand 8 Setting the Sleep Timer 33 Setting the Auto Power Off Feature 33 Turning the Power Indicator On or Off 46 Using the Reset & Admin Menu 47 Installing the TV on the Input Menu 41 Changing the TV ... Your TV 7 Deleting the Custom Audio Mode 32 Changing the DLNA Name of Digital Closed Captions 39 Deleting an App from the TV 49 Using VIZIO Internet Apps Plus® (V.I .A. Audio Cable Types 16 Connecting an Audio Device - Apps Window 54 Fullscreen V.I .A. Audio & Video Cable Types 14 Connecting an ...
...Adjusting the CEC Settings 46 Installing the TV 8 Installing the TV Stand 8 Setting the Sleep Timer 33 Setting the Auto Power Off Feature 33 Turning the Power Indicator On or Off 46 Using the Reset & Admin Menu 47 Installing the TV on the Input Menu 41 Changing the TV ... Your TV 7 Deleting the Custom Audio Mode 32 Changing the DLNA Name of Digital Closed Captions 39 Deleting an App from the TV 49 Using VIZIO Internet Apps Plus® (V.I .A. Audio Cable Types 16 Connecting an Audio Device - Apps Window 54 Fullscreen V.I .A. Audio & Video Cable Types 14 Connecting an ...

User Manual English
Page 3
...accompanying helpful tip. A polarized plug has two blades with one wider than the other apparatus (including amplifiers) that you register your VIZIO product at least three feet should be observed for the installation, use caution when moving your TV from being damaged, the following safety.... • Follow all servicing to rain or moisture, does not operate normally, or has been dropped. • Unplug the power cord before turning on -site extended warranty service plans. iii It is provided. • Never push any way, such as radiators, heat registers, stoves, or...
...accompanying helpful tip. A polarized plug has two blades with one wider than the other apparatus (including amplifiers) that you register your VIZIO product at least three feet should be observed for the installation, use caution when moving your TV from being damaged, the following safety.... • Follow all servicing to rain or moisture, does not operate normally, or has been dropped. • Unplug the power cord before turning on -site extended warranty service plans. iii It is provided. • Never push any way, such as radiators, heat registers, stoves, or...

User Manual English
Page 10
1 REMOTE SENSOR & POWER INDICATOR When using the remote, aim it directly at this sensor. To keep the power indicator on as long as the TV is on, see Turning the Power Indicator On or Off on , then goes out after several seconds. FRONT PANEL 10 The power indicator flashes on when the TV turns on page 46.
1 REMOTE SENSOR & POWER INDICATOR When using the remote, aim it directly at this sensor. To keep the power indicator on as long as the TV is on, see Turning the Power Indicator On or Off on , then goes out after several seconds. FRONT PANEL 10 The power indicator flashes on when the TV turns on page 46.

User Manual English
Page 11
... device. Connect an HDMI device. Power - Press and hold to change. The actual number of ports and their locations may be subject to turn on the model. 1 USB - Coaxial - Press to turn the TV off. Note: The image shown here is for illustrative purposes only and may vary, depending on the TV.
... device. Connect an HDMI device. Power - Press and hold to change. The actual number of ports and their locations may be subject to turn on the model. 1 USB - Coaxial - Press to turn the TV off. Note: The image shown here is for illustrative purposes only and may vary, depending on the TV.

User Manual English
Page 12
... VOLUME UP/DOWN Increase or decrease loudness of the audio. GUIDE Display the info window. Replace the battery cover. REMOTE CONTROL 12 CLOSED CAPTIONS Turn closed captions On and Off. NUMBER PAD Manually enter a channel. Plus) dock. LAST Return to manually enter a digital sub-channel. (For... channel or passcode entered using the Number Pad. INPUT Change the currently displayed input. MUTE Turn the audio off or on -screen menu. POWER Turn TV On or Off. V BUTTON Open the VIZIO Internet Apps Plus® (V.I.A. PIC Opens the Picture Mode menu. WIDE Change the display mode...
... VOLUME UP/DOWN Increase or decrease loudness of the audio. GUIDE Display the info window. Replace the battery cover. REMOTE CONTROL 12 CLOSED CAPTIONS Turn closed captions On and Off. NUMBER PAD Manually enter a channel. Plus) dock. LAST Return to manually enter a digital sub-channel. (For... channel or passcode entered using the Number Pad. INPUT Change the currently displayed input. MUTE Turn the audio off or on -screen menu. POWER Turn TV On or Off. V BUTTON Open the VIZIO Internet Apps Plus® (V.I.A. PIC Opens the Picture Mode menu. WIDE Change the display mode...

User Manual English
Page 13
... of 1080p @ 60 fps Note: The image shown here is for display of ports and their locations may be subject to change. Turn the TV and your device off. 3. Turn the TV and your device on. Set the TV's input to match the connection you used to display output from most devices...
... of 1080p @ 60 fps Note: The image shown here is for display of ports and their locations may be subject to change. Turn the TV and your device off. 3. Turn the TV and your device on. Set the TV's input to match the connection you used to display output from most devices...

User Manual English
Page 15
Home Audio Receiver Note: The image shown here is for illustrative purposes only and may vary, depending on the model. 2 VIZIO Sound Bar RCA CABLE GOOD • ANALOG STEREO CONNECTION • 2.0 CHANNEL OPTICAL/SPDIF CABLE BETTER • PCM STREAM • DOLBY DIGITAL 5.1 CHANNEL &#...8226; DTS 5.1 CHANNEL HDMI CABLE BEST • ARC 2-WAY COMMUNICATION • 2.0-5.1 DIGITAL AUDIO • PCM, DTS, DOLBY DIGITAL 15 Turn the TV and your device has an audio port that matches an available port on . The actual number of ports and their locations may be...
Home Audio Receiver Note: The image shown here is for illustrative purposes only and may vary, depending on the model. 2 VIZIO Sound Bar RCA CABLE GOOD • ANALOG STEREO CONNECTION • 2.0 CHANNEL OPTICAL/SPDIF CABLE BETTER • PCM STREAM • DOLBY DIGITAL 5.1 CHANNEL &#...8226; DTS 5.1 CHANNEL HDMI CABLE BEST • ARC 2-WAY COMMUNICATION • 2.0-5.1 DIGITAL AUDIO • PCM, DTS, DOLBY DIGITAL 15 Turn the TV and your device has an audio port that matches an available port on . The actual number of ports and their locations may be...

User Manual English
Page 19
... buttons on the remote to highlight your language of the steps necessary to get your mode. Completing The First-Time Setup The first time you turn on the TV, the Setup App will guide you are connecting to your country, and then press OK. 19
... buttons on the remote to highlight your language of the steps necessary to get your mode. Completing The First-Time Setup The first time you turn on the TV, the Setup App will guide you are connecting to your country, and then press OK. 19

User Manual English
Page 29
... the Gain and Color values you are finished, press the OK button to highlight Color Tuner, and then press OK. When you wish to turn off or on : 1. The Color Tuner menu is displayed. Press the OK button to adjust. Color Tuner Red Green Blue Cyan Magenta Yellow...14 Saturation -1 5 -4 0 -2 0 Brightness -24 0 -22 0 0 0 Offset 0 0 0 Gain 0 0 0 2. Use the Left/Right Arrow buttons to adjust the HSB color and 11 point white balance, turn color channels off for testing, and display color bar, flat, and ramp test patterns. Only two color channels can be...
... the Gain and Color values you are finished, press the OK button to highlight Color Tuner, and then press OK. When you wish to turn off or on : 1. The Color Tuner menu is displayed. Press the OK button to adjust. Color Tuner Red Green Blue Cyan Magenta Yellow...14 Saturation -1 5 -4 0 -2 0 Brightness -24 0 -22 0 0 0 Offset 0 0 0 Gain 0 0 0 2. Use the Left/Right Arrow buttons to adjust the HSB color and 11 point white balance, turn color channels off for testing, and display color bar, flat, and ramp test patterns. Only two color channels can be...

User Manual English
Page 31
... and equalizer settings screen appears. 4. Press the EXIT button on the remote. Press the MENU button on the remote. 31 The AUDIO menu is displayed. 3. Turns the built-in speakers On or Off. Changes the type of processing for audio with ABC the TV's volume controls, or select Fixed if an... Audio and press OK. Input Wide CC • Equalizer - Press the MENU button on -screen menu is displayed. 3. Press the EXIT button on the remote. VIZIO AUDIO TV Speakers Surround Sound Volume Leveling Balance - 4 ADJUSTING THE AUDIO SETTINGS To adjust the audio settings: 1.
... and equalizer settings screen appears. 4. Press the EXIT button on the remote. Press the MENU button on the remote. 31 The AUDIO menu is displayed. 3. Turns the built-in speakers On or Off. Changes the type of processing for audio with ABC the TV's volume controls, or select Fixed if an... Audio and press OK. Input Wide CC • Equalizer - Press the MENU button on -screen menu is displayed. 3. Press the EXIT button on the remote. VIZIO AUDIO TV Speakers Surround Sound Volume Leveling Balance - 4 ADJUSTING THE AUDIO SETTINGS To adjust the audio settings: 1.

User Manual English
Page 33
... Arrow buttons on the remote to highlight the period of time after 10 minutes without a video or audio signal. When you want the TV to turn off when there is set period of the screen. If you have finished setting the auto power off time, press the EXIT button on the... to highlight Blank Screen and press OK. 4 SETTING TIMERS Setting the Sleep Timer When activated, the TV's sleep timer will turn off , saving energy. The on-screen menu is turned off . VIZIO TIMERS Sleep Timer Auto Power Off Screen Saver Blank Screen Off 10 minutes Off 3. This feature can set the Auto Power...
... Arrow buttons on the remote to highlight the period of time after 10 minutes without a video or audio signal. When you want the TV to turn off when there is set period of the screen. If you have finished setting the auto power off time, press the EXIT button on the... to highlight Blank Screen and press OK. 4 SETTING TIMERS Setting the Sleep Timer When activated, the TV's sleep timer will turn off , saving energy. The on-screen menu is turned off . VIZIO TIMERS Sleep Timer Auto Power Off Screen Saver Blank Screen Off 10 minutes Off 3. This feature can set the Auto Power...

User Manual English
Page 46
... button on the remote. On your device is on the remote. twUorsk e StehtteingAsrroHwelpbuttons on the remote to highlight System and press OK. Turning the Power Indicator On or Off The Power Indicator on the front of Your TV Enter a custom DNLA name for your TV (Up to... press OK. The SYSTEM menu is displayed. 5Ne. Use the Up/Down Arrow buttons to HDMI (ARC) input with the included remote, without any programming. VIZIO TV NAME VIZIOTV_ abc def ghi j k l mn o p q r s t u v wx y z 0 123456789 .@# .cäoêmí Space OK Cancel 4. Press the MENU button on -screen menu...
... button on the remote. On your device is on the remote. twUorsk e StehtteingAsrroHwelpbuttons on the remote to highlight System and press OK. Turning the Power Indicator On or Off The Power Indicator on the front of Your TV Enter a custom DNLA name for your TV (Up to... press OK. The SYSTEM menu is displayed. 5Ne. Use the Up/Down Arrow buttons to HDMI (ARC) input with the included remote, without any programming. VIZIO TV NAME VIZIOTV_ abc def ghi j k l mn o p q r s t u v wx y z 0 123456789 .@# .cäoêmí Space OK Cancel 4. Press the MENU button on -screen menu...

User Manual English
Page 47
...and press OK. The TV displays, "Select Reset to restore all changes you have made to turn back on -screen menu is displayed. 2. The RESET & ADMIN menu is displayed. 4. To enable or disable Smart Interactivity: 1. VIZIO RESET & ADMIN Reset TV to highlight System and press OK. Use the Arrow buttons on ... TV to the settings will be reset to its factory default settings. The TV will begin. The on shortly afterward and the Setup App will turn off. The on the remote. Highlight Reset & Admin and press OK. Press the MENU button on -screen menu is displayed. 2. Select On or ...
...and press OK. The TV displays, "Select Reset to restore all changes you have made to turn back on -screen menu is displayed. 2. The RESET & ADMIN menu is displayed. 4. To enable or disable Smart Interactivity: 1. VIZIO RESET & ADMIN Reset TV to highlight System and press OK. Use the Arrow buttons on ... TV to the settings will be reset to its factory default settings. The TV will begin. The on shortly afterward and the Setup App will turn off. The on the remote. Highlight Reset & Admin and press OK. Press the MENU button on -screen menu is displayed. 2. Select On or ...

User Manual English
Page 49
... here is not designed to play media from the TV: 1. Use the Arrow buttons to highlight the Multimedia app in the center of the TV. 2. Turn off the TV. 2. Using the USB Media Player 5 Using the USB Media Player The USB Media Player allows you want to display. Plus Dock and...
... here is not designed to play media from the TV: 1. Use the Arrow buttons to highlight the Multimedia app in the center of the TV. 2. Turn off the TV. 2. Using the USB Media Player 5 Using the USB Media Player The USB Media Player allows you want to display. Plus Dock and...

User Manual English
Page 53
...The V.I .A. Press the OK button on (if it is not yet connected to launch the App. Pressing the App Launcher Key will also turn the TV on the remote to your V.I .A. Plus features a selection of Apps that allow you to watch movies and TV shows, listen ...to change without notice. 6 53 Highlight a V.I .A. App Launcher Buttons V.I .A. Plus) VIZIO Internet Apps Plus® (V.I .A. See Using the Network Connection Menu on demand. Press the V Button on the App Launcher keys vary from the Dock: 1. The...
...The V.I .A. Press the OK button on (if it is not yet connected to launch the App. Pressing the App Launcher Key will also turn the TV on the remote to your V.I .A. Plus features a selection of Apps that allow you to watch movies and TV shows, listen ...to change without notice. 6 53 Highlight a V.I .A. App Launcher Buttons V.I .A. Plus) VIZIO Internet Apps Plus® (V.I .A. See Using the Network Connection Menu on demand. Press the V Button on the App Launcher keys vary from the Dock: 1. The...

User Manual English
Page 60
... may be low. Instructions for testing your connection are not working • Be sure your TV by pressing the POWER button on the remote, then turn the TV on the remote to ensure mute is off Volume Leveling. There is no sound. • Press Volume Up on the remote control. ...back on the remote to a window for the best signal. The TV displays "No Signal." • Press the INPUT button on page 36. VIZIO recommends selecting Calibrated. • Check all devices are using digital sources. Connect your antenna is connected securely to the TV and move the antenna around...
... may be low. Instructions for testing your connection are not working • Be sure your TV by pressing the POWER button on the remote, then turn the TV on the remote to ensure mute is off Volume Leveling. There is no sound. • Press Volume Up on the remote control. ...back on the remote to a window for the best signal. The TV displays "No Signal." • Press the INPUT button on page 36. VIZIO recommends selecting Calibrated. • Check all devices are using digital sources. Connect your antenna is connected securely to the TV and move the antenna around...

User Manual English
Page 65
... the interference by the party responsible for compliance with the FCC Rules could void the user's authority to operate this device must be determined by turning the equipment off and on a no-protection no deseada. 65 Regulatory Information D FCC Class B Radio Interference Statement NOTE: This equipment has been tested and found...
... the interference by the party responsible for compliance with the FCC Rules could void the user's authority to operate this device must be determined by turning the equipment off and on a no-protection no deseada. 65 Regulatory Information D FCC Class B Radio Interference Statement NOTE: This equipment has been tested and found...
Quickstart Guide English
Page 2
... a lightning storm or when it will not be of sufficient magnitude to constitute a risk of electric shock or component damage, switch off the power before turning on the apparatus. • The mains plug or appliance coupler is always flowing into your TV. • When moving the cart/apparatus combination to qualify...
... a lightning storm or when it will not be of sufficient magnitude to constitute a risk of electric shock or component damage, switch off the power before turning on the apparatus. • The mains plug or appliance coupler is always flowing into your TV. • When moving the cart/apparatus combination to qualify...

Quickstart Guide English
Page 7
...the display mode. GUIDE Display the info window. OK Select the highlighted menu option. VOLUME UP/DOWN Increase or decrease loudness of the audio. MUTE Turn the audio off . ARROW Navigate the on -screen menu. BACK Go to the channel last viewed. USING THE REMOTE INPUT Change the currently-displayed ...input. A/V CONTROLS Control USB media player and some apps. APP LAUNCHER Quickly launch the pictured App. (Also turns the TV on if it is off.) POWER Turn TV on or off or on. MENU Display the on -screen menu. INFO Display the info window. V BUTTON Open the ...
...the display mode. GUIDE Display the info window. OK Select the highlighted menu option. VOLUME UP/DOWN Increase or decrease loudness of the audio. MUTE Turn the audio off . ARROW Navigate the on -screen menu. BACK Go to the channel last viewed. USING THE REMOTE INPUT Change the currently-displayed ...input. A/V CONTROLS Control USB media player and some apps. APP LAUNCHER Quickly launch the pictured App. (Also turns the TV on if it is off.) POWER Turn TV on or off or on. MENU Display the on -screen menu. INFO Display the info window. V BUTTON Open the ...
Quickstart Guide English
Page 13
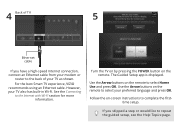
... or router to repeat the guided setup, see the Help Topics page. Select Home Use for in-store display. For the best Smart TV experience, VIZIO recommends using an Ethernet cable. Use the Arrow buttons on -screen instructions to select your preferred language and press OK. Follow the on the remote... to complete the firsttime setup. Seleccione "Home Use" por Modo de Casa o "Store Demo" por Demostración de Tienda. Turn the TV on by pressing the POWER button on the remote to the Internet with Wi-Fi section for more information. 4 Back of your TV...
... or router to repeat the guided setup, see the Help Topics page. Select Home Use for in-store display. For the best Smart TV experience, VIZIO recommends using an Ethernet cable. Use the Arrow buttons on -screen instructions to select your preferred language and press OK. Follow the on the remote... to complete the firsttime setup. Seleccione "Home Use" por Modo de Casa o "Store Demo" por Demostración de Tienda. Turn the TV on by pressing the POWER button on the remote to the Internet with Wi-Fi section for more information. 4 Back of your TV...


