Manuel de l Utilisateur
Page 16
... GooBgelderoTCeoarmmnasd&a Français Game Room Policy CongraCtuhPoloaolictsyieoanWs!i-Fi NetwCoonrdkito.ns Start streaming your favorite shows now! You can turn your VIZIO TV. Let's set upHloocwalacrehaynonueulss.ing your TV? Your use of this device. NOTE: Accepting the terms and policiesis...? Acceptez les conditions et restrictions et enregistreUSAz votre apMepxicoareil. shows now! shows now! By the way... You can turn your VIZIO TV Located? Start streaming your favorite shows now! Let's set up local channels.Download now from the antenna, wall...
... GooBgelderoTCeoarmmnasd&a Français Game Room Policy CongraCtuhPoloaolictsyieoanWs!i-Fi NetwCoonrdkito.ns Start streaming your favorite shows now! You can turn your VIZIO TV. Let's set upHloocwalacrehaynonueulss.ing your TV? Your use of this device. NOTE: Accepting the terms and policiesis...? Acceptez les conditions et restrictions et enregistreUSAz votre apMepxicoareil. shows now! shows now! By the way... You can turn your VIZIO TV Located? Start streaming your favorite shows now! Let's set up local channels.Download now from the antenna, wall...
User Manual
Page 2
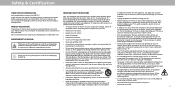
...your dealer. This may compromise the integrity of important operating instructions. exposed to qualified service personnel. Do not place your new VIZIO TV. unless proper ventilation is required when the apparatus has been damaged in accordance with one wider than the voltage specified....warranty does not cover user abuse or improper installations. • Protect the power cord from being damaged, the following safety instructions before turning on your TV to avoid causing fire, electric shock, or component damage. • A distance of your TV and to protect...
...your dealer. This may compromise the integrity of important operating instructions. exposed to qualified service personnel. Do not place your new VIZIO TV. unless proper ventilation is required when the apparatus has been damaged in accordance with one wider than the voltage specified....warranty does not cover user abuse or improper installations. • Protect the power cord from being damaged, the following safety instructions before turning on your TV to avoid causing fire, electric shock, or component damage. • A distance of your TV and to protect...

User Manual
Page 6
... 35 Adjusting the CEC Settings 35 Changing the TV Name 36 Using the Reset & Admin Menu 37 Restoring the TV to Factory Default Settings 37 Turning the Power Indicator On or Off 37 Using the Info Window 39 SmartCast HomeSM 40 What is SmartCast Home 40 What You Can Do with...
... 35 Adjusting the CEC Settings 35 Changing the TV Name 36 Using the Reset & Admin Menu 37 Restoring the TV to Factory Default Settings 37 Turning the Power Indicator On or Off 37 Using the Info Window 39 SmartCast HomeSM 40 What is SmartCast Home 40 What You Can Do with...

User Manual
Page 7
The power indicator flashes on when the TV turns on , see Turning the Power Indicator On or Off. 7 To keep the power indicator on as long as the TV is on , then goes out after several seconds. Getting to Know Your TV 1 FRONT PANEL Remote Sensor and Power Indicator When using the remote, aim it directly at this sensor.
The power indicator flashes on when the TV turns on , see Turning the Power Indicator On or Off. 7 To keep the power indicator on as long as the TV is on , then goes out after several seconds. Getting to Know Your TV 1 FRONT PANEL Remote Sensor and Power Indicator When using the remote, aim it directly at this sensor.
User Manual
Page 8
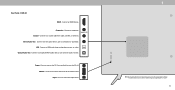
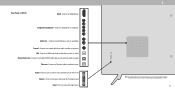
D24h-G9 HDMI - Stereo Audio Out - Connect 3.5 mm audio device, such as home audio receiver. USB - Optical Audio Out - Volume - Press to change. INPUT 1 Note: The image ... to a coaxial cable from cable, satellite, or antenna. Connect an HDMI device. Connect a composite. Connect to increase or decrease the TV volume level. Connect to turn on the model. 8 Power - Video/ L/R Coaxial - Press and hold to an optical/SPDIF audio device, such as a headset or sound bar. Press to play photo...
D24h-G9 HDMI - Stereo Audio Out - Connect 3.5 mm audio device, such as home audio receiver. USB - Optical Audio Out - Volume - Press to change. INPUT 1 Note: The image ... to a coaxial cable from cable, satellite, or antenna. Connect an HDMI device. Connect a composite. Connect to increase or decrease the TV volume level. Connect to turn on the model. 8 Power - Video/ L/R Coaxial - Press and hold to an optical/SPDIF audio device, such as a headset or sound bar. Press to play photo...
User Manual
Page 9
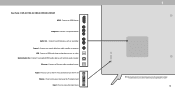
... Volume - INPUT 1 Note: The image shown here is for illustrative purposes only and may vary, depending on the TV. Ethernet - Press and hold to turn the TV off. Press to modem/ router. Component/Composite - Coaxial - Optical Audio Out - Power - Audio Out - Connect a USB thumb drive to a...Connect to an optical/SPDIF audio device, such as sound bar. VOL Input - Connect to play photo, music, or video. Rear Panel - D40f-G9 HDMI - Connect to an RCA device, such as home audio receiver. Press to change. The actual number of ports and their locations may be...
... Volume - INPUT 1 Note: The image shown here is for illustrative purposes only and may vary, depending on the TV. Ethernet - Press and hold to turn the TV off. Press to modem/ router. Component/Composite - Coaxial - Optical Audio Out - Power - Audio Out - Connect a USB thumb drive to a...Connect to an optical/SPDIF audio device, such as sound bar. VOL Input - Connect to play photo, music, or video. Rear Panel - D40f-G9 HDMI - Connect to an RCA device, such as home audio receiver. Press to change. The actual number of ports and their locations may be...
User Manual
Page 10
... may vary, depending on the TV. Composite - Press and hold to change. Coaxial - The actual number of ports and their locations may be subject to turn on the model. 10 Audio Out - Connect to an optical/SPDIF audio device, such as sound bar. Connect to an RCA device, such as home... TV volume level. Press to play photo, music, or video. Connect a USB thumb drive to access the input menu. Volume - Rear Panel - Ethernet - Press to turn the TV off. USB - Power - Optical Audio Out - Connect an HDMI device. D32h...
... may vary, depending on the TV. Composite - Press and hold to change. Coaxial - The actual number of ports and their locations may be subject to turn on the model. 10 Audio Out - Connect to an optical/SPDIF audio device, such as sound bar. Connect to an RCA device, such as home... TV volume level. Press to play photo, music, or video. Connect a USB thumb drive to access the input menu. Volume - Rear Panel - Ethernet - Press to turn the TV off. USB - Power - Optical Audio Out - Connect an HDMI device. D32h...

User Manual
Page 11
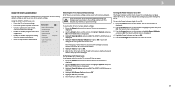
AUDIO & VIDEO CABLE TYPES Your TV can be used (HDMI-1, HDMI-2, etc.). Connect the appropriate cable (not included) to display output from most devices. 1. Turn the TV and your device has a video port that matches an available port on the TV (HDMI, Component, etc.). 2. Set the TV's input to match ...
AUDIO & VIDEO CABLE TYPES Your TV can be used (HDMI-1, HDMI-2, etc.). Connect the appropriate cable (not included) to display output from most devices. 1. Turn the TV and your device has a video port that matches an available port on the TV (HDMI, Component, etc.). 2. Set the TV's input to match ...

User Manual
Page 12
Turn the TV and your device on Your Device 12 Connect the appropriate cable (not included) to match the connection you used (Composite). Set the TV's input to the TV and the device using an adapter (not included). 2. D24h-G9 ONLY D24h-G9 includes a Composite In / AV In port that requires additional adapters (not included). 1. Composite input on back of TV* Video/ L/R Connecting to a composite device Video / Audio L/R Adapter (Not Included) *The actual ports and their locations may vary, depending on the TV model. 1 Composite Connection on . CONNECTING A DEVICE -
Turn the TV and your device on Your Device 12 Connect the appropriate cable (not included) to match the connection you used (Composite). Set the TV's input to the TV and the device using an adapter (not included). 2. D24h-G9 ONLY D24h-G9 includes a Composite In / AV In port that requires additional adapters (not included). 1. Composite input on back of TV* Video/ L/R Connecting to a composite device Video / Audio L/R Adapter (Not Included) *The actual ports and their locations may vary, depending on the TV model. 1 Composite Connection on . CONNECTING A DEVICE -

User Manual
Page 13
HDMI CABLE HDMI RCA CABLE L R 1 OPTICAL/SPDIF CABLE Optical Note: The actual ports and their locations may vary, depending on the TV (Optical, RCA, etc). 2. Verify that matches an available port on the TV model. 13 Turn the TV and your device has audio port that your device on. AUDIO CABLE TYPES Your TV can be output sound to the TV and the device. 3. Connect the appropriate cable (not included) to an audio device, such as a receiver or sound bar. 1. CONNECTING A DEVICE -
HDMI CABLE HDMI RCA CABLE L R 1 OPTICAL/SPDIF CABLE Optical Note: The actual ports and their locations may vary, depending on the TV (Optical, RCA, etc). 2. Verify that matches an available port on the TV model. 13 Turn the TV and your device has audio port that your device on. AUDIO CABLE TYPES Your TV can be output sound to the TV and the device. 3. Connect the appropriate cable (not included) to an audio device, such as a receiver or sound bar. 1. CONNECTING A DEVICE -
User Manual
Page 15
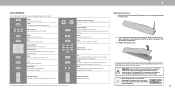
...the previous on the batteries match the (+) and (-) symbols inside the battery compartment. 3. Channel Up/Down Change the channel When needed, VIZIO recommends replacing the batteries that the (+) and (-) symbols on -screen menu Info Display the info window WatchFree™ Access WatchFree channels (...1 USING THE REMOTE Note that specific buttons may cause choking and/or lead to a fire or chemical burn if mishandled. INPUT Power Turn television on your batteries consistent with two, new Duracell 'AAA' alkaline batteries 15 Insert two batteries into the remote control. It may...
...the previous on the batteries match the (+) and (-) symbols inside the battery compartment. 3. Channel Up/Down Change the channel When needed, VIZIO recommends replacing the batteries that the (+) and (-) symbols on -screen menu Info Display the info window WatchFree™ Access WatchFree channels (...1 USING THE REMOTE Note that specific buttons may cause choking and/or lead to a fire or chemical burn if mishandled. INPUT Power Turn television on your batteries consistent with two, new Duracell 'AAA' alkaline batteries 15 Insert two batteries into the remote control. It may...

User Manual
Page 16
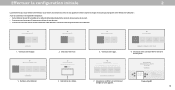
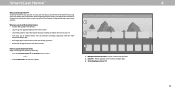
... located? The VIZIO SmartCastTM App brings together TV Shows, movies, and more from the App Store or Google Play. Completing The First-Time Setup 2 The first time you turn your TV ready for use. ChooHsoewaaWrei-yFoi uNuestwinogrky.our TV? Choose home use of Service and Privacy Policies. Where is properly connected to...
... located? The VIZIO SmartCastTM App brings together TV Shows, movies, and more from the App Store or Google Play. Completing The First-Time Setup 2 The first time you turn your TV ready for use. ChooHsoewaaWrei-yFoi uNuestwinogrky.our TV? Choose home use of Service and Privacy Policies. Where is properly connected to...

User Manual
Page 21
... 4-digit PIN. 4. The LOCK PICTURE MODE menu is set, then lock/ unlock. Use the Number Pad on your remote to exit the menu screens. Then turn ON Lock Picture Mode. 6. Press the Exit button to highlight Delete and press OK. 3. Use the Left/Right Arrow buttons to exit the menu screens...
... 4-digit PIN. 4. The LOCK PICTURE MODE menu is set, then lock/ unlock. Use the Number Pad on your remote to exit the menu screens. Then turn ON Lock Picture Mode. 6. Press the Exit button to highlight Delete and press OK. 3. Use the Left/Right Arrow buttons to exit the menu screens...

User Manual
Page 22
... When you wish to adjust. An X appears over a color channel that brightness. -or- Use the Arrow buttons to highlight another color channel to turn color channels off . 4. Use the Arrow buttons on the remote to highlight Off. To hide the SMPTE Test Pattern, use the Left/Right Arrow ...Tuner Settings The Color Tuner settings allow technicians to manually calibrate the TV. The COLOR TUNER menu is displayed. Press the OK button to turn color channels off or on the remote to highlight the Gain and Color values you have finished with precisely set colors, and a specialized ...
... When you wish to adjust. An X appears over a color channel that brightness. -or- Use the Arrow buttons to highlight another color channel to turn color channels off . 4. Use the Arrow buttons on the remote to highlight Off. To hide the SMPTE Test Pattern, use the Left/Right Arrow ...Tuner Settings The Color Tuner settings allow technicians to manually calibrate the TV. The COLOR TUNER menu is displayed. Press the OK button to turn color channels off or on the remote to highlight the Gain and Color values you have finished with precisely set colors, and a specialized ...

User Manual
Page 24
...On 3. Toggle between On or Off to On, DTS signals cannot be passed through digital audio outputs. • Lip Sync - If this occurs, turn volume leveling off. Select Auto, PCM, Dolby D or Bitstream. Select Variable if you are set to hide or display the on-screen volume slider that...press Left/Right Arrow buttons to a home theater audio system. The on the remote. Use the Arrow buttons on the remote. • Balance - Turns the built-in speakers Digital Audio Out Auto On or Off. ADJUSTING THE AUDIO SETTINGS To adjust the audio settings: 1. Sets the volume control properties...
...On 3. Toggle between On or Off to On, DTS signals cannot be passed through digital audio outputs. • Lip Sync - If this occurs, turn volume leveling off. Select Auto, PCM, Dolby D or Bitstream. Select Variable if you are set to hide or display the on-screen volume slider that...press Left/Right Arrow buttons to a home theater audio system. The on the remote. Use the Arrow buttons on the remote. • Balance - Turns the built-in speakers Digital Audio Out Auto On or Off. ADJUSTING THE AUDIO SETTINGS To adjust the audio settings: 1. Sets the volume control properties...

User Manual
Page 27
... the remote to highlight Timers and press OK. From the TIMERS menu, use the Blank Screen feature: 1. If you don't want the TV to turn the TV off when there is no signal, change the setting to highlight Blank Screen. 2. To use the Up/Down Arrow buttons on -screen menu...the Auto Power Off feature: 1. Press the Menu button on the remote. Sleep Timer Auto Power Off Blank Screen Off 10 Minutes 3. This feature can turn off while audio is displayed. Otherwise, select 10 minutes. 3. Setting the Auto Power Off Feature To help save energy, your TV screen can be ...
... the remote to highlight Timers and press OK. From the TIMERS menu, use the Blank Screen feature: 1. If you don't want the TV to turn the TV off when there is no signal, change the setting to highlight Blank Screen. 2. To use the Up/Down Arrow buttons on -screen menu...the Auto Power Off feature: 1. Press the Menu button on the remote. Sleep Timer Auto Power Off Blank Screen Off 10 Minutes 3. This feature can turn off while audio is displayed. Otherwise, select 10 minutes. 3. Setting the Auto Power Off Feature To help save energy, your TV screen can be ...

User Manual
Page 36
... to highlight TV Name and press OK. Use the Arrow buttons on the remote to highlight System and press OK. Accessibility settings VIZIO is displayed. Use the Arrow and OK buttons to providing intuitive, user-friendly products. 3 Changing the TV Name Naming your TV...control your TV across multiple devices . Use the Arrow buttons on -screen Menu is displayed. The list of paired devices or unpair a device: 1. Turn Text-to confirm. The TV name input menu is displayed. Press the Menu button on the remote control. 2. Djae's Tablet 2. Speech Rate* ...
... to highlight TV Name and press OK. Use the Arrow buttons on the remote to highlight System and press OK. Accessibility settings VIZIO is displayed. Use the Arrow and OK buttons to providing intuitive, user-friendly products. 3 Changing the TV Name Naming your TV...control your TV across multiple devices . Use the Arrow buttons on -screen Menu is displayed. The list of paired devices or unpair a device: 1. Turn Text-to confirm. The TV name input menu is displayed. Press the Menu button on the remote control. 2. Djae's Tablet 2. Speech Rate* ...
User Manual
Page 37
... Demo Mode Reset & Admin Back Reset to Factory Defaults Soft Power Cycle Power Indicator On System PIN Code USB Power Always On Viewing Data VIZIO Privacy Policy Store Demo Restoring the TV to Factory Default Settings All of your TV normally does not glow when the TV is on -screen... to lock content and picture settings • Enable or disable program offers and suggestions • Enable or disable anonymous debug data for the TV to turn off then on -screen menu settings can : • Reset the TV to factory settings • Force the system to power off . Highlight Yes and...
... Demo Mode Reset & Admin Back Reset to Factory Defaults Soft Power Cycle Power Indicator On System PIN Code USB Power Always On Viewing Data VIZIO Privacy Policy Store Demo Restoring the TV to Factory Default Settings All of your TV normally does not glow when the TV is on -screen... to lock content and picture settings • Enable or disable program offers and suggestions • Enable or disable anonymous debug data for the TV to turn off then on -screen menu settings can : • Reset the TV to factory settings • Force the system to power off . Highlight Yes and...

User Manual
Page 38
...used for this TV, including the IP address. Power is available. 3 Setting a System PIN You can easily turn this feature On or Off in the RESET & ADMIN menu. VIZIO Viewing Data is turned on your new PIN. Enter and confirm your television/display, such as "Viewing Data." System PIN Code Back... Change the PIN used to support.vizio.com and selecting Contact Us. When the TV is powered off, ...
...used for this TV, including the IP address. Power is available. 3 Setting a System PIN You can easily turn this feature On or Off in the RESET & ADMIN menu. VIZIO Viewing Data is turned on your new PIN. Enter and confirm your television/display, such as "Viewing Data." System PIN Code Back... Change the PIN used to support.vizio.com and selecting Contact Us. When the TV is powered off, ...
User Manual
Page 40
... Launch SmartCast Home: Begin streatming with SmartCast Home by mirroring your laptop or mobile device onto your TV. • Turn your iOS or Android device into the ultimate streaming companion with the VIZIO SmartCast Mobile app. • Rearrange apps on your home screen just the way you discover, stream, and control your...
... Launch SmartCast Home: Begin streatming with SmartCast Home by mirroring your laptop or mobile device onto your TV. • Turn your iOS or Android device into the ultimate streaming companion with the VIZIO SmartCast Mobile app. • Rearrange apps on your home screen just the way you discover, stream, and control your...


