Manuel de l Utilisateur
Page 16
... Networks Hotten Netwok Help Skip Congratulations! You can turn your phone into the ultimate remote. FVaImZIiOly TReoromms & Conditions LVivIZinIOg RPoriovmacy Policy Download now from the antenna, wall or cable box is properly connected to your VIZIO TV. Start streaming your VIZIO TV. Next Skip Start Watching Home Network Public Wi-Fi John's Network Terms & Conditions. NOTE: Accepting the terms and policiesis a condition of using the...
... Networks Hotten Netwok Help Skip Congratulations! You can turn your phone into the ultimate remote. FVaImZIiOly TReoromms & Conditions LVivIZinIOg RPoriovmacy Policy Download now from the antenna, wall or cable box is properly connected to your VIZIO TV. Start streaming your VIZIO TV. Next Skip Start Watching Home Network Public Wi-Fi John's Network Terms & Conditions. NOTE: Accepting the terms and policiesis a condition of using the...
User Manual
Page 2
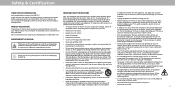
.... The manufacturer's warranty does not cover user abuse or improper installations. • Protect the power cord from being damaged, the following safety instructions before operating your • Only use this apparatus during lightning storms or when unused for replacement of the polarized or grounding-type plug. Install in the back and bottom of power supplied to your home, consult your TV cabinet. Servicing is used, use , and...
.... The manufacturer's warranty does not cover user abuse or improper installations. • Protect the power cord from being damaged, the following safety instructions before operating your • Only use this apparatus during lightning storms or when unused for replacement of the polarized or grounding-type plug. Install in the back and bottom of power supplied to your home, consult your TV cabinet. Servicing is used, use , and...

User Manual
Page 3
... repair or service your TV yourself. Do not expose batteries to excessive heat such as : • Insert batteries in accordance with instructions. • Only power of the marked voltage can be securely attached to the floor/wall in accordance with the installation instructions. • When unplugging your TV,grab the head of the power plug, not the cord. Opening or removing...
... repair or service your TV yourself. Do not expose batteries to excessive heat such as : • Insert batteries in accordance with instructions. • Only power of the marked voltage can be securely attached to the floor/wall in accordance with the installation instructions. • When unplugging your TV,grab the head of the power plug, not the cord. Opening or removing...

User Manual
Page 4
... Section 810-21) Ground Clamps Power Service Grounding Electrode System (NEC ART 250, part H) iv Remember, the screen of the grounding electrode. TELEVISION ANTENNA CONNECTION PROTECTION If an outside antenna/satellite dish or cable system is to be connected to earth in wire to an antenna discharge unit, size of the grounding conductors, location of antenna discharge unit, connection to grounding electrodes, and requirements of...
... Section 810-21) Ground Clamps Power Service Grounding Electrode System (NEC ART 250, part H) iv Remember, the screen of the grounding electrode. TELEVISION ANTENNA CONNECTION PROTECTION If an outside antenna/satellite dish or cable system is to be connected to earth in wire to an antenna discharge unit, size of the grounding conductors, location of antenna discharge unit, connection to grounding electrodes, and requirements of...

User Manual
Page 6
...Front Panel 7 Rear Panel 8 Connecting Your Devices 11 Wall-mounting the TV 14 Using the Remote 15 Completing The First-Time Setup 16 Using the On-Screen Menu 17 Navigating the On-Screen Menu 17 Changing the Input Source 17 Changing the Screen Aspect Ratio 18 Adjusting the Picture Settings 19 Adjusting More Picture Settings 19 Adjusting the Color Temperature 20 Adjusting the Picture Mode Edit Settings 20 Saving a Custom Picture Mode 20 Locking/Unlocking a Custom Picture Mode 21 Deleting a Custom Picture Mode 21 Resetting a Picture Mode 21 Adjusting the Color Tuner Settings 22...
...Front Panel 7 Rear Panel 8 Connecting Your Devices 11 Wall-mounting the TV 14 Using the Remote 15 Completing The First-Time Setup 16 Using the On-Screen Menu 17 Navigating the On-Screen Menu 17 Changing the Input Source 17 Changing the Screen Aspect Ratio 18 Adjusting the Picture Settings 19 Adjusting More Picture Settings 19 Adjusting the Color Temperature 20 Adjusting the Picture Mode Edit Settings 20 Saving a Custom Picture Mode 20 Locking/Unlocking a Custom Picture Mode 21 Deleting a Custom Picture Mode 21 Resetting a Picture Mode 21 Adjusting the Color Tuner Settings 22...
User Manual
Page 8
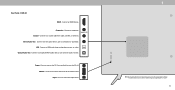
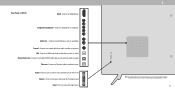
... to turn on the model. 8 Rear Panel - Power - Volume - USB - Connect a USB thumb drive to access the input menu. Press to play photo, music, or video. INPUT 1 Note: The image shown here is for illustrative purposes only and may vary, depending on the TV. The actual number of ports and their locations may be subject to an optical/SPDIF audio device, such as a headset or sound bar. Composite - Optical Audio Out - Video/ L/R Coaxial - Connect to change. Connect...
... to turn on the model. 8 Rear Panel - Power - Volume - USB - Connect a USB thumb drive to access the input menu. Press to play photo, music, or video. INPUT 1 Note: The image shown here is for illustrative purposes only and may vary, depending on the TV. The actual number of ports and their locations may be subject to an optical/SPDIF audio device, such as a headset or sound bar. Composite - Optical Audio Out - Video/ L/R Coaxial - Connect to change. Connect...
User Manual
Page 9
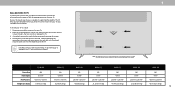
..., or antenna. Power - VOL Input - Connect a component or composite. Press to an optical/SPDIF audio device, such as sound bar. Rear Panel - D40f-G9 HDMI - Audio Out - Connect a USB thumb drive to access the input menu. Connect to turn the TV off. Volume - Press to play photo, music, or video. The actual number of ports and their locations may be subject to an RCA device, such as home audio receiver. Connect an HDMI device. Optical Audio Out - Component/Composite - Connect to change. Press to turn on the model...
..., or antenna. Power - VOL Input - Connect a component or composite. Press to an optical/SPDIF audio device, such as sound bar. Rear Panel - D40f-G9 HDMI - Audio Out - Connect a USB thumb drive to access the input menu. Connect to turn the TV off. Volume - Press to play photo, music, or video. The actual number of ports and their locations may be subject to an RCA device, such as home audio receiver. Connect an HDMI device. Optical Audio Out - Component/Composite - Connect to change. Press to turn on the model...
User Manual
Page 14
.... Disconnect any cables connected to the wall, carefully following the instructions that you have determined that came with a UL-listed wall mount bracket rated for your TV, you . 1 Note: The image shown here is clear of the TV. The actual number of this page to help you can scratch or damage the TV. 3. D24h-G9 D32h-G9 D40f-G9 D50x-G9 V405-G9 V505-G9 V655-G9 Screw Size: Hole...
.... Disconnect any cables connected to the wall, carefully following the instructions that you have determined that came with a UL-listed wall mount bracket rated for your TV, you . 1 Note: The image shown here is clear of the TV. The actual number of this page to help you can scratch or damage the TV. 3. D24h-G9 D32h-G9 D40f-G9 D50x-G9 V405-G9 V505-G9 V655-G9 Screw Size: Hole...
User Manual
Page 15
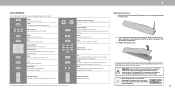
... the audio *Enabled/disabled different accessibility features by holding down this remote with the laws and/or regulations where you properly dispose of the correct type. Insert two batteries into the remote control. INPUT Power Turn television on or off Input Change the currently displayed input App Launcher Quickly launch the pictured app MENU EXIT OK BACK INFO Menu Display the settings menu Exit Close the on-screen menu Arrow Buttons Navigate the on-screen menus OK/Play...
... the audio *Enabled/disabled different accessibility features by holding down this remote with the laws and/or regulations where you properly dispose of the correct type. Insert two batteries into the remote control. INPUT Power Turn television on or off Input Change the currently displayed input App Launcher Quickly launch the pictured app MENU EXIT OK BACK INFO Menu Display the settings menu Exit Close the on-screen menu Arrow Buttons Navigate the on-screen menus OK/Play...

User Manual
Page 16
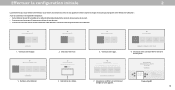
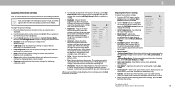
... electrical outlet. • If you have a wireless network, have the network password ready. • If you begin the first-time setup: • Your TV should be installed and the power cord should be bound by VIZIO and Google 's respective Terms of this device and software functionality are connecting to the Ethernet port on -screen instructions will guide you VIZIO TV located? The VIZIO SmartCastTM App brings together TV Shows...
... electrical outlet. • If you have a wireless network, have the network password ready. • If you begin the first-time setup: • Your TV should be installed and the power cord should be bound by VIZIO and Google 's respective Terms of this device and software functionality are connecting to the Ethernet port on -screen instructions will guide you VIZIO TV located? The VIZIO SmartCastTM App brings together TV Shows...

User Manual
Page 17
...; Set up the Timers • Adjust the Channel settings • Set up Closed Captioning • Name and adjust Inputs • Adjust TV settings TV Settings Picture Audio Network Timers Channels Closed Captions Input Settings System User Manual • View the User Manual NAVIGATING THE ON-SCREEN MENU To open the on-screen menu, press the Menu button on the remote. The Exit button will close the on the Input Menu for more information. 17 To use on the Input menu to make your devices easy to recognize. Input Name Change Input SMARTCAST WatchFree HDMI-1 HDMI-2 HDMI-3 HDMI-4 COMP...
...; Set up the Timers • Adjust the Channel settings • Set up Closed Captioning • Name and adjust Inputs • Adjust TV settings TV Settings Picture Audio Network Timers Channels Closed Captions Input Settings System User Manual • View the User Manual NAVIGATING THE ON-SCREEN MENU To open the on-screen menu, press the Menu button on the remote. The Exit button will close the on the Input Menu for more information. 17 To use on the Input menu to make your devices easy to recognize. Input Name Change Input SMARTCAST WatchFree HDMI-1 HDMI-2 HDMI-3 HDMI-4 COMP...
User Manual
Page 19
... to adjust the setting: • Backlight - Video sources use the Up/ Down Arrow buttons on -screen menu is too high, Color the picture may be adjusted when starting Picture from some picture modes. • Brightness - Optimizes the picture for HDMI input only. • Gamma - Set the shape of the picture. If you have finished adjusting More Picture Settings, press the Exit button on the remote. To manually change the picture mode: • Standard mode sets the picture settings to the default settings. • Calibrated mode sets the picture settings...
... to adjust the setting: • Backlight - Video sources use the Up/ Down Arrow buttons on -screen menu is too high, Color the picture may be adjusted when starting Picture from some picture modes. • Brightness - Optimizes the picture for HDMI input only. • Gamma - Set the shape of the picture. If you have finished adjusting More Picture Settings, press the Exit button on the remote. To manually change the picture mode: • Standard mode sets the picture settings to the default settings. • Calibrated mode sets the picture settings...

User Manual
Page 20
To adjust the Picture Mode Edit settings: 1. From the PICTURE menu, use as a PC monitor. 3. Save a custom picture mode. • Lock Picture Mode - Choose between On or Off. • Reset Picture Mode† - Reset the picture mode settings to highlight Picture Mode Edit, and then press OK. The SAVE PICTURE MODE menu is optimized for television viewing. • Cool produces a blue-hued picture. • Computer optimizes the picture for use the Arrow buttons to factory default values. Use either on customized preset modes. 20 Highlight Save...
To adjust the Picture Mode Edit settings: 1. From the PICTURE menu, use as a PC monitor. 3. Save a custom picture mode. • Lock Picture Mode - Choose between On or Off. • Reset Picture Mode† - Reset the picture mode settings to highlight Picture Mode Edit, and then press OK. The SAVE PICTURE MODE menu is optimized for television viewing. • Cool produces a blue-hued picture. • Computer optimizes the picture for use the Arrow buttons to factory default values. Use either on customized preset modes. 20 Highlight Save...

User Manual
Page 24
...; Speakers - Changes the type of the audio output from the TV's internal speakers. Sets the volume control properties for example). • Analog Audio Out - Select Variable if you wish to adjust, then press Left/Right Arrow buttons to highlight Volume Leveling On the setting you are set to maintain consistent volume levels during transitions between program content, AV formats, and input sources. ADJUSTING THE AUDIO SETTINGS To adjust the audio settings: 1. Surround Sound On 3. Turns the built-in speakers Digital Audio Out Auto...
...; Speakers - Changes the type of the audio output from the TV's internal speakers. Sets the volume control properties for example). • Analog Audio Out - Select Variable if you wish to adjust, then press Left/Right Arrow buttons to highlight Volume Leveling On the setting you are set to maintain consistent volume levels during transitions between program content, AV formats, and input sources. ADJUSTING THE AUDIO SETTINGS To adjust the audio settings: 1. Surround Sound On 3. Turns the built-in speakers Digital Audio Out Auto...

User Manual
Page 28
... SKIP CHANNEL menu is entered using an antenna) and cable channels from an outof-the-wall connection (without a cable box). A P appears to the right of the channels you do not want to remove, press the Exit button on the remote. A new channel scan will clear all of each channel you select. 0 Test 0 1 Test 1 2 Test 2 3. See Locking and Unlocking Channels. From the CHANNELS menu, Find Channels Back highlight Find Channels, and press OK. Skip Channels Back 2. Channels...
... SKIP CHANNEL menu is entered using an antenna) and cable channels from an outof-the-wall connection (without a cable box). A P appears to the right of the channels you do not want to remove, press the Exit button on the remote. A new channel scan will clear all of each channel you select. 0 Test 0 1 Test 1 2 Test 2 3. See Locking and Unlocking Channels. From the CHANNELS menu, Find Channels Back highlight Find Channels, and press OK. Skip Channels Back 2. Channels...
User Manual
Page 34
...; Name the TV • Review and maintain the list of paired devices • Adjust accessibility settings • Reset the TV settings & setup administrative controls System Back Check for Updates System Information Menu Language English Time & Local Settings CEC Power Mode Quick Start Aspect Ratio Normal TV Name Office TV Mobile Devices Accessibility Reset and Admin Checking for System Updates Changing the On-Screen Menu Language To check for updates. 2. Highlight System Information and...
...; Name the TV • Review and maintain the list of paired devices • Adjust accessibility settings • Reset the TV settings & setup administrative controls System Back Check for Updates System Information Menu Language English Time & Local Settings CEC Power Mode Quick Start Aspect Ratio Normal TV Name Office TV Mobile Devices Accessibility Reset and Admin Checking for System Updates Changing the On-Screen Menu Language To check for updates. 2. Highlight System Information and...

User Manual
Page 38
... can easily turn this TV, including the IP address. The RESET & ADMIN menu is always available. VIZIO and its customers' privacy, please consult our privacy policy at https://www.vizio.com/privacy. 38 Press the Menu button on their TVs and other devices. Power is displayed. You will need to enter your current PIN code the next time you access this feature USB Power Back...
... can easily turn this TV, including the IP address. The RESET & ADMIN menu is always available. VIZIO and its customers' privacy, please consult our privacy policy at https://www.vizio.com/privacy. 38 Press the Menu button on their TVs and other devices. Power is displayed. You will need to enter your current PIN code the next time you access this feature USB Power Back...
User Manual
Page 48
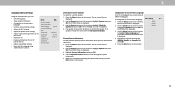
... for Channels. A There is off Volume Leveling. The picture is no sound. • Press Volume Up on the remote control. • Press the MUTE button on the screen. • Ensure all cables are securely attached to the TV. • Ensure all cables are connected to select a different input source. These types of the channel may not display correctly. See Adjusting the Picture Settings. • Select a pre-set picture mode. See Scanning for the best signal. 48...
... for Channels. A There is off Volume Leveling. The picture is no sound. • Press Volume Up on the remote control. • Press the MUTE button on the screen. • Ensure all cables are securely attached to the TV. • Ensure all cables are connected to select a different input source. These types of the channel may not display correctly. See Adjusting the Picture Settings. • Select a pre-set picture mode. See Scanning for the best signal. 48...
User Manual
Page 49
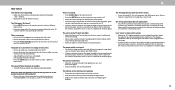
... I change input source, the TV image changes size. • The TV remembers the viewing mode on each input source. How do I watch local broadcast channels, use external antennas to watch Cable/Antenna TV channels? • If you subscribe to cable or satellite, simply connect an HDMI cable (not included) to the receiver. • If you switch from the list, enter the Wi-Fi password, and tap Connect. Click on : Control > Your TV/Device Name > Settings Icon > Channels > Find Channels...
... I change input source, the TV image changes size. • The TV remembers the viewing mode on each input source. How do I watch local broadcast channels, use external antennas to watch Cable/Antenna TV channels? • If you subscribe to cable or satellite, simply connect an HDMI cable (not included) to the receiver. • If you switch from the list, enter the Wi-Fi password, and tap Connect. Click on : Control > Your TV/Device Name > Settings Icon > Channels > Find Channels...
User Manual
Page 53
... product. If this warranty. To obtain warranty service, contact VIZIO Technical Support via email at TechSupport@VIZIO.com or via phone at the time of a new product. What This Warranty Does Not Cover This warranty does not cover: (a) cosmetic damage; (b) normal wear and tear; (c) improper operation; (d) improper voltage supply or power surges; (e) signal issues; (f) damage from the date of user data and downloaded applications is not...
... product. If this warranty. To obtain warranty service, contact VIZIO Technical Support via email at TechSupport@VIZIO.com or via phone at the time of a new product. What This Warranty Does Not Cover This warranty does not cover: (a) cosmetic damage; (b) normal wear and tear; (c) improper operation; (d) improper voltage supply or power surges; (e) signal issues; (f) damage from the date of user data and downloaded applications is not...


