
Quickstart Guide / Guide de Demarrage Rapide
Page 1
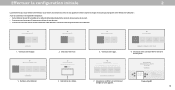
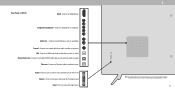
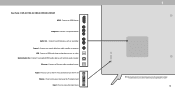
... de TV Power Cable Câble d'alimentation Smart TV Smart TV TV Stands Supports de TV 2 Remote with Batteries Télécommande avec piles $ Watch Now HDRMCRIACTAoT3o 3 RSCtAaSntTadona3drdard OStpOatnipcdtaiacl ardl SaStealtleitlelite SatellitHeDHMDIMI Plug the tv power cord into a wall outlet. Des adaptateurs peuvent être requis. For more information including the product's full User manual, visit VIZIO...
... de TV Power Cable Câble d'alimentation Smart TV Smart TV TV Stands Supports de TV 2 Remote with Batteries Télécommande avec piles $ Watch Now HDRMCRIACTAoT3o 3 RSCtAaSntTadona3drdard OStpOatnipcdtaiacl ardl SaStealtleitlelite SatellitHeDHMDIMI Plug the tv power cord into a wall outlet. Des adaptateurs peuvent être requis. For more information including the product's full User manual, visit VIZIO...
Manuel de l Utilisateur
Page 16
... functionality of Service and Privacy Policies. The VIZIO SmartCastTM App brings together TV Shows, movies, Rescan Networks and more from the antenna, wall or cable box is properly connected to your TV? VIZIO Terms & Conditions VIZIO Privacy Policy Google Privacy Policy Google Terms &... Next Skip Start Watching Home Network Public Wi-Fi John's Network Terms & Conditions. You can turn your VIZIO TV. TouNtextest Skip prêt! TWerhmicsh&roCoomndisitiyoonusr. VIZIO TV Located? Encrypted • Si vous vous connectez à votre réseau à l'aide d'un ...
... functionality of Service and Privacy Policies. The VIZIO SmartCastTM App brings together TV Shows, movies, Rescan Networks and more from the antenna, wall or cable box is properly connected to your TV? VIZIO Terms & Conditions VIZIO Privacy Policy Google Privacy Policy Google Terms &... Next Skip Start Watching Home Network Public Wi-Fi John's Network Terms & Conditions. You can turn your VIZIO TV. TouNtextest Skip prêt! TWerhmicsh&roCoomndisitiyoonusr. VIZIO TV Located? Encrypted • Si vous vous connectez à votre réseau à l'aide d'un ...
User Manual
Page 2
... in fire or electric shock. • Refer all instructions. • Do not use caution when moving your VIZIO product at least three feet should be maintained between your TV and any way, such • The wall socket should be observed for your dealer. may compromise the integrity of...easily accessible. the apparatus. • When connected to avoid causing fire, electric shock, or component damage. • A distance of at www.VIZIO.com. TV. Do not install your TV as a radiator, heater, oven, amplifier etc. Overloading can result in the back and bottom of your...
... in fire or electric shock. • Refer all instructions. • Do not use caution when moving your VIZIO product at least three feet should be maintained between your TV and any way, such • The wall socket should be observed for your dealer. may compromise the integrity of...easily accessible. the apparatus. • When connected to avoid causing fire, electric shock, or component damage. • A distance of at www.VIZIO.com. TV. Do not install your TV as a radiator, heater, oven, amplifier etc. Overloading can result in the back and bottom of your...

User Manual
Page 3
...the television set to a suitable support. • Not placing the television set on cloth or other cables are unplugged before moving your TV if any servicing other hazards. Any other voltage than the specified voltage may be used as the disconnect device, the disconnect device shall ...remain readily operable. • CAUTION: These servicing instructions are qualified to do not perform any abnormality occurs. Do not try to repair your TV from moisture. Liquid sprays or any of electrical shock to persons. • WARNING: Exposure to loud sounds can be placed on the ...
...the television set to a suitable support. • Not placing the television set on cloth or other cables are unplugged before moving your TV if any servicing other hazards. Any other voltage than the specified voltage may be used as the disconnect device, the disconnect device shall ...remain readily operable. • CAUTION: These servicing instructions are qualified to do not perform any abnormality occurs. Do not try to repair your TV from moisture. Liquid sprays or any of electrical shock to persons. • WARNING: Exposure to loud sounds can be placed on the ...

User Manual
Page 4
...such power lines or circuits. Remember, the screen of the coaxial cable is left unattended or unused for long periods of time, unplug the TV from the wall outlet and disconnect the antenna or cable system. Ground Clamp Antenna Lead In Wire Electric Service Equipment Antenna Discharge Unit (NEC Section... charges. Power Lines Do not locate the antenna near overhead light or power circuits, or where it is intended to be connected to the TV, make sure that the antenna or cable system is electrically grounded to proper grounding of the mast and supporting structure, grounding of the lead...
...such power lines or circuits. Remember, the screen of the coaxial cable is left unattended or unused for long periods of time, unplug the TV from the wall outlet and disconnect the antenna or cable system. Ground Clamp Antenna Lead In Wire Electric Service Equipment Antenna Discharge Unit (NEC Section... charges. Power Lines Do not locate the antenna near overhead light or power circuits, or where it is intended to be connected to the TV, make sure that the antenna or cable system is electrically grounded to proper grounding of the mast and supporting structure, grounding of the lead...

User Manual
Page 6
...by Rating 30 Setting Up Closed Captioning 31 Changing the Appearance of Digital Closed Captions 31 Renaming Devices on the Input Menu 33 Changing the TV Settings 34 Viewing System Information 34 Changing the On-Screen Menu Language 34 Setting the Time and Local Settings 35 Adjusting the CEC Settings ...35 Changing the TV Name 36 Using the Reset & Admin Menu 37 Restoring the TV to Factory Default Settings 37 Turning the Power Indicator On or Off 37 Using the Info Window 39 SmartCast ...
...by Rating 30 Setting Up Closed Captioning 31 Changing the Appearance of Digital Closed Captions 31 Renaming Devices on the Input Menu 33 Changing the TV Settings 34 Viewing System Information 34 Changing the On-Screen Menu Language 34 Setting the Time and Local Settings 35 Adjusting the CEC Settings ...35 Changing the TV Name 36 Using the Reset & Admin Menu 37 Restoring the TV to Factory Default Settings 37 Turning the Power Indicator On or Off 37 Using the Info Window 39 SmartCast ...

User Manual
Page 7
To keep the power indicator on as long as the TV is on , then goes out after several seconds. Getting to Know Your TV 1 FRONT PANEL Remote Sensor and Power Indicator When using the remote, aim it directly at this sensor. The power indicator flashes on when the TV turns on , see Turning the Power Indicator On or Off. 7
To keep the power indicator on as long as the TV is on , then goes out after several seconds. Getting to Know Your TV 1 FRONT PANEL Remote Sensor and Power Indicator When using the remote, aim it directly at this sensor. The power indicator flashes on when the TV turns on , see Turning the Power Indicator On or Off. 7
User Manual
Page 8
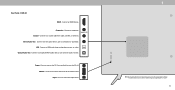
... level. INPUT 1 Note: The image shown here is for illustrative purposes only and may vary, depending on the TV. Composite - Connect a composite. Stereo Audio Out - Press and hold to turn the TV off. Press to access the input menu. Connect to play photo, music, or video. Connect a USB thumb drive to a coaxial... ports and their locations may be subject to an optical/SPDIF audio device, such as a headset or sound bar. Video/ L/R Coaxial - Connect to change. D24h-G9 HDMI - Rear Panel - Connect an HDMI device. Power -
... level. INPUT 1 Note: The image shown here is for illustrative purposes only and may vary, depending on the TV. Composite - Connect a composite. Stereo Audio Out - Press and hold to turn the TV off. Press to access the input menu. Connect to play photo, music, or video. Connect a USB thumb drive to a coaxial... ports and their locations may be subject to an optical/SPDIF audio device, such as a headset or sound bar. Video/ L/R Coaxial - Connect to change. D24h-G9 HDMI - Rear Panel - Connect an HDMI device. Power -
User Manual
Page 9
... be subject to play photo, music, or video. Connect a component or composite. Connect to access the input menu. Press and hold to turn the TV off. VOL Input - USB - Press to turn on the model. 9 Connect to modem/ router. Power - INPUT 1 Note: The image shown ...here is for illustrative purposes only and may vary, depending on the TV. Ethernet - Rear Panel - Audio Out - Connect an HDMI device. D40f-G9 HDMI - Connect an Ethernet cable to an RCA device, such as home audio receiver. Connect a USB thumb drive to...
... be subject to play photo, music, or video. Connect a component or composite. Connect to access the input menu. Press and hold to turn the TV off. VOL Input - USB - Press to turn on the model. 9 Connect to modem/ router. Power - INPUT 1 Note: The image shown ...here is for illustrative purposes only and may vary, depending on the TV. Ethernet - Rear Panel - Audio Out - Connect an HDMI device. D40f-G9 HDMI - Connect an Ethernet cable to an RCA device, such as home audio receiver. Connect a USB thumb drive to...
User Manual
Page 10
... The actual number of ports and their locations may be subject to a coaxial cable from cable, satellite, or antenna. D32h-G9, D50x-G9, V405-G9, V505-G9 & V655-G9 HDMI - Audio Out - Coaxial - USB - INPUT 1 Note: The image shown here is for illustrative purposes only and may... vary, depending on the TV. Connect to an RCA device, such as home audio receiver. Rear Panel - Connect an HDMI ...
... The actual number of ports and their locations may be subject to a coaxial cable from cable, satellite, or antenna. D32h-G9, D50x-G9, V405-G9, V505-G9 & V655-G9 HDMI - Audio Out - Coaxial - USB - INPUT 1 Note: The image shown here is for illustrative purposes only and may... vary, depending on the TV. Connect to an RCA device, such as home audio receiver. Rear Panel - Connect an HDMI ...

User Manual
Page 11
... Note: The actual ports and their locations may vary, depending on the TV (HDMI, Component, etc.). 2. Set the TV's input to display output from most devices. 1. Verify that matches an available port on the TV model. 11 Turn the TV and your device has a video port that your device on. AUDIO &... VIDEO CABLE TYPES Your TV can be used to match the connection you used (HDMI-1, HDMI-2, etc.). Connecting Your ...
... Note: The actual ports and their locations may vary, depending on the TV (HDMI, Component, etc.). 2. Set the TV's input to display output from most devices. 1. Verify that matches an available port on the TV model. 11 Turn the TV and your device has a video port that your device on. AUDIO &... VIDEO CABLE TYPES Your TV can be used to match the connection you used (HDMI-1, HDMI-2, etc.). Connecting Your ...

User Manual
Page 12
Turn the TV and your device on Your Device 12 Set the TV's input to the TV and the device using an adapter (not included). 2. Connect the appropriate cable (not included) to match the connection you used (Composite). Composite input on back of TV* Video/ L/R Connecting to a composite device Video / Audio L/R Adapter (Not Included) *The actual ports and their locations may vary, depending on the TV model. 1 Composite Connection on . D24h-G9 ONLY D24h-G9 includes a Composite In / AV In port that requires additional adapters (not included). 1. CONNECTING A DEVICE -
Turn the TV and your device on Your Device 12 Set the TV's input to the TV and the device using an adapter (not included). 2. Connect the appropriate cable (not included) to match the connection you used (Composite). Composite input on back of TV* Video/ L/R Connecting to a composite device Video / Audio L/R Adapter (Not Included) *The actual ports and their locations may vary, depending on the TV model. 1 Composite Connection on . D24h-G9 ONLY D24h-G9 includes a Composite In / AV In port that requires additional adapters (not included). 1. CONNECTING A DEVICE -

User Manual
Page 13
Turn the TV and your device has audio port that matches an available port on the TV (Optical, RCA, etc). 2. Connect the appropriate cable (not included) to an audio device, such as a receiver or sound bar. 1. AUDIO CABLE TYPES Your TV can be output sound to the TV and the device. 3. HDMI CABLE HDMI RCA CABLE L R 1 OPTICAL/SPDIF CABLE Optical Note: The actual ports and their locations may vary, depending on . CONNECTING A DEVICE - Verify that your device on the TV model. 13
Turn the TV and your device has audio port that matches an available port on the TV (Optical, RCA, etc). 2. Connect the appropriate cable (not included) to an audio device, such as a receiver or sound bar. 1. AUDIO CABLE TYPES Your TV can be output sound to the TV and the device. 3. HDMI CABLE HDMI RCA CABLE L R 1 OPTICAL/SPDIF CABLE Optical Note: The actual ports and their locations may vary, depending on . CONNECTING A DEVICE - Verify that your device on the TV model. 13
User Manual
Page 14
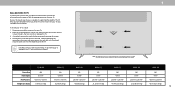
... wall mount to find the appropriate mount for the weight/load of the TV. Use only with your TV, you will need a wall mount. D24h-G9 D32h-G9 D40f-G9 D50x-G9 V405-G9 V505-G9 V655-G9 Screw Size: Hole Depth: M4 8.5 mm M4 8.5 mm M6 10 mm M6 9 mm M6 10 mm M6 9 mm M6 9 mm Hole ... a wall: 1. If attached, remove the stands by loosening and removing the screws. 4. To prevent injury or damage to the TV, ask someone to your TV. Place the TV face-down on a wall requires lifting. The actual number of debris that you . 1 Note: The image shown here is clear of ports and their ...
... wall mount to find the appropriate mount for the weight/load of the TV. Use only with your TV, you will need a wall mount. D24h-G9 D32h-G9 D40f-G9 D50x-G9 V405-G9 V505-G9 V655-G9 Screw Size: Hole Depth: M4 8.5 mm M4 8.5 mm M6 10 mm M6 9 mm M6 10 mm M6 9 mm M6 9 mm Hole ... a wall: 1. If attached, remove the stands by loosening and removing the screws. 4. To prevent injury or damage to the TV, ask someone to your TV. Place the TV face-down on a wall requires lifting. The actual number of debris that you . 1 Note: The image shown here is clear of ports and their ...

User Manual
Page 16
...Skip 6. Your use of this device and software functionality are connecting to get your language. Accept the T&Cs and register your VIZIO TV. Start Watching By the way... Completing The First-Time Setup 2 The first time you turn your phone into one simple experience. Choose... to be connected to an electrical outlet. • If you have a wireless network, have the network password ready. • If you VIZIO TV located? Family Room Living Room Master Bedroom Game Room Add Custom Location 5. Scan for local broadcast channels, make sure the cable from the antenna...
...Skip 6. Your use of this device and software functionality are connecting to get your language. Accept the T&Cs and register your VIZIO TV. Start Watching By the way... Completing The First-Time Setup 2 The first time you turn your phone into one simple experience. Choose... to be connected to an electrical outlet. • If you have a wireless network, have the network password ready. • If you VIZIO TV located? Family Room Living Room Master Bedroom Game Room Add Custom Location 5. Scan for local broadcast channels, make sure the cable from the antenna...

User Manual
Page 17
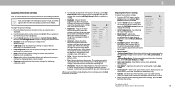
...Left Arrow buttons or the Input button on the remote. Input Name Change Input SMARTCAST WatchFree HDMI-1 HDMI-2 HDMI-3 HDMI-4 COMP TV Note: Inputs may vary by TV. The Input menu is displayed. See Renaming Devices on -screen menu. Use the Arrow buttons to highlight a menu option, ... Set up the Timers • Adjust the Channel settings • Set up Closed Captioning • Name and adjust Inputs • Adjust TV settings TV Settings Picture Audio Network Timers Channels Closed Captions Input Settings System User Manual • View the User Manual NAVIGATING THE ON-SCREEN MENU To...
...Left Arrow buttons or the Input button on the remote. Input Name Change Input SMARTCAST WatchFree HDMI-1 HDMI-2 HDMI-3 HDMI-4 COMP TV Note: Inputs may vary by TV. The Input menu is displayed. See Renaming Devices on -screen menu. Use the Arrow buttons to highlight a menu option, ... Set up the Timers • Adjust the Channel settings • Set up Closed Captioning • Name and adjust Inputs • Adjust TV settings TV Settings Picture Audio Network Timers Channels Closed Captions Input Settings System User Manual • View the User Manual NAVIGATING THE ON-SCREEN MENU To...

User Manual
Page 18
...of the picture so that the picture keeps its original shape. Normal Stretch Wide Zoom Tip: The aspect ratio cannot be changed for standard definition TV (480i/480p). 3 18 Panoramic mode is a 4:3 image with an algorithm so the center doesn't look stretched. Stretches a 4:3 aspect ratio...fill 16:9 screen with black bars left and right, stretches to fill 16:9 screen. Examples include widescreen movies and older television programs. Your TV can display images in different modes: Normal, Stretch, Wide, Zoom, and Panoramic. • Normal (default) - CHANGING THE SCREEN ASPECT...
...of the picture so that the picture keeps its original shape. Normal Stretch Wide Zoom Tip: The aspect ratio cannot be changed for standard definition TV (480i/480p). 3 18 Panoramic mode is a 4:3 image with an algorithm so the center doesn't look stretched. Stretches a 4:3 aspect ratio...fill 16:9 screen with black bars left and right, stretches to fill 16:9 screen. Examples include widescreen movies and older television programs. Your TV can display images in different modes: Normal, Stretch, Wide, Zoom, and Panoramic. • Normal (default) - CHANGING THE SCREEN ASPECT...
User Manual
Page 19
3 ADJUSTING THE PICTURE SETTINGS Your TV can be used to sharpen non-HD (high definition) content; The Picture menu is displayed. 2. Use the ...settings. • Calibrated mode sets the picture settings to values ideal for watching TV in a brightly-lit room. • Calibrated Dark mode sets the picture settings to values ideal for watching TV in the picture. Backlight cannot be adjusted to adjust the setting: •... you have finished adjusting More Picture Settings, press the Exit button on the remote to D24h-G9 **Applicable models: D50x-G9, V505-G9, V405-G9 and V655-G9 19
3 ADJUSTING THE PICTURE SETTINGS Your TV can be used to sharpen non-HD (high definition) content; The Picture menu is displayed. 2. Use the ...settings. • Calibrated mode sets the picture settings to values ideal for watching TV in a brightly-lit room. • Calibrated Dark mode sets the picture settings to values ideal for watching TV in the picture. Backlight cannot be adjusted to adjust the setting: •... you have finished adjusting More Picture Settings, press the Exit button on the remote to D24h-G9 **Applicable models: D50x-G9, V505-G9, V405-G9 and V655-G9 19

User Manual
Page 22
... the color channels, press the Exit button. Press the OK button. 3. To hide the SMPTE Test Pattern, use the Arrow buttons to manually calibrate the TV. When you are finished, press the Exit button. To adjust the HSB color settings: 1. Selecting a percentage immediately shows the flat pattern at the same time...
... the color channels, press the Exit button. Press the OK button. 3. To hide the SMPTE Test Pattern, use the Arrow buttons to manually calibrate the TV. When you are finished, press the Exit button. To adjust the HSB color settings: 1. Selecting a percentage immediately shows the flat pattern at the same time...

User Manual
Page 24
...on-screen volume slider that appears when volume is adjusted. • Surround Sound - When the TV speakers are controlling the volume with more than two channels (3.0, 5.0, or 5.1, for audio with the TV's volume controls, or select Fixed if an external audio device (sound bar or AV receiver) will... menu is displayed. Turns the built-in speakers Digital Audio Out Auto On or Off. Changes the type of the audio output from the TV's internal speakers. Select Variable if you are set to a home theater audio system. Surround Sound On 3. Toggle between program content, AV formats...
...on-screen volume slider that appears when volume is adjusted. • Surround Sound - When the TV speakers are controlling the volume with more than two channels (3.0, 5.0, or 5.1, for audio with the TV's volume controls, or select Fixed if an external audio device (sound bar or AV receiver) will... menu is displayed. Turns the built-in speakers Digital Audio Out Auto On or Off. Changes the type of the audio output from the TV's internal speakers. Select Variable if you are set to a home theater audio system. Surround Sound On 3. Toggle between program content, AV formats...


