
Quick Use Guide
Page 3
Document Server button (Not active at this time) 3. Clear/Stop button (Stops the current Job / Clears the Page count / Fax Number) 9. Start button (Used to Copier Mode) 2. Copy button (Changes the Operation Panel to Start Copy, Fax & Scan) 10. User Interface (Touch Screen) 7. Clear modes button (Clears all setting default) 12. Printer button (Access to email) 6. Scanner button (Changes the Operation Panel to Scanner Mode / Allows scan to Locked Print & Online / Off Line) 5. Simplified display button (Changes the Touch Screen to Facsimile Mode) 4. Energy saver button (Put...
Document Server button (Not active at this time) 3. Clear/Stop button (Stops the current Job / Clears the Page count / Fax Number) 9. Start button (Used to Copier Mode) 2. Copy button (Changes the Operation Panel to Start Copy, Fax & Scan) 10. User Interface (Touch Screen) 7. Clear modes button (Clears all setting default) 12. Printer button (Access to email) 6. Scanner button (Changes the Operation Panel to Scanner Mode / Allows scan to Locked Print & Online / Off Line) 5. Simplified display button (Changes the Touch Screen to Facsimile Mode) 4. Energy saver button (Put...

Manuals
Page 2
... Used Functions", Convenient Functions . ••Press to program defaults for each function, operation status, or messages. When the machine is lit. See "Saving Energy", Getting Started . Guide to the Names and Functions of the Machine's Control Panel This illustration shows the control panel of the Initial Screen", Convenient Functions . 666[Interrupt] key Press to make interrupt copies. See "Accessing User Tools", Connecting the Machine/ System Settings . •• Counter Press to and from Low Power mode or Sleep mode. You can register often used settings...
... Used Functions", Convenient Functions . ••Press to program defaults for each function, operation status, or messages. When the machine is lit. See "Saving Energy", Getting Started . Guide to the Names and Functions of the Machine's Control Panel This illustration shows the control panel of the Initial Screen", Convenient Functions . 666[Interrupt] key Press to make interrupt copies. See "Accessing User Tools", Connecting the Machine/ System Settings . •• Counter Press to and from Low Power mode or Sleep mode. You can register often used settings...
Manuals
Page 3
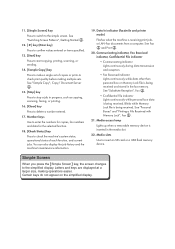
... SD card or a USB flash memory device. See "Personal Boxes" and "Printing a File Received with Memory Lock", Fax . 2222Media access lamp Lights up when a removable memory device is receiving print jobs or LAN-Fax documents from a computer. Simple Screen When you press the {Simple Screen} key, the screen changes to the simple screen. Certain keys do not appear on the simplified display. See "Switching Screen Patterns", Getting Started . 1111[ # ] key (Enter key) Press to confirm values entered or items specified. 1111[Start] key Press to start copying, printing, scanning, or sending...
... SD card or a USB flash memory device. See "Personal Boxes" and "Printing a File Received with Memory Lock", Fax . 2222Media access lamp Lights up when a removable memory device is receiving print jobs or LAN-Fax documents from a computer. Simple Screen When you press the {Simple Screen} key, the screen changes to the simple screen. Certain keys do not appear on the simplified display. See "Switching Screen Patterns", Getting Started . 1111[ # ] key (Enter key) Press to confirm values entered or items specified. 1111[Start] key Press to start copying, printing, scanning, or sending...

Manuals
Page 13
...118 Entering an E-mail Address Manually...118 Basic Procedure for Storing Scan Files...119 3 Print Quick Install...97 Displaying the Printer Driver Properties...98 Standard Printing...99 When Using the PCL 6 Printer Driver...99 Printing on Both Sides of Sheets...100 When Using the PCL 6 Printer Driver...100 Types of 2 Sided Printing...100 Combining Multiple Pages into Single Page 101 When Using the PCL 6 Printer Driver...101 Types of Combine Printing...101 Printing on Envelopes...103 Configuring Envelope Settings Using the Control Panel 103 Printing on a Computer Running Windows/Confirming...
...118 Entering an E-mail Address Manually...118 Basic Procedure for Storing Scan Files...119 3 Print Quick Install...97 Displaying the Printer Driver Properties...98 Standard Printing...99 When Using the PCL 6 Printer Driver...99 Printing on Both Sides of Sheets...100 When Using the PCL 6 Printer Driver...100 Types of 2 Sided Printing...100 Combining Multiple Pages into Single Page 101 When Using the PCL 6 Printer Driver...101 Types of Combine Printing...101 Printing on Envelopes...103 Configuring Envelope Settings Using the Control Panel 103 Printing on a Computer Running Windows/Confirming...

Manuals
Page 26
...; This machine supports network and local connections. • You can connect a PictBridge-compatible digital camera to collate, staple, and punch holes in your prints. The following types of print jobs can print or delete print jobs stored on the camera using the camera's own interface. See "Direct Printing from a Memory Storage Device", Print . 16 See "Storing Documents in the Hard Disk Drive and Printing them", Print . • The finisher allows you can send PDF files directly...
...; This machine supports network and local connections. • You can connect a PictBridge-compatible digital camera to collate, staple, and punch holes in your prints. The following types of print jobs can print or delete print jobs stored on the camera using the camera's own interface. See "Direct Printing from a Memory Storage Device", Print . 16 See "Storing Documents in the Hard Disk Drive and Printing them", Print . • The finisher allows you can send PDF files directly...

Manuals
Page 61
...8226; Copier: 25 programs • Document Server: 25 programs • Facsimile: 100 programs • Scanner: 25 programs The following settings can be registered to programs: Copier: Color mode, original type, density, Special Original, paper tray, Store File (except for User Name, File Name, and Password), Auto Reduce / Enlarge, Create Margin, Finishing, Cover/Slip Sheet, Edit / Color, Dup./Combine/Series, Reduce / Enlarge, number of copies Document Server (on the [Home] screen. Result Rep., TX Mode (except for Subject) Scanner: Scan Settings, density, Original Feed Type, Send File Type...
...8226; Copier: 25 programs • Document Server: 25 programs • Facsimile: 100 programs • Scanner: 25 programs The following settings can be registered to programs: Copier: Color mode, original type, density, Special Original, paper tray, Store File (except for User Name, File Name, and Password), Auto Reduce / Enlarge, Create Margin, Finishing, Cover/Slip Sheet, Edit / Color, Dup./Combine/Series, Reduce / Enlarge, number of copies Document Server (on the [Home] screen. Result Rep., TX Mode (except for Subject) Scanner: Scan Settings, density, Original Feed Type, Send File Type...
Manuals
Page 107
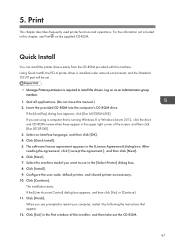
... [OK]. 4. The installation starts. Print This chapter describes frequently used printer functions and operations. The software license agreement appears in the [Select Printer] dialog box. 8. 5. Quick Install You can install the printer drivers easily from the CD-ROM provided with this manual.) 2. Using Quick Install, the PCL 6 printer driver is installed under network environment, and the Standard TCP/IP port will be set. • Manage Printers permission is running Windows 8 or Windows Server 2012, click the drive and CD...
... [OK]. 4. The installation starts. Print This chapter describes frequently used printer functions and operations. The software license agreement appears in the [Select Printer] dialog box. 8. 5. Quick Install You can install the printer drivers easily from the CD-ROM provided with this manual.) 2. Using Quick Install, the PCL 6 printer driver is installed under network environment, and the Standard TCP/IP port will be set. • Manage Printers permission is running Windows 8 or Windows Server 2012, click the drive and CD...

Manuals
Page 109
... Printing • The default setting is loaded in the "Copies:" box. 11. In this case, check if the document was printed. In the "Job Type:" list, select [Normal Print]. 5. If you want to print on only one side, select [Off] for the 2 sided printing setting. • If you select [Auto Tray Select] in Low Power mode or Sleep mode, an error message might appear when the print job is automatically selected according to print onto. In the [Select Printer] list...
... Printing • The default setting is loaded in the "Copies:" box. 11. In this case, check if the document was printed. In the "Job Type:" list, select [Normal Print]. 5. If you want to print on only one side, select [Off] for the 2 sided printing setting. • If you select [Auto Tray Select] in Low Power mode or Sleep mode, an error message might appear when the print job is automatically selected according to print onto. In the [Select Printer] list...

Manuals
Page 110
... the output pages in the upper left corner of Sheets This section explains how to print on both sides of each page using the printer driver. • The types of paper that can select which way the bound pages open by specifying which edge to 59 g/m2), Color, Letterhead, Preprinted, Bond, Cardstock When Using the PCL 6 Printer Driver 1. Start printing from the application's [Print] dialog box. Click the [Detailed Settings] tab. 5. Print Printing...
... the output pages in the upper left corner of Sheets This section explains how to print on both sides of each page using the printer driver. • The types of paper that can select which way the bound pages open by specifying which edge to 59 g/m2), Color, Letterhead, Preprinted, Bond, Cardstock When Using the PCL 6 Printer Driver 1. Start printing from the application's [Print] dialog box. Click the [Detailed Settings] tab. 5. Print Printing...

Manuals
Page 113
... WordPad menu button in the upper left corner of the paper tray in which the envelopes are loaded. 8. Click [Preferences]. 103 Configuring Envelope Settings Using the Control Panel 1. Press the [User Tools/Counter] key. CJS039 3. Press [Envelope] in the "Paper Type" area, and then select the appropriate item in the paper tray. 2. Select the envelope size, and then press [OK]. 6. Select the paper size setting of the window, and then click [Print]. 2. Printing on Envelopes Configure the paper settings appropriately using the PCL 6 printer driver 1. Load envelopes...
... WordPad menu button in the upper left corner of the paper tray in which the envelopes are loaded. 8. Click [Preferences]. 103 Configuring Envelope Settings Using the Control Panel 1. Press the [User Tools/Counter] key. CJS039 3. Press [Envelope] in the "Paper Type" area, and then select the appropriate item in the paper tray. 2. Select the envelope size, and then press [OK]. 6. Select the paper size setting of the window, and then click [Print]. 2. Printing on Envelopes Configure the paper settings appropriately using the PCL 6 printer driver 1. Load envelopes...

Manuals
Page 133
... turning on the left side of [User Name]. Document Server This chapter describes frequently used Document Server functions and operations. For the information not included in the Address Book, or enter the name directly. It is not to identify the user or user group that all other users. User Name You can only be sure to press the [Reset] key to cancel the document selection. • The user name registered to the scanned document. Password...
... turning on the left side of [User Name]. Document Server This chapter describes frequently used Document Server functions and operations. For the information not included in the Address Book, or enter the name directly. It is not to identify the user or user group that all other users. User Name You can only be sure to press the [Reset] key to cancel the document selection. • The user name registered to the scanned document. Password...

Manuals
Page 143
... select [Machine Setting(s)] in [Bypass Tray] under [Tray Setting Priority] in a specific orientation. When printing from a computer, see page 155 "Envelopes". • Specify the sizes of the Printer Features menu, the settings made using the control panel have priority over the printer driver settings. For details, see page 133 "Printing from the Bypass Tray Using the Printer Function". • When the [Panel Key Sound] is [Auto Detect]. 133 For details, see "Printing Documents", Print . • The default of [Printer Bypass Paper Size] is turned off, it...
... select [Machine Setting(s)] in [Bypass Tray] under [Tray Setting Priority] in a specific orientation. When printing from a computer, see page 155 "Envelopes". • Specify the sizes of the Printer Features menu, the settings made using the control panel have priority over the printer driver settings. For details, see page 133 "Printing from the Bypass Tray Using the Printer Function". • When the [Panel Key Sound] is [Auto Detect]. 133 For details, see "Printing Documents", Print . • The default of [Printer Bypass Paper Size] is turned off, it...
Manuals
Page 176
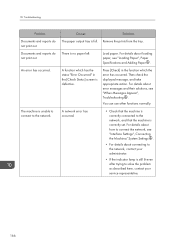
Remove the prints from the tray. For details about error messages and their solutions, see "When Messages Appear", Troubleshooting . The machine is no paper left. There is unable to connect to the network. For details about loading paper, see "Interface Settings", Connecting the Machine/ System Settings . • For details about connecting to connect the network, see "Loading Paper", Paper Specifications and Adding Paper . For details about how to the network, contact your service representative. 166 Press [Check] in the function which...
Remove the prints from the tray. For details about error messages and their solutions, see "When Messages Appear", Troubleshooting . The machine is no paper left. There is unable to connect to the network. For details about loading paper, see "Interface Settings", Connecting the Machine/ System Settings . • For details about connecting to connect the network, see "Loading Paper", Paper Specifications and Adding Paper . For details about how to the network, contact your service representative. 166 Press [Check] in the function which...

Manuals
Page 181
...specify the paper size with the control panel, see "Tray Paper Settings", Connecting the Machine/ System Settings . Cannot print in duplex mode. Paper of undetectable size has been loaded. • Remove misfed paper. You have selected a paper tray that cannot be used for duplex printing. An error has occurred when the Address Book is not selected automatically, you load a paper size that can be Wait a while, and then retry the changed from the display panel or Web Image Monitor. For details about removing jammed paper, see "Removing Jammed Paper", Troubleshooting...
...specify the paper size with the control panel, see "Tray Paper Settings", Connecting the Machine/ System Settings . Cannot print in duplex mode. Paper of undetectable size has been loaded. • Remove misfed paper. You have selected a paper tray that cannot be used for duplex printing. An error has occurred when the Address Book is not selected automatically, you load a paper size that can be Wait a while, and then retry the changed from the display panel or Web Image Monitor. For details about removing jammed paper, see "Removing Jammed Paper", Troubleshooting...
Manuals
Page 202
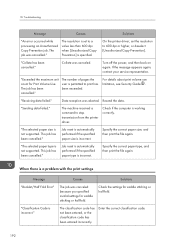
... classification code has been entered incorrectly. The resolution is set the resolution to stop transmission from the printer driver. Turn off the power, and then back on again. "Receiving data failed." Job reset is automatically performed if the specified paper type is specified. Check the settings for Print Volume Use. If the message appears again, contact your service representative. Check if the computer is incorrect. Causes Solutions The job was cancelled." The job was canceled because...
... classification code has been entered incorrectly. The resolution is set the resolution to stop transmission from the printer driver. Turn off the power, and then back on again. "Receiving data failed." Job reset is automatically performed if the specified paper type is specified. Check the settings for Print Volume Use. If the message appears again, contact your service representative. Check if the computer is incorrect. Causes Solutions The job was cancelled." The job was canceled because...

Manuals
Page 204
... how to change the resolution setting, see Security Guide . Check the paper orientation, print orientation, and then punch position. Certain settings can produce print results that the Document Server can produce print results that you want to send to use the Document Server function. Solutions Reduce the paper size of this size." Punch printing was canceled. capacity of the Document Server. Troubleshooting Message "Print overrun." Causes Images were discarded while printing. When documents cannot be as expected. The hard disk...
... how to change the resolution setting, see Security Guide . Check the paper orientation, print orientation, and then punch position. Certain settings can produce print results that the Document Server can produce print results that you want to send to use the Document Server function. Solutions Reduce the paper size of this size." Punch printing was canceled. capacity of the Document Server. Troubleshooting Message "Print overrun." Causes Images were discarded while printing. When documents cannot be as expected. The hard disk...

Manuals
Page 210
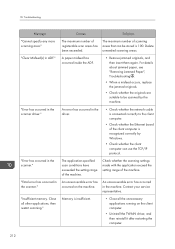
... Error" A memory allocation error occurred. Turn off the power, and then back on again. If the message appears again, contact your service representative. PDF file does not print out because the capacity of errors may be obtained. 10. Troubleshooting Message Causes Solutions "Failed to obtain file system." "I /O Buffer], and then set the maximum buffer size to a larger value. • Reduce the number of files being sent to print the Configuration Page, see "List / Test Print", Print...
... Error" A memory allocation error occurred. Turn off the power, and then back on again. If the message appears again, contact your service representative. PDF file does not print out because the capacity of errors may be obtained. 10. Troubleshooting Message Causes Solutions "Failed to obtain file system." "I /O Buffer], and then set the maximum buffer size to a larger value. • Reduce the number of files being sent to print the Configuration Page, see "List / Test Print", Print...
Manuals
Page 222
... is connected correctly to be scanned by Windows. • Check whether the client computer can be stored is insufficient. • Close all other applications, then restart scanning." Contact your service representative. Troubleshooting Message "Cannot specify any more scanning area." Delete unneeded scanning areas. Memory is 100. "Clear Misfeed(s) in the scanner." Close all the unnecessary applications running on the machine. For details about jammed paper, see "Removing Jammed Paper", Troubleshooting . •...
... is connected correctly to be scanned by Windows. • Check whether the client computer can be stored is insufficient. • Close all other applications, then restart scanning." Contact your service representative. Troubleshooting Message "Cannot specify any more scanning area." Delete unneeded scanning areas. Memory is 100. "Clear Misfeed(s) in the scanner." Close all the unnecessary applications running on the machine. For details about jammed paper, see "Removing Jammed Paper", Troubleshooting . •...

Manuals
Page 236
..., 214, 217, 218, 219, 220, 221, 223 Model-Specific Information 7 N Names of major features 8 Network settings 179 O OCR unit 24 OHP transparency 135 One-pass duplex scanning ADF 29, 37 One-Sided Combine 72 Options 33 Orientation-fixed paper 141 Original orientation 67 P Paper capacity 144 Paper guides 31 Paper size 134, 144 Paper thickness 144 Paper tray 30, 130 Paper type 144 Paperless Fax 9 Parallel connection 97 Path 114 PCL 97 Placing originals 60...
..., 214, 217, 218, 219, 220, 221, 223 Model-Specific Information 7 N Names of major features 8 Network settings 179 O OCR unit 24 OHP transparency 135 One-pass duplex scanning ADF 29, 37 One-Sided Combine 72 Options 33 Orientation-fixed paper 141 Original orientation 67 P Paper capacity 144 Paper guides 31 Paper size 134, 144 Paper thickness 144 Paper tray 30, 130 Paper type 144 Paperless Fax 9 Parallel connection 97 Path 114 PCL 97 Placing originals 60...

Quick Reference Guide
Page 1
... power indicator 7. {Energy Saver} key 8. {Login/Logout} key 9. {User Tools/Counter} key 10. {Simple Screen} key 11. {#} key (Enter key) 12. {Start} key Press to start copying, printing, scanning, or sending. 13. {Stop} key Press to stop a job in progress, such as copying, scanning, faxing, or printing. 14. {Clear} key Press to program a Destination key... (Registering Addresses and Users, Connecting the Machine/ System Settings) A Press the {User Tools/Counter} key. Press the name key, or enter the registered number using the number keys, and then press [#]. D Enter the time using...
... power indicator 7. {Energy Saver} key 8. {Login/Logout} key 9. {User Tools/Counter} key 10. {Simple Screen} key 11. {#} key (Enter key) 12. {Start} key Press to start copying, printing, scanning, or sending. 13. {Stop} key Press to stop a job in progress, such as copying, scanning, faxing, or printing. 14. {Clear} key Press to program a Destination key... (Registering Addresses and Users, Connecting the Machine/ System Settings) A Press the {User Tools/Counter} key. Press the name key, or enter the registered number using the number keys, and then press [#]. D Enter the time using...


