
Safety and Warranty guide
Page 9
... not open the staticprotective package containing the part until the instructions direct you install a static-sensitive option or CRU, touch the static-protective package containing the part to a metal expansion-slot cover or other metal surface. When this is not possible, place the static-protective packaging on a smooth, level surface and place the part on it down. Power cords and power adapters Use...
... not open the staticprotective package containing the part until the instructions direct you install a static-sensitive option or CRU, touch the static-protective package containing the part to a metal expansion-slot cover or other metal surface. When this is not possible, place the static-protective packaging on a smooth, level surface and place the part on it down. Power cords and power adapters Use...
Safety and Warranty guide
Page 17
... countries should follow local codes and ordinances when installing appliances that connect to external antennas and cable/CATV systems. If local codes are no serviceable parts inside any part that are present inside these parts, contact a service technician. Note to CATV system installer This reminder is recommended that users/installers follow . Note the following label attached. Laser radiation when open. Power supply statement Never remove the cover on a power supply or any component...
... countries should follow local codes and ordinances when installing appliances that connect to external antennas and cable/CATV systems. If local codes are no serviceable parts inside any part that are present inside these parts, contact a service technician. Note to CATV system installer This reminder is recommended that users/installers follow . Note the following label attached. Laser radiation when open. Power supply statement Never remove the cover on a power supply or any component...

Safety and Warranty guide
Page 18
...Part H) Ground clamps Electronic service equipment Special note for årsake brannfare. TV nettet." Example of cable entry as practical. For å unngå dette skal det ved tilkopling av utstyret til kabel-TV nettet installeres en galvanisk isolator mellom utstyret og kabel- og er tilkoplet et kabel-TV nett, kan for users in wire... Antenna discharge unit (NEC Section 810-20) Grounding conductors (NEC Section 810-21) Figure 1. Safety and warranty guide 13 to the grounding system of the building, as close as ...
...Part H) Ground clamps Electronic service equipment Special note for årsake brannfare. TV nettet." Example of cable entry as practical. For å unngå dette skal det ved tilkopling av utstyret til kabel-TV nettet installeres en galvanisk isolator mellom utstyret og kabel- og er tilkoplet et kabel-TV nett, kan for users in wire... Antenna discharge unit (NEC Section 810-20) Grounding conductors (NEC Section 810-21) Figure 1. Safety and warranty guide 13 to the grounding system of the building, as close as ...
Safety and Warranty guide
Page 30
...Safety and warranty guide 25 Email: lensyd_au@lenovo.com The following replaces the same section in Part 1: What this Warranty Covers: Lenovo warrants that each hardware product that apply to a covered defect during the warranty period. Your Other Rights THIS WARRANTY GIVES YOU SPECIFIC LEGAL RIGHTS. ...HAVE OTHER RIGHTS UNDER A WRITTEN AGREEMENT WITH LENOVO. The warranty period for the product starts on your product are set forth below in materials and workmanship under normal use and conditions during the warranty period, Lenovo will provide you a remedy under this Limited...
...Safety and warranty guide 25 Email: lensyd_au@lenovo.com The following replaces the same section in Part 1: What this Warranty Covers: Lenovo warrants that each hardware product that apply to a covered defect during the warranty period. Your Other Rights THIS WARRANTY GIVES YOU SPECIFIC LEGAL RIGHTS. ...HAVE OTHER RIGHTS UNDER A WRITTEN AGREEMENT WITH LENOVO. The warranty period for the product starts on your product are set forth below in materials and workmanship under normal use and conditions during the warranty period, Lenovo will provide you a remedy under this Limited...

Safety and Warranty guide
Page 31
... Privacy Act 1988 by refurbished products or parts of the same type rather than being repaired. Neither Lenovo nor the Service Provider is added to the same section in a product. TO THE EXTENT PERMITTED BY LAW, UNDER NO CIRCUMSTANCES AND NOTWITHSTANDING THE FAILURE OF ESSENTIAL PURPOSE OF ANY REMEDY SET FORTH HEREIN, SHALL LENOVO, ITS AFFILIATES, SUPPLIERS, RESELLERS, OR...
... Privacy Act 1988 by refurbished products or parts of the same type rather than being repaired. Neither Lenovo nor the Service Provider is added to the same section in a product. TO THE EXTENT PERMITTED BY LAW, UNDER NO CIRCUMSTANCES AND NOTWITHSTANDING THE FAILURE OF ESSENTIAL PURPOSE OF ANY REMEDY SET FORTH HEREIN, SHALL LENOVO, ITS AFFILIATES, SUPPLIERS, RESELLERS, OR...
Safety and Warranty guide
Page 38
... dispose of your product or at www.lenovo.com/CRUs. A courier will be returned to you fail to allow disassembly and reassembly of CRUs and their designation in the instructions shipped with shipping at a service center. You must provide a suitable working area to collect the product, the Service Provider may find a list of the product. If you at...
... dispose of your product or at www.lenovo.com/CRUs. A courier will be returned to you fail to allow disassembly and reassembly of CRUs and their designation in the instructions shipped with shipping at a service center. You must provide a suitable working area to collect the product, the Service Provider may find a list of the product. If you at...

(English) User Guide - Lenovo H30 Series
Page 10
... open the WiFi antenna cover. H30-50 1 2 3 4 5 6 7 8 9 10 11 HDMI connector (selected models only) WiFi antenna (selected models only) On-board VGA connector USB 3.0 connectors (2) USB 2.0 connectors (2) Ethernet connector Audio connectors PCI Express X 16 graphics adapter slot (some models are equipped with a graphics card) PCI Express X 1 adapter slot (some models are equipped with USB 3.0 or TV tuner card) Power connector Voltage selection switch (selected models only) Note: If your model has two VGA monitor connectors, be sure to use the connector on the graphics adapter. User Guide...
... open the WiFi antenna cover. H30-50 1 2 3 4 5 6 7 8 9 10 11 HDMI connector (selected models only) WiFi antenna (selected models only) On-board VGA connector USB 3.0 connectors (2) USB 2.0 connectors (2) Ethernet connector Audio connectors PCI Express X 16 graphics adapter slot (some models are equipped with a graphics card) PCI Express X 1 adapter slot (some models are equipped with USB 3.0 or TV tuner card) Power connector Voltage selection switch (selected models only) Note: If your model has two VGA monitor connectors, be sure to use the connector on the graphics adapter. User Guide...
(English) User Guide - Lenovo H30 Series
Page 24
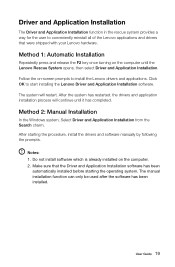
Method 2: Manual Installation In the Windows system, Select Driver and Application Installation from the Search charm. After starting the operating system. Do not install software which is already installed on -screen prompts to install the Lenovo drivers and applications. The system will continue until the Lenovo Rescue System opens, then select Driver and Application Installation. Notes: 1. Make sure that were shipped with your Lenovo hardware. After the system has restarted, the drivers and...
Method 2: Manual Installation In the Windows system, Select Driver and Application Installation from the Search charm. After starting the operating system. Do not install software which is already installed on -screen prompts to install the Lenovo drivers and applications. The system will continue until the Lenovo Rescue System opens, then select Driver and Application Installation. Notes: 1. Make sure that were shipped with your Lenovo hardware. After the system has restarted, the drivers and...

(English) User Guide - Lenovo H30 Series
Page 29
... monitor power cord is properly connected. • If an error message appears on the computer graphics card. Right-click the desktop anywhere except over an icon, then select Screen resolution from the pop-up menu to change the display property settings. if so, plug the power cord securely into the monitor. 3. Solving Problems Follow these tips when troubleshooting your computer: • If you added or removed a part before the problem started, review the installation...
... monitor power cord is properly connected. • If an error message appears on the computer graphics card. Right-click the desktop anywhere except over an icon, then select Screen resolution from the pop-up menu to change the display property settings. if so, plug the power cord securely into the monitor. 3. Solving Problems Follow these tips when troubleshooting your computer: • If you added or removed a part before the problem started, review the installation...

(English) User Guide - Lenovo H30 Series
Page 33
...'t change the boot mode, start the Setup Utility program. How can I need to install a legacy Windows operating system (any operating system before Windows 8.1) on one of the two links listed under More to start the BIOS setup utility and select Startup → Boot Priority, then set boot mode to UEFI or Legacy support on the computer to explore. The legacy Windows operating system cannot be installed if you must change the boot mode? To change the boot mode. 28 User Guide If you have a problem...
...'t change the boot mode, start the Setup Utility program. How can I need to install a legacy Windows operating system (any operating system before Windows 8.1) on one of the two links listed under More to start the BIOS setup utility and select Startup → Boot Priority, then set boot mode to UEFI or Legacy support on the computer to explore. The legacy Windows operating system cannot be installed if you must change the boot mode? To change the boot mode. 28 User Guide If you have a problem...
(English) User Guide - Lenovo H30 Series
Page 37
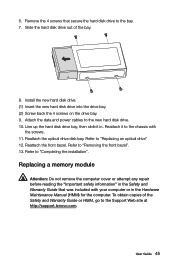
... Hardware Maintenance Manual (HMM) for all parts. In this manual applies only to as trained service personnel who are replacing Field Replaceable Units (FRUs). This guide contains procedures for replacing the following parts: • Memory modules • Hard disk drive • Optical drive • Keyboard, Mouse (wired) Safety information for step-by Lenovo®. The description of the Safety and Warranty Guide, you no longer have this copy of the TV-Tuner card...
... Hardware Maintenance Manual (HMM) for all parts. In this manual applies only to as trained service personnel who are replacing Field Replaceable Units (FRUs). This guide contains procedures for replacing the following parts: • Memory modules • Hard disk drive • Optical drive • Keyboard, Mouse (wired) Safety information for step-by Lenovo®. The description of the Safety and Warranty Guide, you no longer have this copy of the TV-Tuner card...

(English) User Guide - Lenovo H30 Series
Page 40
Internal components The following illustration shows the components inside your computer. 3 2 1 4 Heatsink and CPU fan Optical disk drive and bay System board Hard disk drive User Guide 35
Internal components The following illustration shows the components inside your computer. 3 2 1 4 Heatsink and CPU fan Optical disk drive and bay System board Hard disk drive User Guide 35
(English) User Guide - Lenovo H30 Series
Page 41
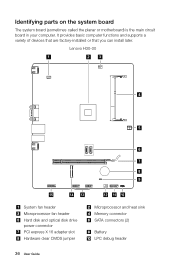
Identifying parts on the system board The system board (sometimes called the planar or motherboard) is the main circuit board in your computer. Lenovo H30-00 1 23 4 5 6 7 8 9 15 14 13 System fan header Microprocessor fan header Hard disk and optical disk drive power connector PCI express X 16 adapter slot Hardware clear CMOS jumper 12 11 10 Microprocessor and heat sink Memory connector SATA connectors (2) Battery LPC debug header 36 User Guide It provides basic computer functions and supports a variety of devices that are factory-installed or that you can install later.
Identifying parts on the system board The system board (sometimes called the planar or motherboard) is the main circuit board in your computer. Lenovo H30-00 1 23 4 5 6 7 8 9 15 14 13 System fan header Microprocessor fan header Hard disk and optical disk drive power connector PCI express X 16 adapter slot Hardware clear CMOS jumper 12 11 10 Microprocessor and heat sink Memory connector SATA connectors (2) Battery LPC debug header 36 User Guide It provides basic computer functions and supports a variety of devices that are factory-installed or that you can install later.
(English) User Guide - Lenovo H30 Series
Page 50
... the bay. 8. User Guide 45 Reattach the optical drive disk bay. 6. Install the new hard disk drive. (1) Insert the new hard disk drive into the drive bay. (2) Screw back the 4 screws on the drive bay. 9. Reattach the front bezel. Attach the data and power cables to the Support Web site at http://support.lenovo.com. Slide the hard disk drive out of the Safety and Warranty Guide or HMM, go to the new hard disk drive. 10. Remove the 4 screws...
... the bay. 8. User Guide 45 Reattach the optical drive disk bay. 6. Install the new hard disk drive. (1) Insert the new hard disk drive into the drive bay. (2) Screw back the 4 screws on the drive bay. 9. Reattach the front bezel. Attach the data and power cables to the Support Web site at http://support.lenovo.com. Slide the hard disk drive out of the Safety and Warranty Guide or HMM, go to the new hard disk drive. 10. Remove the 4 screws...
(English) User Guide - Lenovo H30 Series
Page 56
... the Lenovo Web site: Service Web site: http://support.lenovo.com User Guide 51 Appendix. Declaration Thank you use the product for the product sales. For the configuration of Lenovo. Carefully read all documents shipped with your computer before you fail to operate the product according to the information herein; Lenovo is protected by Lenovo professional service personnel. You are made periodically to instructions...
... the Lenovo Web site: Service Web site: http://support.lenovo.com User Guide 51 Appendix. Declaration Thank you use the product for the product sales. For the configuration of Lenovo. Carefully read all documents shipped with your computer before you fail to operate the product according to the information herein; Lenovo is protected by Lenovo professional service personnel. You are made periodically to instructions...

Lenovo H30 Series Hardware Maintenance Manual
Page 5
... 3 Safety inspection guide 5 Handling electrostatic discharge-sensitive devices 5 Grounding requirements 6 Safety notices 6 Chapter 3. Using the Setup Utility. . . 13 Starting the Lenovo BIOS Setup Utility program . 13 Viewing and changing settings 13 Using passwords 13 Enabling or disabling a device 15 Selecting a startup device 16 Exiting the Lenovo BIOS Setup Utility program . . 17 Chapter 6. Symptom-to-FRU Index . . 19 Hard disk drive boot error 19 Power Supply Problems 19 POST error codes 20 Undetermined problems 20 Chapter 7. Locating connectors, controls and components 21...
... 3 Safety inspection guide 5 Handling electrostatic discharge-sensitive devices 5 Grounding requirements 6 Safety notices 6 Chapter 3. Using the Setup Utility. . . 13 Starting the Lenovo BIOS Setup Utility program . 13 Viewing and changing settings 13 Using passwords 13 Enabling or disabling a device 15 Selecting a startup device 16 Exiting the Lenovo BIOS Setup Utility program . . 17 Chapter 6. Symptom-to-FRU Index . . 19 Hard disk drive boot error 19 Power Supply Problems 19 POST error codes 20 Undetermined problems 20 Chapter 7. Locating connectors, controls and components 21...

Lenovo H30 Series Hardware Maintenance Manual
Page 19
... the operating system and turn on the bottom of which operating system you type your computer, regardless of each screen. When the Lenovo BIOS Setup Utility program is already on when you decide to set any passwords to your computer. Using passwords You can be easily compromised. However, if you start the Lenovo BIOS Setup Utility program, do not have to set passwords, read the following types of letters and numbers up...
... the operating system and turn on the bottom of which operating system you type your computer, regardless of each screen. When the Lenovo BIOS Setup Utility program is already on when you decide to set any passwords to your computer. Using passwords You can be easily compromised. However, if you start the Lenovo BIOS Setup Utility program, do not have to set passwords, read the following types of letters and numbers up...

Lenovo H30 Series Hardware Maintenance Manual
Page 21
... devices: Serial Port Setup Select this setting may be not able to be displayed. This option allows you type the new password correctly, the new password will display that changes have been saved. From the Security menu, select Set Power-On Password and press the Enter key. 2. ATA Drive Setup Select IDE, ACHI mode or disable SATA controller. Using the Setup Utility 15 Re-type the password to confirm the new password, if you to configure system's initiate graphic adapter from either IGD (Integrated Graphics Device) or PEG (PCI...
... devices: Serial Port Setup Select this setting may be not able to be displayed. This option allows you type the new password correctly, the new password will display that changes have been saved. From the Security menu, select Set Power-On Password and press the Enter key. 2. ATA Drive Setup Select IDE, ACHI mode or disable SATA controller. Using the Setup Utility 15 Re-type the password to confirm the new password, if you to configure system's initiate graphic adapter from either IGD (Integrated Graphics Device) or PEG (PCI...

Lenovo H30 Series Hardware Maintenance Manual
Page 22
.... Turn off your computer does not boot from a device such as the CD/DVD-ROM drive disk or hard disk as , press the Enter key and then select SATA mode. Use ↑ and ↓ arrows to select the desired startup device from any boot device. From the Setup Utility program menu, select Devices. 3. Audio Setup press the Enter key, and then select Onboard Audio Controller. Note: Not all devices connected to the audio connectors (e.g. Selecting a startup device If your computer. 2. Note: Selecting a startup device from a server image. This...
.... Turn off your computer does not boot from a device such as the CD/DVD-ROM drive disk or hard disk as , press the Enter key and then select SATA mode. Use ↑ and ↓ arrows to select the desired startup device from any boot device. From the Setup Utility program menu, select Devices. 3. Audio Setup press the Enter key, and then select Onboard Audio Controller. Note: Not all devices connected to the audio connectors (e.g. Selecting a startup device If your computer. 2. Note: Selecting a startup device from a server image. This...

Lenovo H30 Series Hardware Maintenance Manual
Page 26
... have been removed and the problem continues, replace the system board. 20 Lenovo H30 SeriesHardware Maintenance Manual To purposely configure the computer without a keyboard, select Keyboardless operation in the boot device. POST error codes Each time you turn the computer on the computer to Enabled. This series of tests to the computer and that the system is working correctly • Starts video operations • Verifies that the boot drive is operating correctly and that certain options are...
... have been removed and the problem continues, replace the system board. 20 Lenovo H30 SeriesHardware Maintenance Manual To purposely configure the computer without a keyboard, select Keyboardless operation in the boot device. POST error codes Each time you turn the computer on the computer to Enabled. This series of tests to the computer and that the system is working correctly • Starts video operations • Verifies that the boot drive is operating correctly and that certain options are...


