
KIP 7100 User Guide
Page 2
...printers, facsimiles, copiers, scanners, and multifunction devices. When this product is an open system in North America. This device complies with the requirements in Pub.22 of China. (1) Do not install Machine around other electronic equipment or other office equipment. Other devices may not cause harmful interference, and (2) this Hardware Operation Guide carefully before using the printer... other precision instruments. Please keep this product meets the ENERGY STAR ® guidelines for purchasing the Multi-Function Printer KIP 7100. Operation is an international program that...
...printers, facsimiles, copiers, scanners, and multifunction devices. When this product is an open system in North America. This device complies with the requirements in Pub.22 of China. (1) Do not install Machine around other electronic equipment or other office equipment. Other devices may not cause harmful interference, and (2) this Hardware Operation Guide carefully before using the printer... other precision instruments. Please keep this product meets the ENERGY STAR ® guidelines for purchasing the Multi-Function Printer KIP 7100. Operation is an international program that...

KIP 7100 User Guide
Page 4
... turn it off and unplug it may cause a fire or you may cause a fire due to do so in which some other sources of the printer. 2. Do not throw the toner into . Install the product as close to move the printer, please contact your service ...printer. Do not damage the Power Cord by stepping on or placing heavy items on the product. If the Power Cord is plugged into a fire or other equipment is damaged, it from the wall electrical outlet immediately. The Power source should be electrically shocked. 1. Do not remove the screw and do not open the cover if not instructed...
... turn it off and unplug it may cause a fire or you may cause a fire due to do so in which some other sources of the printer. 2. Do not throw the toner into . Install the product as close to move the printer, please contact your service ...printer. Do not damage the Power Cord by stepping on or placing heavy items on the product. If the Power Cord is plugged into a fire or other equipment is damaged, it from the wall electrical outlet immediately. The Power source should be electrically shocked. 1. Do not remove the screw and do not open the cover if not instructed...

KIP 7100 User Guide
Page 7
Chapter 1 Before Use 1. 1 Installation Requirements 1. 2 Originals Prohibited from Duplication 1. 3 Features 1. 4 Specifications 1. 4. 1 General 1. 4. 2 Printer part 1. 4. 3 Scanner part 1. 5 Appearance 1. 5. 1 Front view 1. 5. 2 Rear view 1. 6 Specifications for the Scan Original 1. 7 Specifications for the Printing Paper 1. 7. 1 Papers not available to use 1. 7. 2 Keeping the paper in the custody 1. 7. 3 Treatment against environmental condition 1-1 page 1- 2 1- 3 1- 4 1- 5 1- 5 1- 6 1- 8 1- 9 1- 9 1-10 1-11 1-14 1-14 1-15 1-16 Chapter 1 Before Use
Chapter 1 Before Use 1. 1 Installation Requirements 1. 2 Originals Prohibited from Duplication 1. 3 Features 1. 4 Specifications 1. 4. 1 General 1. 4. 2 Printer part 1. 4. 3 Scanner part 1. 5 Appearance 1. 5. 1 Front view 1. 5. 2 Rear view 1. 6 Specifications for the Scan Original 1. 7 Specifications for the Printing Paper 1. 7. 1 Papers not available to use 1. 7. 2 Keeping the paper in the custody 1. 7. 3 Treatment against environmental condition 1-1 page 1- 2 1- 3 1- 4 1- 5 1- 5 1- 6 1- 8 1- 9 1- 9 1-10 1-11 1-14 1-14 1-15 1-16 Chapter 1 Before Use
KIP 7100 User Guide
Page 8
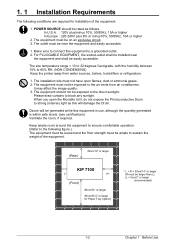
...% to block any sunlight. It may affect the image quality. 3. Keep ample room around the equipment to ensure comfortable operation. (Refer to the following conditions are required for installation of the equipment. (Rear) 30cm/12" or larger KIP 7100 L* R* (Front) 80cm/32" or larger 90cm/35.4" or larger for Paper Tray (option) * L + R = 35cm/14" or larger (R must be...
...% to block any sunlight. It may affect the image quality. 3. Keep ample room around the equipment to ensure comfortable operation. (Refer to the following conditions are required for installation of the equipment. (Rear) 30cm/12" or larger KIP 7100 L* R* (Front) 80cm/32" or larger 90cm/35.4" or larger for Paper Tray (option) * L + R = 35cm/14" or larger (R must be...

KIP 7100 User Guide
Page 10
... the highest quality images controlled by an advanced KIP Image Process System. (6) Easy access to USB port allows users to provide efficient productivity by using "File to Print" / "Scan to use system. (some functions may be optional) (2) KIP HDP technology generates no waste toner. (3) The combination of the user's print handling. (8) Various media source; Advanced drivers and comprehensive print utilities make the KIP 7100 an advanced, easy to USB" (option). (7) 2-way print ejection (top / rear...
... the highest quality images controlled by an advanced KIP Image Process System. (6) Easy access to USB port allows users to provide efficient productivity by using "File to Print" / "Scan to use system. (some functions may be optional) (2) KIP HDP technology generates no waste toner. (3) The combination of the user's print handling. (8) Various media source; Advanced drivers and comprehensive print utilities make the KIP 7100 an advanced, easy to USB" (option). (7) 2-way print ejection (top / rear...
KIP 7100 User Guide
Page 11
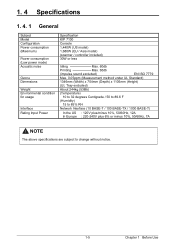
... Model Configuration Power consumption (Maximum) Power consumption (Low power mode) Acoustic noise Ozone Dimensions Weight Environmental condition for usage Interface Rating Input Power Specification KIP 7100 Console 1,440W (US model) 1,680W (EU / Asia model) (scanner / controller included) 30W or less Idling Max. 60db Printing Max. 65db (impulse sound excluded) EN ISO 7779 Max. 0.05ppm (Measurement method under UL Standard) 1346mm (Width) x 704mm (Depth) x 1105mm (Height) (UI, Tray...
... Model Configuration Power consumption (Maximum) Power consumption (Low power mode) Acoustic noise Ozone Dimensions Weight Environmental condition for usage Interface Rating Input Power Specification KIP 7100 Console 1,440W (US model) 1,680W (EU / Asia model) (scanner / controller included) 30W or less Idling Max. 60db Printing Max. 65db (impulse sound excluded) EN ISO 7779 Max. 0.05ppm (Measurement method under UL Standard) 1346mm (Width) x 704mm (Depth) x 1105mm (Height) (UI, Tray...

KIP 7100 User Guide
Page 12
.... Print size ISO (mm) (from Paper Tray, option) Width Length 594 420 297 210 420 X X 297 X X ANSI (inch) Width Length 24 22 18 17 12 11 9 8.5 18 X X 17 X X 12 X X 11 X X Warm up time First print time Fusing method Development method Shorter than 6,000mm, its image quality or the reliability of print head Print width Print length Specification LED Array Electro photography Organic Photoconductive Drum...
.... Print size ISO (mm) (from Paper Tray, option) Width Length 594 420 297 210 420 X X 297 X X ANSI (inch) Width Length 24 22 18 17 12 11 9 8.5 18 X X 17 X X 12 X X 11 X X Warm up time First print time Fusing method Development method Shorter than 6,000mm, its image quality or the reliability of print head Print width Print length Specification LED Array Electro photography Organic Photoconductive Drum...

KIP 7100 User Guide
Page 14
... 3 Scanner part Subject Scanning method Light source Setting of original Starting point of scan Scan width Scan length Margin area Optical resolution Digital resolution Original transportation Transportable original thickness Specification Contact Image Sensor (CIS) (5 pieces of A4 sized CIS)...side edges 600dpi 200 / 300 / 400 / 600 dpi Sheet through type Max: 1.60mm Min : 0.05mm NOTE If the original is thicker than 0.6mm, its image quality is not guaranteed. Scanning speed 60 mm per second (max) NOTE The above specifications are subject to change without notice. 1-8 Chapter 1 Before Use...
... 3 Scanner part Subject Scanning method Light source Setting of original Starting point of scan Scan width Scan length Margin area Optical resolution Digital resolution Original transportation Transportable original thickness Specification Contact Image Sensor (CIS) (5 pieces of A4 sized CIS)...side edges 600dpi 200 / 300 / 400 / 600 dpi Sheet through type Max: 1.60mm Min : 0.05mm NOTE If the original is thicker than 0.6mm, its image quality is not guaranteed. Scanning speed 60 mm per second (max) NOTE The above specifications are subject to change without notice. 1-8 Chapter 1 Before Use...

KIP 7100 User Guide
Page 15
... Scanner Unit when you make scan or copy. 6 Toner Hatch (Original Table) Open the Toner Hatch when you replace the Toner Cartridge. Your USB flash memory storage can be loaded here. 10 Print Tray 11 Stylus 12 USB Port These trays catch ejected prints. PLEASE DO NOT push the LCD area too strong. PLEASE DO NOT use any other pointed object to press buttons on the touch screen. Use this unit when you make scan or copy. 7 Engine Unit Open...
... Scanner Unit when you make scan or copy. 6 Toner Hatch (Original Table) Open the Toner Hatch when you replace the Toner Cartridge. Your USB flash memory storage can be loaded here. 10 Print Tray 11 Stylus 12 USB Port These trays catch ejected prints. PLEASE DO NOT push the LCD area too strong. PLEASE DO NOT use any other pointed object to press buttons on the touch screen. Use this unit when you make scan or copy. 7 Engine Unit Open...
KIP 7100 User Guide
Page 16
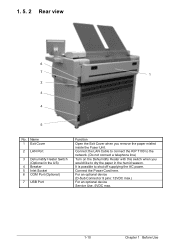
... Use Connect the LAN Cable to connect the KIP 7100 to the network. (Do not connect a telephone line) Turn on the Dehumidify Heater with this switch when you remove the paper misfed inside the Fuser Unit. Name 1 Exit Cover 2 LAN Port 3 Dehumidify Heater Switch (Optional in the humid season. Connect the Power Cord here. It is possible to dry the paper in the US) 4 Breaker 5 Inlet Socket 6 COM Port (Optional) 7 USB Port Function Open the...
... Use Connect the LAN Cable to connect the KIP 7100 to the network. (Do not connect a telephone line) Turn on the Dehumidify Heater with this switch when you remove the paper misfed inside the Fuser Unit. Name 1 Exit Cover 2 LAN Port 3 Dehumidify Heater Switch (Optional in the humid season. Connect the Power Cord here. It is possible to dry the paper in the US) 4 Breaker 5 Inlet Socket 6 COM Port (Optional) 7 USB Port Function Open the...
KIP 7100 User Guide
Page 22
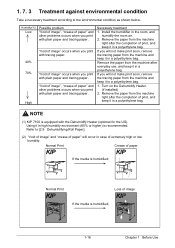
... plain paper and tracing paper. NOTE (1) KIP 7100 is humidified; 1-16 Chapter 1 Before Use Normal Print Crease of image If the media is equipped with plain paper and tracing paper. Turn on the Dehumidify Heater. (if installed) 2. Normal Print Loss of paper If the media is recommended. Remove the paper from the machine right after the completion of image" occurs when you will not make print soon, remove the tracing paper from the machine...
... plain paper and tracing paper. NOTE (1) KIP 7100 is humidified; 1-16 Chapter 1 Before Use Normal Print Crease of image If the media is equipped with plain paper and tracing paper. Turn on the Dehumidify Heater. (if installed) 2. Normal Print Loss of paper If the media is recommended. Remove the paper from the machine right after the completion of image" occurs when you will not make print soon, remove the tracing paper from the machine...

KIP 7100 User Guide
Page 23
Chapter 2 Basic Operation 2. 1 Turning on KIP 7100 2. 2 Turning off KIP 7100 2. 3 Replacing Roll Media 2. 4 Replacing Toner Cartridge 2. 5 Cut Sheet Media 2. 6 Copying 2. 7 Emergency Stop of Scan or Copy 2. 8 Canceling Sleep Mode 2. 9 Dehumidifying Roll Media 2-1 page 2- 2 2- 4 2- 5 2-11 2-15 2-16 2-18 2-19 2-20 Chapter 2 Basic Operation
Chapter 2 Basic Operation 2. 1 Turning on KIP 7100 2. 2 Turning off KIP 7100 2. 3 Replacing Roll Media 2. 4 Replacing Toner Cartridge 2. 5 Cut Sheet Media 2. 6 Copying 2. 7 Emergency Stop of Scan or Copy 2. 8 Canceling Sleep Mode 2. 9 Dehumidifying Roll Media 2-1 page 2- 2 2- 4 2- 5 2-11 2-15 2-16 2-18 2-19 2-20 Chapter 2 Basic Operation

KIP 7100 User Guide
Page 37
... the feeding roller, the machine automatically carries and sets the paper at the proper position. "Curl up ) (2) Setting a cut sheet to result in "curl down ) Incorrect (curl up " sheets tend to the Bypass Feeder while the printer is processing a print job cause a paper jam. 2-15 Chapter 2 Basic Operation There are several size markings on the table between its concerning size markings then insert it into the Bypass Feeder. Open...
... the feeding roller, the machine automatically carries and sets the paper at the proper position. "Curl up ) (2) Setting a cut sheet to result in "curl down ) Incorrect (curl up " sheets tend to the Bypass Feeder while the printer is processing a print job cause a paper jam. 2-15 Chapter 2 Basic Operation There are several size markings on the table between its concerning size markings then insert it into the Bypass Feeder. Open...

KIP 7100 User Guide
Page 38
... on the Original Table with face up Original Guides (1) with Original Guides (1). 2. 6 Copying 1. NOTE The scanner unit does not accept originals automatically during Sleep Mode. Place the original on the UI screen and then insert an original. 2-16 Chapter 2 Basic Operation There are several size markings on Original Table which indicate possible feed positions. The KIP 7100 will start the copy process. Line up .
... on the Original Table with face up Original Guides (1) with Original Guides (1). 2. 6 Copying 1. NOTE The scanner unit does not accept originals automatically during Sleep Mode. Place the original on the UI screen and then insert an original. 2-16 Chapter 2 Basic Operation There are several size markings on Original Table which indicate possible feed positions. The KIP 7100 will start the copy process. Line up .
KIP 7100 User Guide
Page 41
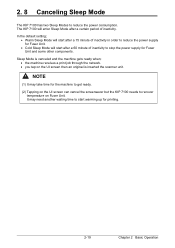
... for printing. 2-19 Chapter 2 Basic Operation In the default setting; • Warm Sleep Mode will start after a certain period of inactivity to reduce the power consumption. Sleep Mode is inserted the scanner unit. It may take time for the machine to get ready. (2) Tapping on the UI screen can cancel the screensaver but the KIP 7100 needs to reduce the power supply for Fuser Unit. • Cold Sleep Mode will enter Sleep Mode...
... for printing. 2-19 Chapter 2 Basic Operation In the default setting; • Warm Sleep Mode will start after a certain period of inactivity to reduce the power consumption. Sleep Mode is inserted the scanner unit. It may take time for the machine to get ready. (2) Tapping on the UI screen can cancel the screensaver but the KIP 7100 needs to reduce the power supply for Fuser Unit. • Cold Sleep Mode will enter Sleep Mode...

KIP 7100 User Guide
Page 42
... of the Dehumidify Heater Switch on the Dehumidify Heater, press the H side of image". Such problems above kinds of paper If the media is equipped with the Dehumidify Heater (optional for the US) If needed, contact the service personnel for detail. NOTE KIP 7100 is humidified; Normal Print Crease of print defect. To turn off.) H L 2-20 Chapter 2 Basic Operation Defective prints you will experience most...
... of the Dehumidify Heater Switch on the Dehumidify Heater, press the H side of image". Such problems above kinds of paper If the media is equipped with the Dehumidify Heater (optional for the US) If needed, contact the service personnel for detail. NOTE KIP 7100 is humidified; Normal Print Crease of print defect. To turn off.) H L 2-20 Chapter 2 Basic Operation Defective prints you will experience most...

KIP 7100 User Guide
Page 43
Chapter 3 Error Correction 3. 1 Mis-feed Error 3. 1. 1 Deck Jam / Feeding Jam 3. 1. 2 Manual Jam 3. 1. 3 Reg. Jam / Internal Jam 3. 1. 4 Fuser Jam 3. 1. 5 Stack Jam 3. 1. 6 Original Jam 3. 1. 7 Accessory Jam 3. 2 Other Operator Call Error 3. 2. 1 Roll Replacement 3. 2. 2 Toner Empty 3. 2. 3 Cutter Set NG 3. 2. 4 Scanner Unit Open 3. 2. 5 Printer Not Available 3. 3 Service Call Error page 3- 2 3- 2 3- 5 3- 6 3- 7 3-10 3-11 3-11 3-12 3-12 3-12 3-12 3-12 3-12 3-13 3-1 Chapter 3 Error Correction
Chapter 3 Error Correction 3. 1 Mis-feed Error 3. 1. 1 Deck Jam / Feeding Jam 3. 1. 2 Manual Jam 3. 1. 3 Reg. Jam / Internal Jam 3. 1. 4 Fuser Jam 3. 1. 5 Stack Jam 3. 1. 6 Original Jam 3. 1. 7 Accessory Jam 3. 2 Other Operator Call Error 3. 2. 1 Roll Replacement 3. 2. 2 Toner Empty 3. 2. 3 Cutter Set NG 3. 2. 4 Scanner Unit Open 3. 2. 5 Printer Not Available 3. 3 Service Call Error page 3- 2 3- 2 3- 5 3- 6 3- 7 3-10 3-11 3-11 3-12 3-12 3-12 3-12 3-12 3-12 3-13 3-1 Chapter 3 Error Correction
KIP 7100 User Guide
Page 54
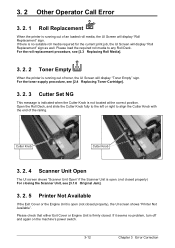
... "Scanner Unit Open" if the Scanner Unit is open. (not closed properly) For closing the Scanner Unit, see [2.3 Replacing Roll Media]. 3. 2. 2 Toner Empty When the printer is open (not closed . If it seems no suitable roll media required for the current print job, the UI Screen will display "Roll Replacement" sign. If there is no problem, turn off and again on the machine's power switch. 3-12 Chapter 3 Error Correction Please load the required roll media to align...
... "Scanner Unit Open" if the Scanner Unit is open. (not closed properly) For closing the Scanner Unit, see [2.3 Replacing Roll Media]. 3. 2. 2 Toner Empty When the printer is open (not closed . If it seems no suitable roll media required for the current print job, the UI Screen will display "Roll Replacement" sign. If there is no problem, turn off and again on the machine's power switch. 3-12 Chapter 3 Error Correction Please load the required roll media to align...
KIP 7100 User Guide
Page 55
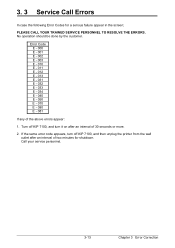
... seconds or more. 2. Call your service personnel. 3-13 Chapter 3 Error Correction No operation should be done by the customer. Turn off KIP 7100, and then unplug the printer from the wall outlet after an interval of the above errors appear: 1. 3. 3 Service Call Errors In case the following Error Codes for shutdown. If the same error code appears, turn off KIP 7100, and turn it on after an interval...
... seconds or more. 2. Call your service personnel. 3-13 Chapter 3 Error Correction No operation should be done by the customer. Turn off KIP 7100, and then unplug the printer from the wall outlet after an interval of the above errors appear: 1. 3. 3 Service Call Errors In case the following Error Codes for shutdown. If the same error code appears, turn off KIP 7100, and turn it on after an interval...
KIP 7100 User Guide
Page 57
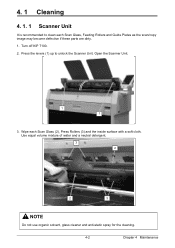
4. 1 Cleaning 4. 1. 1 Scanner Unit It is recommended to unlock the Scanner Unit. Turn off KIP 7100. 2. Wipe each Scan Glass, Feeding Rollers and Guide Plates as the scan/copy image may become defective if these parts are dirty. 1. Press the levers (1) up to clean each Scan Glass (2), Press Rollers (3) and the inside surface with a soft cloth. Open the Scanner Unit. 1 1 3. Use equal volume mixture of water and a neutral detergent. 3 2 2 3 NOTE Do not use organic solvent, glass cleaner and anti-static spray for the cleaning. 4-2 Chapter 4 Maintenance
4. 1 Cleaning 4. 1. 1 Scanner Unit It is recommended to unlock the Scanner Unit. Turn off KIP 7100. 2. Wipe each Scan Glass, Feeding Rollers and Guide Plates as the scan/copy image may become defective if these parts are dirty. 1. Press the levers (1) up to clean each Scan Glass (2), Press Rollers (3) and the inside surface with a soft cloth. Open the Scanner Unit. 1 1 3. Use equal volume mixture of water and a neutral detergent. 3 2 2 3 NOTE Do not use organic solvent, glass cleaner and anti-static spray for the cleaning. 4-2 Chapter 4 Maintenance


