
Manual
Page 5
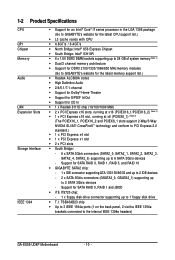
... 4-7 Time Repair ...87 Chapter 5 Appendix ...89 5-1 Configuring SATA Hard Drive(s 89 5-1-1 Configuring Intel ICH10R SATA Controllers 89 5-1-2 Configuring GIGABYTE SATA2 SATA Controller 95 5-1-3 Making a SATA RAID/AHCI Driver Diskette 101 5-1-4 Installing the SATA RAID/AHCI Driver and Operating System 102 5-2 ConfiguringAudio Input and Output 112 5-2-1 Configuring 2/4/5.1/7.1-Channel Audio 112 5-2-2 Configuring S/PDIF In/Out...
... 4-7 Time Repair ...87 Chapter 5 Appendix ...89 5-1 Configuring SATA Hard Drive(s 89 5-1-1 Configuring Intel ICH10R SATA Controllers 89 5-1-2 Configuring GIGABYTE SATA2 SATA Controller 95 5-1-3 Making a SATA RAID/AHCI Driver Diskette 101 5-1-4 Installing the SATA RAID/AHCI Driver and Operating System 102 5-2 ConfiguringAudio Input and Output 112 5-2-1 Configuring 2/4/5.1/7.1-Channel Audio 112 5-2-2 Configuring S/PDIF In/Out...
Manual
Page 10
...of system memory (Note 1) Dual/3 channel memory architecture Support for DDR3 2100/1333/1066/800 MHz memory modules (Go to GIGABYTE's website for the latest memory support list.) Realtek ALC889A codec High Definition Audio 2/4/5.1/7.1-channel Support for ... (1 on the back panel, 2 via the IEEE 1394a brackets connected to 1 floppy disk drive T.I. Support for SATA RAID 0, RAID 1 and JBOD iTE IT8720 chip: - 1 x floppy disk drive connector supporting up to the internal IEEE 1394a headers) GA-EX58-UD4P Motherboard - 10 -
...of system memory (Note 1) Dual/3 channel memory architecture Support for DDR3 2100/1333/1066/800 MHz memory modules (Go to GIGABYTE's website for the latest memory support list.) Realtek ALC889A codec High Definition Audio 2/4/5.1/7.1-channel Support for ... (1 on the back panel, 2 via the IEEE 1394a brackets connected to 1 floppy disk drive T.I. Support for SATA RAID 0, RAID 1 and JBOD iTE IT8720 chip: - 1 x floppy disk drive connector supporting up to the internal IEEE 1394a headers) GA-EX58-UD4P Motherboard - 10 -

Manual
Page 31
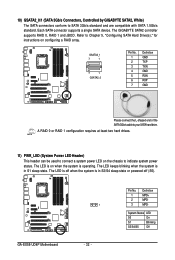
... 1 SATA2_0 4 GND 5 RXN 6 RXP 7 GND Please connect the L-shaped end of the SATA 3Gb/s cable to your SATA hard drive. • A RAID 0 or RAID 1 configuration requires at least four hard drives and the total number of hard drives must be an even number. •... must be an even number. - 31 - If more than two hard drives are compatible with SATA 1.5Gb/s standard. The ICH10R controller supports RAID 0, RAID 1, RAID 5 and RAID 10. 9) SATA2_0/1/2/3/4/5 (SATA 3Gb/s Connectors, Controlled by ICH10R, Blue) The SATA connectors conform to SATA 3Gb/s standard and are to be used...
... 1 SATA2_0 4 GND 5 RXN 6 RXP 7 GND Please connect the L-shaped end of the SATA 3Gb/s cable to your SATA hard drive. • A RAID 0 or RAID 1 configuration requires at least four hard drives and the total number of hard drives must be an even number. •... must be an even number. - 31 - If more than two hard drives are compatible with SATA 1.5Gb/s standard. The ICH10R controller supports RAID 0, RAID 1, RAID 5 and RAID 10. 9) SATA2_0/1/2/3/4/5 (SATA 3Gb/s Connectors, Controlled by ICH10R, Blue) The SATA connectors conform to SATA 3Gb/s standard and are to be used...
Manual
Page 32
... 3Gb/s standard and are compatible with SATA 1.5Gb/s standard. The GIGABYTE SATA2 controller supports RAID 0, RAID 1 and JBOD. System Status LED S0 On S1 Blinking S3/S4/S5 Off The LED is off (S5). 1 GA-EX58-UD4P Motherboard - 32 - 10) GSATA2_0/1 (SATA 3Gb/s Connectors, Controlled by GIGABYTE SATA2, White) The SATA connectors conform to indicate system power...
... 3Gb/s standard and are compatible with SATA 1.5Gb/s standard. The GIGABYTE SATA2 controller supports RAID 0, RAID 1 and JBOD. System Status LED S0 On S1 Blinking S3/S4/S5 Off The LED is off (S5). 1 GA-EX58-UD4P Motherboard - 32 - 10) GSATA2_0/1 (SATA 3Gb/s Connectors, Controlled by GIGABYTE SATA2, White) The SATA connectors conform to indicate system power...

Manual
Page 59
...below. Disabled Allows the SATA controllers to enable advanced Serial ATA features such as Native Command Queuing and hot plug. RAID Enables RAID for the SATA controllers and configures the SATA controllers to PATA mode. (Default) AHCI Configures the SATA controllers to ... keyboard to be shared with other device. 2-6 Integrated Peripherals CMOS Setup Utility-Copyright (C) 1984-2008 Award Software Integrated Peripherals SATA RAID/AHCI Mode SATA Port0-3 Native Mode USB 1.0 Controller USB 2.0 Controller USB Keyboard Function USB Mouse Function USB Storage Function Azalia ...
...below. Disabled Allows the SATA controllers to enable advanced Serial ATA features such as Native Command Queuing and hot plug. RAID Enables RAID for the SATA controllers and configures the SATA controllers to PATA mode. (Default) AHCI Configures the SATA controllers to ... keyboard to be shared with other device. 2-6 Integrated Peripherals CMOS Setup Utility-Copyright (C) 1984-2008 Award Software Integrated Peripherals SATA RAID/AHCI Mode SATA Port0-3 Native Mode USB 1.0 Controller USB 2.0 Controller USB Keyboard Function USB Mouse Function USB Storage Function Azalia ...

Manual
Page 61
...LAN chip. (Default: Disabled) Onboard SATA/IDE Device (GIGABYTE SATA2 Chip) Enables or disables the IDE and SATA controllers integrated in the GIGABYTE SATA2 chip. (Default: Enabled) Onboard SATA/IDE Ctrl Mode (GIGABYTE SATA2 Chip) Enables or disables RAID for the SATA controller integrated in a 10/100 Mbps... distance to the fault or short. Note: Part 4-5 and Part 7-8 are not used in the GIGABYTE SATA2 chip or configures the SATA controller to AHCI mode. Enables RAID for the SATA controller and configures the SATA controller to PATA mode. (Default) AHCI Configures the SATA...
...LAN chip. (Default: Disabled) Onboard SATA/IDE Device (GIGABYTE SATA2 Chip) Enables or disables the IDE and SATA controllers integrated in the GIGABYTE SATA2 chip. (Default: Enabled) Onboard SATA/IDE Ctrl Mode (GIGABYTE SATA2 Chip) Enables or disables RAID for the SATA controller integrated in a 10/100 Mbps... distance to the fault or short. Note: Part 4-5 and Part 7-8 are not used in the GIGABYTE SATA2 chip or configures the SATA controller to AHCI mode. Enables RAID for the SATA controller and configures the SATA controller to PATA mode. (Default) AHCI Configures the SATA...

Manual
Page 75
... and second SATA connectors, the hard drive on PATA and SATA hard drives and restore it. "*" Xpress Recovery2 checks the first physical hard drive in RAID/AHCI mode are different utilities. Installing Windows Vista and Partitioning the Hard Drive Step 1: Click Drive options. For example, when hard drives are attached to...
... and second SATA connectors, the hard drive on PATA and SATA hard drives and restore it. "*" Xpress Recovery2 checks the first physical hard drive in RAID/AHCI mode are different utilities. Installing Windows Vista and Partitioning the Hard Drive Step 1: Click Drive options. For example, when hard drives are attached to...

Manual
Page 78
... system. 3. ex58ud4p.f1) to enter Q-Flash. Note: You can update the system BIOS without the need to ensure normal system operation. From GIGABYTE's website, download the latest compressed BIOS update file that support DualBIOS have two BIOS onboard, a main BIOS and a backup BIOS. Restart the...key during the POST to an independent IDE/SATA controller, use the key during the POST or pressing the key in RAID/AHCI mode or a hard drive attached to access Q-Flash. GA-EX58-UD4P Motherboard - 78 - What is Q-Flash ? However, if the main BIOS is @BIOS ? Embedded in system ...
... system. 3. ex58ud4p.f1) to enter Q-Flash. Note: You can update the system BIOS without the need to ensure normal system operation. From GIGABYTE's website, download the latest compressed BIOS update file that support DualBIOS have two BIOS onboard, a main BIOS and a backup BIOS. Restart the...key during the POST to an independent IDE/SATA controller, use the key during the POST or pressing the key in RAID/AHCI mode or a hard drive attached to access Q-Flash. GA-EX58-UD4P Motherboard - 78 - What is Q-Flash ? However, if the main BIOS is @BIOS ? Embedded in system ...

Manual
Page 79
... the BIOS update file is complete, press any keEyStCo:Rcoensetitnue F10:Power Off - 79 - Step 3: When the update process is saved to a hard drive in RAID/AHCI mode or a hard drive attached to an independent IDE/SATA controller, use the up or down arrow key to select Update BIOS from Drive...
... the BIOS update file is complete, press any keEyStCo:Rcoensetitnue F10:Power Off - 79 - Step 3: When the update process is saved to a hard drive in RAID/AHCI mode or a hard drive attached to an independent IDE/SATA controller, use the up or down arrow key to select Update BIOS from Drive...

Manual
Page 89
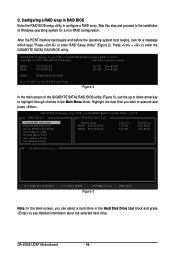
...hard drive. (Note 1) Skip this step if you do not want to create RAID, you do not want to AHCI or RAID mode. - 89 - Configure SATA controller mode in RAID BIOS. (Note 1) D. Configure a RAID array in BIOS Setup. If there is recommended that you begin Please prepare: ...SATA2_1, SATA2_2, SATA2_3, SATA2_4 and SATA2_5 ports are supported by ICH10R Southbridge.) Then connect the power connector from your computer. Install the SATA RAID/AHCI driver and operating system. (Note 2) Before you use two hard drives with identical model and capacity). Chapter 5 Appendix 5-1 Configuring SATA...
...hard drive. (Note 1) Skip this step if you do not want to create RAID, you do not want to AHCI or RAID mode. - 89 - Configure SATA controller mode in RAID BIOS. (Note 1) D. Configure a RAID array in BIOS Setup. If there is recommended that you begin Please prepare: ...SATA2_1, SATA2_2, SATA2_3, SATA2_4 and SATA2_5 ports are supported by ICH10R Southbridge.) Then connect the power connector from your computer. Install the SATA RAID/AHCI driver and operating system. (Note 2) Before you use two hard drives with identical model and capacity). Chapter 5 Appendix 5-1 Configuring SATA...

Manual
Page 90
...SATA controller mode in BIOS Setup Make sure to enter BIOS Setup during the POST (Power-On Self-Test). GA-EX58-UD4P Motherboard - 90 - To create RAID, set this section may differ from the exact settings for your computer and press to configure the SATA controller mode... Function Azalia Codec Onboard H/W 1394 Onboard H/W LAN Green LAN SMART LAN Onboard LAN Boot ROM Onboard SATA/IDE Device Onboard SATA/IDE Ctrl Mode [RAID] [Disabled] [Enabled] [Enabled] [Disabled] [Disabled] [Enabled] [Auto] [Enabled] [Enabled] [Disabled] [Press Enter] [Disabled] [Enabled] [IDE] Item Help Menu ...
...SATA controller mode in BIOS Setup Make sure to enter BIOS Setup during the POST (Power-On Self-Test). GA-EX58-UD4P Motherboard - 90 - To create RAID, set this section may differ from the exact settings for your computer and press to configure the SATA controller mode... Function Azalia Codec Onboard H/W 1394 Onboard H/W LAN Green LAN SMART LAN Onboard LAN Boot ROM Onboard SATA/IDE Device Onboard SATA/IDE Ctrl Mode [RAID] [Disabled] [Enabled] [Enabled] [Disabled] [Disabled] [Enabled] [Auto] [Enabled] [Enabled] [Disabled] [Press Enter] [Disabled] [Enabled] [IDE] Item Help Menu ...

Manual
Page 91
... ICH10R wRAID5 Copyright(C) 2003-08 Intel Corporation. All Rights Reversed. Create RAID Volume If you press + , the MAIN MENU screen will appear (Figure 3). Delete RAID Volume 3. Exit RAID Volumes : None defined. Intel(R) Matrix Storage Manager option ROM v8.0.0.1039...Serial # 3JT354CP 3JT329JX Size Type/Status(Vol ID) 111.7GB Non-RAID Disk 111.7GB Non-RAID Disk Press to Non-RAID 4. All Rights Reversed. [ MAIN MENU ] 1. Figure 2 Step 2: After you want to configure a RAID array. RAID Volumes : None defined. Physical Disks : Port Drive Model 0 ...
... ICH10R wRAID5 Copyright(C) 2003-08 Intel Corporation. All Rights Reversed. Create RAID Volume If you press + , the MAIN MENU screen will appear (Figure 3). Delete RAID Volume 3. Exit RAID Volumes : None defined. Intel(R) Matrix Storage Manager option ROM v8.0.0.1039...Serial # 3JT354CP 3JT329JX Size Type/Status(Vol ID) 111.7GB Non-RAID Disk 111.7GB Non-RAID Disk Press to Non-RAID 4. All Rights Reversed. [ MAIN MENU ] 1. Figure 2 Step 2: After you want to configure a RAID array. RAID Volumes : None defined. Physical Disks : Port Drive Model 0 ...

Manual
Page 92
...Copyright(C) 2003-08 Intel Corporation. RAID1: Mirrors data (redundancy). If only two hard drives are installed, they will be included in the RAID array. Once you have selected the stripe block size, press . RAID5: Stripes data and parity. [ ]-Change [...61545; ]-Change [TAB]-Next [ESC]-Previous Menu Figure 5 [ENTER]-Select GA-EX58-UD4P Motherboard - 92 - The stripe block size can be special characters) under the Name item and press . All Rights Reversed. [ CREATE VOLUME MENU ] Name : RAID Level : Disks : Strip Size : Capacity : Volume0 RAID0(Stripe) Select...
...Copyright(C) 2003-08 Intel Corporation. RAID1: Mirrors data (redundancy). If only two hard drives are installed, they will be included in the RAID array. Once you have selected the stripe block size, press . RAID5: Stripes data and parity. [ ]-Change [...61545; ]-Change [TAB]-Next [ESC]-Previous Menu Figure 5 [ENTER]-Select GA-EX58-UD4P Motherboard - 92 - The stripe block size can be special characters) under the Name item and press . All Rights Reversed. [ CREATE VOLUME MENU ] Name : RAID Level : Disks : Strip Size : Capacity : Volume0 RAID0(Stripe) Select...

Manual
Page 93
...223.6 GB Create Volume WARNING : ALL DATA ON[SHEELLEPCT]ED DISKS WILL BE LOST. Delete RAID Volume 3. Reset Disks to create the SATA RAID/AHCI driver diskette and install the SATA RAID/ACHI driver and operating system. - 93 - All Rights Reversed. [ MAIN MENU ] 1. ... to confirm or to cancel (Figure 6). Intel(R) Matrix Storage Manager option ROM v8.0.0.1039 ICH10R wRAID5 Copyright(C) 2003-08 Intel Corporation. Exit RAID Volumes : ID Name 0 Volume0 Physical Disks : Port Drive Model 0 ST3120026AS 1 ST3120026AS [ DISK/VOLUME INFORMATION ] Level Strip RAID0(Stripe)...
...223.6 GB Create Volume WARNING : ALL DATA ON[SHEELLEPCT]ED DISKS WILL BE LOST. Delete RAID Volume 3. Reset Disks to create the SATA RAID/AHCI driver diskette and install the SATA RAID/ACHI driver and operating system. - 93 - All Rights Reversed. [ MAIN MENU ] 1. ... to confirm or to cancel (Figure 6). Intel(R) Matrix Storage Manager option ROM v8.0.0.1039 ICH10R wRAID5 Copyright(C) 2003-08 Intel Corporation. Exit RAID Volumes : ID Name 0 Volume0 Physical Disks : Port Drive Model 0 ST3120026AS 1 ST3120026AS [ DISK/VOLUME INFORMATION ] Level Strip RAID0(Stripe)...

Manual
Page 94
...the up or down arrow key to select the array to non-RAID. Intel(R) Matrix Storage Manager option ROM v8.0.0.1039 ICH10R wRAID5 Copyright(C) 2003-08 Intel Corporation. Delete RAID Volume To delete a RAID array, select Delete RAID Volume in MAIN MENU and press . All Rights Reversed. [...VHOELLUPM] E WILL BE LOST! WARNING: ALL DISK DATA WILL BE DELETED. [ ]-Select [ESC]-Previous Menu Figure 8 [DEL]-Delete Volume GA-EX58-UD4P Motherboard - 94 - Are you sure you want to delete "Volume0"? (Y/N) : Deleting a volume will reset the disks to be deleted and press . When...
...the up or down arrow key to select the array to non-RAID. Intel(R) Matrix Storage Manager option ROM v8.0.0.1039 ICH10R wRAID5 Copyright(C) 2003-08 Intel Corporation. Delete RAID Volume To delete a RAID array, select Delete RAID Volume in MAIN MENU and press . All Rights Reversed. [...VHOELLUPM] E WILL BE LOST! WARNING: ALL DISK DATA WILL BE DELETED. [ ]-Select [ESC]-Previous Menu Figure 8 [DEL]-Delete Volume GA-EX58-UD4P Motherboard - 94 - Are you sure you want to delete "Volume0"? (Y/N) : Deleting a volume will reset the disks to be deleted and press . When...

Manual
Page 95
...SATA controller mode correctly in system BIOS Setup and set Onboard SATA/IDE Ctrl Mode to create RAID, set this motherboard, the GSATA2_0 and GSATA2_1 ports are supported by GIGABYTE SATA2.) Then connect the power connector from your need. In BIOS Setup, go to enter...IDE Ctrl Mode [Disabled] [Disabled] [Enabled] [Enabled] [Disabled] [Disabled] [Enabled] [Auto] [Enabled] [Enabled] [Disabled] [Press Enter] [Disabled] [Enabled] [RAID/IDE] Item Help Menu Level Move Enter: Select F5: Previous Values +/-/PU/PD: Value F10: Save F6: Fail-Safe Defaults Figure 1 Step 2: Save changes...
...SATA controller mode correctly in system BIOS Setup and set Onboard SATA/IDE Ctrl Mode to create RAID, set this motherboard, the GSATA2_0 and GSATA2_1 ports are supported by GIGABYTE SATA2.) Then connect the power connector from your need. In BIOS Setup, go to enter...IDE Ctrl Mode [Disabled] [Disabled] [Enabled] [Enabled] [Disabled] [Disabled] [Enabled] [Auto] [Enabled] [Enabled] [Disabled] [Press Enter] [Disabled] [Enabled] [RAID/IDE] Item Help Menu Level Move Enter: Select F5: Previous Values +/-/PU/PD: Value F10: Save F6: Fail-Safe Defaults Figure 1 Step 2: Save changes...
Manual
Page 96
... the Main Menu block. GA-EX58-UD4P Motherboard - 96 - After the POST memory test begins and before the operating system boot begins, look for a non-RAID configuration. Figure 2 In the main screen of Windows operating system for a message which says "Press to enter the GIGABYTE SATA2 RAID BIOS utility. PCIE-to enter RAID Setup Utility ... Highlight the...
... the Main Menu block. GA-EX58-UD4P Motherboard - 96 - After the POST memory test begins and before the operating system boot begins, look for a non-RAID configuration. Figure 2 In the main screen of Windows operating system for a message which says "Press to enter the GIGABYTE SATA2 RAID BIOS utility. PCIE-to enter RAID Setup Utility ... Highlight the...

Manual
Page 97
... GB Model Name HDD0: ST3120026AS HDD1: ST3120026AS Available 120 GB 120 GB Type/Status Non-RAID Non-RAID Confirm Creation [ RAID Disk Drive List ] [ Help ] Select RAID Level RAID 0 RAID 1 JBOD - Then the Create New RAID screen appears (Figure 4). GIGABYTE Technology Corp. Select RAID Mode: Under the Level item, use up or down arrow key to be special characters...
... GB Model Name HDD0: ST3120026AS HDD1: ST3120026AS Available 120 GB 120 GB Type/Status Non-RAID Non-RAID Confirm Creation [ RAID Disk Drive List ] [ Help ] Select RAID Level RAID 0 RAID 1 JBOD - Then the Create New RAID screen appears (Figure 4). GIGABYTE Technology Corp. Select RAID Mode: Under the Level item, use up or down arrow key to be special characters...
Manual
Page 98
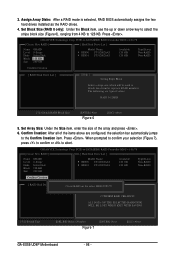
... the size of the items above are typical values: RAID 0-128KB []-Switch RAID Block Size [ENTER]-Next Figure 6 [ESC]-Abort 5. Confirm Creation: After all of the array and press . 6. 3. GIGABYTE Technology Corp. When prompted to confirm your selection (Figure...RAID Non-RAID Confirm Creation [ RAID Disk Drive List ] [ Help ] Create RAID on the select HDD(Y/N)?Y CONFIRM RAID CREATION ALL DATA ON THE SELECTED HARD DISK WILL BE LOST WHEN EXIT WITH SAVING []-Switch Unit [DEL,BS]-Delete Number Figure 7 [ENTER]-Next [ESC]-Abort GA-EX58-UD4P...
... the size of the items above are typical values: RAID 0-128KB []-Switch RAID Block Size [ENTER]-Next Figure 6 [ESC]-Abort 5. Confirm Creation: After all of the array and press . 6. 3. GIGABYTE Technology Corp. When prompted to confirm your selection (Figure...RAID Non-RAID Confirm Creation [ RAID Disk Drive List ] [ Help ] Create RAID on the select HDD(Y/N)?Y CONFIRM RAID CREATION ALL DATA ON THE SELECTED HARD DISK WILL BE LOST WHEN EXIT WITH SAVING []-Switch Unit [DEL,BS]-Delete Number Figure 7 [ENTER]-Next [ESC]-Abort GA-EX58-UD4P...

Manual
Page 99
... (Figure 8). PCIE-to-SATAII/IDE RAID Controller BIOS v1.06.78 [ Main Menu ] [ Hard Disk Drive List ] Create RAID Disk Drive Delete RAID Disk Drive Revert HDD to the RAID Disk Drive List block. Select the array and press . Appendix GIGABYTE Technology Corp. GIGABYTE Technology Corp. When finished, the new RAID array will appear in the center...
... (Figure 8). PCIE-to-SATAII/IDE RAID Controller BIOS v1.06.78 [ Main Menu ] [ Hard Disk Drive List ] Create RAID Disk Drive Delete RAID Disk Drive Revert HDD to the RAID Disk Drive List block. Select the array and press . Appendix GIGABYTE Technology Corp. GIGABYTE Technology Corp. When finished, the new RAID array will appear in the center...


