Owners Manual
Page 3
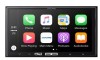
... 8 Location of Controls 8 Touch Operation 8 Turning Power On or Off 8 Turning the System On 9 Adjusting the Volume 9 Muting the Sound 9 Operating an Item in a List 9 Using Siri 9 About Hands-Free Phone 10 Applying Alpine TuneIt App 10 Adjusting the sound Settings using Alpine Tunelt App 10 Radio/RBDS Listening to the Radio 11 Presetting Stations Manually 11 Presetting Stations Automatically 11 Tuning to Preset Stations 11 PTY (Program Type) Tuning (RBDS mode only 11 Displaying Radio Text (RBDS mode only 11 Apple CarPlay (Optional) Connecting your iPhone 12...
... 8 Location of Controls 8 Touch Operation 8 Turning Power On or Off 8 Turning the System On 9 Adjusting the Volume 9 Muting the Sound 9 Operating an Item in a List 9 Using Siri 9 About Hands-Free Phone 10 Applying Alpine TuneIt App 10 Adjusting the sound Settings using Alpine Tunelt App 10 Radio/RBDS Listening to the Radio 11 Presetting Stations Manually 11 Presetting Stations Automatically 11 Tuning to Preset Stations 11 PTY (Program Type) Tuning (RBDS mode only 11 Displaying Radio Text (RBDS mode only 11 Apple CarPlay (Optional) Connecting your iPhone 12...
Owners Manual
Page 4
... Output Speaker 24 Adjusting the Microphone Level 24 External Accessory Control Setup 24 Setting the External Accessory Control ...... 24 iDataLink Operation Access to iDataLink Mode 25 About Parking Sensor screen 26 External Accessory Control Operation 27 Information Product Software Update 28 In Case of Difficulty 28 If this Message Appears 28 Specifications 29 Installation and Connections Warning 30 Caution 30 Precautions 30 Installation 31 Uninstalling the original car stereo 31 Mounting...
... Output Speaker 24 Adjusting the Microphone Level 24 External Accessory Control Setup 24 Setting the External Accessory Control ...... 24 iDataLink Operation Access to iDataLink Mode 25 About Parking Sensor screen 26 External Accessory Control Operation 27 Information Product Software Update 28 In Case of Difficulty 28 If this Message Appears 28 Specifications 29 Installation and Connections Warning 30 Caution 30 Precautions 30 Installation 31 Uninstalling the original car stereo 31 Mounting...
Owners Manual
Page 8
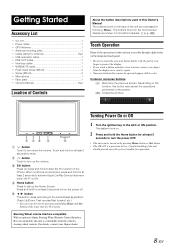
... Accessory List • iLX-107 1 • Power cable 1 • GPS Antenna 1 • Antenna mounting plate 1 • Cable clamp for antenna 1set • USB extension cable 1 • PRE OUT cable 1 • Interface cable 1 • W.REMOTE cable 1 • Flush head screw (M5×8 4 • Screw (M5×8 4 • Microphone 1 • Face plate 1 • Owner's Manual 1set Location of Controls About the button descriptions used in this button may cancel the operations performed on the screen. [ ]: Closes the window...
... Accessory List • iLX-107 1 • Power cable 1 • GPS Antenna 1 • Antenna mounting plate 1 • Cable clamp for antenna 1set • USB extension cable 1 • PRE OUT cable 1 • Interface cable 1 • W.REMOTE cable 1 • Flush head screw (M5×8 4 • Screw (M5×8 4 • Microphone 1 • Face plate 1 • Owner's Manual 1set Location of Controls About the button descriptions used in this button may cancel the operations performed on the screen. [ ]: Closes the window...

Owners Manual
Page 10
... iPhone can be used to make audio adjustments for this unit. 1 Make sure the unit is powered off , sound setting cannot be done via the iPhone. • The setting cannot be done on page 16) Info area Preset button 10-EN Using the Alpine TuneIt App, customized parameters can adjust the volume of information such as hands-free. About Hands-Free Phone When connected to this unit, your Alpine dealer. • The application program and related specifications...
... iPhone can be used to make audio adjustments for this unit. 1 Make sure the unit is powered off , sound setting cannot be done via the iPhone. • The setting cannot be done on page 16) Info area Preset button 10-EN Using the Alpine TuneIt App, customized parameters can adjust the volume of information such as hands-free. About Hands-Free Phone When connected to this unit, your Alpine dealer. • The application program and related specifications...

Owners Manual
Page 11
... activated and the display changes to the Radio mode screen. 3 Touch [ ] to the Radio 1 Press the Home button. In manual mode, touch and hold any one of the preset buttons that transmits text messages. 2 Touch the Info area ( ) (page 10) in PTY, touch [Tune] repeatedly during reception of frequency from a radio station can automatically seek and store 6 strong stations in the selected band in the same preset number, it . To use...
... activated and the display changes to the Radio mode screen. 3 Touch [ ] to the Radio 1 Press the Home button. In manual mode, touch and hold any one of the preset buttons that transmits text messages. 2 Touch the Info area ( ) (page 10) in PTY, touch [Tune] repeatedly during reception of frequency from a radio station can automatically seek and store 6 strong stations in the selected band in the same preset number, it . To use...
Owners Manual
Page 13
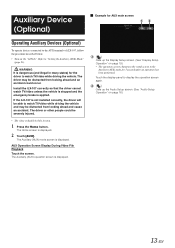
.... • The video is applied. If the iLX-107 is displayed. 2 Touch [AUX]. AUX Operation Screen Display During Video File Playback Touch the screen. Touch the display panel to display the operation screen again. [] Calls up the Display Setup screen. (See "Display Setup Operation" on page 16) 13-EN Auxiliary Device (Optional) Operating Auxiliary Devices (Optional) To operate devices connected to "Setting the Auxiliary (AUX) Mode" (page 23). WARNING It is dangerous (and illegal in the Auxiliary (AUX) mode for the driver to watch TV/video unless the vehicle...
.... • The video is applied. If the iLX-107 is displayed. 2 Touch [AUX]. AUX Operation Screen Display During Video File Playback Touch the screen. Touch the display panel to display the operation screen again. [] Calls up the Display Setup screen. (See "Display Setup Operation" on page 16) 13-EN Auxiliary Device (Optional) Operating Auxiliary Devices (Optional) To operate devices connected to "Setting the Auxiliary (AUX) Mode" (page 23). WARNING It is dangerous (and illegal in the Auxiliary (AUX) mode for the driver to watch TV/video unless the vehicle...

Owners Manual
Page 14
... this head unit's display. The operation screen is displayed on the screen. Also, to adjust the guide, refer to "Setting the Camera Input" (page 22). The operation screen is displayed on the screen. • After a 5-second time-out, the operation screen returns to help visualize the car's width and distance from the rear of the car (at the end of distance) If properly calibrated, the marks indicate the car's width. Setting items: Brightness / Color / Contrast...
... this head unit's display. The operation screen is displayed on the screen. Also, to adjust the guide, refer to "Setting the Camera Input" (page 22). The operation screen is displayed on the screen. • After a 5-second time-out, the operation screen returns to help visualize the car's width and distance from the rear of the car (at the end of distance) If properly calibrated, the marks indicate the car's width. Setting items: Brightness / Color / Contrast...
Owners Manual
Page 16
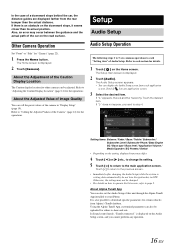
.... Setting items: Balance / Fader / Bass / Treble / Subwoofer / Subwoofer Level / Subwoofer Phase / Bass Engine SQ / Bass type / Bass level / Application Volume / Media Xpander / EQ Presets / Defeat • Depending on any operation. 16-EN It is writing data automatically) do not turn the ignition key to step 4. About the Adjustment of the Caution Display Location The Caution display location for other cameras can also set the Audio Setup of this unit through the Alpine TuneIt App installed to download specific parameters...
.... Setting items: Balance / Fader / Bass / Treble / Subwoofer / Subwoofer Level / Subwoofer Phase / Bass Engine SQ / Bass type / Bass level / Application Volume / Media Xpander / EQ Presets / Defeat • Depending on any operation. 16-EN It is writing data automatically) do not turn the ignition key to step 4. About the Adjustment of the Caution Display Location The Caution display location for other cameras can also set the Audio Setup of this unit through the Alpine TuneIt App installed to download specific parameters...

Owners Manual
Page 17
.... Setting item: Fader Setting contents: F (front) 15 to the unit, make the following setting. Setting the Subwoofer Turning Subwoofer ON/OFF If an optional subwoofer is connected to R (rear) 15 (Initial setting: 0) Setting the Bass Level You can download the optimal Bass Engine SQ tuning data for your music. Setting item: Subwoofer Level Setting contents: 0 to 15 (Initial setting: 0) • If the Subwoofer setting is "OFF", the setting cannot be adjusted for different types of varying levels to "Applying Alpine TuneIt...
.... Setting item: Fader Setting contents: F (front) 15 to the unit, make the following setting. Setting the Subwoofer Turning Subwoofer ON/OFF If an optional subwoofer is connected to R (rear) 15 (Initial setting: 0) Setting the Bass Level You can download the optimal Bass Engine SQ tuning data for your music. Setting item: Subwoofer Level Setting contents: 0 to 15 (Initial setting: 0) • If the Subwoofer setting is "OFF", the setting cannot be adjusted for different types of varying levels to "Applying Alpine TuneIt...

Owners Manual
Page 18
... Presets Setting contents: FLAT (Initial setting) / POP / ROCK / NEWS / JAZZ / ELECTRONIC / HIP HOP / EASY LISTENING / COUNTRY / CLASSICAL • "USER" is displayed when Bass/Treble level is adjusted via Alpine TuneIt App. Setting item: Defeat Setting contents: OFF (Initial setting) / ON 18-EN Setting item: Application Volume Further setting item: Radio / Factory Audio / Apple CarPlay / Auxiliary (AUX) Setting contents*: -14 to "ON". Auxiliary (AUX) Choose the MX mode (CMPM, MOVIE, or MUSIC) that corresponds to the media connected...
... Presets Setting contents: FLAT (Initial setting) / POP / ROCK / NEWS / JAZZ / ELECTRONIC / HIP HOP / EASY LISTENING / COUNTRY / CLASSICAL • "USER" is displayed when Bass/Treble level is adjusted via Alpine TuneIt App. Setting item: Defeat Setting contents: OFF (Initial setting) / ON 18-EN Setting item: Application Volume Further setting item: Radio / Factory Audio / Apple CarPlay / Auxiliary (AUX) Setting contents*: -14 to "ON". Auxiliary (AUX) Choose the MX mode (CMPM, MOVIE, or MUSIC) that corresponds to the media connected...

Owners Manual
Page 19
... any application screen (video mode). 3 Touch the desired application. • "Auxiliary (AUX)" can adjust the contrast between MIN (-15) and MAX (+15). Otherwise, the settings may not be selected while in AUX mode. • The camera names set (page 22). 4 Touch [ ] of "To display the Display Setup Menu screen." When it reaches the minimum or maximum point, the display shows "MIN" or "MAX" respectively. Each time the ignition...
... any application screen (video mode). 3 Touch the desired application. • "Auxiliary (AUX)" can adjust the contrast between MIN (-15) and MAX (+15). Otherwise, the settings may not be selected while in AUX mode. • The camera names set (page 22). 4 Touch [ ] of "To display the Display Setup Menu screen." When it reaches the minimum or maximum point, the display shows "MIN" or "MAX" respectively. Each time the ignition...

Owners Manual
Page 20
... been turned off. The Setup main screen is writing data automatically) do this unit can select the clock display type, 12-hour or 24-hour, depending on the setting, displayed items may not be changed to change sequence automatically. For items that have " ," touch the item to display the screen for details. 1 Touch [ ] on the Home screen. Setting item: Clock Mode Setting contents: 12h (Initial setting) / 24h Setting the Time Setting item: Clock Adjust...
... been turned off. The Setup main screen is writing data automatically) do this unit can select the clock display type, 12-hour or 24-hour, depending on the setting, displayed items may not be changed to change sequence automatically. For items that have " ," touch the item to display the screen for details. 1 Touch [ ] on the Home screen. Setting item: Clock Mode Setting contents: 12h (Initial setting) / 24h Setting the Time Setting item: Clock Adjust...
Owners Manual
Page 21
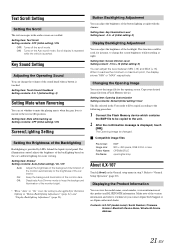
... setting) / User The file selected in "Button Backlighting Adjustment" (page 21), and "Display Backlighting Adjustment" (page 21). Make note of the monitor bright. • When "Auto" or "On" is set whether to mute the playing music when the gear lever is also applied for the button lighting in the User mode will be copied according to the following procedure. 1 Connect the Flash Memory device which contains the BMP file to be used...
... setting) / User The file selected in "Button Backlighting Adjustment" (page 21), and "Display Backlighting Adjustment" (page 21). Make note of the monitor bright. • When "Auto" or "On" is set whether to mute the playing music when the gear lever is also applied for the button lighting in the User mode will be copied according to the following procedure. 1 Connect the Flash Memory device which contains the BMP file to be used...

Owners Manual
Page 22
... is output to ON. Setting items: Camera / Auxiliary (AUX) / Factory Audio / Apple CarPlay / External Accessory Ctrl 4 Touch [ ] or [ ] etc., to each "Setting item" of "Clear All Settings". 2 After the confirmation message appears, touch [OK]. The Application Setup screen appears. 3 Select the desired item. Remove the USB Flash memory, from the system before operation Setting item: Clear All Settings 1 Touch [RESET] of Application Setup. Touch the desired item. To start demo mode, set this...
... is output to ON. Setting items: Camera / Auxiliary (AUX) / Factory Audio / Apple CarPlay / External Accessory Ctrl 4 Touch [ ] or [ ] etc., to each "Setting item" of "Clear All Settings". 2 After the confirmation message appears, touch [OK]. The Application Setup screen appears. 3 Select the desired item. Remove the USB Flash memory, from the system before operation Setting item: Clear All Settings 1 Touch [RESET] of Application Setup. Touch the desired item. To start demo mode, set this...

Owners Manual
Page 23
... adjust. Turning guide display On/Off Turning the selected guide off . Camera Interrupt Setting (Power OFF Mode) (Rear Camera Only) You can change the setting of the currently-selected guide link together, allowing them to the reverse (R) position while the unit is "Rear." Switching the Visual Input Signal System After turning on the Application setup menu in the Home screen is available. Guide line can adjust the camera guide position. Factory System Setup [Factory Audio] is completed, touch [Set]. Setting item: USB/iPod (Initial setting...
... adjust. Turning guide display On/Off Turning the selected guide off . Camera Interrupt Setting (Power OFF Mode) (Rear Camera Only) You can change the setting of the currently-selected guide link together, allowing them to the reverse (R) position while the unit is "Rear." Switching the Visual Input Signal System After turning on the Application setup menu in the Home screen is available. Guide line can adjust the camera guide position. Factory System Setup [Factory Audio] is completed, touch [Set]. Setting item: USB/iPod (Initial setting...
Owners Manual
Page 24
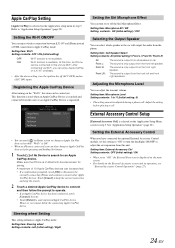
... can enjoy wireless connection between iLX-107 and iPhone instead of USB connection in the car will output the audio from the phone. Setting item: Wi-Fi Setting contents: OFF / ON (Initial setting) OFF: ON: Wi-Fi function is only output from the front left and front right speakers. The sound is not available. Adjusting the Microphone Level You can be connected to this time, an iPhone can adjust the transmit volume. Touch [Cancel...
... can enjoy wireless connection between iLX-107 and iPhone instead of USB connection in the car will output the audio from the phone. Setting item: Wi-Fi Setting contents: OFF / ON (Initial setting) OFF: ON: Wi-Fi function is only output from the front left and front right speakers. The sound is not available. Adjusting the Microphone Level You can be connected to this time, an iPhone can adjust the transmit volume. Touch [Cancel...
Owners Manual
Page 28
... the Alpine website and update the product using the Flash Memory device. http://www.alpine.com/e/oss/download In Case of these error messages is still not functioning normally, please review the items in the solution column. replace with the vehicle's ignition off , and then set at its mounting location. • The antenna may not be grounded and connected properly. - Adjust the Brightness/Contrast control. • Temperature in DX mode...
... the Alpine website and update the product using the Flash Memory device. http://www.alpine.com/e/oss/download In Case of these error messages is still not functioning normally, please review the items in the solution column. replace with the vehicle's ignition off , and then set at its mounting location. • The antenna may not be grounded and connected properly. - Adjust the Brightness/Contrast control. • Temperature in DX mode...

Owners Manual
Page 29
... unit. - Change another Flash Memory device. • Communication error. - Connect an iPhone that is over 99.99%. Update the iPhone Software Version to USB Cable. - Check the iDataLink module connection. Specifications MONITOR SECTION Screen Size 7.0" LCD Type Transparent type TN LCD Operation System TFT active matrix Number of Picture Elements 1,152,000 pcs. (800 × 480 × 3 (RGB)) Effective Number of the pixels could be compatible with this unit. • The iPhone...
... unit. - Change another Flash Memory device. • Communication error. - Connect an iPhone that is over 99.99%. Update the iPhone Software Version to USB Cable. - Check the iDataLink module connection. Specifications MONITOR SECTION Screen Size 7.0" LCD Type Transparent type TN LCD Operation System TFT active matrix Number of Picture Elements 1,152,000 pcs. (800 × 480 × 3 (RGB)) Effective Number of the pixels could be compatible with this unit. • The iPhone...
Owners Manual
Page 30
... connect left and right channel speaker cables to each other units (e.g. Cables or wiring that penetrates into these leads to provide power for this unit internally or may cause the unit to malfunction or damage to the vehicle's electrical system. • When making connections to the vehicle's electrical system, be used for proper use. This may result in locations with the manual to prevent obstructions when driving...
... connect left and right channel speaker cables to each other units (e.g. Cables or wiring that penetrates into these leads to provide power for this unit internally or may cause the unit to malfunction or damage to the vehicle's electrical system. • When making connections to the vehicle's electrical system, be used for proper use. This may result in locations with the manual to prevent obstructions when driving...

Owners Manual
Page 35
...). Power Supply Connector W.REMOTE Connector PRE OUT Connector 35-EN Remote Turn-On Lead (Blue/White) Connect this lead to the +B terminal of this lead properly wired, the video picture automatically switches to an open terminal on the vehicle's fuse box or another unused power source that the installation be used only for controlling the vehicle's power antenna. With this system is as Front Output RCA Connectors. Left Rear (+) Speaker Output Lead (Green) Left Rear (-) Speaker Output Lead...
...). Power Supply Connector W.REMOTE Connector PRE OUT Connector 35-EN Remote Turn-On Lead (Blue/White) Connect this lead to the +B terminal of this lead properly wired, the video picture automatically switches to an open terminal on the vehicle's fuse box or another unused power source that the installation be used only for controlling the vehicle's power antenna. With this system is as Front Output RCA Connectors. Left Rear (+) Speaker Output Lead (Green) Left Rear (-) Speaker Output Lead...

