Pioneer DEH-P6500 Support Question
Pioneer DEH-P6500 Support Question
Find answers below for this question about Pioneer DEH-P6500.Need a Pioneer DEH-P6500 manual? We have 2 online manuals for this item!
Question posted by ABANDONEDSEE on October 31st, 2015
Hot And Ground
the hot and ground wires got ripped out of my pioneer DEH-P6500 deck harness i dont know how to reinstall them
Current Answers
Answer #1: Posted by TommyKervz on November 1st, 2015 5:02 AM
TommyKervz

Member since:
January 10th, 2013 Points: 17,776,833

Member since:
January 10th, 2013 Points: 17,776,833
The installation manual from the link below should be able to assist on wiring..
http://www.manualslib.com/manual/310718/Pioneer-Deh-P6500.html?page=2#manual
Supporting Image
You can click the image below to enlarge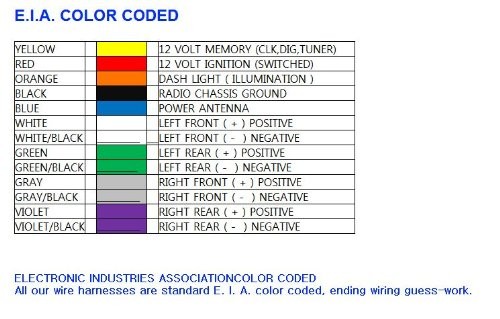
Answer #2: Posted by TommyKervz on November 1st, 2015 4:58 AM
TommyKervz
Member since:
January 10th, 2013 Points: 17,776,833
Member since:
January 10th, 2013 Points: 17,776,833
Related Pioneer DEH-P6500 Manual Pages
Owner's Manual - Page 3
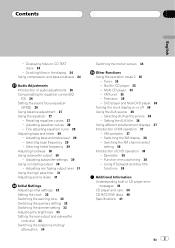
... discs 24
Scrolling titles in the display 24 Using compression and bass emphasis 24
Audio Adjustments Introduction of DVD operation 38
Operation 38 Function menu switching 38 ...operation 37 Switching the XM display 38 Swiching the XM channel select
setting 38 Introduction of audio adjustments 26 Compensating for equalizer curves (EQ- EX) 26 Setting the sound focus equalizer
(SFEQ) 26...
Owner's Manual - Page 4
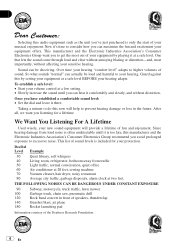
... CONSTANT EXPOSURE 90 Subway, motorcycle, truck traffic, lawn mower 100 Garbage truck, chain saw, pneumatic drill 120 Rock band concert in the future. Selecting fine audio equipment such as the unit you've just purchased is too late, this manufacturer and the Electronic Industries Association's Consumer Electronics Group recommend you avoid...
Owner's Manual - Page 9
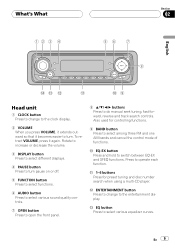
... search when using a multi-CD player.
To retract VOLUME, press it becomes easier to turn pause on or off.
5 FUNCTION button Press to select functions.
6 AUDIO button Press to select various sound quality controls.
7 OPEN button Press to open the front panel.
8 a/b/c/d buttons Press to switch between EQ-EX and SFEQ...
Owner's Manual - Page 26
..., you can select the non fading output setting only when non fading output is automatically returned to the source display.
1
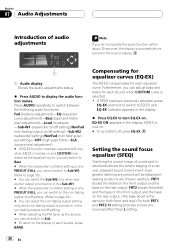
1 Audio display Shows the audio adjustments status.
% Press AUDIO to display the audio function names. Setting the sound focus equalizer (SFEQ)
Clarifying the sound image of vocals and instruments allows the simple staging of...
Owner's Manual - Page 27
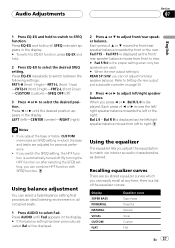
...speaker balance. Press EQ-EX and hold until Fad appears in all occupied seats.
1 Press AUDIO to select Fad. Recalling equalizer curves
There are six stored equalizer curves which the bass and...for personal preference.
! Here is displayed as desired. Press AUDIO until SFEQ indicator appears in the display. HHHHHHHHHHHHHH Audio Adjustments
Section
07
English
1 Press EQ-EX and hold .
...
Owner's Manual - Page 28
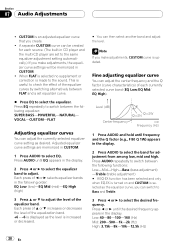
...! Fine adjusting equalizer curve
You can then select another band and adjust the level. Press AUDIO repeatedly to switch between FLAT and a set to adjust the level of each source. (... If you can be memorized in CUSTOM.
!
Level (dB) Center frequency
Q=2N Q=2W Frequency (Hz)
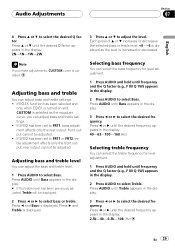
1 Press AUDIO and hold until frequency and the Q factor (e.g., F 80 Q 1W) appears in the display.
2 Press c or...
Owner's Manual - Page 29
... appears in the display. 2N1N1W2W
Note
If you can adjust bass and treble settings. ! Press AUDIO until the desired Q factor appears in the display.
3 Press c or d to FRT1, bass adjustment affects ... select Bass. Selecting bass frequency
You can adjust the bass and treble level.
1 Press AUDIO to FRT1 or FRT2, treble adjustment affects only the front output: rear output cannot be adjusted...
Owner's Manual - Page 30
...select cut -off , press b.
3 Press c or d to select Sub-W2. Section
HHHHHHHHHHHHHH
07 Audio Adjustments
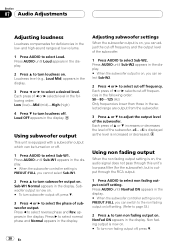
Adjusting loudness
Loudness compensates for the subwoofer), but is output through this units low pass filter ...Press a to turn subwoofer output off frequency and the output level of the subwoofer.
1 Press AUDIO to select the phase of the subwoofer. +6 6 is displayed as the level is ...
Owner's Manual - Page 31
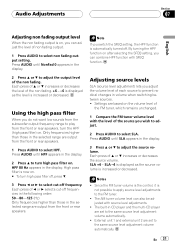
...frequency. SLA +4 SLA 4 is displayed as the level is increased or decreased.
Press AUDIO until NonFad 0 appears in volume when switching between sources. !
Since the FM tuner volume is... unchanged.
1 Compare the FM tuner volume level with source level adjustments.
! HHHHHHHHHHHHHH Audio Adjustments
Section
07
English
Adjusting non fading output level
When the non fading output is ...
Owner's Manual - Page 34
.... Even if you change the subwoofer controller, subwoofer output and non fading output in the audio menu return to turn the non fading output (refer to Using non fading output on or... off the moving source icon disappears after opening screen is no audio adjustment is ended.
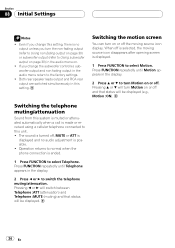
1 Press FUNCTION to select Telephone. Switching the telephone muting/attenuation
Sound ...
Owner's Manual - Page 35
... lower the volume level, by about 90%.
FUNCTION Press to turn BSM off . AUDIO
Press to the original volume level.
Other Functions
HHHHHHHHHHHHHH
Section
09
English
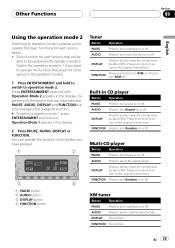
Using the operation... ! Press ENTERTAINMENT and hold until Operation Mode 2 appears in the display.
2 Press PAUSE, AUDIO, DISPLAY or FUNCTION. Depending on the source that does not correspond to the operation mode 2....
Owner's Manual - Page 36
... on or off .
Section
09 Other Functions
HHHHHHHHHHHHHH
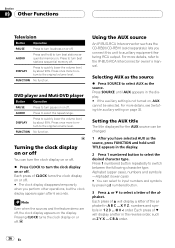
Television
Button
Operation
PAUSE
Press to turn loudness on .
FUNCTION No function.
Each press of the alphabet. AUDIO
Press and hold until AUX appears in 1 2 3 ... @ # < order...
Owner's Manual - Page 37
...). Other Functions
HHHHHHHHHHHHHH
Section
09
English
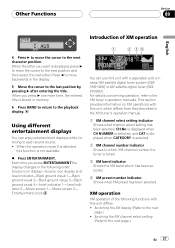
Introduction of the following order: Source icon displaySource icon display and level indicatorBack ground visual 1Back ground visual 2Back ground visual 3Back ground visual 4Level indicator 1Level indicator 2Movie screen 1Movie screen 2 Entertainment clock
1
2 34
You can enjoy entertainment displays while listening to the...
Owner's Manual - Page 38
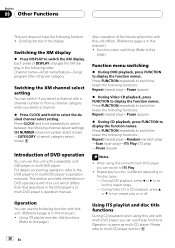
... is different depending on the disc types. During DVD playback, press c or d to select the repeat range. During Video CD or CD playback, press a or b to turn repeat play )Pause (pause)
% During Video CD playback, press FUNCTION to select the desired channel select setting. Press CLOCK and hold to display the function...
Owner's Manual - Page 39
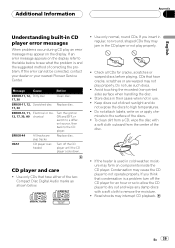
If the error cannot be corrected, contact your dealer or your nearest Pioneer Service Center. CDs that have either of the two Compact Disc Digital Audio marks as shown below to the surface of the disc. Do not use . ! Do not attach labels, write on components inside the CD player.
If ...
Owner's Manual - Page 40
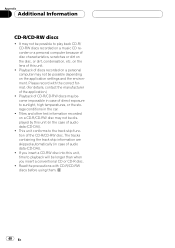
... are skipped automatically (in the case of direct exposure to the track skip function of audio data (CD-DA)).
! Read the precautions with the correct format. (For details, contact...the application.)
! This unit conforms to sunlight, high temperatures, or the storage conditions in case of audio data (CD-DA)).
! If you insert a conventional CD or CD-R disc.
! Playback of discs...
Owner's Manual - Page 41
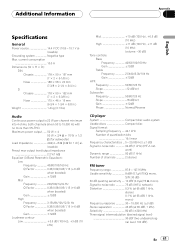
...× 2 × 6-3/8 in.) Nose 170 × 46 × 15 mm (6-3/4 × 1-3/4 × 5/8 in.)
Weight 1.4 kg (3.1 lbs)
Audio
Continuous power output is 22 W per channel minimum into 4 ohms, both channels driven 50 to -noise ratio 75 dB (IHF-A network) Distortion 0.3 % (at ...
English
Specifications
General
Power source 14.4 V DC (10.8 15.1 V allowable)
Grounding system Negative type Max.
Other Manual - Page 1

... amp and other units, then make connections correctly.
• Secure the wiring with ignition switch ON/OFF operations. Please ground this product and those noted here may fail to a terminal coupled with cable clamps or adhesive tape. INSTALLATION MANUAL OF OF
DEH-P6500
This product conforms to an external power amp's system remote control...
Other Manual - Page 2
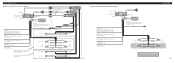
... using the optional amplifier. Orange/white To lighting switch terminal. Fig. 3 If not, keep the Audio Mute lead free of ignition switch position.
Yellow To terminal always supplied with power regardless of any connections. Black (ground) To vehicle (metal) body. The subwoofer output of the power amp or Auto-antenna relay control...
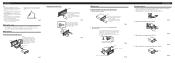
Other Manual - Page 3
...
Fig. 13 Fig. 14 Installation
Note: • Before finally installing the unit, connect the
wiring temporarily, making sure it is a sudden stop, like an emergency stop. • The semiconductor... Front-mount
Installation with a groove downwards and attach it overheats, so don't install the unit anywhere hot - For details, refer to this unit. 1. To secure, bend the tabs 90 degrees.)
53...
Similar Questions


