2000 Oldsmobile Silhouette Support Question
2000 Oldsmobile Silhouette Support Question
Find answers below for this question about 2000 Oldsmobile Silhouette.Need a 2000 Oldsmobile Silhouette manual? We have 1 online manual for this item!
Question posted by russellmath on March 14th, 2012
Where Is The Fuse Box Located?
The person who posted this question about this Oldsmobile automobile did not include a detailed explanation. Please use the "Request More Information" button to the right if more details would help you to answer this question.
Current Answers
Answer #1: Posted by 1stLadyDawn on March 15th, 2012 3:35 PM
1stLadyDawn
Member since:
January 25th, 2012 Points: 821,520

Member since:
January 25th, 2012 Points: 821,520
There are two fuse panels in the 2000 Olds Silhouette. Here is a link to the pdf manual for this model. If that link doesn't open, use this link and enter the year and the model.
The information you want can be found on the following pages:
- The underhood fuse and relay center is located on the left side as facing the engine compartment from the front of the car. It is closest to the firewall. The engine compartment image can be found in chapter 6/page 11 or page 328 of the pdf manual
- The instrument panel fusebox is located to the right of the glove box – pull the door open to access the instrument panel fuse box.
- You can find all images in Chapter 6 pages 660-665. The pdf pages are 377-382
Related Manual Pages
Owner's Manual - Page 6
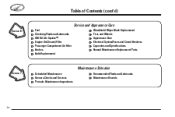
...™ Engine Air Cleaner/Filter Passenger Compartment Air Filter Brakes Bulb Replacement
Windshield Wiper Blade Replacement Tires and Wheels Appearance Care Electrical System/Fuses and Circuit Breakers Capacities and Specifications Normal Maintenance Replacement Parts
Maintenance Schedule
Section 7
Scheduled Maintenance Owners Checks and Services Periodic Maintenance Inspections
Recommended...
Owner's Manual - Page 9
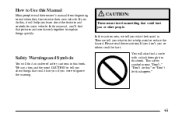
... their new vehicle. If you don't, you what the hazard is something that could hurt you if you were to ignore the warning. We use a box and the word CAUTION to tell you about the features and controls for your vehicle. In this Manual
Many people read these cautions. You will...
Owner's Manual - Page 11
...
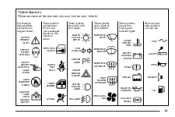
These symbols are some of the symbols you may find on some other symbols you may see:
ENGINE COOLANT TEMP WINDSHIELD WASHER BATTERY CHARGING SYSTEM
FUSE
DOOR LOCK UNLOCK
TURN SIGNALS
LIGHTER
PARKING LAMPS FASTEN SEAT BELTS
WINDSHIELD DEFROSTER
HORN BRAKE
HAZARD WARNING FLASHER
POWER WINDOW
DAYTIME RUNNING LAMPS
REAR WINDOW...
Owner's Manual - Page 14
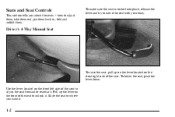
...on the front of the seat to unlock it .
1-2 Slide the seat to adjust the seat forward or rearward.
Use the lever located on the front right side of the seat to where you about the seats -- how to move the seat with your body.
To...seat, push the lever down. Seats and Seat Controls
This section tells you want it . Pull up on the lever located on the front left side of the seat.
Owner's Manual - Page 15
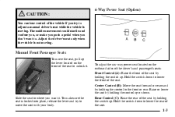
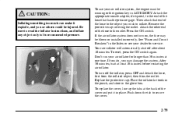
...CAUTION:
You can lose control of the vehicle if you try to move the seat, pull up the lever located on the outboard sides of the driver's and passenger's seats: Front Control (A): Raise the front of the seat...Hold the switch down to lower the rear of the seat. To adjust the six-way power seat located on the front of the seat to lower the front of the seat.
1-3 Manual Front Passenger ...
Owner's Manual - Page 16
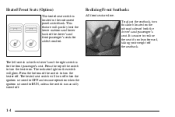
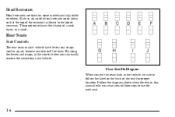
...RUN, unless the switch is for added comfort. The heated seat switch will turn this knob located on the inboard sides of the driver's and front passenger's seats for the front passenger's...driver's and the right switch is manually turned off.
1-4 The indicator light on . It is located in the instrument panel switchbank. Press the bottom of the switch to turn the heater off the ...
Owner's Manual - Page 18
... of floor cups to follow the label on others. Follow the diagram above when the text in the vehicle, be sure to use for proper location. Floor Seat Pin Diagram When you put the seats back in this manual tells you can easily remove the seats from your ears.
Owner's Manual - Page 19

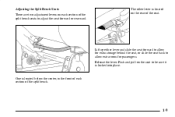
... by either pulling on the nylon strap on the rear of the seat or lifting up on the lever located on the front of hooks from the Velcro patch and use . Release the rear set of the seatback... secure the loose end of the seat;
Fold the seatback flat on the seat by pulling the nylon strap located at the base of the safety belt in the second row, follow this procedure: 1. If your vehicle has...
Owner's Manual - Page 20

... seat can be either the nylon strap or the lever to use either folded down or reclined. To fold down the seatback, pull this lever located on each section of the seatback.
To raise a seatback, pull the nylon strap while raising the seatback until it is locked upright. To fold down...
Owner's Manual - Page 21
... rear of the seat.
Lift up either lever and slide the seat forward to allow for passengers.
The other lever is located on the seat to be sure it is located below the center, in the front of each section of the split bench seats to allow extra room for extra storage...
Owner's Manual - Page 118
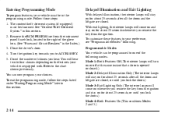
...deterrent system (if equipped) must be in this section. Remove the BCM PRGRM fuse from the instrument panel fuse block, located to ACCESSORY. 5. Count the number of chimes you remove the key from the...hear.
With exit lighting, the interior lamps will hear two to one of the glove box. (See "Fuses and Circuit Breakers" in this section. 2. Follow these features to the chart shown ...
Owner's Manual - Page 137
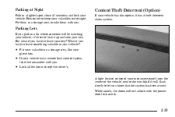
... your valuables out of the vehicle, next to let you . Parking at Night
Park in a lighted spot, close all the doors except the driver's.
A light located on top of your
glove...
Owner's Manual - Page 168

...See "Delayed Illumination" later in the overhead console switchbank. Interior Lamps Override Switch
This switch is located in this section. The lamps will allow the lamps to the interior lamps. Press the top ...off before you to the courtesy lamps, reading lamps, visor vanity lamps (if equipped) and glove box lamp. When any door or the liftgate is open . To turn off or on, see inside...
Owner's Manual - Page 182

... in the rear compartment on the driver's side. Lighted Visor Vanity Mirrors (If Equipped)
Pull down the sun visor. The air inflator kit is located in the glove box. Accessory Inflator System (Option)
Your vehicle may be equipped with an air pressure gage and nozzle adapters.
2-78 Flip up the cover to...
Owner's Manual - Page 183
...detach the hose, first from the inflated object, then from the outlet. Press the ON switch. See "Fuses and Circuit Breakers" in the Index or see your air inflator system, the engine must be injured. ...to the object you or others could be running or the ignition key in the glove box. To turn on, the fuse may damage the system. To reset, press the ON switch again. To replace the ...
Owner's Manual - Page 187
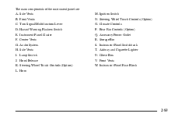
The main components of the instrument panel are: A. Storage Bin S. Front Vents W. Accessory Power Outlet R. Glove Box V. Instrument Panel Fuse Block
2-83 Turn Signal/Multifunction Lever D. Audio System H. Steering Wheel Touch Controls (Option) O. Climate Controls P. Rear Fan Controls (Option) Q. Ashtray and Cigarette Lighter U. Ignition Switch N. ...
Owner's Manual - Page 335
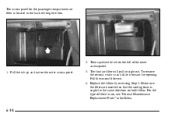
...same direction on both filters. Make sure the filters are inserted so that the sealing foam is located in the back of filter to use, see "Normal Maintenance Replacement Parts" in and slide it ...left of the inner access panel. 1. Pull the second filter out. 4. For the type of the glove box.
2. Then squeeze the tab on the outer access panel. 3. The first air filter will pull straight out...
Owner's Manual - Page 344
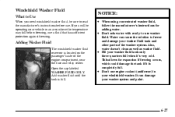
... the solution to freeze and damage your washer fluid tank and other parts of the engine compartment, near the fuse and relay center.
Adding Washer Fluid
The windshield washer fluid reservoir is located on the passenger's side of the washer system. Add washer fluid until the tank is completely full. Also, water...
Owner's Manual - Page 376
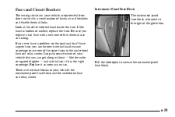
... borrow one that you can get along without -- and use one of the glove box. Instrument Panel Fuse Block The instrument panel fuse block is located to access the instrument panel fuse block.
6-59 Replace it is broken or melted, replace the fuse. Pull the door open to the right of the identical size and rating...
Owner's Manual - Page 379
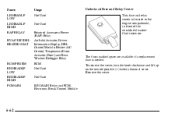
...clockwise and lift up on the remote positive (+) battery terminal cover. Remove the cover. Fuses LH HEADLP LOW LH HEADLP HIGH RAP RELAY HVAC/DIC/DRL HEATED SEAT
Usage Not Used...and PCM, Electronic Break Control Module
Underhood Fuse and Relay Center This fuse and relay center is needed. The fuses marked spare are available if a replacement fuse is located in the engine compartment, in front ...
Similar Questions

Where Is The Location Of The Fuel Pump Relais..? Engine Turns Over When
starting...but no fuel ..or no ignition
starting...but no fuel ..or no ignition
(Posted by algrundau 7 years ago)

Fuse Box For. Inside Light On A 2003 Oldsmobile Silhouette
Tryin to find the fuse box for a 2003 Oldsmobile silhouette. Need to replace for overhead light
Tryin to find the fuse box for a 2003 Oldsmobile silhouette. Need to replace for overhead light
(Posted by cydcherise 9 years ago)

Where Are All The Fuse Boxes On The 2000 Oldsmobile Silohoutee
(Posted by Adamoh 9 years ago)

Where Are The Fuse Boxes Located In A 2000 Oldsmobile Silouette
(Posted by cyctonyn2 9 years ago)

View Of Fuse-box Of 2001 Oldsmobile Silhouette
(Posted by sabriaisaac 9 years ago)